
 Open Access Article
 This Open Access Article is licensed under a
 Creative Commons Attribution 3.0 Unported Licence
5-Axis CNC micro-milling machine for three-dimensional microfluidics
Mitchell J. C.
Modarelli
 ,
Devin M.
Kot-Thompson
and
Kazunori
Hoshino
*
,
Devin M.
Kot-Thompson
and
Kazunori
Hoshino
*
Department of Biomedical Engineering, University of Connecticut, 260 Glenbrook Rd, Storrs, CT 06269 USA. E-mail: mitchell.modarelli@uconn.edu; hoshino@engr.uconn.edu
First published on 4th November 2024
Abstract
The gold standard of microfluidic fabrication techniques, SU-8 patterning, requires photolithography equipment and facilities and is not suitable for 3D microfluidics. A 3D printer is more convenient and may achieve high resolutions comparable to conventional photolithography, but only with select materials. Alternatively, 5-axis computer numerical control (CNC) micro-milling machines can efficiently prototype structures with high resolutions, high aspect ratios, and non-planar geometries from a variety of materials. These machines, however, have not been catered for laboratory-based, small-batch microfluidics development and are largely inaccessible to researchers. In this paper, we present a new 5-axis CNC micro-milling machine specifically designed for prototyping 3D microfluidic channels, made affordable for research and laboratories. The machine is assembled from commercially available products and custom-build parts, occupying 0.72 cubic meters, and operating entirely from computer aided design (CAD) and manufacturing (CAM) software. The 5-axis CNC micro-milling machine achieves sub-μm bidirectional repeatability (≤0.23 μm), machinable features <20 μm, and a work volume of 50 × 50 × 68 mm. The tool compatibility and milling parameters were designed to enable fabrication of virtually any mill-able material including metals like aluminum, brass, stainless steel, and titanium alloys. To demonstrate milling high resolution and high aspect ratios, we milled a thin wall from 360 brass with a width of 18.1 μm and an aspect ratio of ∼50![[thin space (1/6-em)]](https://www.rsc.org/images/entities/char_2009.gif) :1. We also demonstrated fabricating molds from 360 brass with non-planar geometries to create polydimethylsiloxane (PDMS) microfluidic channels. These included a channel on a 90° edge and a channel on a rounded edge with a 250 μm radius of curvature. Our 5-axis CNC micro-milling machine offers the most versatility in prototyping microfluidics by enabling high resolutions, geometric complexity, a large work volume, and broad material compatibility, all within a user-friendly benchtop system.
:1. We also demonstrated fabricating molds from 360 brass with non-planar geometries to create polydimethylsiloxane (PDMS) microfluidic channels. These included a channel on a 90° edge and a channel on a rounded edge with a 250 μm radius of curvature. Our 5-axis CNC micro-milling machine offers the most versatility in prototyping microfluidics by enabling high resolutions, geometric complexity, a large work volume, and broad material compatibility, all within a user-friendly benchtop system.
1. Introduction
Microfluidics are a crucial tool across multiple disciplines of science and research.1,2 As efforts in the field of microfluidics increase, techniques and equipment have become more accessible to researchers, driving new ideas, methods, and applications of microfluidics in academia and industry.3Many microfluidic fabrication techniques exist because each offers its own advantages and disadvantages.4 Choosing the best fabrication technique depends on the desired resolution, geometry, material, cost, production time, and application of the microfluidic device in development.4 For example, SU-8 photolithography or silicon micropatterning have produced the highest achievable resolutions, creating sub-μm structures.4,5 However, the necessary equipment, clean room, trained operator, and production time make these techniques costly for prototyping, customization, or small batch production of microfluidic devices.4,6 SU-8 photolithography or silicon micropatterning are also limited to select materials and planar geometries.4,7 As a counter example, 3D printing offers very fast and low-cost production of microfluidics with complex 2D and 3D geometries.4,8,9 The minimal equipment, working environment, and computer aided design required for 3D printing make this technique accessible and affordable.8 Its capability of creating hollow channels and chambers without assembly is difficult to achieve with other methods. An appropriate choice of 3D printing method depends on microfluidics fabrication requirements and each method's advantages and challenges. Fused deposition modelling (FDM) is the most popular for general 3D printing. The main challenge of FDM in microfluidics fabrication is the large size of the extruded filament, resulting in fluidic channels typically sized in a few hundred micrometers.10 Selective laser sintering (SLS) can print various materials, including metals such as titanium and stainless steel. However, SLS is not commonly chosen for microfluidics because it produces porous surfaces with roughness typically exceeding a few micrometers,11 and residual precursor powder in small cavities is difficult to remove.10 Stereolithography (SL), which creates objects through photopolymerization, offers a resolution comparable to photolithography. Digital light projection-based SL (DLP-SL) is today's most common form of 3D printing for microfluidics fabrication. The material choice in SL is limited because it requires the material to be photopolymerizable. Many 3D photopolymerizable materials have been studied to expand the use of SL. Folch, et al. reported SL of a 3D-printable (photopolymerizable) PDMS resin, with the mechanical properties of printed structures similar to Sylgard-184. Since SL involves layer-by-layer exposure and draining of uncured resin, the viscosity of the resin is a key factor in defining the minimum microchannel dimensions.12 Potkay, et al. developed a low-viscosity, photopolymerizable PDMS and used DLP-SL to achieve unobstructed fluidic channels as small as 38.4 μm (± 5.0 μm) in height.13 In general, achieving high precision and surface quality, especially on slanted geometries, remains challenging for 3D printing.4,8,14,15
Injection molding and roll-to-roll manufacturing are standard methods for high-volume production in industry. In academic settings, roll-to-roll manufacturing has been studied to fabricate PDMS microfluidic devices through template imprinting and synchronized laser engraving.16,17 Injection molding, the most prevalent method for mass-producing plastic materials, has also found applications in academia.18,19 However, the cost and time required to manufacture metal molds limit its wider adoption.10 An affordable milling system capable of milling metals could expand the use of injection molding within the academic community.
Collectively, current fabrication techniques for microfluidic devices provide a broad range of solutions. However, there is a growing demand in the biomedical field for microfluidics using biocompatible materials and 3D shapes that current techniques do not meet.20,21 We propose using 5-axis CNC micro-milling as a fabrication method for microfluidic devices with material diversity and 3D shapes. Currently, 3-axis milling has been reported for prototyping and fabricating microfluidics, but this technique is limited in geometric complexity.22–26 5-Axis systems expand the capabilities of traditional 3-axis systems by including two rotational axes, allowing the workpiece to be milled from virtually any position. 5-Axis systems can mill overhanging geometries, curved surfaces, and inclined features. These systems can perform continuous milling operations to avoid manually rotating and realigning the workpiece. Continuous operations provide high material removal rates by keeping the tool in constant contact with the workpiece.27,28 This also improves the accuracy and surface quality of parts since the cutting tool can move along 5 axes. 5-Axis CNC micro-milling systems can produce uniquely curved channels, amorphous surfaces, angled through holes, and non-planar chambers.29,30 Therefore, these systems have potential applications in microfluidics. However, 5-axis CNC micro-milling machines are largely reserved for high-end industries.31,32 These machines are not catered to the fabrication of microfluidics and are not readily accessible to researchers.33
Therefore, we have designed a unique 5-axis CNC micro-milling machine for affordable prototyping, customization, and small batch production of microfluidic devices. Our machine prioritizes four critical factors: (1) resolution, (2) geometric complexity, (3) material compatibility, and (4) costs of the equipment, facilities, and fabrication. Although there has been an attempt to create a custom 5-axis system,34 the technology has not been fully utilized for prototyping research materials. To our knowledge, our study is the first attempt to create 3D microfluidic channels using 5-axis CNC milling.
Our first design objective was to achieve high resolution structures within tens of μm in size and aspect ratios comparable to the best techniques. Nordin, et al. identified 10–30 μm as a potential limitation of DLP-SL and reported a valve measuring 15 μm × 15 μm.35 Chen, et al. discussed the difficulty of using standard DLP-SL to create microchannels smaller than 100 μm, reporting their achievement of a Z-resolution of approximately 10 μm (±2.0 μm) as a recent advancement.36 McAlpine, et al. summarized that the highest resolution of standard SL methods is around 10 μm.8 Advanced direct laser writing (DLW) employs multi-photon exposure for SL, achieving resolutions below a micrometer, but it is not commonly used to create entire microfluidic devices.8 Regarding aspect ratios, according to well-cited studies on high aspect ratio SU-8 patterns, a ratio over 10 is considered high,37 and 17 by Gale, et al. remains among the highest reliably achieved.38 Chlorine inductively coupled plasma etching is capable of aspect ratios >32:1, demonstrated by Volatier, et al.39 In this paper, we demonstrate a 5-axis CNC micro-milling machine that competes with these resolutions. Our machine also includes a system of three microscopic cameras for in situ inspection during the process. The machining surface and tool can be monitored in situ, providing visual inspection of the tool and stock.
Our second objective was a high design flexibility to create geometrically complex features. 3D printing has set a high standard for microfluidics with geometric complexity, such as 3D printed microfluidic mixers, channels on curved surfaces, and integrated electronic sensors demonstrated by Su, et al.9 Unlike any other microfluidic fabrication technique, 5-axis CNC micro-milling can compete with 3D printing's design flexibility because of its degrees of freedom, and with 3D printing's easy operation because of its similar implementation of computer aided design and manufacturing. Our 5-axis CNC micro-milling machine has five axes with sub-μm precision and uses CAD and CAM software to produce complex 3D microfluidic channels.
Our third objective was for our machine to be compatible with the most versatile selection of materials. The operating parameters of CNC milling are highly customizable, such as the spindle speed, feed rate, tool diameter, tool length, and radial (Ae) and axial (Ap) depths of cut. This allows nearly any metal, polymer, composite, ceramic, or other hard material to be milled as a microfluidic channel or a master for a microfluidic mold.28,40 Stainless steel, for example, is biocompatible and important in biomedical applications but cannot be machined with traditional MEMS techniques. Unlike MEMS processes, 5-axis CNC micro-milling does not involve mask fabrication or lithography, broadening usable materials and providing faster turnaround time necessary for prototyping microfluidics.28,41
Our fourth objective was for our 5-axis CNC micro-milling to not require expensive facilities such as a clean room or specialized equipment. In this paper, we demonstrate a benchtop 5-axis CNC micro-milling machine made entirely from commercially available products and custom-made parts, occupying 0.72 cubic meters. We have also reduced the costs of fabrication to predictable tool wear, raw materials, and power consumption.
We have designed a new 5-axis CNC micro-milling machine catered to the fabrication of microfluidic devices that achieves (1) high resolution, (2) complex 3D geometries, (3) versatile material compatibility, and (4) efficient fabrication costs. By prioritizing these four critical factors, we are making 5-axis CNC micro-milling machines affordable to researchers and applicable to microfluidics research.
2. Experimental
2.1. Design of the 5-axis CNC micro-milling machine
The 5-axis CNC micro-milling machine is constructed from commercially available products, including the computer modelling and operating software, firmware, milling station hardware, and system of microscopic cameras for in situ monitoring. The system loop diagram is shown in Fig. 1, and the data flow diagram is shown in Fig. 2. | ||
| Fig. 1 System loop diagram: (1) the operator provides G-code instructions through (2) the CNC software. (3) The CNC board receives the G-code instructions and controls (4) the servomotors driving the linear and rotational stages to move the spindle and workpiece during milling operations. (5) The optical microscopes provide (6) in situ inspection for the operator, and (1) the operator provides new instructions. | ||
 | ||
| Fig. 2 Data flow diagram: (a) the 3D model is created using Fusion 360 CAD; (b) then the manufacturing toolpath is designed with Fusion 360 CAM and (c) exported as G-code; (d) the G-code is imported into Mach3 on a desktop computer, which is used to (e) operate the 5-axis mill; (f) a system of three optical microscopes image the milling process and allows in situ optical inspection on the desktop computer. | ||
000 rpm. This range of rotational speeds allows for micro-milling resins, plastics, woods, and a wide variety of metals, including aluminium, brass, stainless steel, and titanium alloys. The spindle is driven by an electric motor and uses compressed-air cooling to prevent heating in the motor and keep the bearings clean.
 | ||
| Fig. 3 (a) Illustration of 5-axis CNC micro-milling station, including the spindle (red), linear and rotational stages (black), servomotors (brown), optical microscopes (light blue), coolant dispenser (yellow), and articulating arm (dark blue); (b) photograph of the realized 5-axis CNC micro-milling station. | ||
:1 worm/gear ratio (RTR-4, Dover Motion). The A-axis has a ±90° range of motion, and the B-axis range is unlimited. All five axes are controlled by step-and-direction servomotors (ClearPath SDSK Series, CPM-SDSK-2311P-EQN, Teknic, Inc., Victor, NY) with resolutions of 6400 steps per rev. The servomotors have embedded drivers and are powered by a low voltage (75 VDC) power supply (IPC-5, Teknic, Inc).
We first milled a thin brass pillar and fixed this pillar to the B-axis. The A-axis stage was rotated +90° so that the pillar was aligned with the Y-axis. The Y-axis camera (Model 33110) was used to observe the position of the brass pillar on the X–Z plane. By rotating the B-axis 180° we found the center of rotation, which determined our X- and Z-origins. The endmill was aligned to the X- and Z-origins and zeroed.
The brass pillar was removed and fixed to the A-axis stage so that the pillar was aligned with the vertical X-axis. The X-axis camera (model 67317) was used to observe the position of the brass pillar on the Y–Z plane. By rotating the A-axis 180° we found the center of rotation, which determined our Y-origin and confirmed our Z-origin. The endmill was aligned to the Y-origin and zeroed.
When exchanging endmills, only the Z-axis required realignment. The current endmill was placed at the origin, and using one microscope, the position of the origin was recorded on the computer monitor. The Z-axis was retracted and the endmill was exchanged. Then the endmill was aligned with the origin recorded on the monitor, and the Z-axis was zeroed.
2.2. Fabrication of high aspect ratio walls
000 rpm spindle speed, 90 mm min−1 feed rate, 0.050 mm Ap, and 0.400 Ae. The result was a rectangular wall 1 × 1.5 × 4 mm (W × H × L).
To create thin walls, we milled two adjacent trenches. We used a 100 μm-diameter, 2-flute, solid carbide, square endmill with a 1 mm neck length and 300 μm length of cut (RSE230, NS TOOL USA, Inc., Rochester Hills, MI). We milled at a 30000 rpm spindle speed, 0.5 mm min−1 feed rate, 150 μm Ap, and 100 μm Ae. After the first trench was milled, the brass stock was cleaned with air, then wetted with acetone. Once the acetone evaporated, a drop of cyanoacrylate glue (commonly known as super glue) was applied to the trench to secure the thin wall. The cure time for the super glue was 24 minutes. Then a second trench was milled with the same parameters, creating the thin wall between the trenches.
Once the thin walls were complete, the brass stock was removed and cleaned with compressed air, then submerged in acetone for 10 minutes to remove lubricating oil and glue. We did not use sonication because the thin wall was delicate. Lastly, the thin wall was cleaned in a plasma cleaner (PDC-32G, Harrick Plasma) for 60 seconds using air at a pressure of 200 mTorr and 18 W power. Fig. 4 shows SEM (ZEISS Crossbeam 340) images of the thin wall. The width of the wall varied slightly; we determined the maximum width to be 18.1 μm. The wall height was 900.4 providing an aspect ratio of 49.7:1.
 | ||
| Fig. 4 SEM images of thin wall with 49.7:1 aspect ratio: (a) side view at 180× magnification; (b) angled view at 175× magnification; (c) illustration of toolpath. | ||
 | ||
| Fig. 5 Illustration of the milling toolpath for the thin walls with multi-axis milling features; (a) milling perpendicular slot; (b) milling thin walls. | ||
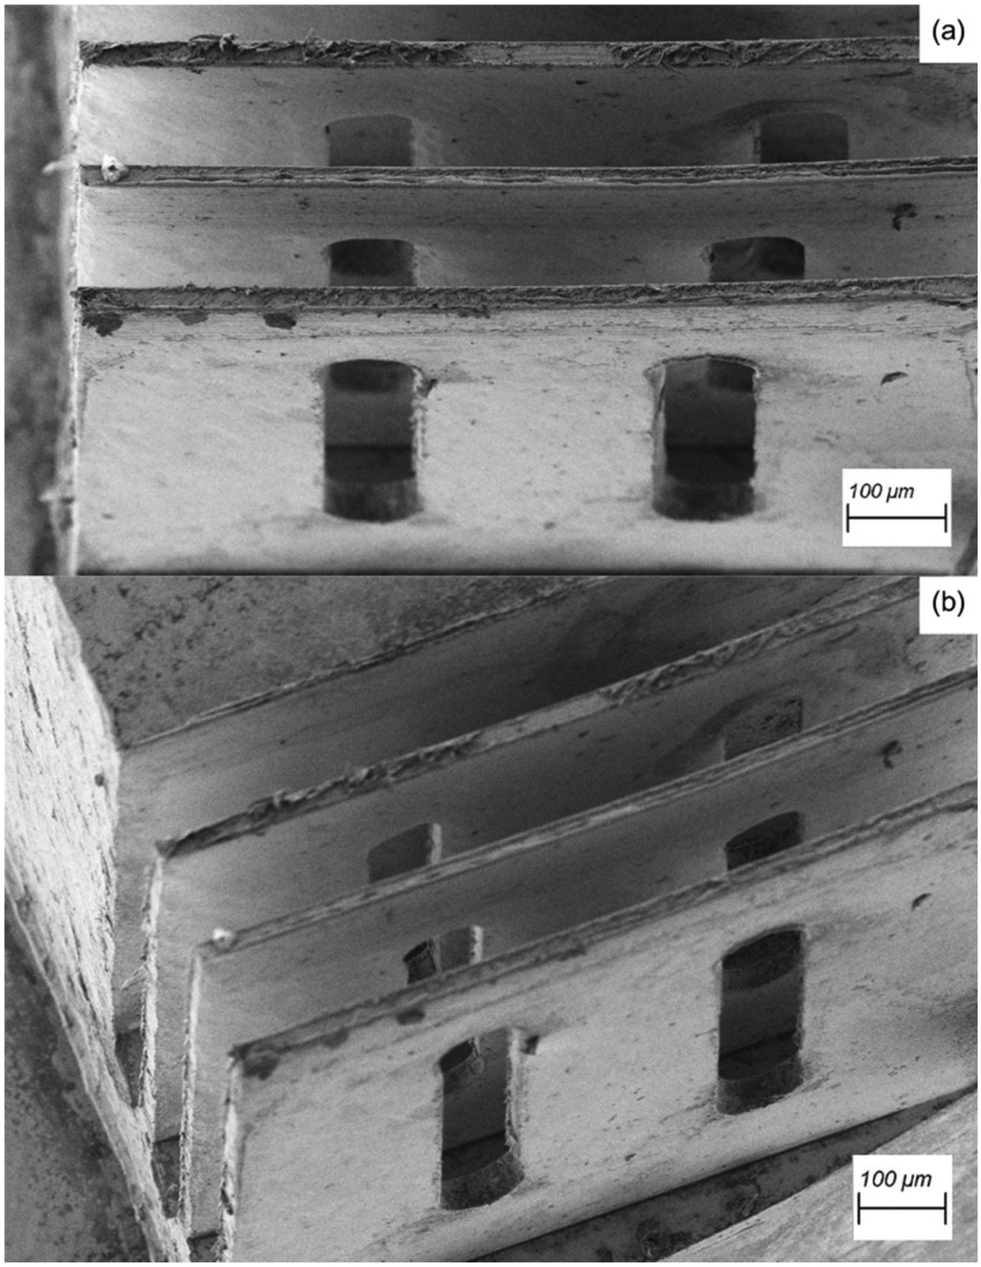 | ||
| Fig. 6 SEM images of thin walls with side slots: (a) 250× magnification; (b) 200× magnification. | ||
2.3. Material compatibility
 | ||
| Fig. 7 Identical dome models milled from grade 5 titanium (top left), 360 brass (bottom left), 6061 aluminum (top right), and acrylic (bottom right) using the 5-axis CNC micro-milling machine, compared to human thumb nail. | ||
Fig. 8a and b illustrate 5-axis milling and 3-axis milling, respectively. With the 5-axis CNC micro-milling machine, we are able to mill pockets and channels while keeping the tool orthogonal to the model's surface. This is crucial for retaining consistent channel dimensions when milling on complex 3D surfaces.
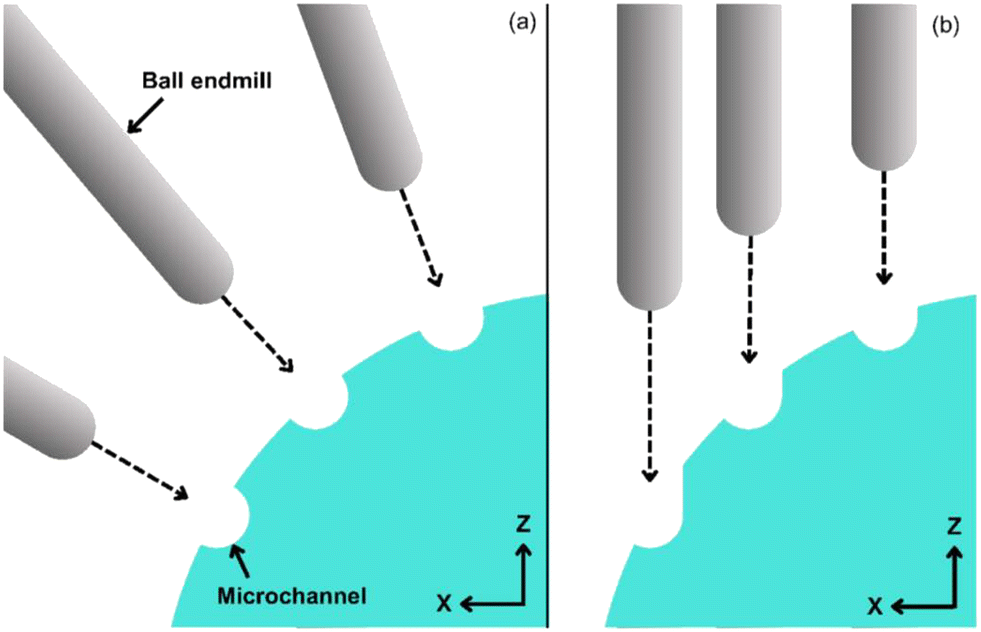 | ||
| Fig. 8 Illustration of (a) 5-axis milling orthogonal to the surface of the workpiece, compared to (b) 3-axis milling in which the channel dimensions are distorted. | ||
000 rpm, 290 mm min−1; (b) 20000 rpm, 45 mm min−1; (c) 20000 rpm, 45 mm min−1; and (d) 7000 rpm, 80 mm min−1.
We used a widefield confocal microscope (Smartproof 5, ZEISS, Oberkochen, Germany) to collect surface roughness data for each material and milling parameter. The microscope used VK-X3000 Multifile Analyzer software at 50× magnification. For each milling parameter, three images (280 × 210 μm) were taken, and the surface roughness values were averaged. The surface roughness results are shown in Fig. 9. A 40 μm radial depth of cut produced the smallest surface roughness (Sa) for each material: (a) 64 nm, (b) 61 nm, (c) 58 nm, and (d) 86 nm. Comparatively, recent websites and papers report DLP-SL producing surface roughness values of 180 nm (Ra),42 380 nm (Sa),43 and 1303 nm (Sa)44 when printing resins.
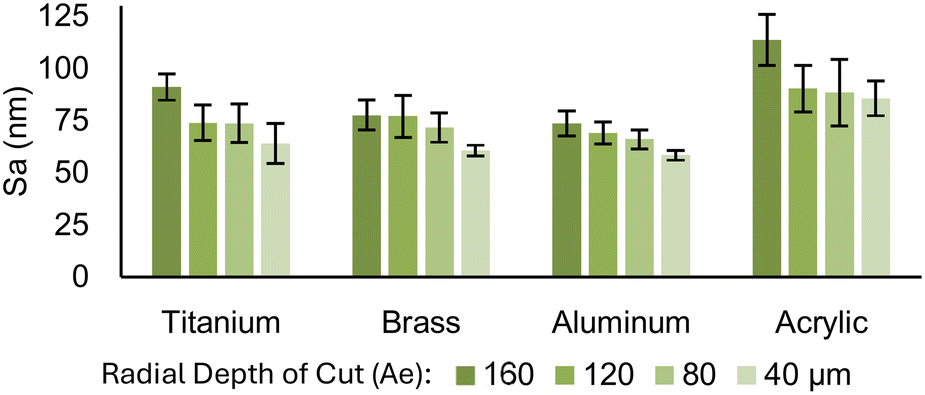 | ||
| Fig. 9 Surface roughness of milled materials for various radial depths of cut (Ae), with standard deviation bars. | ||
000 rpm spindle speed, 45 mm min−1 feed rate, 0.010 mm Ap, and 0.160 mm Ae. This finishing process replicated the surface of the brass master molds in section 2.4.
We created two identical pillars of PDMS (d = 5 mm), one molded from the milled brass and the other from smooth acrylic (Fig. 10a). We used Sylgard 184 Silicone Elastomer Kit at a 10:1 ratio of base to curing agent. The uncured PDMS was degassed in a vacuum for 30 minutes, poured into the molds, degassed again for 30 minutes, and heated at 70 °C for 3 hours.
 | ||
| Fig. 10 Illustrated process for measuring the bond strength of plasma-bonded PDMS: (a) molding the surfaces of PDMS pillars from smooth acrylic and milled brass; (b) bonding the PDMS components using plasma treatment; (c) applying an increasing force until separation. | ||
After curing, the PDMS pillars were bonded to smooth PDMS (Fig. 10b). All PDMS components were placed in a plasma cleaner (PDC-32G, Harrick Plasma) for 45 seconds using air at a pressure of 200 mTorr and 18 W power. The surfaces were wetted with isopropanol, immediately placed together, and placed in the oven at 70 °C for 60 minutes.
We measured the bond strengths of both PDMS samples by applying an increasing force until the point of separation (Fig. 10c). The sample was pulled by a spring attached to a linear stage. For each incremental movement of the stage (∼16 μm), the force applied to the PDMS was measured by a load cell connecting the spring and linear stage. The bonding strength was characterized by the maximum force applied before the PDMS sample separated at the plasma-bonded surface. For this test, we conducted three samples for each condition.
The PDMS surface molded from milled brass withstood 93.9 kPa, 126.3 kPa, and 120.6 kPa, while the surface molded from smooth acrylic withstood smooth acrylic withstood 114.9 kPa, 103.9 kPa, and 122.2 kPa. The results of a two-sample t-test were a T-statistic of 0.0071 and a P-value of 0.995, very close to 1, indicating that there would be no statistically significant difference between the two conditions within a practical number of samples.
2.4. Fabrication of 3D microfluidic channels
 | ||
| Fig. 11 CAD models of (a) channel 1 with a planar pattern, (b) channel 2 with a 90° edge, and (c) channel 3 with a rounded edge with a 250 μm radius of curvature. | ||
000 rpm spindle speed, 180 mm min−1 feed rate, 0.100 mm Ap, and 0.800 mm Ae. The roughing process involved an initial surfacing of the stock top followed by the removal of a 1.930 mm deep pocket, leaving 70 μm of depth for the finishing process. Channels 2 and 3 both required a 90° y-axis rotation to mill both faces of the microfluidic channels during the roughing process.
In the finishing process, we utilized a 1/64′′-diameter, 3 flute, solid carbide, square endmill operating at a 20000-rpm spindle speed, 45 mm min−1 feed rate, 0.010 mm Ap, and 0.160 mm Ae. The finishing process involved a 20 μm deep surfacing within the mold pocket, followed by the cleanout of the 50 μm deep channels. Channels 2 and 3 both required a 90° y-axis rotation to mill both faces of the microfluidic channels. Channel 3 also required incremental rotation around the y-axis during the finishing process to create the curved channel walls.
Once the roughing and finishing toolpaths were generated, the milling processes were simulated in Fusion 360 to ensure the machine avoided collisions during and between operations. Then we output G-code compatible with Mach3, our CNC software.
:1 ratio of base to curing agent. Once mixed, the uncured PDMS was degassed in a vacuum for 30 minutes. Then the PDMS was poured into the brass master molds and degassed for an additional 30 minutes. These PDMS molds were the bottom components of the microfluidic channels. Top components were made from a rectangular acrylic master mold. In this mold, one edge was given 250 μm fillet to match the curvature of channel 3. The molds were covered and placed in an oven at 70 °C for 3 hours.
After removing the molds from the oven and allowing to cool to room temperature, the cured PDMS molds were bonded using plasma treatment. Both top and bottom components were placed in the plasma cleaner (PDC-32G, Harrick Plasma) for 45 seconds using air at a pressure of 200 mTorr and 18 W power. The surfaces of the top and bottom components were wetted with isopropanol, immediately placed together, and placed in the oven at 70 °C for 60 minutes. The PDMS channels were removed from the oven and allowed to cool to room temperature. The channels were then placed in a larger acrylic mold and submerged in uncured PDMS to allow for better handling and imaging of the channels. After curing in the oven under the same conditions, The PDMS channels were removed and cooled. Holes with 1.5 mm diameters were punched into the PDMS for setup of the fluid tubes. Fabrication of the PDMS microchannels is illustrated in Fig. 12.
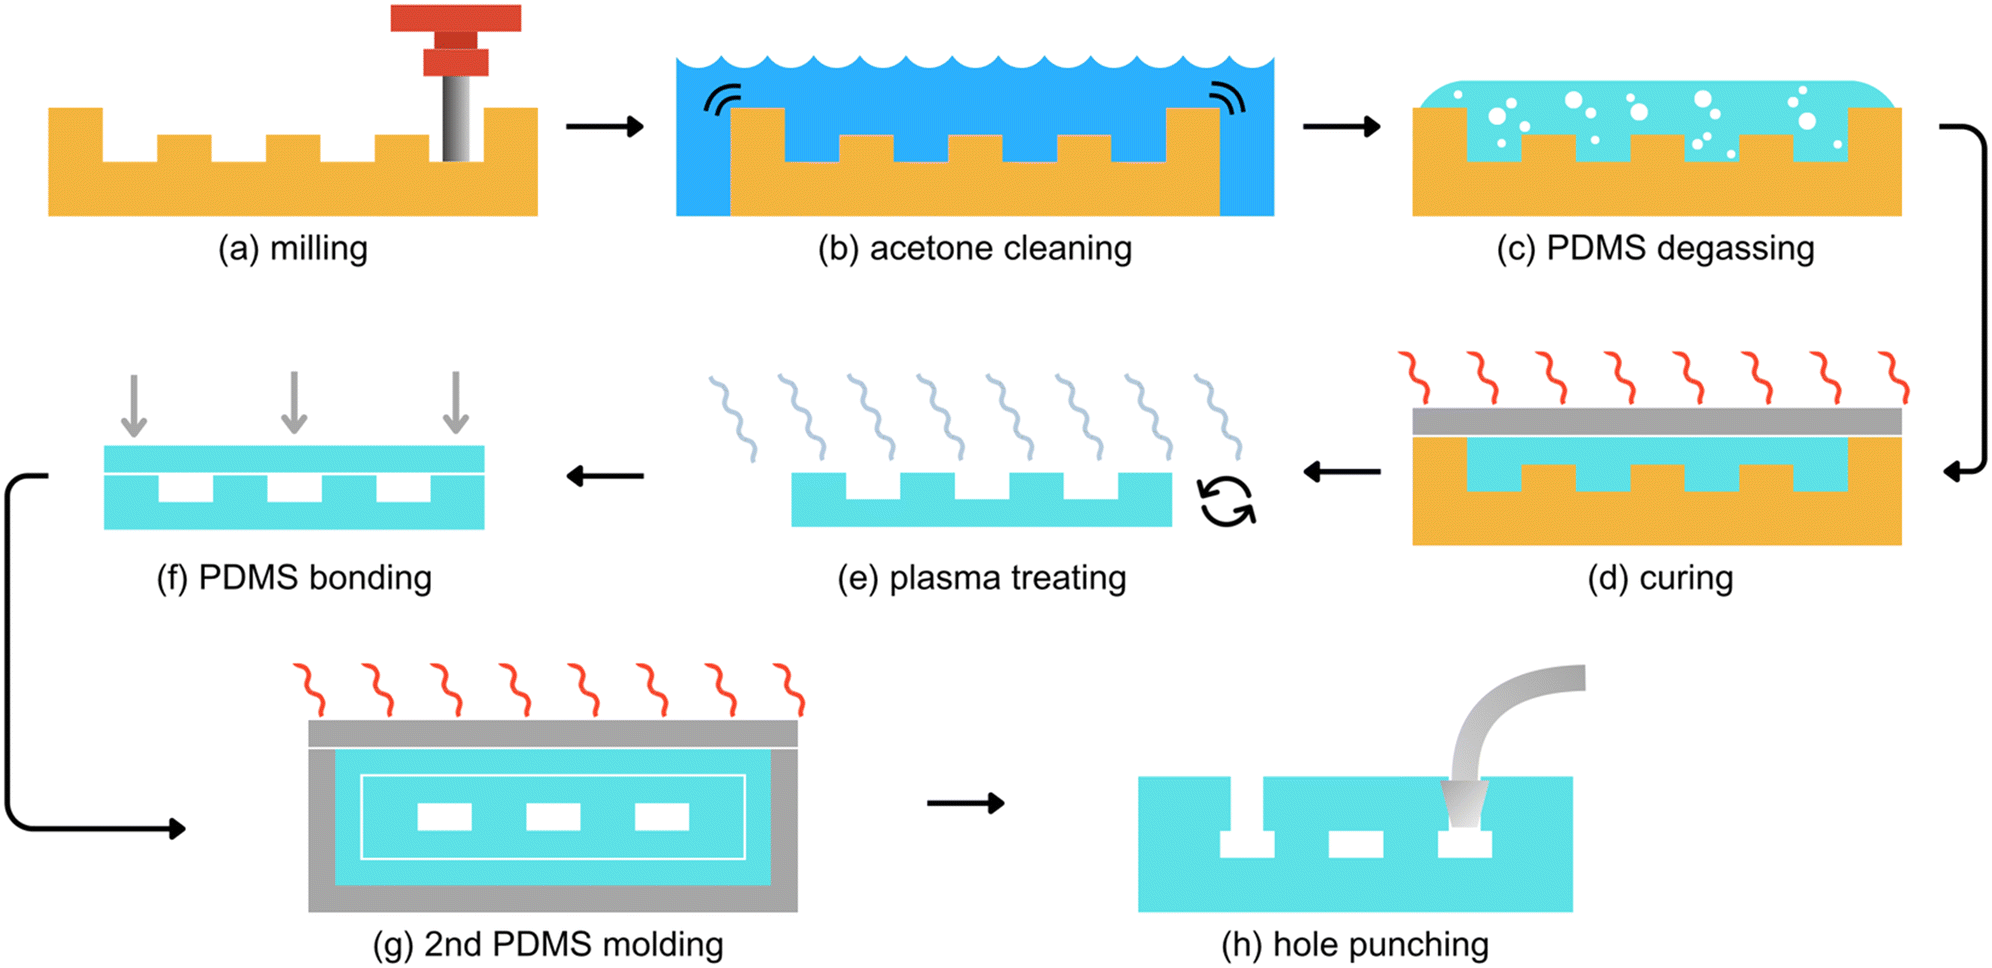 | ||
| Fig. 12 Illustrated fabrication of PDMS microfluidic channels: (a) mill brass molds; (b) clean with sonication in acetone; (c) fill molds with uncured PDMS and degas; (d) cover and cure PDMS at 70 °C for 3 hours; (e) plasma treat cured PDMS; (f) bond PDMS microchannel; (g) embed microchannel in large PDMS mold; (h) hole punch cured microchannel for tube assembly. | ||
3. Results and discussion
3.1. Parts list and cost of fabrication
Table 1 lists the components and approximate cost of the 5-axis CNC micro-milling machine. The base plate, base materials, and miscellaneous optomechanical components are not priced because these components are highly customizable, and their costs will vary based on the design and preferences of the user. In our case, we used an internal machine shop to source these components and found miscellaneous optomechanical stages in our laboratory. The most expensive components of the 5-axis CNC micro-milling machine are the motion stages, nearing 60% of the cost. Precision-grade ball screw stages with a 2 mm pitch were chosen for their improved accuracy, precision, smooth motion, and speed over lead screw stages.| Component | Description | Cost |
|---|---|---|
| Spindle system | Spindle (MS01-R03, Minitor, Tokyo, Japan), power supply (MT01CP, Minitor, Tokyo, Japan), accessories | $4000 |
| Motion stages | X-Z (XYRB-4040, Dover Motion, Boxborough, MA), Y (LMB-200), A and B (RTR-4) | $20500 |
| Servomotors | ClearPath SDSK series (CPM-SDSK-2311P-EQN, Teknic, Inc., Victor, NY) | $1640 |
| CNC controller | Pokeys57CNC | $170 |
| Air supply | Air compressor (8010SPC, California air tools, Inc., San Diego, CA), pressure regulator (MAR1, Minitor, Tokyo, Japan) | $1650 |
| Microscopes | Lenses (67316, 67317, 33110, Edmund optics, Barrington, NJ), CMOS cameras (BFS-U3-27S5M-C, BFS-U3-13Y3M-C, FLIR, Wilsonville, OR) |
$4300 |
| Coolant system | Coolant dispenser, articulating arm | $40 |
| Total | $32300 |
|
As an alternative option to the stages used in this work, ball screw linear stages are commercially available at lower prices, provided a lower accuracy. For possible cost reduction, we also tested a commercially available, low cost, 5 mm-pitch ball screw linear stage priced at less than $150, using the same servomotor (CPM-SDSK-2311P-EQN, Teknic, Inc., Victor, NY). While the 5-axis CNC micro-milling machine demonstrated sub-μm bidirectional repeatability (≤0.23 μm), the low-cost linear stage achieved a 1.87 μm bidirectional repeatability. We also tested a desktop 3-axis CNC milling machine (monoFab SRM-20, Roland DGA, Irvine, CA) which uses lead screw linear stages and stepper motors. The entire system is priced at approximately $4000 and achieved a 4.00 μm bidirectional repeatability. The price of developing a 5-axis CNC micro-milling machine will depend on the desired repeatability. Reducing the price of the 5-axis CNC micro-milling machine is easily manageable while still achieving a suitable performance of sub-10 μm repeatability.
3.2. Operation
Operating the 5-axis CNC micro-milling machine is simple and does not require training to work in a specialized facility, like a clean room in the case of photolithography. The system is fully operated within our laboratory. The 5-axis CNC micro-milling machine requires basic understanding of G-code to operate manually. Otherwise, the system is fully operated through Fusion 360 CAD and CAM, similar to a 3D printer. Autodesk provides free trainings for Fusion 360, and milling parameters including the spindle speed, feed rate, and depths of cut are largely provided by the tool manufacturers.3.3. Bidirectional repeatability of the milling machine
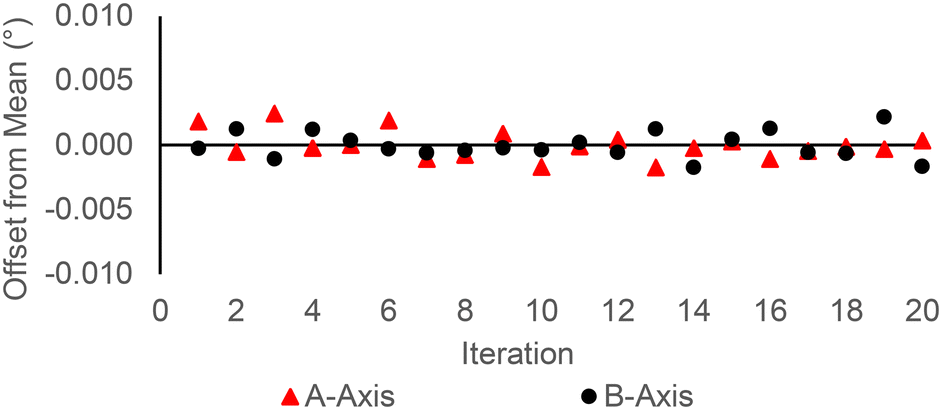
The bidirectional repeatability of the 5-axis CNC micro-milling machine is a combined result of the stages, servomotors, and assembly. To test the bidirectional repeatability of the five axes, each axis was measured independently for 20 iterations of movement along its maximum range of motion, limiting the A-axis to ±90° of rotation and the B-axis to ±360° of rotation. A needle was fixed to each axis, and the needle's position during each iteration of movement was photographed with a microscope (67317, Edmund Optics, Barrington, NJ) and measured using ImageJ.Absolute deviations of the linear and rotational axes are shown in Fig. 13 and 14, respectively. The standard deviations for the 5 axes are listed as the bidirectional repeatability in Table 2. Over 20 iterations of cyclic movement, the X-, Y-, and Z-axes had positional ranges (max–min) less than 1 μm, and the A- and B-axes had angular ranges less than 0.005°. The linear axes also demonstrated sub-μm bidirectional repeatability. The Y-axis showed the highest standard deviation, likely because of its higher range of motion and the higher weight of the assembly. The A- and B-axes both showed standard deviations of 0.001° (Table 2).
 | ||
| Fig. 13 Measured absolute deviation of linear axes. | ||
 | ||
| Fig. 14 Measured absolute deviation of rotational axes. | ||
| Axis | Bidirectional repeatability |
|---|---|
| X | 0.12 μm |
| Y | 0.23 μm |
| Z | 0.16 μm |
| A | 0.001° |
| B | 0.001° |
3.4. Dimensional analysis of microfluidic channel molds
We took scanning electron microscope images of the three brass master molds to determine the dimensional precision along the channel and dimensional accuracy compared to the computer aided design. Fig. 15 shows SEM images of the three channel master molds, and Fig. 16 charts the width measurements of the channels, each measured at 40 locations using ImageJ software. Table 3 provides the accuracy (averages) and precision (standard deviations) of the channel dimensions. The design width of the channels was 50 μm, and the widths of channels 1, 2, and 3 averaged 53.9 μm, 55.1 μm, and 63.7 μm, respectively. Channel 1 may have the highest dimensional accuracy because it had the simplest toolpath, only milling on a single plane.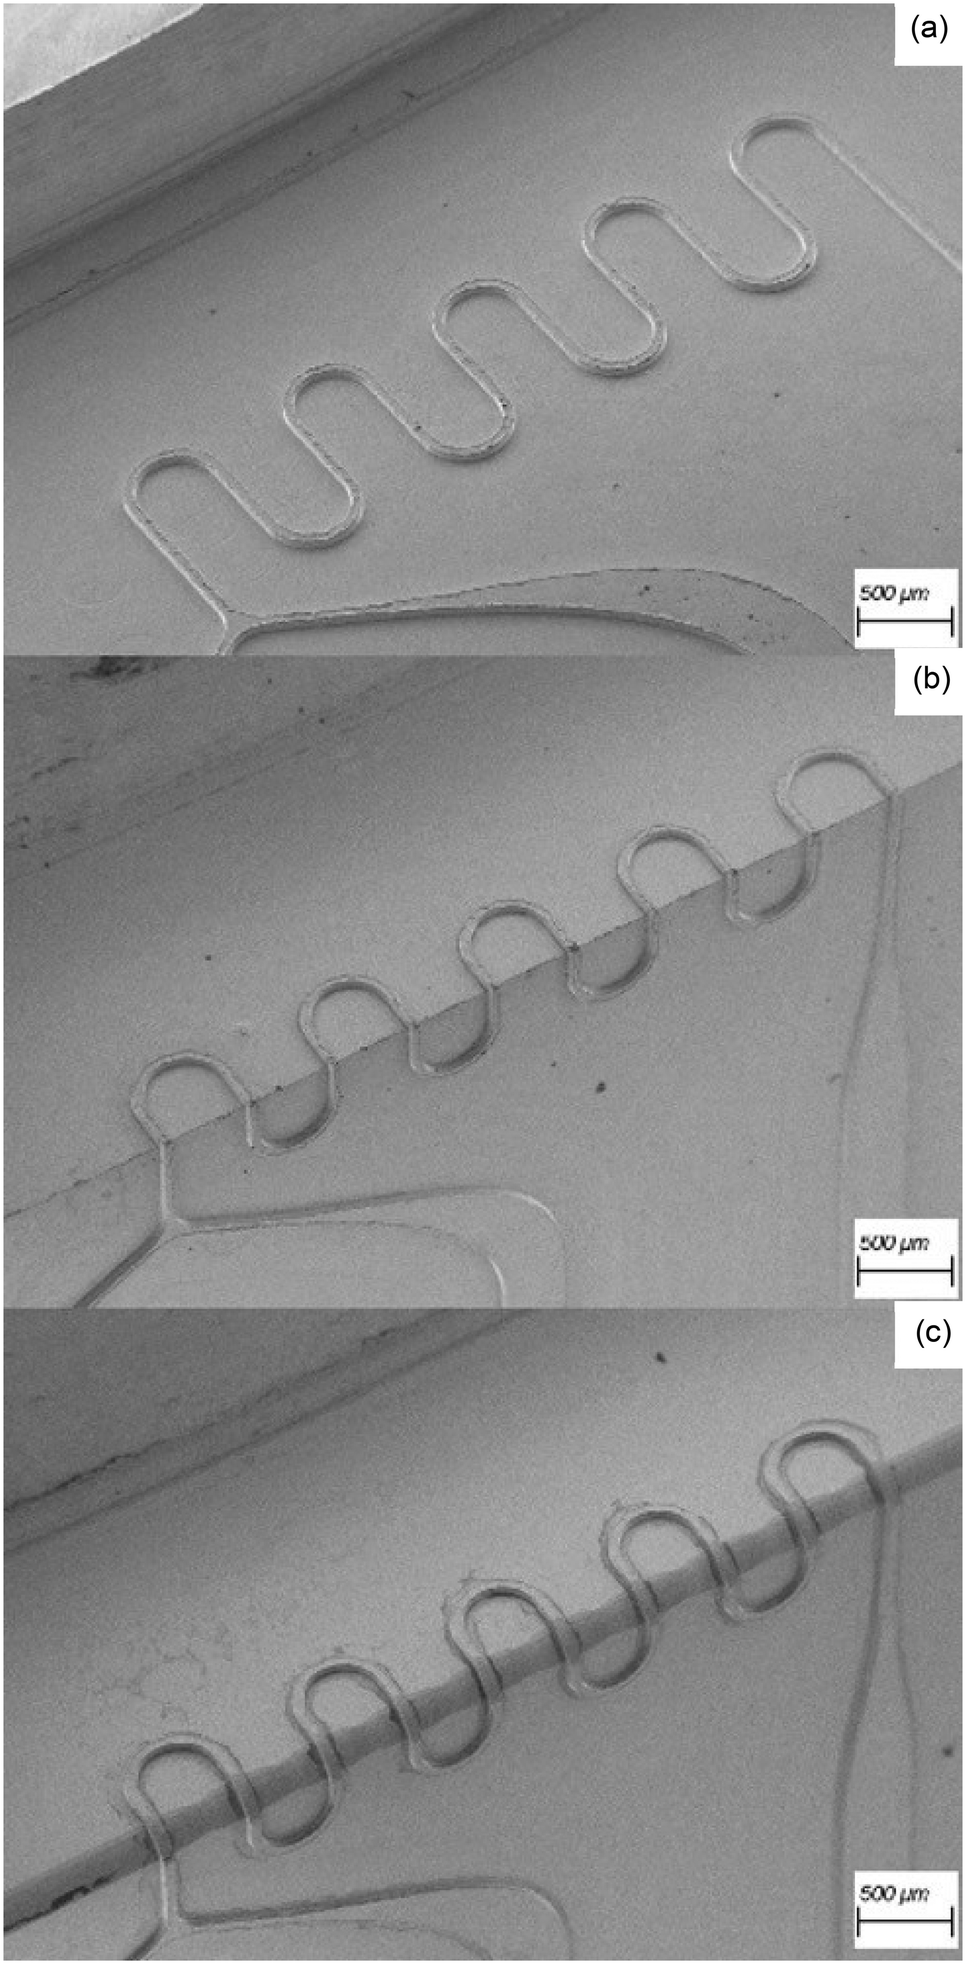 | ||
| Fig. 15 SEM images of brass master molds at 45× magnification: (a) channel 1 (planar); (b) channel 2 (90° edge); (c) channel 3 (250 μm radius edge). | ||
 | ||
| Fig. 16 Width measurements of channels 1, 2, and 3. | ||
| Channel | 1 | 2 | 3 |
|---|---|---|---|
| Average (μm) | 53.9 | 55.1 | 63.7 |
| SD (μm) | −3.3 | 4.5 | −3.5 |
The dimensional error is likely a result of the milling process rather than the accuracy or repeatability of the machine. The main causes of geometric inaccuracies are tool deflection, tool runout, and machining chatter.45,46 These factors will vary the position of the endmill radially but not axially. Because of the low strength and stiffness of small endmills, such as the 1–64′′-diameter tool used, material removal rates must be maintained by retaining high spindle speeds above 20000 rpm and slow, smooth, and continuous feed rates.45 However, higher spindle speeds generate more chatter. Therefore, we can improve the dimensional accuracy and precision of the channels by optimizing the spindle speed and feed rate given our work material and tool diameter; and other milling parameters can be manipulated including the radial (Ae) and axial (Ap) depths of cut, endmill coating, helix angle, flute count, lubrication, etc. As discussed in section 2.2.1, we achieved sub 20 μm, very high aspect ratio (∼50:1) structures. Further width reduction is easily achievable with a lower aspect ratio (∼1:1) channel as commonly used in microfluidics. For example, Fig. 17 shows the end of a 15 × 15 (W × H) brass channel milled using a 50 μm-diameter, 2-flute, solid carbide, square endmill (NSME230, NS TOOL USA, Inc., Rochester Hills, MI) operating at a 60000 rpm spindle speed, 1 mm min−1 feedrate, 2 μm Ap, and 20 μm Ae.
 | ||
| Fig. 17 Optical inspection using 8× magnification microscope: 15 × 15 μm (W × H) brass channel milled using 50 μm-diameter square endmill (NSME230, NS TOOL USA, Inc., Rochester Hills, MI). | ||
All three channels demonstrated average widths greater than the design. This variation can be corrected in the computer aided manufacturing by adding an additional finishing toolpath to refine the channel widths. While increasing production time, additional finishing passes can optimize the surface and dimensional accuracy of the channels. The SEM images also revealed burring along the edges of Channels 1, 2, and 3.
Burring on our microfluidic channel is shown in Fig. 18a. Burring is caused by plastic and elastic deformation, predominately a result of the work material properties and the endmill geometry, deflection, runout, and chatter.45 Because burrs deteriorate the precision, function, and performance of machined parts, removing and even preventing burrs has become a complicated and extensively researched subject.45 To deburr our channel, we added a contour finishing pass on the sides followed by a pass on the top surface using the 1/64′′-diameter, 3 flute, solid carbide, square endmill. We used a spindle speed of 20000 rpm and reduced the feed rate to 5 mm min−1. Fig. 18b shows the results of deburring.
 | ||
| Fig. 18 SEM image of 360 brass microfluidic channel at 1000× magnification (a) without and (b) with deburring. | ||
3.5. Channel testing
The three PDMS microfluidic channels were qualitatively assessed by supplying the two inputs with deionized water containing red food dye. Fig. 19 shows the function of all three channels. Fig. 19b reflects the 90° edge of channel 2, and Fig. 19c shows the rounded edge of channel 3 with a 250 μm radius of curvature. Inducing chaotic advection with a 3D serpentine microchannel has been a widely known method to promote mixing.47 Microfluidic mixing will be one of the practical applications of our 3D fluidic channels.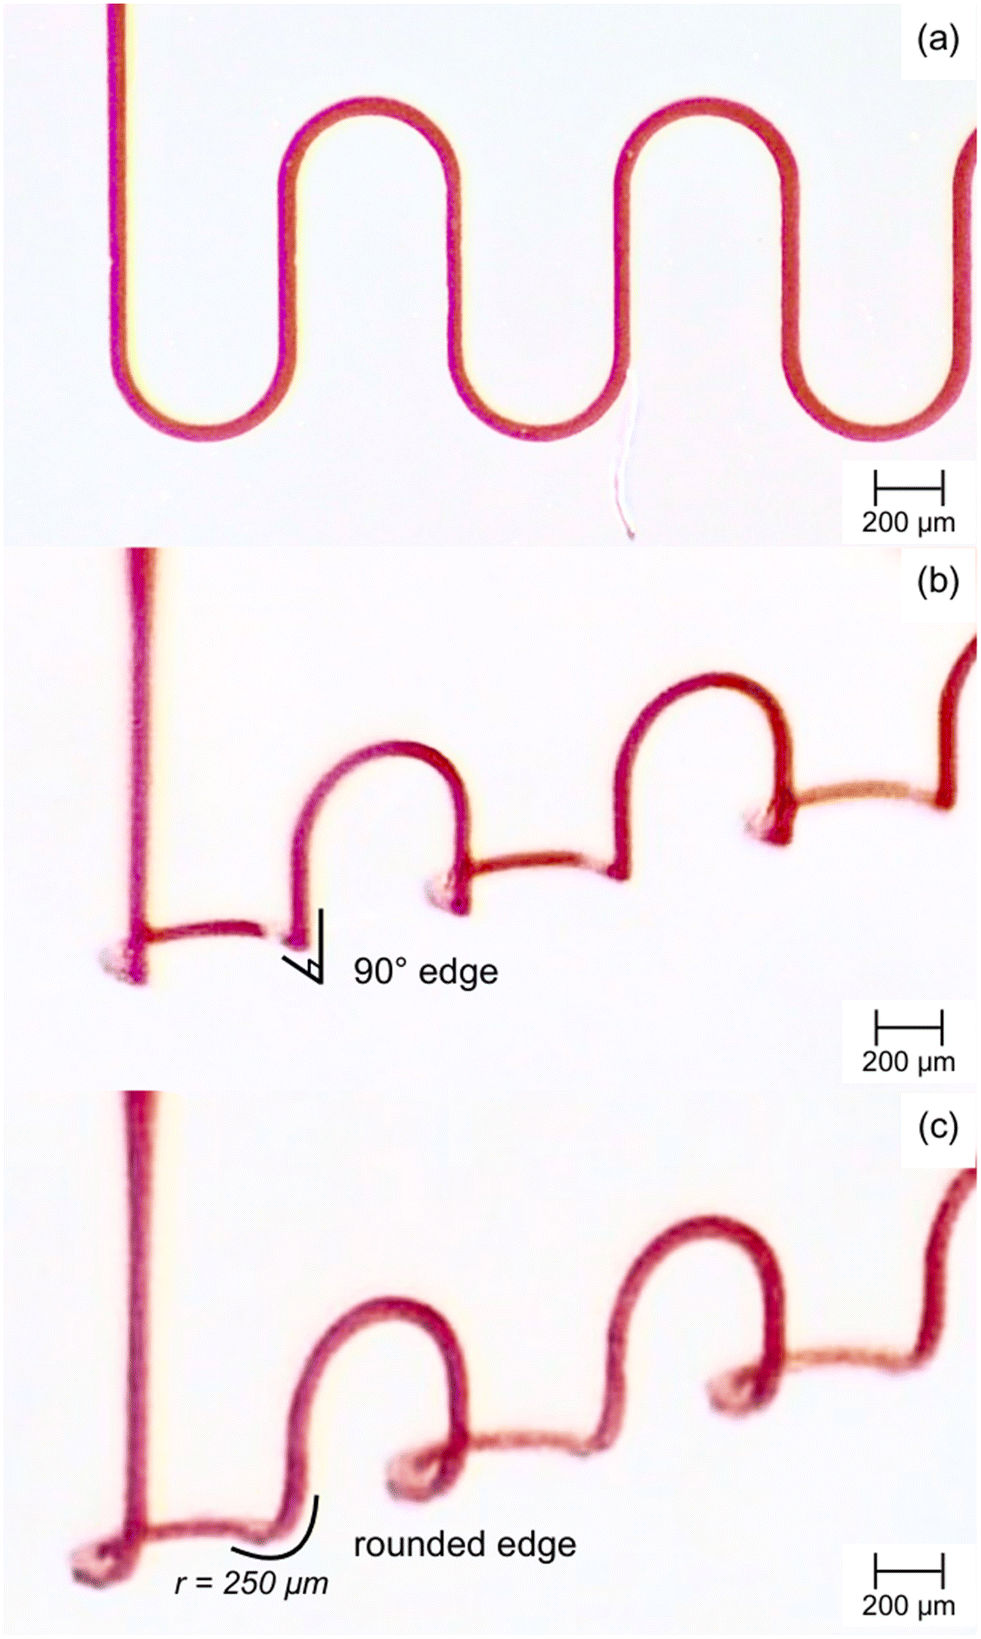 | ||
| Fig. 19 Optical images of PDMS microfluidic channels: (a) channel 1 (planar); (b) channel 2 (90° edge); (c) channel 3 (250 μm radius edge). | ||
3.6. Applications of 5-axis CNC micro-milling
The main motivation of this study is to answer the growing demand within the biomedical field to fabricate microfluidic devices using biocompatible materials and complex 3D shapes.21,22 A recent article published by Luo, et al. reviews the existing methods and applications of implantable microfluidic devices.48 Implantable microfluidics are medical devices that manipulate small volumes of fluid in the human body to diagnose, monitor, or treat medical conditions for short or long periods of time.48 The review focuses on the existing methods of implantable microfluidics within current academia. Luo, et al. specifically addresses deep reactive-ion etching of silicon to mold PDMS,49 injection molding into a series of molds with strictly horizontal and vertical structures,50 and stacking and bonding planar layers of PDMS to create a 3D channel.51,52 While three-dimensional, none of these methods demonstrate curved surfaces or slanted geometries. One method in the review created non-planar structures by means of thermoforming a planar PDMS microchannel, consequentially altering the dimensions of the microfluidic channels and chambers from their original mold.53The development of implanted microfluidic devices will require a new technique for fabricating three-dimensional microchannels compatible with complex anatomical geometries. 5-Axis CNC micro-milling opens the door to designing and developing implantable microfluidic devices that meet the geometric complexity and biocompatibility required in the biomedical field. We have designed a microfluidic device to demonstrate how our novel system may address a breadth of healthcare scenarios.
We milled a microfluidic channel along the contour of a model condyle using the 5-axis CNC micro-milling machine (Fig. 20). The condylar process of the human jaw is the lower portion of the temporomandibular joint (Fig. 20c). We milled the condyle from acrylic, then milled a semi-circular (d = 100 μm) channel within a shallow recession along the contour of the bone model. We used our system to create a PDMS mold to fill the recession and cover the microchannel, restoring the surface of the condylar process. The PDMS mold was bonded to the acrylic by applying a thin layer of liquid PDMS within the acrylic recession without filling the microchannel. Then the PDMS mold was aligned to the acrylic, and the liquid PDMS was cured at 70 °C for 60 minutes. Fig. 20a shows the acrylic condyle, and Fig. 20b shows the microfluidic channel with red food dye. With the 5-axis CNC micro-milling machine, we milled the microchannel while keeping the tool orthogonal to the model's surface. This is crucial for retaining consistent channel dimensions when milling on complex 3D surfaces, as we discussed with Fig. 8.
 | ||
| Fig. 20 Microfluidic channel on a model condylar process of the temporomandibular joint: (a) realized microfluidic channel on acrylic condylar process; (b) top-down view of microfluidic channel; (c) CAD model of human jaw, highlighting the condylar process in blue. | ||
One future application of 5-axis CNC micro-milling will be microfluidic channels embedded in orthopedic implants for nutrient or cell delivery. Applications of fluid delivery to the TMJ might include symptomatic relief of osteoarthritis or tissue regeneration of the disc or bone. 5-Axis CNC micro-milled fluidic channels may enable tissue engineering approaches that restore the complex structures of bone through anatomically accurate and osteoinductive scaffolds, while addressing limited tissue longevity by providing long-term drug delivery to targeted sites.54 5-Axis CNC micro-milling is particularly advantageous for prototyping and engineering implantable microfluidic devices because of this method's versatile material compatibility and high resolution of complex structures. Our system's material compatibility allows researchers to selectively choose non-toxic, non-inflammatory biocompatible materials that minimize the risk of immune responses. Our system's high resolution and achievement of complex geometries enables miniaturization of implantable microfluidic devices while maintaining their functionality and reliability.
We provide this conceptual demonstration to show the broad applications of 5-axis CNC micro-milling as a novel and effective method of creating implantable microfluidic devices. We have tailored our 5-axis CNC micro-milling machine to promote interdisciplinary research within the fields of biology, medicine, and engineering.
3.7. Limitations
5-Axis CNC micro-milling is advantageous for prototyping microfluidic channels with high resolutions, high aspect ratios, non-planar geometries, and material versatility. While this method meets the demand for microfluidics made from biocompatible materials and complex 3D shapes, there remain limitations to 5-axis CNC micro-milling and the current study.The advantage of 3D printing, in the case of digital light projection-based stereo-lithography (DLP-SL), is that embedded microfluidic channels can be fabricated directly. 5-Axis CNC micro-milling microfluidic channels involves assembly since milling requires access from the outside of the workpiece. For example, in section 3.6, we created a 3D microfluidic channel on the non-planar surface of a model condylar process. This involved molding a PDMS component designed to fit within the recession of the condyle housing the channel. Because of the asymmetry of the PDMS component, it aligned to the recession extremely easily since the two surfaces fit in only one orientation. While required, aligning complex 3D microfluidics does not cause practical problems in small-batch prototyping.
While 5-axis CNC micro-milling offers very high resolutions, burring remains a typical complication with milling in general that reduces the quality of machined materials. Preventing burrs remains an ongoing topic of research because of the compounding effects of the material properties, machining parameters, and endmill geometry, deflection, runout, and chatter. We have addressed burring on our samples using two strategies, finishing toolpaths and cleaning. We implemented finishing toolpaths to repeat passes over the side and top of the microfluidic channels. These toolpaths typically utilized the smallest tool in use, operating at lower feed rates. Fig. 18 visualizes the result of deburring. Additionally, we cleaned finished metal parts with pressurized air, then an acetone bath and sonication to remove residual lubricating oil, milled chips, and burrs.
In Fig. 17 we display the in situ visual inspection from our system of optical microscopes. The limit of our optical inspection is the resolution of the optical microscopes. While microscopes with higher resolutions are available, we chose models 67316 and 67317 (Edmund Optics, Barrington, NJ) for their 65 mm working distance, compatible with the machine's full range of motion. Likewise, model 33110 has a greater working distance of 220 mm. The resolution of in situ optical inspection can easily be improved with higher-magnification microscopes.
In section 2.2.1, when milling thin walls with high aspect ratios, we manually applied glue to the first trench to avoid plastic deformation of the thin wall while milling the adjacent trench. We may also avoid deformation by milling both trenches simultaneously with smaller axial depths of cut (Ap). As an example, Bang, et al. created brass walls with a 26:1 aspect ratio by milling multiple trenches at the same axial depth before moving to the next axial depth (5 μm Ap).34 This method will also allow us to fabricate multiple walls at the same time. Regarding the use of glue, dispensing sacrificial supporting material is a common technique used in 3D printing as well.10 In our case, applying temporary supporting material can be automated for faster manufacturing. However, time efficiency was not a critical issue or a goal of this study. Our aim was to demonstrate the high resolution of the 5-axis CNC micro-milling machine. We successfully achieve this by milling a thin wall with a width <20 μm and an aspect ratio near 50:1, which far surpasses the ratios achieved with common techniques like SU-8 patterning.37,38
4. Conclusions
We designed, built, and tested a 5-axis CNC micro-milling machine catered to prototype microfluidic channels with 3D flow paths. The machine achieved (1) high resolution, (2) complex 3D geometries, (3) versatile material compatibility, and (4) efficient fabrication costs.We demonstrated the high resolution of the 5-axis CNC micro-milling machine by milling a thin wall with a width <20 μm and an aspect ratio of 49.7:1. Then we demonstrated milling small features with geometries unusual to microfabrication. We milled a series of three thin walls with two slots cutting through the surfaces of all three walls. Next, we showed more complex 5-axis CNC micro-milling by producing domes with pockets and channels orthogonal to the semi-spherical surface. The domes demonstrated repeatable fabrication of multiple material types, replicating the model in titanium, brass, aluminum, and acrylic. We tested the surface roughness of each material type, finding sub-100 nm arithmetical mean height (Sa) values for nearly all the milling conditions tested. We compared the bond strength of PDMS molded from milled brass to a control, finding both to have practically the same strength. Next, we milled microfluidic channel (width ∼50 μm) molds with non-planar geometries. One channel demonstrated a 90° edge at the intersection of two perpendicular planes, and a second channel demonstrated a rounded edge with a 250 μm radius of curvature. Finally, we provided a conceptual demonstration of an implantable microfluidic device fabricated using 5-axis CNC micro-milling, showing promise to the development of geometrically and biologically compatible implants.
The 5-axis CNC micro-milling machine was designed with versatile material compatibility and low operating costs. The motor spindle has a 1 μm accuracy and speeds between 5000 and 60000 rpm, compatible with resins, plastics, woods, and metals. The 5-axis CNC micro-milling machine reduces fabrication costs for small-batch research and development by its design freedom and operating requirements. Because fabrication only requires CAD and CAM, operating the machine is simple and user-friendly. CAD and CAM also allow users the most design freedom to reduce production time and material costs under their unique milling criteria. The 5-axis CNC micro-milling machine also requires minimal equipment and working conditions. The entire system only occupies 0.72 cubic meters and does not require expensive facilities or special equipment.
Our 5-axis CNC micro-milling machine allows researchers to work autonomously to prototype complex 3D microfluidic channels and molds. We demonstrate sub-μm bidirectional repeatability of all five axes (≤0.23 μm) and a resolution below 20 μm. Making 5-axis CNC micro-milling accessible to research and laboratory environments will provide new opportunities to advance the development of microfluidic devices and benefit the multiple disciplines of science and research utilizing microfluidics.
Data availability
We include all data within the manuscript which discusses the functionality of the system presented.Author contributions
Conceptualization: M. J. C. M., D. M. K.-T. and K. H.; data curation: M. J. C. M.; funding acquisition: K. H.; Investigation: M. J. C. M., D. M. K.-T. and K. H.; methodology: M. J. C. M., D. M. K.-T. and K. H.; project administration: K. H.; resources: K. H.; supervision: K. H.; writing – original draft: M. J. C. M.; writing – review & editing: M. J. C. M. and K. H.Conflicts of interest
There are no conflicts to declare.Acknowledgements
We thank the National Institute of Undersea Vehicle Technology (NIUVT) for funding support.References
- P. N. Nge, C. I. Rogers and A. T. Woolley, Chem. Rev., 2013, 113, 2550–2583 CrossRef.
- H. M. Xia, J. W. Wu, J. J. Zheng, J. Zhang and Z. P. Wang, Lab Chip, 2021, 21, 1241–1268 RSC.
- D. J. Guckenberger, T. E. de Groot, A. M. D. Wan, D. J. Beebe and E. W. K. Young, Lab Chip, 2015, 15, 2364–2378 RSC.
- Z. Akbari, M. A. Raoufi, S. Mirjalali and B. Aghajanloo, Biomicrofluidics, 2023, 17, 051504 CrossRef.
- B. K. Gale, A. R. Jafek, C. J. Lambert, B. L. Goenner, H. Moghimifam, U. C. Nze and S. K. Kamarapu, Inventions, 2018, 3, 60 CrossRef.
- D. Qin, Y. Xia, J. A. Rogers, R. J. Jackman, X.-M. Zhao and G. M. Whitesides, in Microsystem Technology in Chemistry and Life Science, ed. A. Manz and H. Becker, Springer, Berlin, 1998, ch. 1, vol. 194, pp. 1–20 Search PubMed.
- M. Madou and C. Wang, Encyclopedia of Nanotechnology, Springer, Dordrecht, 2012 Search PubMed.
- R. Su, F. Wang and M. C. McAlpine, Lab Chip, 2023, 23, 1279–1299 RSC.
- R. Su, J. Wen, Q. Su, M. S. Wiederoder, S. J. Koester, J. R. Uzarski and M. C. McAlpine, Sci. Adv., 2020, 6, eabc9846 CrossRef PubMed.
- N. Bhattacharjee, A. Urrios, S. Kang and A. Folch, Lab Chip, 2016, 16, 1720–1742 RSC.
- B. Nagarajan, Z. Hu, X. Song, W. Zhai and J. Wei, Engineering, 2019, 5, 702–720 CrossRef.
- N. Bhattacharjee, C. Parra-Cabrera, Y. T. Kim, A. P. Kuo and A. Folch, Adv. Mater., 2018, 30, 1800001 CrossRef.
- E. Fleck, C. Keck, K. Ryszka, E. DeNatale and J. Potkay, Micromachines, 2023, 14, 773 CrossRef.
- Y. Hwang, O. H. Paydar and R. N. Candler, Sens. Actuators, A, 2015, 226, 137–142 CrossRef.
- H. T. Yau, T. J. Yang and Y. K. Lin, Comput.-Aided Des. Appl, 2016, 13, 32–38 CrossRef.
- O. H. Huttunen, J. Hiitola-Keinanen, J. Petaja, E. Hietala, H. Lindstrom and J. Hiltunen, J. Microelectromech. Syst., 2024, 33, 95–101 Search PubMed.
- A. Zhang, K. Tharwani, J. Wang, G. K. Seilo, M. A. Atie and J. A. Potkay, Lab Chip, 2024, 4357–4370 RSC.
- D. A. Mair, E. Geiger, A. P. Pisano, J. M. J. Fréchet and F. Svec, Lab Chip, 2006, 6, 1346–1354 RSC.
- U. N. Lee, X. Su, D. J. Guckenberger, A. M. Dostie, T. Zhang, E. Berthier and A. B. Theberge, Lab Chip, 2018, 18, 496–504 RSC.
- S. Li, Z. Ma, Z. Cao, L. Pan and Y. Shi, Small, 2020, 16, e1903822 CrossRef PubMed.
- H. An, L. Chen, X. Liu, B. Zhao, H. Zhang and Z. Wu, Sens. Actuators, 2019, 295, 177–187 CrossRef.
- C. E. Owens and A. J. Hart, Lab Chip, 2018, 18, 890–901 RSC.
- M. E. Wilson, N. Kota, Y. Kim, Y. Wang, D. B. Stolz, P. R. LeDuc and O. B. Ozdoganlar, Lab Chip, 2011, 11, 1550–1555 RSC.
- A. Lashkaripour, R. Silva and D. Densmore, Microfluid. Nanofluid., 2018, 22, 1–13 CrossRef.
- C. A. Leclerc, S. Williams, C. Powe, N. Zepp, D. Lipworth, E. Pensini and C. M. Collier, Microfluid. Nanofluid., 2021, 25, 1–12 CrossRef.
- A. Javidanbardan, A. M. Azevedo, V. Chu and J. P. Conde, Micromachines, 2021, 13, 6 CrossRef PubMed.
- E. B. Brousseau, S. S. Dimov and D. T. Pham, Int. J. Adv. Manuf. Tech., 2010, 47, 161–180 CrossRef.
- S. M. Scott and Z. Ali, Micromachines, 2021, 12, 319 CrossRef.
- M. Heckele and W. K. Schomburg, J. Micromech. Microeng., 2004, 14, R1–R14 CrossRef.
- L. Alting, F. Kimura, H. N. Hansen and G. Bissacco, CIRP Ann., 2003, 52, 635–657 CrossRef.
- M. Yang, J. Yang, L. Zhu and X. Yu, Precis. Eng., 2020, 65, 23–31 CrossRef.
- W. Wang, Q. Guo, Z. Yang, Y. Jiang and J. Xu, Robot. Comput.-Integr. Manuf., 2023, 79, 102436 CrossRef.
- D. Zhu, X. Feng, X. Xu, Z. Yang, W. Li, S. Yan and H. Ding, Robot. Comput.-Integr. Manuf., 2020, 65, 101908 CrossRef.
- Y. B. Bang, K. M. Lee and S. Oh, Int. J. Adv. Manuf. Tech., 2005, 25, 888–894 CrossRef.
- J. L. Sanchez Noriega, N. A. Chartrand, J. C. Valdoz, C. G. Cribbs, D. A. Jacobs, D. Poulson, M. S. Viglione, A. T. Woolley, P. M. Van, K. A. Christensen and G. P. Nordin, Nat. Commun., 2021, 12, 5509 CrossRef.
- Y. Xu, F. Qi, H. Mao, S. Li, Y. Zhu, J. Gong, L. Wang, N. Malmstadt and Y. Chen, Nat. Commun., 2022, 13, 918 CrossRef PubMed.
- L. Amato, S. S. Keller, A. Heiskanen, M. Dimaki, J. Emnéus, A. Boisen and M. Tenje, Microelectron. Eng., 2012, 98, 483–487 CrossRef.
- S. Natarajan, D. A. Chang-Yen and B. K. Gale, J. Micromech. Microeng., 2008, 18, 045021 CrossRef.
- M. Volatier, D. Duchesne, R. Morandotti, R. Arès and V. Aimez, Nanotechnology, 2010, 21, 134014 CrossRef.
- H. Becker and C. Gärtner, Electrophoresis, 2000, 21, 12–26 CrossRef PubMed.
- B. Boswell, M. N. Islam and I. J. Davies, Int. J. Adv. Manuf. Tech., 2018, 94, 789–806 CrossRef.
- DLP Microfluidics 3D Printing, https://team.ucdavis.edu/dlp-system, (accessed September 2024).
- J. W. Kang, J. Jeon, J. Y. Lee, J. H. Jeon and J. Hong, Micromachines, 2024, 15, 61 CrossRef.
- J. Qiu, J. Li, Z. Guo, Y. Zhang, B. Nie, G. Qi, X. Zhang, J. Zhang and R. Wei, Materials, 2023, 16, 6984 CrossRef PubMed.
- L. O'Toole, C.-W. Kang and F.-Z. Fang, Adv. Manuf., 2021, 9, 173–205 CrossRef PubMed.
- T. Masuzawa, CIRP Ann., 2000, 49, 473–488 CrossRef.
- R. H. Liu, M. A. Stremler, K. V. Sharp, M. G. Olsen, J. G. Santiago, R. J. Adrian, H. Aref and D. J. Beebe, J. Microelectromech. Syst., 2000, 9, 190–197 Search PubMed.
- T. Luo, L. Zheng, D. Chen, C. Zhang, S. Liu, C. Jiang, Y. Xie, D. Dud and W. Zhoua, Analyst, 2023, 148, 4637 RSC.
- B. Wang, X. Wen, Y. Cao, S. Huang, H. A. Lam, T. L. Liu, P. Chung, H. G. Monbouquette, P. Chiou and N. T. Maidment, Lab Chip, 2020, 20, 1390–1397 RSC.
- Z. Chen, S. Noh, R. D. Prisby and J. Lee, Micromachines, 2020, 11, 300 CrossRef.
- S. Zhao, Y. Chen, B. P. Partlow, A. S. Golding, P. Tseng, J. Coburn, M. B. Applegate, J. E. Moreau, F. G. Omenetto and D. L. Kaplan, Biomaterials, 2016, 93, 60–70 CrossRef PubMed.
- Y. Zhang, A. D. Mickle, P. Gutruf, L. A. Mcilvried, H. Guo, Y. Wu, J. P. Golden, Y. Xue, J. G. Grajales-reyes, X. Wang, S. Krishnan, Y. Xie, D. Peng, C. Su, F. Zhang and J. T. Reeder, Sci. Adv., 2019, 5, eaaw5296 CrossRef PubMed.
- H. An, L. Chen, X. Liu, B. Zhao, H. Zhang and Z. Wu, Sens. Actuators, A, 2019, 295, 177–187 CrossRef.
- T. M. Acri, K. Shin, D. Seol, N. Z. Laird, I. Song, S. M. Geary, J. L. Chakka, J. A. Martin and A. K. Salem, Adv. Healthcare Mater., 2019, 8, e1801236 CrossRef.
| This journal is © The Royal Society of Chemistry 2025 |