DOI:
10.1039/D1RA01732B
(Paper)
RSC Adv., 2021,
11, 14459-14474
Integrated magneto–electrophoresis microfluidic chip purification on library preparation device for preimplantation genetic testing for aneuploidy detection†
Received
4th March 2021
, Accepted 6th April 2021
First published on 16th April 2021
Abstract
Next generation sequencing (NGS) technology has revolutionized the field of personalized medicine through providing patient specific diagnostic information on a nucleic acid level. A key bottleneck in the NGS workflow is the preparation of nucleic acids for sequencing, or library preparation. One approach to overcoming this bottleneck on time and resources is through automating library preparation as much as possible from the stage of DNA extraction to a sequence-ready sample. Here, we have integrated microscale purification and macroscale PCR amplification to create an automated platform to replace manual DNA library preparation and magnetic bead-based cleanup steps. This microfluidic chip integrates magnetic bead transport and electrokinetic flow to remove unbound adapter dimers and other impurities from samples. We incorporate this method to develop an automated NGS DNA library preparation device that also includes macro- and microfluidic reagent movement and mixing and a thermoelectric cooler for controlled capillary heating and cooling. We greatly reduce the hands-on time, amount of pipetting required, and volumes of reagents needed as we test the feasibility of the platform on the clinically important diagnostic field of preimplantation genetic testing for aneuploidy (PGT-A). We prepared euploid and aneuploid five cell samples for sequencing and found our results were accurate for the cell samples with a sequencing quality equivalent to the standard of the DNA libraries prepared manually. Our device platform utilizes concepts such as: magneto–electrophoresis, integrated capillary PCR, and automated sample loading and unloading onto a microfluidic chip.
Introduction
Next generation sequencing (NGS) has contributed significantly to the field of personalized medicine since DNA sequencing can be used to answer questions about an individual's genetic makeup.1 NGS is used routinely in cancer diagnostics,2 infectious disease detection,3 in vitro fertilization embryo testing,4 and more.1 As NGS technologies continue to advance, there remains a consistent need for improvements in DNA library preparation workflows, meaning when the DNA is prepared for sequencing. Manual library preparation is often impacted by variations between samples since the protocol requires precise and accurate reagent handling and time management.5,6 One strategy to combat this limitation is to automate the DNA library preparation where all biomolecular and chemical processes can be performed without any variability caused by user interactions (i.e. manual pipetting). This automation can provide more consistency between results by reducing the risk of cross-contamination of materials, pipetting errors, and other mistakes caused by manual reagent handling.7 Automated library preparation can be performed by high throughput methods using robotic liquid handling machines such as the Sciclone G3 NGSx instrument8 (PerkinElmer, Hopkinton, MA, USA) or NGS DreamPrep (Tecan Trading AG, Switzerland) as well as lower throughput technologies that utilize microfluidics,9,10 or other semi-automated techniques. Microfluidic based automated approaches are notably beneficial because they reduce analysis time, reagent consumption, and costs, while also increasing accuracy. Larger scale robotics and laboratory equipment may be less exact due to reagent volume constraints compared to what is achievable on a microfluidic scale device.11 Current microfluidic devices for DNA library preparation for NGS incorporate droplet-based digital microfluidics with microfluidic mixing,9,10 automated multi-column chromatography,12 and more.
One key step that has limited previous automated microfluidic devices for NGS library preparation is DNA purification using solid-phase reversible immobilization (SPRI) magnetic beads. SPRI magnetic beads used for DNA purification are suspended in a buffer with high poly(ethylene glycol) (PEG) and salt concentrations that encourages DNA to bind to the surface of the carboxyl-coated magnetic beads.13 The DNA coated beads are collected using a magnet followed by wash steps before the DNA is eluted from the beads in a resuspension buffer, creating a highly purified DNA suspension.13 Wash steps are performed using chaotropic compounds, such as ethanol, because nucleic acids precipitate in the presence of alcohols and will not desorb from the magnetic beads until the alcohol is removed and the beads are rehydrated.14 The conventional SPRI protocol involves many pipetting steps that can negatively affect the bead mix if not performed precisely. The device described herein thus incorporates a unique microfluidic chip for DNA purification to reduce the pipette handling of the SPRI beads by the automated system. The motivation for using a microfluidic chip was to limit potential errors that could occur from unintentionally discarding liquid via multiple pipetting steps or vigorously mixing the SPRI beads. Furthermore, manual DNA library preparation is a time consuming and laborious process that has become one of the major bottlenecks for advancing NGS. An automated platform for DNA library preparation can significantly improve the workflow by precise liquid handling and time management to prevent human errors or sample variations. The proposed platform has the potential to offer NGS for smaller-scale laboratory studies, eventually replacing high throughput liquid handling robots without compromising the quality of the sequencing library.
Microfluidic chips have been used for successful molecular purification previously by incorporating interfaces such as oil15 to aid in purification efficacy. To limit the number of additional reagents needed for this device, the microfluidic chip was designed to incorporate electrodes that could create an applied electric field within the chip. This chip is therefore able to combine the concepts of magnetophoresis and electrophoresis which we refer to as magneto–electrophoresis. Magnetophoresis is used to move the magnetic SPRI beads through a viscous medium using an external magnetic field16 and electrophoresis is used to move the DNA not adsorbed to the SPRI beads away from the purified sample and thus improve the DNA purification process. There are indeed several studies (shown in Table 1) performed on DNA purification by selectively binding DNA onto magnetic beads and transporting them to a purified buffer on a microfluidic device. The techniques come under the purview of magnetophoresis. A majority of these studies pertain to the magnetic beads' motion under synergetic action of magnetic and pressure-driven flow fields. Here, no-slip boundary conditions  on the bead surface allows for unbound molecules near the beads to carry over with the beads. Hence, the magnetophoresis is often diffusion-limited as the unbound molecules near the bead surface have to diffuse out into the large velocity field. In contrast, our innovation overcomes this limitation and utilizes magnetic bead transport through an electric field. Here, the unbound molecules, outside a very thin Debye length around the beads, experience a velocity
  proportional to the electric field. Hence, magneto–electrophoresis efficiently removes unbound molecules from the bead cluster. Through incorporating a microfluidic chip for the DNA purification into the automated device design, SPRI beads can still be used for the purification without the need for multiple wash buffer exchanges and potential pipetting errors. Capillary electrophoresis, such as in this design, has been used for nucleic acid sizing, genotyping, and DNA sequencing analysis.18 DNA purification using microfluidics has also been done previously,19,20 but, as seen in Table 1, incorporating magnetophoresis with electrophoresis to assist in purification with SPRI beads has not been explored in this manner until now.
Table 1 Select microfluidic platforms used for separating and purifying nucleic acids
| Study |
Mechanism of separation |
Application |
Use of electric field to enhance separation |
| Our method |
Electrophoresis and magnetophoresis where beads are moved through stationary fluid |
DNA purification during NGS library preparation |
Yes |
| Xu et al.17 |
Magnetophoresis and fluid flow |
Nucleic acid purification from PCR mixture |
No |
| Tan et al.12 |
Column chromatography with fluid flow in a “purification circuit” |
DNA purification during NGS library preparation |
No |
| Hale et al.36 |
Magnetophoresis and continuous fluid flow |
DNA separation from blood |
No |
| Azimi et al.37 |
Magnetic micromixer with buffer exchanges |
DNA extraction from whole blood |
No |
| Kim et al.10 |
Digital microfluidics with magnetic bead capture and buffer exchanges |
DNA purification during NGS library preparation |
No |
| Karle38 |
Magnetophoresis and fluid flow |
DNA extraction from cell lysate |
No |
| Vojtíšek39 |
Magnetophoresis where beads are moved through continuous fluid flow |
DNA hybridization and isolation |
No |
| Deraney et al.35 |
Magnetophoresis and electroosmotic flow |
Nucleic acid extraction and purification from plasma |
Yes |
The scientific and technological rigor of this new device was tested for use in the diagnostic field of preimplantation genetic testing for aneuploidy (PGT-A). One in six couples of reproductive age are affected by infertility, thus in vitro fertilization (IVF) is an essential tool used to increase a couple's chances of a successful pregnancy.21 PGT-A can be performed during IVF and involves performing an embryo biopsy of one to ten cells – known as a trophectoderm (TE) biopsy – followed by genetic analysis testing for Mendelian, chromosomal, and mitochondrial abnormalities.22,23 PGT-A specifically determines when there are an abnormal number of chromosomes or sub-chromosomal deletions or duplications in the embryo.5 NGS can be used to perform 24-chromosome aneuploidy screening and offers complete low pass genomic coverage, rapid results, the ability to detect more subtle abnormalities, and has a reasonably low cost per base.5,24 During NGS the genomic sample that is removed from the TE biopsy is first amplified using Whole Genome Amplification (WGA) before moving into the DNA library preparation workflow. PGT-A was chosen as the application for the development of this system because it is highly sensitive to the sample preparation workflow, outlined in Fig. 1a and b, and will clearly indicate whether the system is performing optimally or not.
 |
| | Fig. 1 Protocol outlines for manual and library preparation device with microfluidic chip methods. | |
One major scientific innovation contributing to the success of this automated device is the microfluidic chip used for DNA purification during library preparation. This microfluidic chip is designed with two wells – one containing the SPRI beads with DNA adsorbed to them and the other a resuspension buffer – connected by a channel to move the sample through using automated magnet motion. Simultaneous magnetophoresis and electrophoresis are used to move the beads from one well to the next while also applying an electric field to the connecting channel to induce electrokinetically-driven migration of non-adsorbed DNA in the opposing direction of the magnetic bead transfer. The combination of these phenomenon results in the automated purification of the DNA library using magneto–electrophoresis. This automatic workflow has been coupled with automatic macro- and microfluidic reagent movement and mixing as well as a thermoelectric cooler for controlled capillary heating and cooling. Through scaling down the reagents used on this device and automating the library preparation process, this device can prepare DNA for sequencing while saving both time and money. Notably, the 2.5 hour library preparation process is reduced to less than 10 minutes of hands-on time from the start of the procedure and only ∼1/3 by volume of the reagents are used compared to the manufacturer's instructions. We successfully apply the novel microfluidic chip workflow towards the purification procedures during NGS library preparation on the automated device and demonstrate its efficacy through both library preparation and sequencing for PGT-A.
Materials and methods
Microfluidic chip fabrication
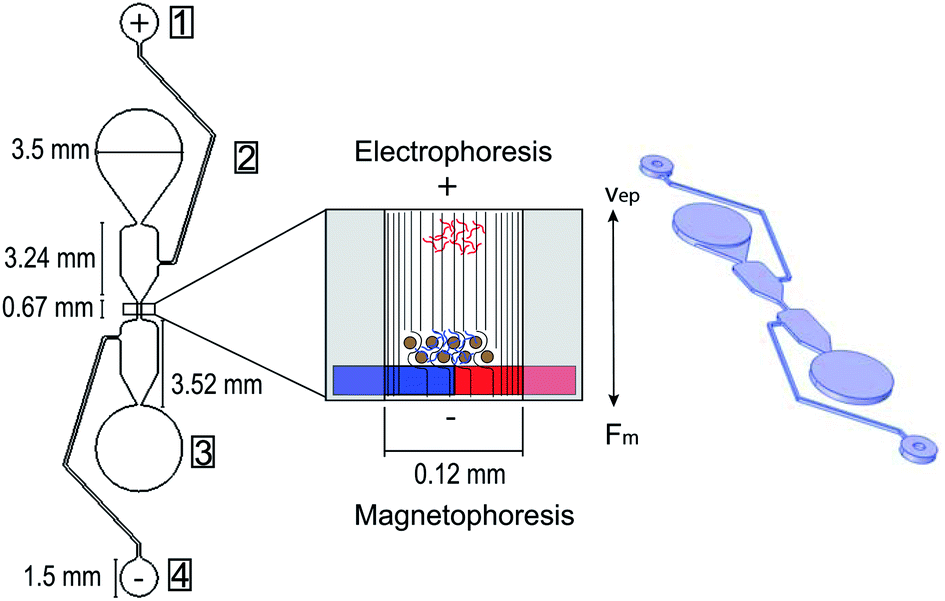
The microfluidic chip used during the DNA purification process was made from polydimethylsiloxane (PDMS). A Sylgard 184 elastomer base and curing agent were mixed in a 10![[thin space (1/6-em)]](https://www.rsc.org/images/entities/char_2009.gif) :1 ratio for one min, then placed in a vacuum chamber for 40 min to dissolve any air bubbles in the mixture. A 2-part sandwich mold was used to make the microfluidic chip with one part made from SU-8 and the other made from aluminum. The SU-8 master mold contains the microfluidic design, and the aluminum mold contains a peg formation that mirrors the circular well design on the SU-8 mold. The 2-part sandwich mold helps to create more uniform wells for sample loading during testing compared to punching a hole through the PDMS to create a well after it solidifies. Following the vacuum chamber, the SU-8 and aluminum molds were clamped together with an opening where the PDMS could fill the molds. The fixture was then placed in a 70 °C oven for 1.5 hours to allow the PDMS to solidify. Next, the two parts of the sandwich mold were taken apart and the PDMS was removed from the aluminum mold. Four reagent wells per DNA purification separator were formed during the PDMS curing process (Fig. 2) and a hole punch was used to ensure all PDMS was cleared from the wells. The internal diameters of the hole punches used were 0.75 mm for the negative electrode well, 1.2 mm for the positive electrode well, and 3.5 mm for the sample input and elution wells. The PDMS and a 1 mm thick glass slide were then cleaned with isopropanol, dried with nitrogen gas, then treated with a plasma wand at high radiofrequency to irreversibly bond the two pieces together. The microfluidic chip was then returned to the 70 °C oven for 30 minutes, then kept at room temperature for at least 24 hours before use to ensure uniform chip-to-chip zeta potential.
:1 ratio for one min, then placed in a vacuum chamber for 40 min to dissolve any air bubbles in the mixture. A 2-part sandwich mold was used to make the microfluidic chip with one part made from SU-8 and the other made from aluminum. The SU-8 master mold contains the microfluidic design, and the aluminum mold contains a peg formation that mirrors the circular well design on the SU-8 mold. The 2-part sandwich mold helps to create more uniform wells for sample loading during testing compared to punching a hole through the PDMS to create a well after it solidifies. Following the vacuum chamber, the SU-8 and aluminum molds were clamped together with an opening where the PDMS could fill the molds. The fixture was then placed in a 70 °C oven for 1.5 hours to allow the PDMS to solidify. Next, the two parts of the sandwich mold were taken apart and the PDMS was removed from the aluminum mold. Four reagent wells per DNA purification separator were formed during the PDMS curing process (Fig. 2) and a hole punch was used to ensure all PDMS was cleared from the wells. The internal diameters of the hole punches used were 0.75 mm for the negative electrode well, 1.2 mm for the positive electrode well, and 3.5 mm for the sample input and elution wells. The PDMS and a 1 mm thick glass slide were then cleaned with isopropanol, dried with nitrogen gas, then treated with a plasma wand at high radiofrequency to irreversibly bond the two pieces together. The microfluidic chip was then returned to the 70 °C oven for 30 minutes, then kept at room temperature for at least 24 hours before use to ensure uniform chip-to-chip zeta potential.
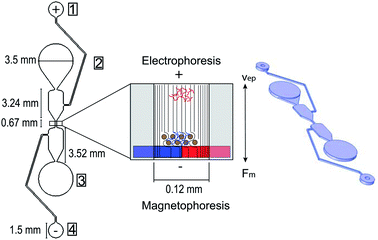 |
| | Fig. 2 Microfluidic chip for DNA purification using magneto–electrophoresis design and dimensions 2D and 3D perspectives. Electrophoresis and magnetophoresis opposing forces are shown where the DNA library, in blue, is adsorbed to the purification beads moving toward the elution well through a stationary separation buffer using magnetophoresis, while the unwanted DNA primer and adapter dimers, in red, are moving toward the sample input well via electrophoresis. Electric field lines are also pictured through the center channel and moving through the purification beads. Wells of the microfluidic chip are identified as: (1) positive electrode well, (2) sample input well, (3) elution well, (4) negative electrode well. | |
Electrokinetic microfluidic chip modeling and measurements
Analysis of the reactions that take place during DNA library preparation was first performed to provide a breakdown of the chemical and molecular processes in the protocol and provide motivation for why DNA purification is performed and why electrophoresis aids in this purification. The microfluidic chip was designed to utilize electrophoretic mobility to attract any unwanted free DNA (i.e. primer dimers and adapter dimers) to a positive electrode, taking advantage of DNA's negative charge. This was used to enhance the DNA purification as the positive electrode well was positioned nearest the sample input well and away from the elution well. This electrophoretic mobility would oppose the magnetophoresis movement of the purification (SPRI) beads which are transferred from the sample input well to elution well during DNA purification. These opposing forces are visualized in Fig. 2 where the DNA library, shown in blue, is mixed with the purification beads and moved toward the elution well using magnetophoresis, while the unwanted DNA dimers, shown in red, move toward the sample input well via electrophoresis. Computational analysis was next performed to evaluate the electrokinetic phenomenon occurring in the microfluidic chip when the steady electric field was applied, including electrophoresis and electroosmosis. Analyzing these electrokinetic phenomena was important for the design of the separation buffer that filled the microfluidic chip to ensure it was conducive to electrophoresis as a purification method and not electroosmosis as the two electrokinetic phenomena opposed each other in this application. Additionally, COMSOL Multiphysics Modeling Software 5.4 was used to interpret the effect of the electric potential differential and electrophoresis within the microfluidic channel. A 2D CAD drawing of the microfluidic chip for one separator was imported into COMSOL and an oblate spheroid shape was added to the center channel to represent the SPRI bead cluster movement during purification. Next, electric currents and transport of diluted species physics were modeled to provide the electric potential and concentration within the microfluidic chip in a stationary study. This study showed the dispersion of the electric field and the concentration gradient of the diluted DNA in the channel. Additionally, Laminar Flow Physics was incorporated into the COMSOL Stationary Study to investigate the effect the microfluidic chip wall conditions have on the electroosmotic flow in the channel. Furthermore, experimental testing was performed to quantitatively characterize the on-chip purification. DNA amplicons of 485 base pairs (bp) and 123-bp were used to represent the average DNA library and adapter dimer sizes (bp), respectively, to study the microfluidic chip purification for this application. A DNA amplicon mixture of 200 ng or 100 ng of both DNA sizes (bp) were tested using on-chip and off-chip (following purification bead manufacturer instructions) purification procedures to better compare the microfluidic chip purification to existing methods.
Device fabrication and system operation
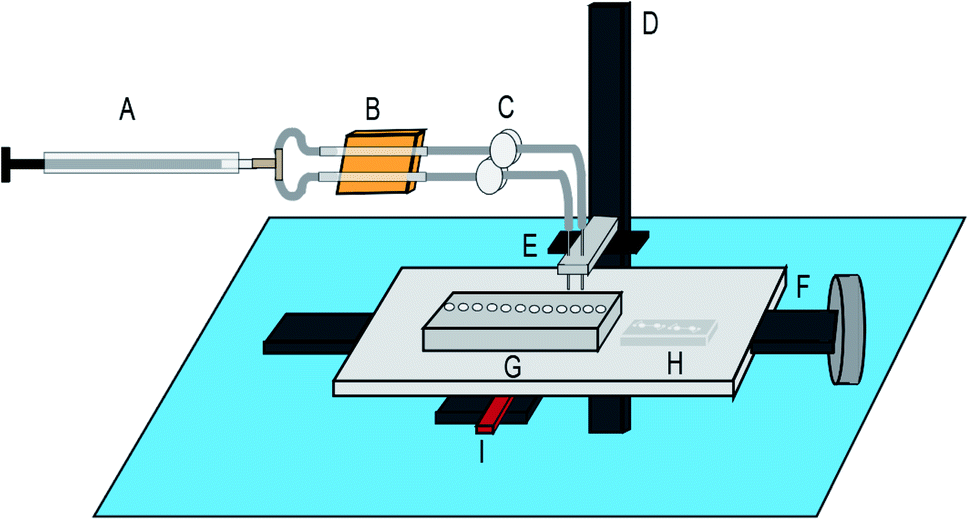
This automated NGS library preparation device (Fig. 3) consists of an x-stage for left–right motion and a z-stage for up–down motion. The stages are both linear screw-drive stages (IGUS, East Providence, RI, USA) with a stepper motor controlled by a script in the Si Programmer application (Applied Motion Products, Watsonville, CA, USA). The x-stage houses the microfluidic chip for DNA purification and the reagent plate containing all PG-Seq kit library preparation reagents (PerkinElmer Health Sciences (Australia), Thebarton, SA, Australia) and additional reagents used for wash steps. The z-stage holds two cannulas that move together, perpendicular to x-stage motion. These metal cannulas have an airtight connection to PTFE (Teflon) tubing (inner diameter 1.02 mm) (Small Parts, Inc., Logansport, IN, USA) which is then connected to flexible polyethylene tubing (inner diameter 0.79 mm) held by electronic pinch valves (NPV Series, Clippard Instrument Laboratory Inc., White Oak, OH, USA). These pinch valves are used to select for one of two cannulas by pinching the undesired cannula to prevent air and liquid movement in that tubing. The tubing in the pinch valves has another airtight connection to more flexible polyethylene tubing (inner diameter 1.59 mm) which is held in the thermoelectric cooler device. This tubing ultimately attaches to a 500 μL Hamilton Gastight Syringe (Reno, NV, USA) which is controlled by a syringe pump (PHD 2000 Programmable, Harvard Apparatus, Holliston, MA, USA) for all liquid handling. The thermoelectric cooler (12711-5P31-15CQ Thermoelectric/Peltier Module, Custom Thermoelectric, Bishopville, MD, USA) used in this device is attached to a copper plate that has been milled to provide spaces for the flexible polyethylene tubing to fit. Around one-third of the tubing directly contacts the copper surface and is held in place by an insulated door that is screwed on to make a tight fit so that heat can be transferred efficiently between the thermoelectric cooler and copper plate to the reagents within the tubing. A LabVIEW VI was used to control the thermoelectric cooler based on real time feedback from a thermocouple (National Instruments, Austin, TX, USA) positioned in flexible polyethylene tubing filled with mineral oil adjacent to where the reagents are loaded. A neodymium bar magnet (K&J Magnetics, Pipersville, PA, USA) is used in conjunction with the microfluidic chip for SPRI bead movement during DNA purification and is mounted to and controlled by a small hobby servo motor which flips the magnet up and down as designated in the script. The x-stage moves in respect to the magnet to transfer purification beads through the microfluidic chip for DNA purification, details of this movement are explained in Fig. 4. The overall device platform is controlled by script-based preprogrammed sequences or manual keystrokes through a master Python script loaded onto a Raspberry Pi with hand-shaking to the Harvard Apparatus syringe pump and Si Programmer (Applied Motion Products, Watsonville, CA, USA) scripts used to control the x- and z-stages. Analysis of the heating and cooling of the thermoelectric cooler during capillary PCR and mixing on the reagent plate are major features of the device that were also analyzed by COMSOL Multiphysics Modeling Software 5.4 simulations and testing in this study. Dimensional analysis of the device was also performed to ensure the reagent volumes would be conducive to the device platform and the reagent plate was set up to avoid any cross contamination between reagents and this analysis is expanded upon in the ESI.†
 |
| | Fig. 3 Device fabrication schematic: (A) syringe pump, (B) thermoelectric cooler, (C) pinch valves to control cannulas (D) Z-stage, (E) cannula 1 and cannula 2, (F) x-stage. (G) reagent plate, (H) microfluidic chip for DNA purification, (I) magnet for DNA purification. | |
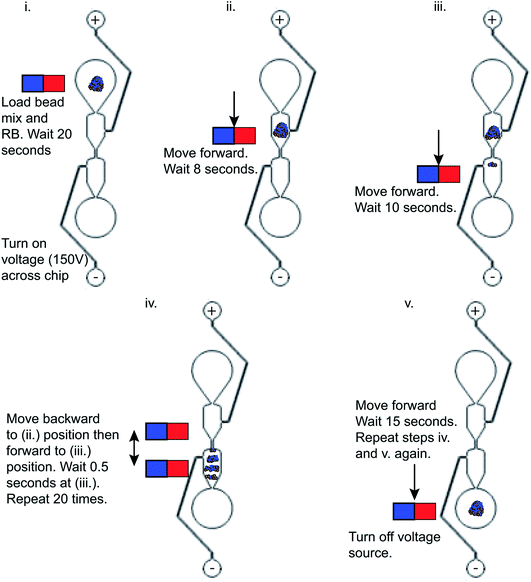 |
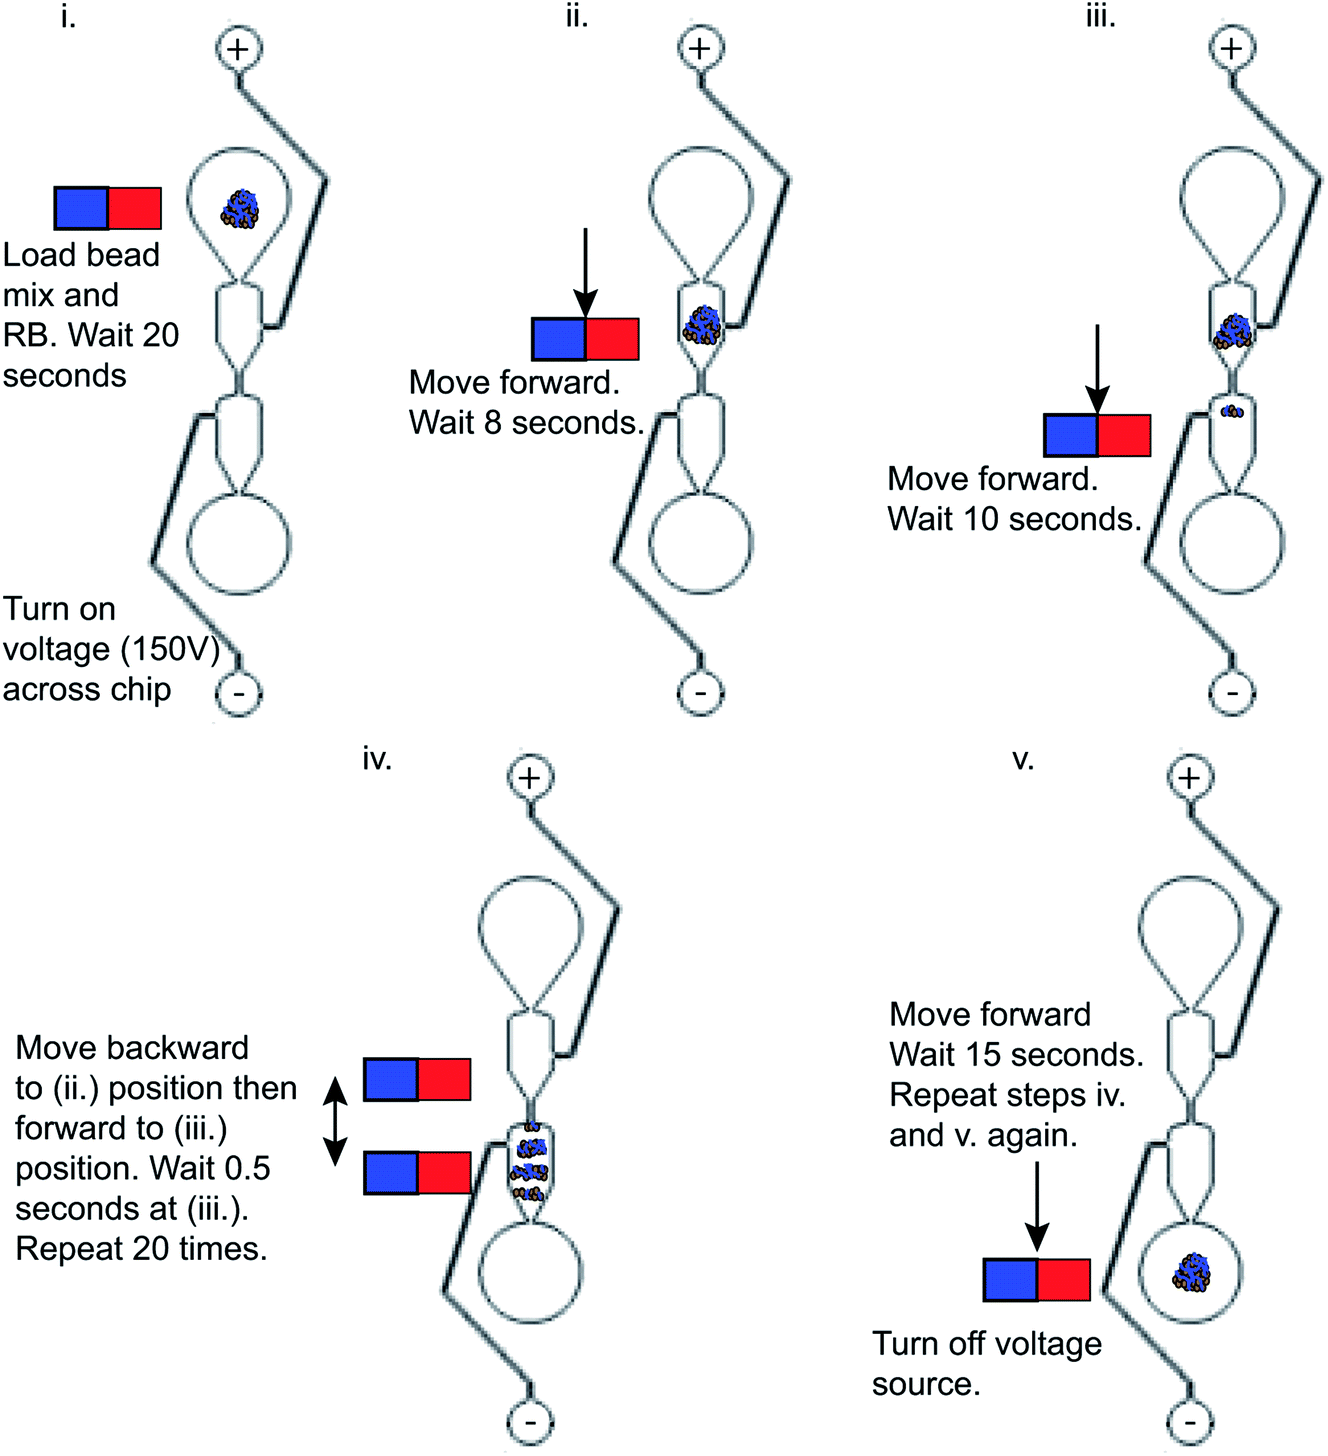
| | Fig. 4 Schematic of the magnet movement used to move the purification beads with adsorbed DNA library (shown in blue) from the sample input well to elution well during DNA purification steps. | |
Application of DNA samples for next generation sequencing library preparation
The NGS library preparation was performed using the PG-Seq kit 2.0 workflow (PerkinElmer Health Sciences (Australia), Thebarton, SA, Australia) which involves: combined fragmentation, end repair, and adenylation; barcoded adapter ligation; PCR amplification; and two Purification Bead cleanup steps, using SPRI beads, following the barcoded adapter ligation and PCR amplification steps (Fig. 1). Initial assay testing of the microfluidic chip and device platform was performed using Lambda DNA (New England Biolabs, Ipswich, MA, USA) for library preparation. The DNA library preparation quantity and quality were evaluated by analyzing the DNA library concentration (ng μL−1), yield (%), average size (bp) of the DNA library, and library purity (A260/A280 ratio). This was done by running one microliter of DNA library sample on the Agilent Bioanalyzer 2100 machine with the Agilent DNA 1000 Kit and DNA Chip for On-Chip-Electrophoresis (Agilent Technologies, Santa Clara, CA, USA). In order to have a sequencing-ready DNA sample, at least 4 ng μL−1 of library is needed in a 20 μL sample and since the library size (bp) is critical for cluster generation on the flow-cell using Illumina technology, an average DNA library size of 400 bp was set as the benchmark.6 Library purity was improved by reducing the concentration of adapter and PCR primer dimers which are created when excess adapters or PCR primers bind to each other and then participate in the amplification process.25 This dimerization drastically interferes with downstream DNA sequencing processes.6 These conditions were compared between sample preparations on-device and manually both using seven PCR cycles, unless otherwise stated. For sequencing testing, two distinct human cell samples were tested: euploid cells (46, XX) from peripheral lymphocyte cells from a healthy female donor of proven fertility (PerkinElmer Health Sciences (Australia), Thebarton SA, Australia) and aneuploid cells (48, XXY, +21) from fibroblast cells (Coriell Institute, Camden, NJ, USA). Each of the cell samples were manually sorted into 5-cell aliquots, representing a TE biopsy, then whole genome amplified (WGA) according to standard PG-Seq kit 2.0 instructions to provide a starting DNA concentration of 40 ng μL−1 for library preparation. The DOPlify procedure includes cell lysis followed by optimized DOP-PCR amplification. The DNA was purified manually using a Purification Bead (SPRI bead) cleanup at a 0.9× bead to DNA volume ratio prior to DNA library preparation. All research was carried out in accordance with Brown University's research guidelines and regulations. Additionally, an MTA (Assurance Form) was signed and approved by Coriell Institute (Camden, NJ, USA) to use the cell lines in this study and all materials were unidentified. Sequencing data was also gathered for samples to determine the accuracy of detecting the expected aneuploid vs. euploid cell samples using the MiSeq sequencer (Illumina, San Diego, CA, USA). The sequencing results were read at 1 × 150 bp and normalized to 500000 reads per sample. The reads were trimmed to 1 × 75 bp to match the standard PG-Seq kit 2.0 protocol and sequence analysis was performed using the PG-Find Software (PerkinElmer Health Sciences Australia, Adelaide, SA, Australia).
Results
Analysis of reaction kinetics for DNA library preparation steps
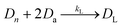
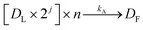
Along with DNA library purification, the effectiveness of this device ultimately depends on successful reaction kinetics for each process of this workflow. Eqn (1)–(3) are used to breakdown the three major enzymatic steps in this assay to model the DNA that makes up the final prepared library, assuming 100% reaction efficiency. The first step in the procedure, fragmentation, is represented by eqn (1), where the initial genomic DNA (Dg) is enzymatically fragmented into n, number of DNA fragments. Each of these DNA fragments (D1, D2,…Dn−1, Dn) represent a unique part of the genomic DNA. The number of DNA fragments produced in this reaction is controlled by a fragmentation reaction rate constant, kf, which is a function of the reaction temperature and buffer conditions including enzyme concentrations, as well as, the initial concentration of the genomic DNA. As specified by the manufacturer, users can adjust the input genomic DNA concentration and the reaction time to produce different fragment sizes (bp) which will be normally distributed around the intended size. By controlling these factors, the number of fragments, n, can therefore be increased or decreased.
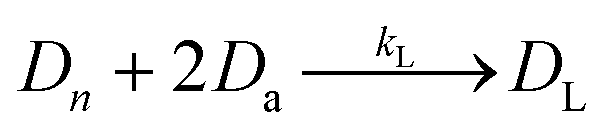
The next enzymatic process in the DNA library preparation is the barcoded adapter ligation. As represented by eqn (2), this step in the procedure will increase the size (bp) of each DNA fragment (Dn) by adding a barcoded adapter (Da) to both ends of all fragments. This step does not increase the number of fragments in solution, thus DL still represents one of n number of DNA fragments which is now ligated to two barcoded adapters. This reaction is controlled by a ligation reaction rate constant, indicated as kL. This is a function of temperature, buffer conditions, enzyme concentrations, and concentration of barcoded adapters. The final enzymatic step in this procedure is the PCR amplification for the ligated DNA fragments. Eqn (3) represents the theoretical yield of the number of DNA fragments in the final library (DF). The exponential increase in the number of each ligated DNA fragment (DL) during PCR is controlled by the number of PCR cycles (j) performed.26 Since PCR amplifies each ligated DNA fragment individually, the final number of DNA fragments in the prepared library (DF) must be multiplied by the number of fragments in the solution, n. This process is controlled by an amplification reaction rate constant (kA), which is a function of the temperature cycling, buffer conditions, and enzyme, primer, and nucleotide (dNTP) concentration in the buffer mixture.
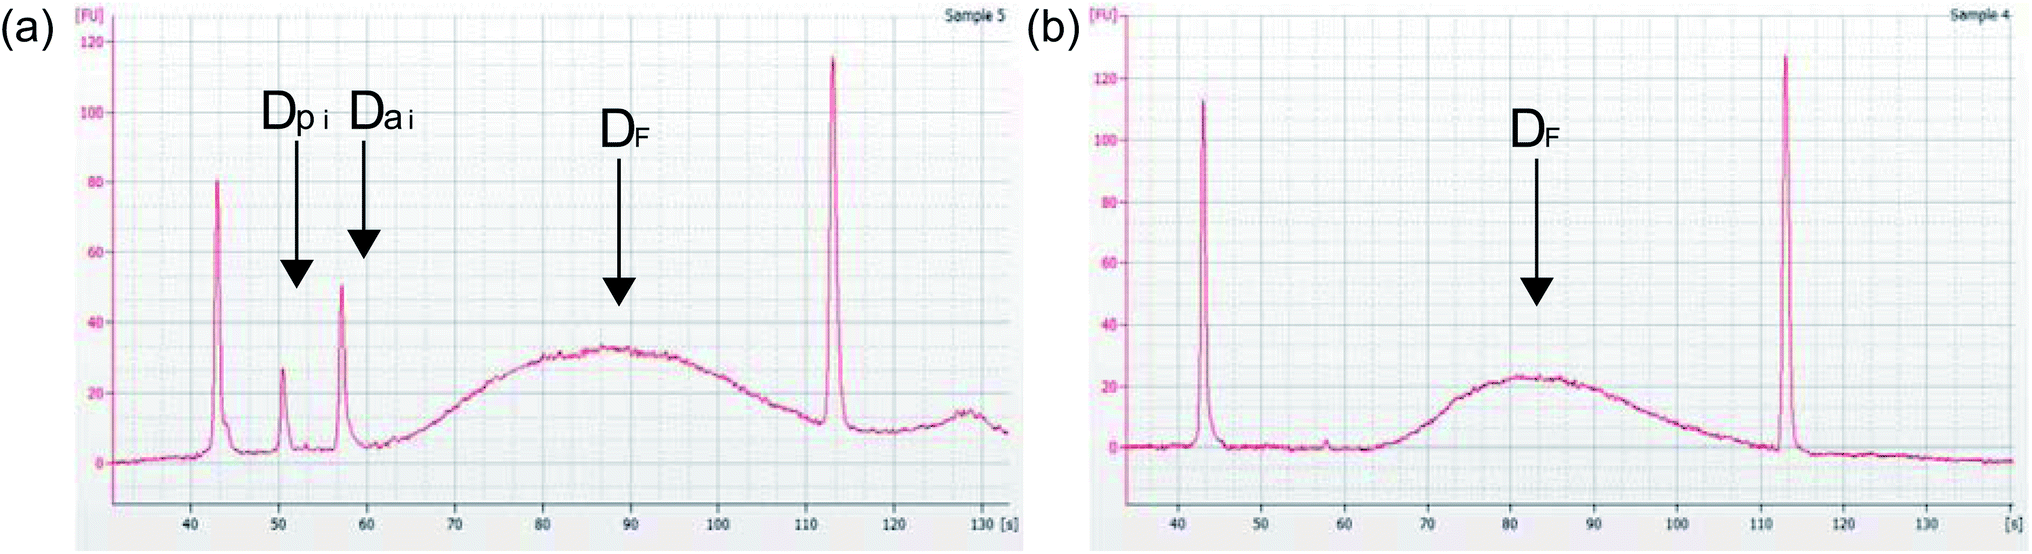
One problem that may occur during PCR amplification is primer or adapter dimer formation and amplification, represented as an exponential increase (i) in the number of barcoded adapters (Da) or PCR primers (Dp) (Fig. 5a). Dimerization negatively affects the quality of prepared libraries and will disrupt downstream DNA sequencing by interfering with the DNA library binding to the flow cell.6 Since these dimers are between 70 bp–130 bp, it is more kinetically favorable for them to bind to the flow cell first, leaving longer fragments of DNA that contain important genetic information left with no place to bind. This can reduce the amount of reads per sample and reduce the sequence information or coverage, which will reduce the amount of useful data for that sample.6 But, with effective DNA purification, these adapters can be eliminated from samples and the resulting library (DF) will be ready for sequencing (Fig. 5b).
| |
 | (1) |
| |
 | (2) |
| |
 | (3) |
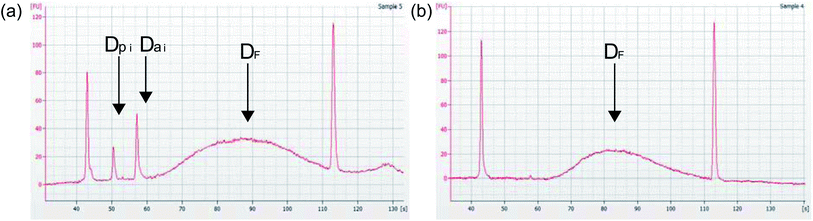 |
| | Fig. 5 Agilent Bioanalyzer 2100 electropherogram analysis of prepared DNA libraries (a) an example of a low quality DNA library due to peaks in electropherogram at ∼50 seconds and 57 seconds, corresponding to ∼70 bp (Dpi, primer dimer) and ∼130 bp (Dai, adapter dimer). (b) An example of a high-quality DNA library with efficient DNA purification. Note removal of primer dimer (Dpi) and adapter dimer (Dai) peaks showing an improvement in prepared DNA library quality. | |
Electrokinetic microfluidic chip modeling and measurements
The post-ligation and post-amplification DNA purifications were performed on a microfluidic chip to purify the DNA library and remove adapter and primer dimers using magneto–electrophoresis. The microfluidic chip (Fig. 2) was positioned on the x-stage (Fig. 3) of the automated library preparation device. When being used, the separation buffer was first loaded into the positive electrode well, filling the microfluidic chip. Following that, the positive and negative electrodes were placed in the respective wells and the neodymium bar magnet was engaged to be adjacent to the glass slide of the microfluidic chip. Next came the automatic loading of the purification bead mix with DNA library adsorbed to it in the sample input well while resuspension buffer was loaded into the elution well simultaneously. The voltage source of 150 V was then applied through the microfluidic chip while the x-stage began to move left to right above the stationary bar magnet, transferring the bead mix through the channel and into the resuspension buffer. The magneto–electrophoresis protocol is further illustrated in Fig. 4 which explains the magnet motion necessary to move the purification bead mix from the sample input well to the elution well. Once the bead mix was in the elution well, the magnet was disengaged to remove the magnetic field while the DNA de–adsorbed from the purification beads into the resuspension buffer for four minutes, resulting in a purified sample. The magnet was then reengaged to move the purification beads out of the elution well so that the purified DNA could be automatically removed from the elution well without transferring any purification beads to the next reagents in the protocol.
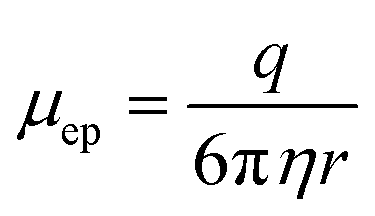
One important design feature considered for this microfluidic chip was the separation buffer which was used to wash the purification beads. This buffer filled the microfluidic chip center channels and was designed to (1) contain enough chaotropic compounds so that the DNA remained adsorbed to the beads during the movement through the chip; (2) not evaporate from the channel before the cleanup could be performed; and (3) reduce the electroosmotic flow within the channel. Therefore, isopropanol contributed to the majority of the separation buffer as an alcohol with a larger molecular weight compared to ethanol which is conventionally used, so it will evaporate more slowly from the microfluidic chip. The last criteria for the separation buffer design was reducing the electroosmotic flow in the chip. Since DNA is negatively charged, the microfluidic chip was designed to use electrophoresis to increase the cleanup efficiency of adapter and primer dimers. Electrophoresis works by separating samples, such as nucleic acids or proteins, using a high voltage differential based on the motion of the charged surface relative to a stationary liquid.18,27 The electrophoretic velocity (vep) in the microfluidic chip (eqn (4)),28 is based on the electrophoretic mobility (μep) and electric field (E). The solute's charge affects the electrophoretic mobility of the DNA in the buffer (equation (5))28 and therefore this electrophoretic velocity moves towards the positive electrode, based on the negative charge of DNA, where q is the solute's charge, η is the buffer viscosity, and r is the solute's radius.
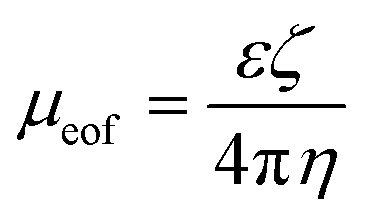
Electroosmosis on the other hand is the electrokinetic motion of the ionized liquid in relation to the stationary charged surface by an applied electric field.27 The electroosmotic flow velocity or the rate at which the buffer moves through the capillary is also a function of the mobility and electric field applied in the system (equation (6)).28 Conversely, electroosmotic mobility is based on the buffer dielectric constant (ε), zeta potential of the channel wall (ζ), and buffer viscosity (η), as seen in eqn (7).28 The zeta potential is directly proportional to the charge on the capillary walls, which in this case is the negatively charged glass slide.28 This then attracts positive ions to the negatively charged wall creating an electric double layer that, when a steady electric field is applied, will cause migration of the positive ions toward the negative electrode, which will create a bulk flow of liquid in the same direction.28 Since the total velocity of the DNA in the applied electric field is controlled by the electrophoretic and electroosmotic velocities (equation (8)), it is essential for the separation buffer to be designed in a way so that the electroosmotic velocity is decreased enough to make electrophoresis the dominating electrokinetic velocity because these two phenomena work in opposite directions in the microfluidic chip.
| |
 | (5) |
| |
 | (7) |
Specific buffers added to isopropanol to the reduce the electroosmotic flow included LabChip Sipper Chip Coating Reagent 8 (PerkinElmer, Hopkinton, MA) which is a positively charged additive designed to be added to the separation buffer of an EZ Reader (PerkinElmer, Hopkinton, MA, USA). This reagent binds to silanol groups in glass channels to neutralize the negatively charged glass. TWEEN and PEG were also added into this separation buffer mix because they acted as surfactants to reduce electroosmotic flow velocity by adsorbing to the capillary wall.29,30 These reagents accounted for ∼40% of the total separation buffer volume, with isopropanol accounting for the remaining 60% to ensure the DNA would remain precipitated onto the purification beads during movement through the microfluidic chip.
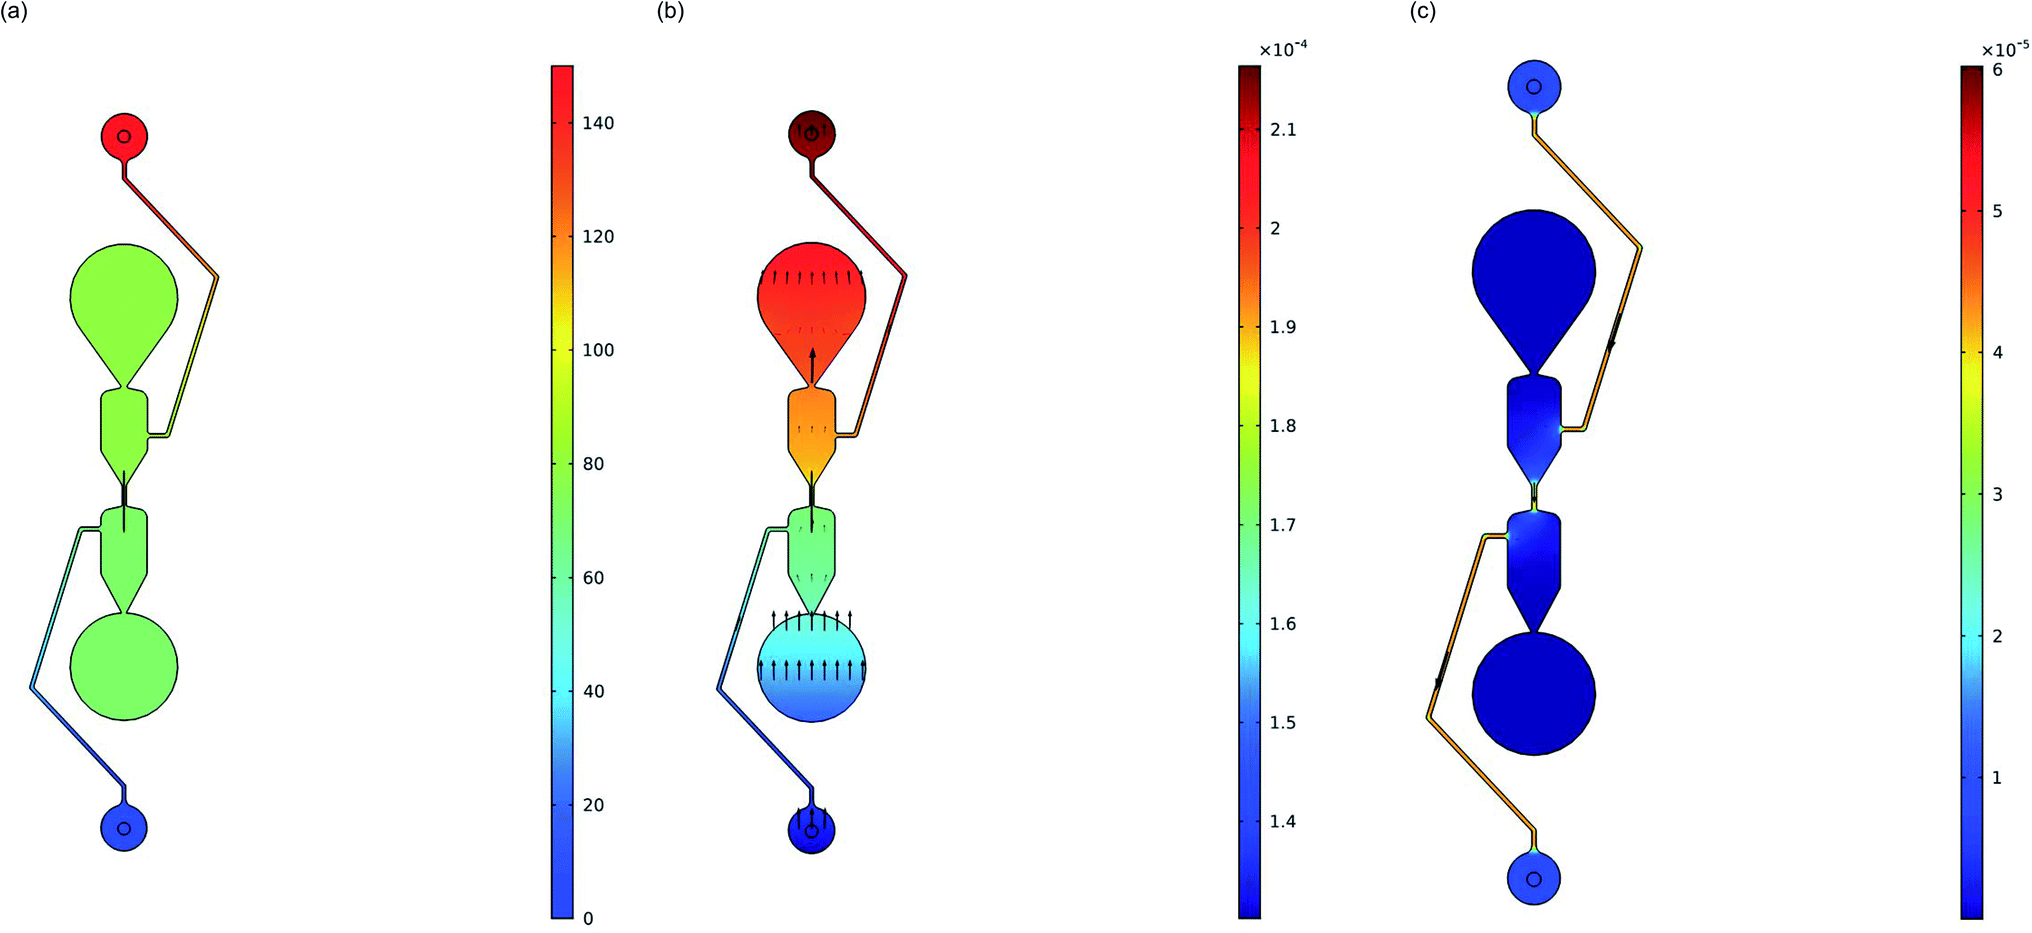
COMSOL Multiphysics Modeling Software was utilized to show the direction of the DNA electrophoresis in the microfluidic chip. A 2D stationary study of one separator on the microfluidic chip was imported into COMSOL and the positive electrode well was assigned an electric potential of 150 V (Fig. 2) to match the experimental testing. The anticipated transport direction of the free DNA (diluted species) not adsorbed to the purification beads was towards the sample input well and away from the elution well. An electric potential of 0 V was assigned to the negative electrode well in the device. A DNA size of 130 bp was selected to model the migration of the free DNA because it represents the size of the adapter dimers that will be purified out of solution. The diffusion of the isolated linear DNA molecules was calculated to be 3.21 μm2 s−1 based on an experimentally derived scaling law comparing the diffusion coefficient of linear DNA to the length of the linear DNA molecules.31 The migration in the electric field is controlled by the electric potential and the Nernst–Einstein relation with a charge number of −260 based on the negative phosphate backbone in the 130-mer DNA. A concentration of 20 ng μL−1 (in a stepwise function in the y-direction) was assigned to each well to visualize the movement of any diluted species that may be in those wells. This model excludes the effect that the purification beads will be having in the channel although an oblate spheroid shape was added to the center of the channel to represent the bead cluster on the chip. Due to the complexity of the separation buffer used to fill the microfluidic chip in these experiments along with the buffers in the purification bead mix carrying the DNA library for purification, the simulations were performed with isopropanol as a model material since it makes up ∼60% of the separation buffer. The electric currents and transport of diluted species physics were modeled, and Fig. 6 provides the electric potential (6a) and concentration (6b) plots. It is clear the electric potentials are largest in the electrode wells and the concentration plot shows the direction that the concentration gradient is moving is towards the positive electrode as anticipated due to the applied electric field.
 |
| | Fig. 6 Electrophoresis in microfluidic chip analysis using COMSOL Multiphysics Modeling Software Stationary Study: (a) electric potential (V) surface plot. (b) Concentration (mol m−3) surface plot with arrow surface representing the concentration gradient. Concentration gradient is largest at the positive electrode, as expected for the negatively charged DNA being modeled. (c) Velocity magnitude (m s−1) surface plot with arrow surface plot representing the velocity field under electroosmotic flow conditions. The highest velocity is in the center channel. | |
COMSOL modeling was also used to visualize any electroosmotic flow and its effect on the transport of DNA in the channel. Under the laminar flow physics module, different wall boundary conditions were tested to analyze the effect on the velocity in the center channel caused by the electroosmotic flow. A ‘No Slip’ wall condition was first assigned to all channels within the microfluidic device to represent the neutralization of the electric double layer by the separation buffer. This simulation shows a velocity of 0 m s−1 in the channels, meaning that there is no electroosmotic flow under these conditions. Conversely, the wall condition can be set to ‘Electroosmotic velocity’ based on the electric field induced electroosmotic flow. The mobility for this model is based on a glass zeta potential of −0.1 V and a relative permittivity of isopropanol (17.9). The result of this simulation shows that velocity magnitude concentrated in the center channel is 3.84 × 10⁻⁵ ± 1.00 × 10⁻⁷ (m s−1) moving in the direction of the negative electrode (Fig. 6c). When flow coupling the laminar flow and transport of diluted species physics though, the negatively charged DNA diluted species still showed a concentration gradient with the largest amount of diluted species (DNA) at the positive electrode, indicating that the electrophoretic mobility was still controlling the free DNA movement.
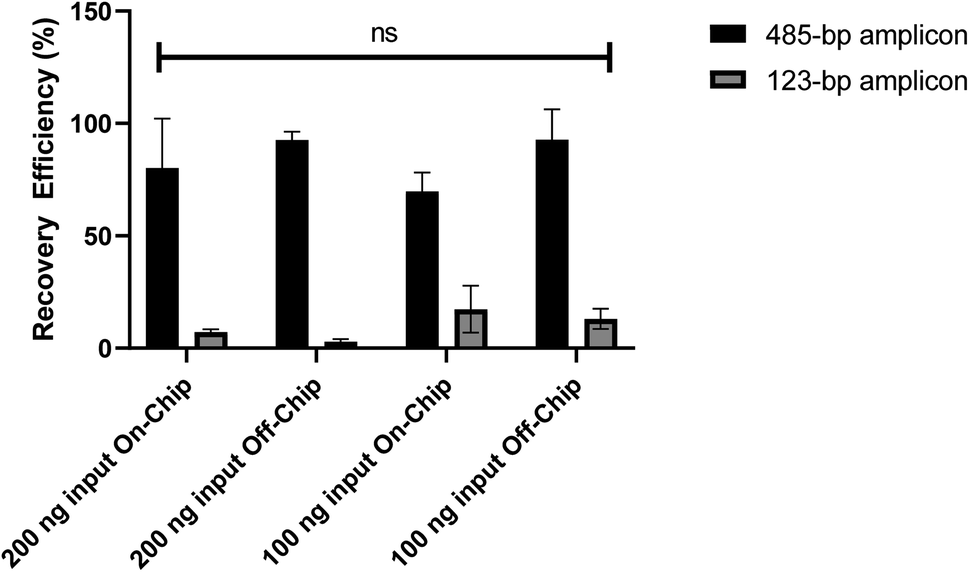
To further characterize the microfluidic chip, the recovery efficiency of DNA purified on-chip was quantified. DNA amplicons of 485-bp and 123-bp were mixed with either 200 ng or 100 ng of each size to create the input DNA sample for purification. In both on-chip and off-chip testing the DNA was suspended in 36 μL of nuclease free water then combined with 36 μL of purification beads for four minutes, as is done on the device. Next, the on-chip tests followed the on-device purification procedure, explained previously, while the off-chip tests followed the purification bead manufacturer's instructions, followed by DNA elution in 20 μL of resuspension buffer. Fig. 7 shows the recovery efficiency (%) of the two DNA sizes where the anticipated result was 100% recovery efficiency for the 485-bp amplicon, representing the full capture of the DNA library, and 0% recovery efficiency for the 123-bp amplicon, representing the removal of adapter dimers.
 |
| | Fig. 7 Recovery efficiency (%) of various DNA purification testing conditions with different amounts of DNA purified on- and off-chip. Analysis of the testing resulted in no statistically significant difference in recovery efficiency between the different groups using a 2-way ANOVA, P value = 0.3902 (n = 3). | |
Capillary PCR modeling and measurements
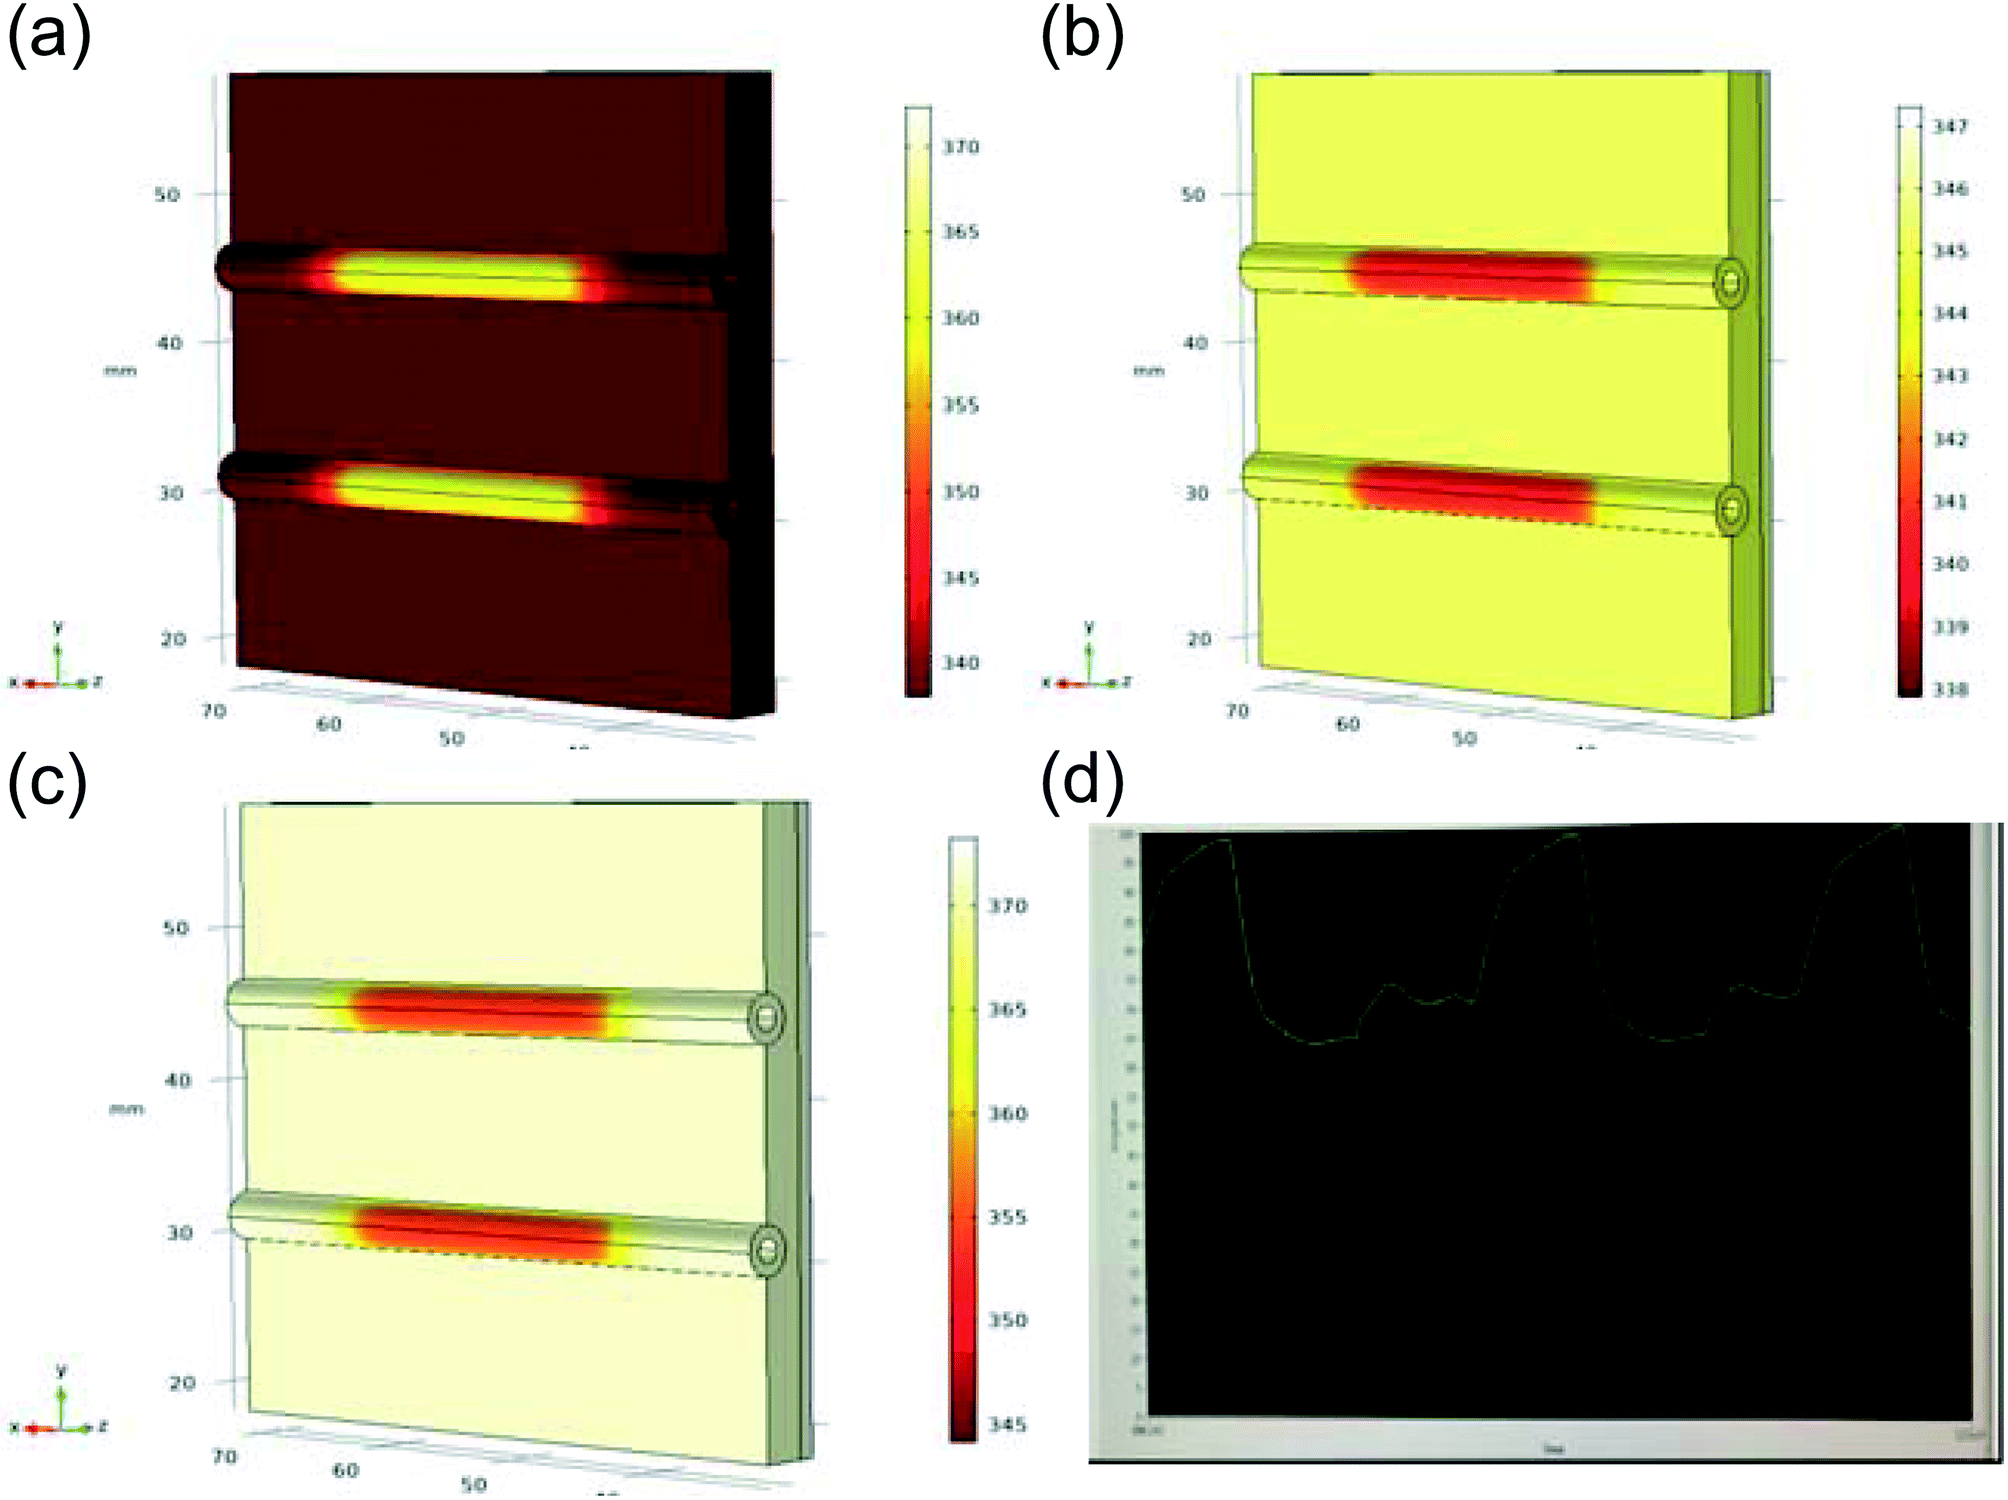
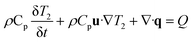
The custom thermoelectric cooler heating system was required to heat reagents from 98 °C to 65 °C to 72 °C during PCR cycling. Thermoelectric cooler heat transfer modeling during PCR thermocycling was performed using COMSOL Multiphysics Modeling Software 5.4 to analyze the dispersion of the thermoelectric cooler heating to the reagents contained in the flexible polyethylene tubing. A 3D drawing was made of the copper plate, tubing, and reagents in the tubing to focus on the efficiency of the heat transfer from a heat source which represented the thermoelectric cooler (Fig. 8). Heat transfer in solids and fluids was used in a time dependent study to model and analyze the rate of heating and cooling of reagents. This rate was then compared to experimentally determined rates gathered from the LabVIEW VI used to control the thermoelectric cooler via thermocouple real time feedback. In the model, water was used as an example liquid in the tubing to be heated and cooled. The thermoelectric cooler material for this modeling was alumina (Al2O3) since the thermoelectric cooler being used is made of 127 couples between lapped ceramic (Al2O3) faces (Custom Thermoelectric, Bishopville, MD, USA). COMSOL Multiphysics Modeling heating and cooling rates were gathered for each step in PCR amplification in a time dependent study derived by eqn (9) and (10). Material properties were used to provide values for these equations where ρ is the density, Cp is the heat capacity at constant pressure, and k is the thermal conductivity.| |
 | (9) |
| |
 | (11) |
 |
| | Fig. 8 Thermoelectric cooler heat transfer in solids and fluids modeling using COMSOL Multiphysics Modeling Software time dependent study (COMSOL label in kelvin) (a) 98 °C to 65 °C at 2 seconds. (b) 65 °C to 72 °C at 2 seconds. (c) 72 °C to 98 °C at 2 seconds. (d) Experimentally gathered LabVIEW VI plot (time vs. temperature) of heating and cooling of reagents in flexible polyethylene tubing. | |
Table 2 shows a comparison of the experimentally derived heating and cooling rates, acquired from LabVIEW graphs (Fig. 8d) vs. the modeling heating and cooling rates. The COMSOL Modeling Rates (Table 2) are based on the time it takes for the water to heat from the initial temperature (T2) to the next temperature in the PCR cycle (T0 when T2 = T0) divided by the temperature change (°C). This is done using the thermoelectric cooler as a heat source domain and the boundary of the thermoelectric cooler adjacent to the copper plate as the next temperature (T0). The heat rate (Q0) was based on the maximum value provided by the thermoelectric cooler specifications (141.3 W) and calculated by eqn (11) in the COMSOL simulations. Fig. 8a–c presents the different heating and cooling time dependent studies at 2 seconds. The experimental and modeling rates were 0.07 °C s−1 and 0.04 °C s−1 different for the heating steps, while the cooling step from 98 °C to 65 °C was 0.5 °C s−1 slower in the modeling rate. It is hypothesized that the COMSOL Multiphysics Software Modeling was so different to the experimentally determined rate of cooling because the COMSOL geometry does not include the aluminum fin heat sink. The heat sink was used on the device to regulate the thermal performance of the thermoelectric cooler, especially during cooling.32 Therefore, this can account for the larger difference in the cooling rates as compared to the near consistency of the heating rates between the experiments and modeling.
Table 2 Comparison of the experimental and modeling rates of heating and cooling of the thermoelectric cooler
| PCR reaction step |
Experimental rate |
Modeling rate |
| 98 °C to 65 °C |
2.45 °C s−1 (13.5 s) |
1.92 °C s−1 (17.2 s) |
| 65 °C to 72 °C |
0.78 °C s−1 (9.0 s) |
0.85 °C s−1 (8.2 s) |
| 72 °C to 98 °C |
1.69 °C s−1 (15.4 s) |
1.65 °C s−1 (15.8 s) |
One problem observed during the 98 °C heating step of the capillary PCR reaction was evaporation of reagents within the tubing. To mitigate this evaporation and reduce any sample loss, a strategy was used to reduce the vapor pressure in the heated plug of liquid and therefore reduce the amount of evaporation based on the Clausius–Clapeyron equation (Equation (12)).33
| |
 | (12) |
This equation shows that a change in the temperature (T) difference can affect the vapor pressure (p), but since the temperature changes are specific for the PCR amplification, another factor needed to be altered. The heat or enthalpy of vaporization (ΔHvap) was then evaluated since it characterizes the amount of energy needed for molecules to escape from the liquid state into a gas. The enthalpy of vaporization is affected by the pressure in the system, since evaporation will happen faster if there is less force on the surface keeping the molecules from converting to a gas at a higher temperature. Therefore, external pressure was applied to reduce the rate of evaporation by closing the pinch valve associated with whichever cannula the liquid was contained in and moving the syringe pump forward almost the entire volume of the 500 μL Hamilton gastight syringe. This pressurization added between 5 and 7 psi of pressure to the reagents in the tubing. This was critical to reducing evaporation, especially during heating, and to perform an efficient reaction with a large enough yield for sequencing.
Microfluidic liquid handling and mixing modeling and analysis
Efficient liquid movement and reagent mixing was considered to reduce any unwanted air bubbles that may interfere with reactions. This was done by modeling the liquid handling as seen in Fig. 9a which shows three different heights the cannulas would stop at for withdrawing or dispensing reagents. Fluid withdrawal occurred at height Z0, while dispensing took place at height A (∼2 mm from bottom of well) for certain reagents. A more complex dispensing pattern was used for larger volumes or more viscous reagents. In these steps a volume of liquid began dispensing at height A but the z-stage holding the cannulas gradually moved to height B, just above the reagent plate (∼9 mm) by the time all liquid was dispensed. The movement of the z-stage holding the cannulas vs. the pump dispensing the fluid is pictured graphically in Fig. 9b, where a wait time was incorporated as the pumping began, then the z-stage moved up slowly, finishing dispensing before reaching height B. The wait time for the pump was used to account for the liquid movement delay, which occurs especially for more viscous reagents (i.e. ligase buffer mix) because a larger pressure force in the tubing is needed to move the reagents. The wait time was also used to account for the rate of reagent dispensing so that the cannula (z-stage) movement correlated with how much liquid was dispensed into the well; the more liquid in the well, the higher the cannula arm was which reduced the chance of making air bubbles when mixing. A faster z-stage movement rate was used to move the cannulas back into the reagent well after reaching height B, with the goal of agitating any air bubbles that may have been formed during the liquid dispensing. This patterned movement was performed eight times during reagent mixing steps and optimized to sufficiently mix all buffers and enzymes to ensure an efficient reaction.
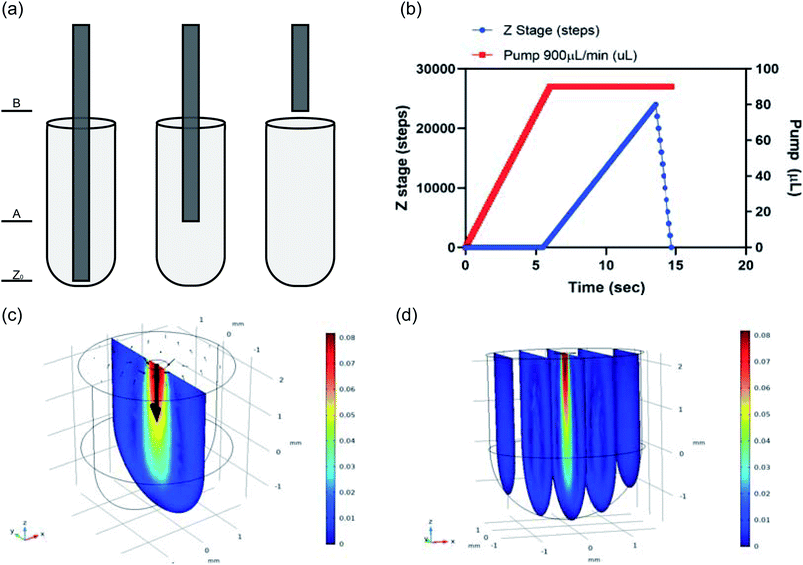 |
| | Fig. 9 Liquid handling analysis: (a) cannula heights for dispensing and sipping liquids. (b) Big add z-stage movement vs. pump timing. Modeling using COMSOL Multiphysics Modeling Software Stationary Study: (c) mixing profile in reagent well, slice: velocity magnitude (m s−1) arrow surface: velocity field, (d) mixing profile in reagent well, 5 slices, slice: velocity magnitude (m s−1). | |
Reagent mixing was also investigated using COMSOL Multiphysics Modeling Software 5.4. A 4 mm tall-cylindrical geometry matching the wells of the reagent plate was built in 3D with a 0.25 mm-radius circle on the top of the cylinder, representing the inner diameter of a cannula. This circle became the inlet boundary in the laminar flow physics being simulated in both stationary and time dependent studies. The top of the cylinder surrounding the inlet circle was assigned as the outlet boundary to account for conservation of mass in the model. There was a no slip wall condition and an inlet velocity of the dispensing in the z-direction, V_z = Q/A = 0.0764 m s−1. The outlet pressure was zero. Results of these simulations are provided in Fig. 9c where a center slice of the 3D well in the stationary study is provided. The velocity magnitude (m s−1) output plot show the mixing velocity was concentrated in the center of the well below the inlet and the time dependent study showed the liquid reached its mixing profile by 0.25 seconds at this velocity. Additionally, Fig. 9c shows the pattern of the mixing by the arrow surface plot, with the mixing circling back up to the top of the reagent well in an elongated ring shape that is maintained over the 2 second time dependent study conducted. The elongated ring mixing shape is represented in 2D but remains consistent in 3D, as seen in the 5-slice image of the simulation (Fig. 9d). Proper mixing is vital for the success of the DNA library preparation and this modeling shows an efficient mixing profile.
On-device library preparations
Before the microfluidic chip was used on the device platform DNA libraries were prepared manually as a benchmark to compare on-chip and on-device testing to. The DNA library concentration (ng μL−1), quality (A260/A280 ratio), and yield (%) prepared in these different tests is presented in Fig. 10a–c and all DNA was resuspended in a 20 μL volume. DNA quality was evaluated using the A260/A280 ratio of sample absorbance at 260 nm and 280 nm as this is used to assess the purity of DNA where a ratio of ∼1.8 is considered pure. The Manual Prep Large Volumes results use 500 ng of input Lambda DNA (New England Biolabs, Ipswich, MA, USA) and five PCR cycles. All other tests use scaled down volumes more conducive to the dimensions of the device using 180 ng of the same input DNA and 5 PCR cycles for the Manual Prep Small Volumes and 7 PCR cycles for the other tests. Full dimensional analysis of the reagent volume scale down is presented in the ESI† as well as the reagent plate layout design process using the two-cannula system. Tables 3 and 4, respectively, show then end result of this analysis to set up the device for library preparation.
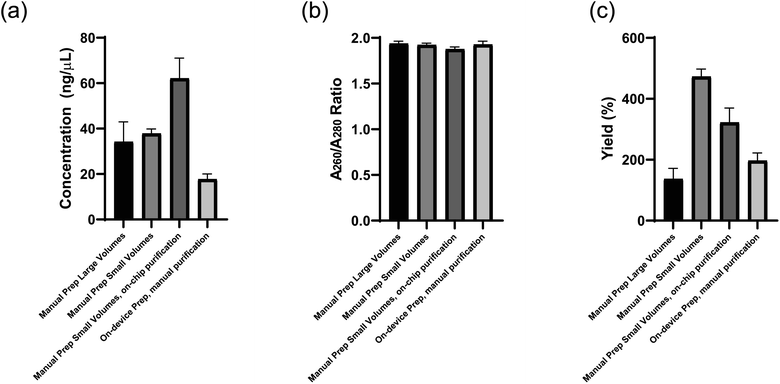 |
| | Fig. 10 (a) Concentration (ng μL−1) (b) quality (A260/A280 ratio), and (c) yield (%) of DNA libraries prepared using manual library preparation under various conditions. | |
Table 3 Reagent volumes used in the manual library preparation according to manufacturer's instructions and on the automated device. PL = post-ligation, PA = post-amplification
| Reagent |
Manual preparation volumes (μL) |
On-device volumes (μL) |
| DNA |
5 μL = 200 ng |
5 μL = 200 ng |
| Fragmentase buffer |
5 |
2 |
| Fragmentase enzyme |
11 |
4 |
| Fragmentase water |
29 |
7 |
| Ligase buffer |
44.5 |
17 |
| Ligase enzyme |
3 |
1 |
| Barcoded adapters |
2.5 |
2 |
| Purification beads (PL) |
100 |
36 |
| Resuspension buffer (PL) |
28 |
25 |
| PCR master mix |
25 |
20 |
| PCR primers |
2 |
2 |
| Purification beads (PA) |
45 |
36 |
| Resuspension buffer (PA) |
33 |
32 |
Table 4 Reagent plate layout and identity of the cannula used on the automated device. PL = post-ligation, PA = post-amplification
| Well |
Reagents |
Cannula |
| 1 |
DNA/fragmentase buffer/fragmentase enzyme/nuclease free water |
1 |
| 2 |
Wash buffer: 0.5 M EDTA |
1 |
| 3 |
Wash buffer: nuclease free water |
1 |
| 4 |
Barcoded adapters |
1 |
| 5 |
PCR master mix |
2 |
| 6 |
PCR primers |
2 |
| 7 |
Resuspension buffer (PA) |
2 |
| 8 |
Purification beads (PA) |
1 |
| 9 |
Purification beads (PL) |
1 |
| 10 |
Ligase buffer/ligase enzyme |
1 |
| 11 |
Resuspension buffer (PL) |
2 |
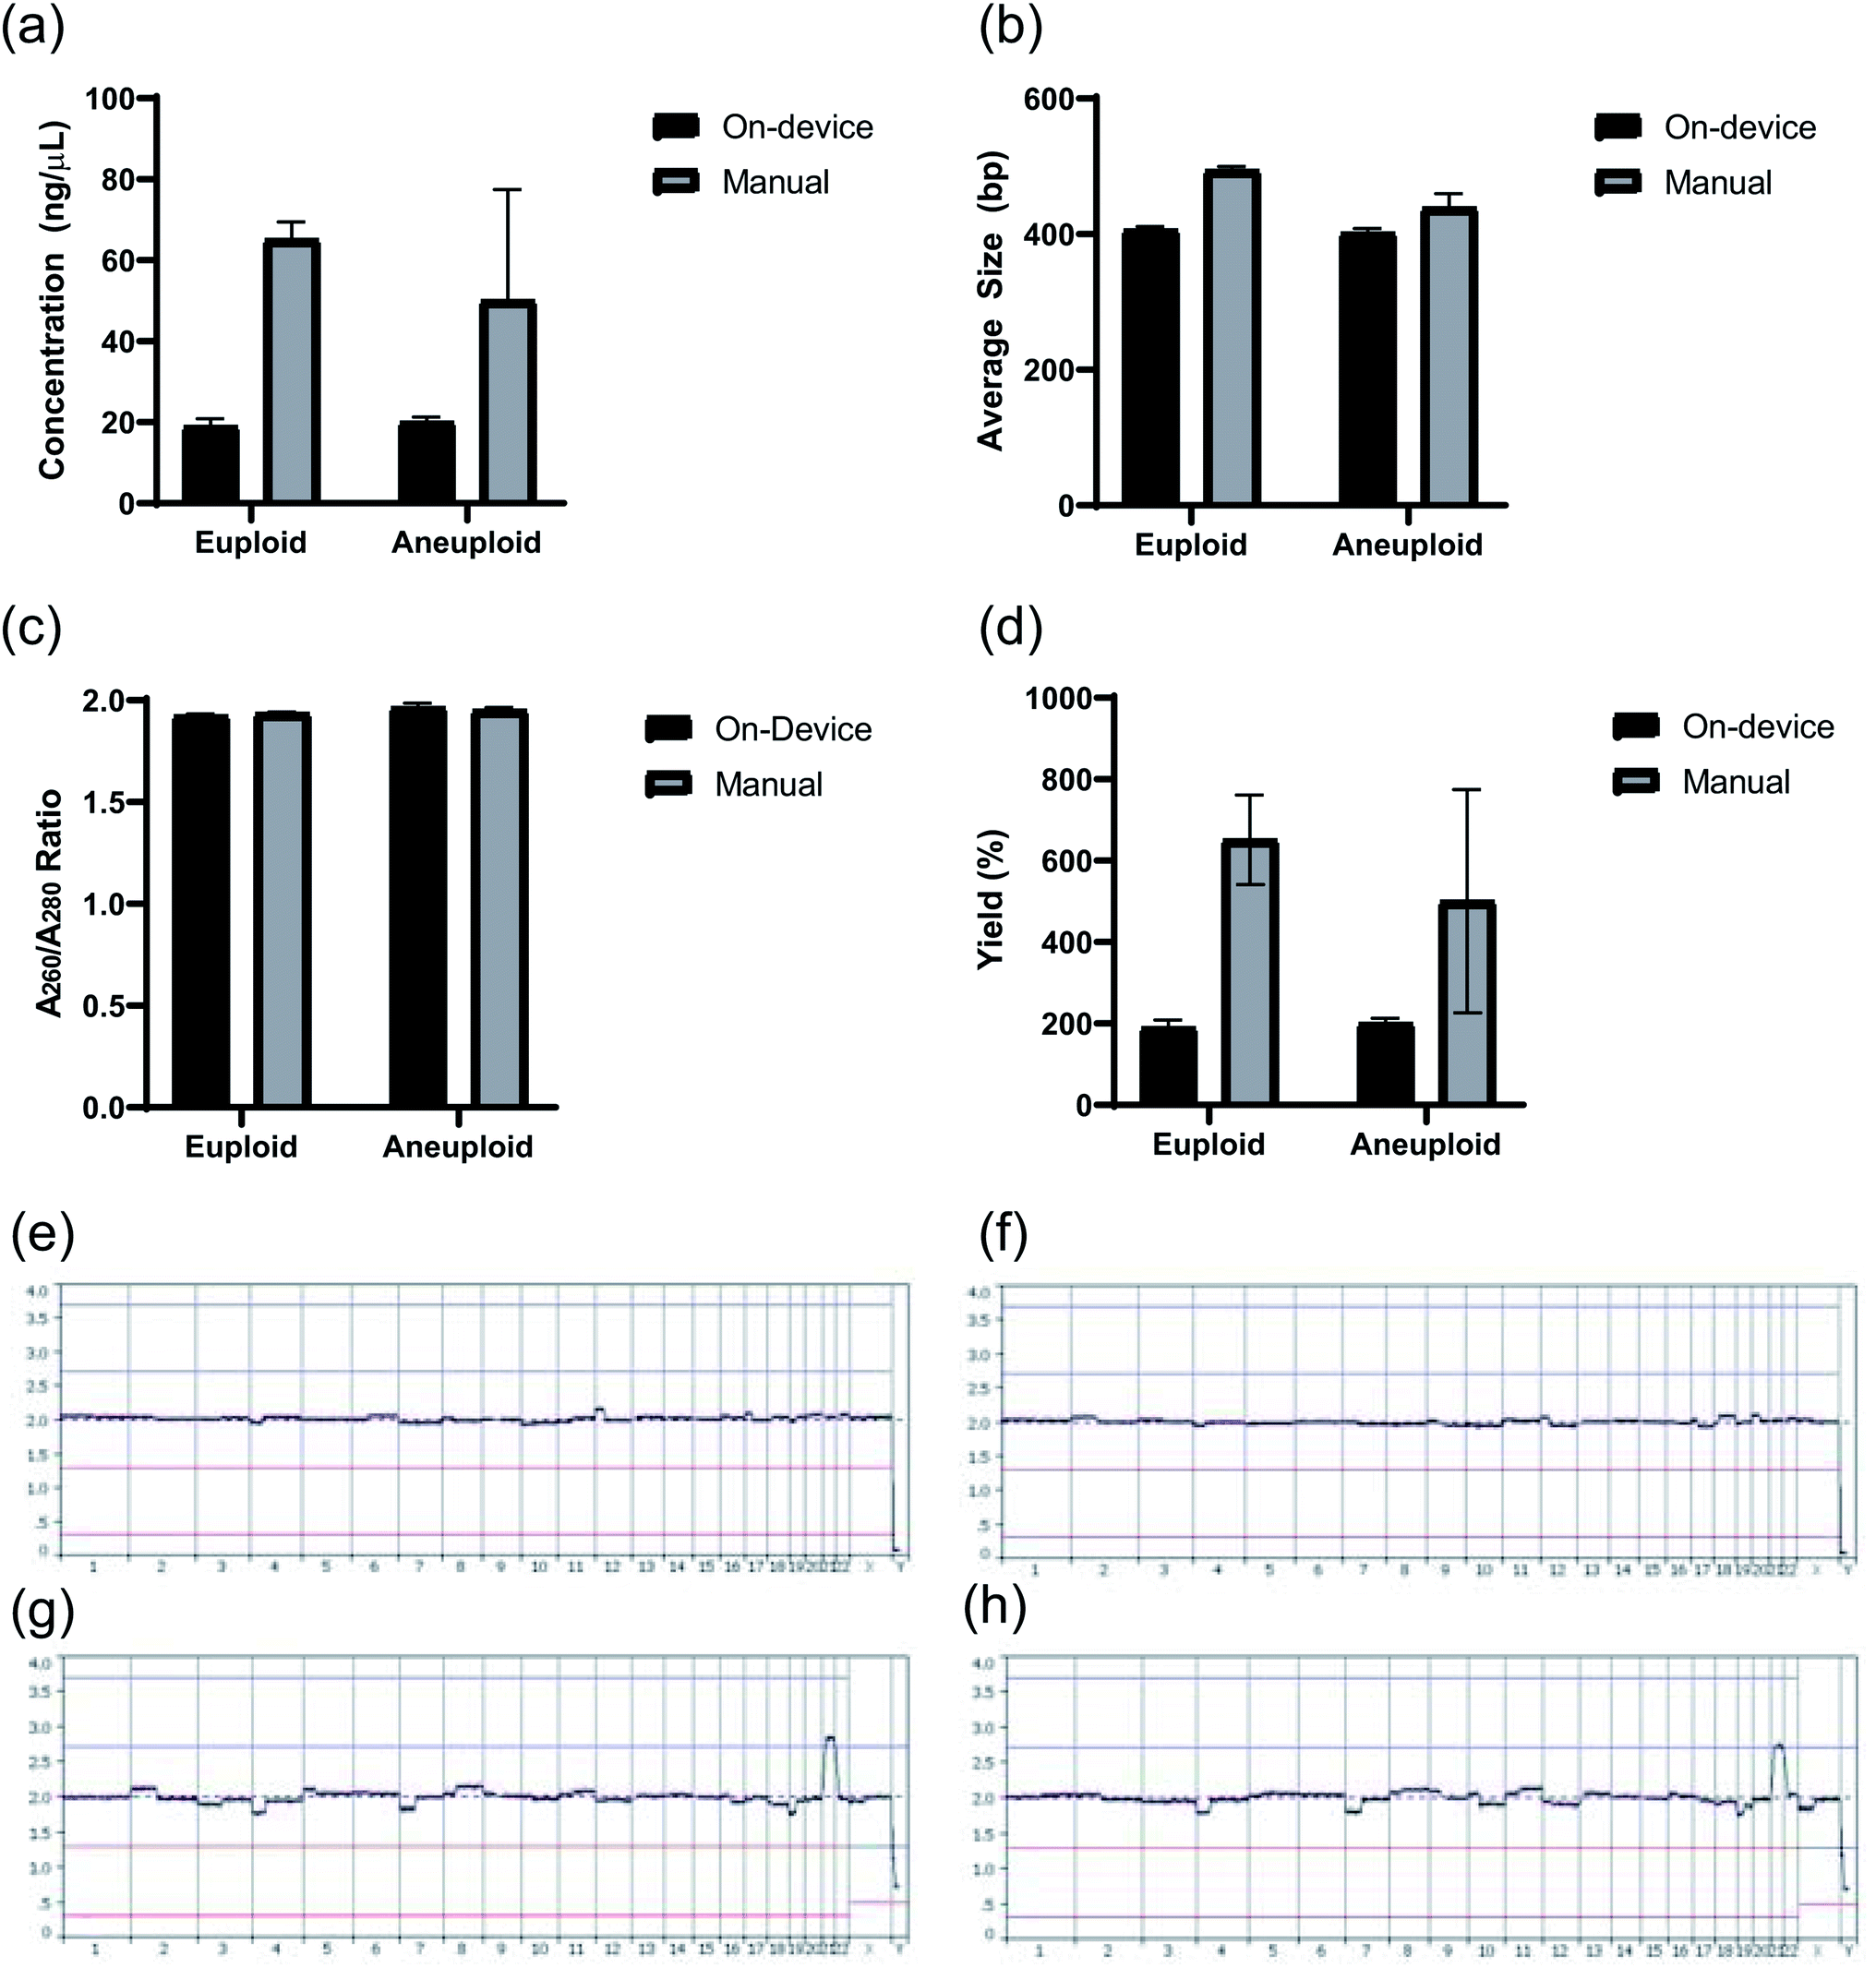
Lastly, to test how this microfluidic chip and device perform in a sequencing application, two DNA samples were prepared for sequencing on the device (one euploid and one aneuploid) and two were prepared for sequencing manually (one euploid and one aneuploid) using the same two starting whole genome amplified samples. Although the sample number is limited, the following results indicate a successful first application of this chip and device design. Quality control results of these libraries obtained through Agilent Bioanalyzer analysis are provided in Fig. 11a and b, showing the library concentration and size results, respectively. The samples prepared manually had an average DNA concentration of 57.57 ± 10.66 ng μL−1 in 20 μL of sample while the sampled prepared on-device had an average DNA concentration of 19.52 ± 0.76 ng μL−1 under the same conditions. Fig. 11b shows that the average library size produced on-device was around 400 bp, which was the set benchmark for the experiment. Additionally, all four samples passed the purification standard for sequencing through observing the absence of adapter or primer dimers using electropherograms of the samples obtained from the Agilent Bioanalyzer (i.e. Fig. 5b) and had a A260/A280 value ∼1.8 (Fig. 11c). Lastly, the DNA library yields comparing the amount of input DNA to final amount of DNA library is presented in Fig. 11d. Sample quality control results were also gathered during sequencing and are presented in Table 5. Overall, the most important information from the DNA sequencing was the diagnostic results from testing five cell aneuploid or euploid samples as this is imperative for the field of PGT-A. The PGT-A karyotype results in Fig. 11e–h indicate this device was able to produce DNA libraries that could specifically identify an aneuploid cell sample vs. euploid cell sample.
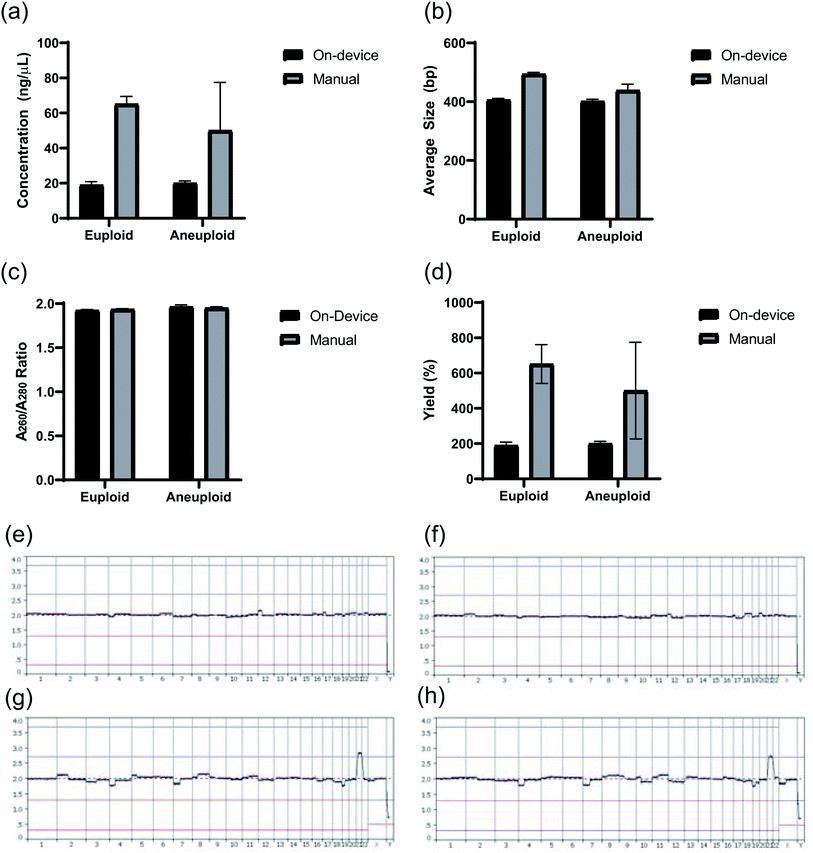 |
| | Fig. 11 (a) Concentration (ng μL−1) (b) average size (bp) (c) quality (A260/A280 ratio), and (d) yield (%) of prepared DNA libraries from euploid and aneuploid 5 cell samples. (e) PGT-A karyotype result for a Euploid 5 cell sample prepared on-device (f) PGT-A karyotype result for a Euploid 5 cell sample prepared manually. (g) PGT-A karyotype result for an Aneuploid 5 cell sample (48, XXY, +21) prepared on-device. (h) PGT-A karyotype result for an Aneuploid 5 cell sample (48, XXY, +21) prepared manually. | |
Table 5 Sample quality control information from Illumina MiSeq sequencing analysis and PG-Find Software for DNA libraries prepared on the device and manually
| Trial |
Total reads |
% mapped reads aligned to hg19 |
PG-find quality score |
| Euploid sample manual preparation |
502553 |
98.81 |
0.0404 |
| Euploid sample on-device |
503579 |
97.74 |
0.0402 |
| Aneuploid sample manual preparation |
502397 |
98.56 |
0.0496 |
| Aneuploid sample on-device |
503705 |
96.07 |
0.0497 |
Discussion
Overall, the microfluidic chip with magneto–electrophoresis used in this application was able to contribute to the purification of DNA library on an automated device platform and result in an accurate PGT-A diagnosis. In addition to that, the reagent scale down and device automation can save users time and money as only ∼1/3 of the reagent volumes are used and the hands-on time of the procedure is reduced from 2.5 hours to less than 10 minutes. Additionally, with less user interaction this device can help to reduce human errors that may interfere with the success of the library preparation. When comparing the DNA libraries prepared on-device to those prepared manually it was important to note that to be conducive to downstream sequencing, there needs to be >4 ng μL−1 of DNA library produced. Thus, although a larger yield was produced using manual preparation and there was variation between the amount of DNA prepared between tests, incorporating additional PCR cycles on the device could be used to increase the quantity of DNA to the range produced manually. For the goal of comparing directly though, seven PCR cycles were used in the final protocols although this can always be adjusted. The smaller yield on the device was most likely due to reagent evaporation or sample loss within the tubing. Reagent evaporation would have occurred while reagents loaded onto the reagent plate at the beginning of the protocol were waiting to be used throughout the ∼2.5 hour library preparation. Although sacrificial liquid was added to reagents to mitigate this concern, it is still a possibility. A more probable factor that could contribute to a decrease in DNA library yield on the device is sample loss within the device tubing throughout the protocol run. Future iterations of this device platform would benefit from decreasing the tubing length where possible and using fewer connecting pieces between tubing as this is where sample loss was often found if it occurred. This was an essential learning from this first-generation device, while there was still enough DNA library prepared to be conducive to downstream sequencing, mitigating any sample loss within the protocol run is an essential task for further iterations. However, when comparing the library yield of this device to other platforms in the literature, yields as low as 60% (ref. 12) and as high as 236% (ref. 34) were reported when comparing the amount of DNA after PCR amplification to the initial DNA input. Therefore, our device platform is still performing as well or better than these existing technologies.
While DNA quantity differed between preparation methods, the quality of the DNA prepared on-device and cleaned by the microfluidic chip using magneto-electrophoresis remained relatively consistent between samples prepared on the device and manually. When characterizing the recovery efficiency (%) of the microfluidic chip DNA purification compared to the off-chip, manual purification, there was no statistically significant difference found between the groups (2-way ANOVA, n = 3, P value = 0.3902). The goal of this testing was to fully capture and purify the 485-bp amplicon, representing the DNA library, while removing the 123-bp amplicon, representing adapter dimers. The microfluidic chip was chosen for this device to reduce the amount of pipette handling of the purification bead mix to limit the chances of unintentionally discarding or disturbing the bead mix on the automated platform. The microfluidic chip simply requires the loading of the bead mix with adsorbed DNA and the removal of the purified DNA without adding and removing wash buffers. Studying the recovery efficiency under various conditions showed that the microfluidic chip purification can perform as well as the conventional off-chip methods used in manual library preparation. The quality of the DNA purification is further evaluated by analyzing the accuracy of the sequencing data. The percent of mapped reads to the reference genome (hg19) is a useful measurement of the overall sequencing accuracy with a larger percentage showing more accuracy. Lower mapped reads can be caused by incomplete fragmentation, low yields, or remaining adapters in the final libraries. The percent of mapped reads also indicates if there is any contaminating non-human DNA. Although the percent of mapped reads was higher for the manually prepared samples, there was not a statistically significant difference in the percentages when comparing the two groups (unpaired t-test, n = 2, P value = 0.1705). Additionally, the PG-find quality scores were compared, which measure the bin to bin variance in reads for each sample before smoothing, similar to the standard deviation where a lower score means more reliable data. A higher quality score can indicate low quality DNA or problems with WGA or library preparation. Since there is no statistically significant difference between the on-device and manually prepared sample quality scores and the same WGA sample was prepared using manual and automated methods (unpaired t-test, n = 2, P value = 0.9947), this indicates the library preparation quality was equivalent.
One more advantage of this microfluidic chip that can be utilized in the future is the capacity to induce electroosmotic flow in the chip as opposed to electrophoresis. Through altering the separation buffer to change the boundary conditions in the microfluidic channel and switching the positive and negative electrode positions, the design can be optimized for electroosmotic flow. One advantage of electroosmotic flow is that it creates a bulk liquid flow where electrophoresis moves charged ions within a solution. This may be beneficial for purifying a sample of non-charged particles depending on the application. Electroosmotic flow and magnetic bead movement has been explored previously35 but not for NGS library preparation to date. Overall, the preliminary data for this microfluidic chip and library preparation device presented in the current study has demonstrated that it can deliver high quality, reliable NGS library preparations and an accurate PGT-A result in an efficient amount of time with minimal user interaction.
Conclusions
As NGS continues to contribute and influence the field of personalized medicine it is essential that the engineered technologies for DNA library preparation are meeting the standard for accurate sequencing and diagnosis. This research presents a novel magnetic bead-based purification microfluidic chip that combines magnetic bead movement and electrokinetic purification, termed magneto–electrophoresis. We also demonstrate precise capillary PCR and reagent mixing through modeling and experimental data. Overall, DNA libraries prepared using this device met the same standard as those libraries prepared manually and PGT-A samples were accurately diagnosed following NGS analysis. This low-throughput method can be scaled up but is ideal for smaller laboratories where a high-throughput robotic liquid handler is not a feasible option for automating library preparation. Lastly, this microfluidic chip and device have the capabilities to be translated to other sample preparation procedures using extracted genomic DNA samples for different diagnostic applications and other methods that require a robust, simple magnetic bead-based purification method.
Conflicts of interest
AT is a paid scientific advisor/consultant and lecturer for PerkinElmer.
Acknowledgements
We would like to thank Francis Cui for his help in designing the microfluidic chip and device for this project. Additionally, we thank John Murphy for his work designing and building the device, Andrew Brodsky for helping put the device together and mechanical trouble shooting, Jacob Feder for working on electrical components of the device, Josh Kinman for sequencing the DNA samples, and Kimberly Warren for analyzing the sequencing data.
References
- M. L. Metzker, Nat. Rev. Genet., 2009, 11, 31 CrossRef PubMed.
- T. Wakai, P. Prasoon, Y. Hirose, Y. Shimada, H. Ichikawa and M. Nagahashi, Int. J. Clin. Oncol., 2019, 24, 115–122 CrossRef PubMed.
- M. Gwinn, D. MacCannell and G. L. Armstrong, JAMA, J. Am. Med. Assoc., 2019, 321, 893–894 CrossRef.
- K. L. Palmerola, S. F. Vitez, S. Amrane, C. P. Fischer and E. J. Forman, J. Assist. Reprod. Genet., 2019, 36, 153–157 CrossRef PubMed.
- S. M. Maxwell and J. A. Grifo, Best Practice & Research Clinical Obstetrics & Gynaecology, 2018 Search PubMed.
- S. R. Head, H. K. Komori, S. A. LaMere, T. Whisenant, F. Van Nieuwerburgh, D. R. Salomon and P. Ordoukhanian, BioTechniques, 2014, 56, 61 CrossRef CAS PubMed.
- B. W. Buchan and N. A. Ledeboer, Clin. Microbiol. Rev., 2014, 27, 783–822 CrossRef PubMed.
- G. Durin, B. Gerwe, S. Duffy and A. Lopez, Automating FFPE Samples from Extraction to NGS Library Preparation, 2016 Search PubMed.
- H. Kim, M. J. Jebrail, A. Sinha, Z. W. Bent, O. D. Solberg, K. P. Williams, S. A. Langevin, R. F. Renzi, J. L. Van De Vreugde and R. J. Meagher, PLoS One, 2013, 8, e68988 CrossRef CAS PubMed.
- H. Kim, M. S. Bartsch, R. F. Renzi, J. He, J. L. Van de Vreugde, M. R. Claudnic and K. D. Patel, J. Lab. Autom., 2011, 16, 405–414 CrossRef CAS PubMed.
- B. M. Paegel, R. G. Blazej and R. A. Mathies, Curr. Opin. Biotechnol., 2003, 14, 42–50 CrossRef CAS.
- S. J. Tan, H. Phan, B. M. Gerry, A. Kuhn, L. Z. Hong, Y. M. Ong, P. S. Y. Poon, M. A. Unger, R. C. Jones and S. R. Quake, PLoS One, 2013, 8, e64084 CrossRef CAS PubMed.
- Y. Xu, B. Vaidya, A. B. Patel, S. M. Ford, R. L. McCarley and S. A. Soper, Anal. Chem., 2003, 75, 2975–2984 CrossRef CAS PubMed.
- S. A. Thatcher, Clin. Chem., 2015, 61, 89–99 CrossRef CAS PubMed.
- F. R. Cui, J. Wang, S. M. Opal and A. Tripathi, PLoS One, 2016, 11, e0149522 CrossRef PubMed.
- M. Zborowski and J. J. Chalmers, Wiley Encyclopedia of Electrical and Electronics Engineering, 1999, pp. 1–23 Search PubMed.
- Y. Xu, Z. Zhang, Z. Su, X. Zhou, X. Han and Q. Liu, Micromachines, 2020, 11, 187 CrossRef PubMed.
- V. Dolník, S. Liu and S. Jovanovich, Electrophoresis, 2000, 21, 41–54 CrossRef.
- Q. Tian, Y. Mu, Y. Xu, Q. Song, B. Yu, C. Ma, W. Jin and Q. Jin, Anal. Biochem., 2015, 491, 55–57 CrossRef CAS PubMed.
- T. Fujii, Microelectron. Eng., 2002, 61, 907–914 CrossRef.
- N. R. Treff and R. S. Zimmerman, Annu. Rev. Genomics Hum. Genet., 2017, 18, 189–200 CrossRef CAS PubMed.
- J. Geraedts and G. De Wert, Clin. Genet., 2009, 76, 315–325 CrossRef CAS PubMed.
- A. H. Handyside and J. D. A. Delhanty, Trends Genet., 1997, 13, 270–275 CrossRef CAS PubMed.
- E. Fragouli, Fertil. Steril., 2018, 109, 606–607 CrossRef PubMed.
- S. Das, S. C. Mohapatra and J. T. Hsu, Biotechnol. Tech., 1999, 13, 643–646 CrossRef CAS.
- C. S. Booth, E. Pienaar, J. R. Termaat, S. E. Whitney, T. M. Louw and H. J. Viljoen, Chem. Eng. Sci., 2010, 65, 4996–5006 CrossRef CAS PubMed.
- C. Yoshina-Ishii and S. G. Boxer, Langmuir, 2006, 22, 2384–2391 CrossRef CAS PubMed.
- F. Tagliaro, G. Manetto, F. Crivellente and F. P. Smith, Forensic Sci. Int., 1998, 92, 75–88 CrossRef CAS.
- M. R. Schure and R. E. Murphy, Electrophoresis, 1995, 16, 2074–2085 CrossRef CAS PubMed.
- D. Das, M. F. Al-Rjoub, W. R. Heineman and R. K. Banerjee, J. Micromech. Microeng., 2016, 26, 055013 CrossRef.
- R. M. Robertson, S. Laib and D. E. Smith, Proc. Natl. Acad. Sci. U. S. A., 2006, 103, 7310–7314 CrossRef CAS PubMed.
- A. Shah, B. G. Sammakia, H. Srihari and K. Ramakrishna, IEEE Trans. Compon. Packag. Technol., 2004, 27, 710–717 CrossRef.
- E. Berthier, J. Warrick, H. Yu and D. J. Beebe, Lab Chip, 2008, 8, 852–859 RSC.
- L. Aigrain, Y. Gu and M. A. Quail, BMC Genomics, 2016, 17, 458 CrossRef PubMed.
- R. N. Deraney, L. Schneider and A. Tripathi, Analyst, 2020, 145, 2412–2419 RSC.
- C. Hale and J. Darabi, Biomicrofluidics, 2014, 8, 044118 CrossRef CAS PubMed.
- S. M. Azimi, G. Nixon, J. Ahern and W. Balachandran, Microfluid. Nanofluid., 2011, 11, 157–165 CrossRef CAS.
- M. Karle, J. Miwa, G. Czilwik, V. Auwärter, G. Roth, R. Zengerle and F. von Stetten, Lab Chip, 2010, 10, 3284–3290 RSC.
- M. Vojtíšek, A. Iles and N. Pamme, Biosens. Bioelectron., 2010, 25, 2172–2176 CrossRef PubMed.
Footnote |
| † Electronic supplementary information (ESI) available. See DOI: 10.1039/d1ra01732b |
|
| This journal is © The Royal Society of Chemistry 2021 |
Click here to see how this site uses Cookies. View our privacy policy here. 
 Open Access Article
 This Open Access Article is licensed under a Creative Commons Attribution-Non Commercial 3.0 Unported Licence
 *a
*a
 on the bead surface allows for unbound molecules near the beads to carry over with the beads. Hence, the magnetophoresis is often diffusion-limited as the unbound molecules near the bead surface have to diffuse out into the large velocity field. In contrast, our innovation overcomes this limitation and utilizes magnetic bead transport through an electric field. Here, the unbound molecules, outside a very thin Debye length around the beads, experience a velocity
 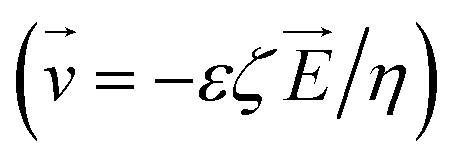 proportional to the electric field. Hence, magneto–electrophoresis efficiently removes unbound molecules from the bead cluster. Through incorporating a microfluidic chip for the DNA purification into the automated device design, SPRI beads can still be used for the purification without the need for multiple wash buffer exchanges and potential pipetting errors. Capillary electrophoresis, such as in this design, has been used for nucleic acid sizing, genotyping, and DNA sequencing analysis.18 DNA purification using microfluidics has also been done previously,19,20 but, as seen in Table 1, incorporating magnetophoresis with electrophoresis to assist in purification with SPRI beads has not been explored in this manner until now.