
New flow control systems in capillarics: off valves†
Julian
Menges
 abc,
Claude
Meffan
bc,
Fabian
Dolamore
ac,
Conan
Fee
cd,
Renwick
Dobson
*acef and
Volker
Nock
*bcf
abc,
Claude
Meffan
bc,
Fabian
Dolamore
ac,
Conan
Fee
cd,
Renwick
Dobson
*acef and
Volker
Nock
*bcf
aSchool of Biological Sciences, University of Canterbury, Christchurch, New Zealand. E-mail: renwick.dobson@canterbury.ac.nz
bDepartment of Electrical and Computer Engineering, University of Canterbury, Christchurch, New Zealand. E-mail: volker.nock@canterbury.ac.nz
cBiomolecular Interaction Centre, University of Canterbury, Christchurch, New Zealand
dSchool of Product Design, University of Canterbury, Christchurch, New Zealand
eDepartment of Biochemistry and Molecular Biology, Bio21 Molecular Science and Biotechnology Institute, University of Melbourne, Victoria, Australia
fThe MacDiarmid Institute for Advanced Materials and Nanotechnology, Wellington, New Zealand
First published on 26th November 2020
Abstract
Capillary systems are a promising technology for point-of-care microfluidics, since they are pre-programmable and self-powered. This work introduces “off valves” as a key building block for capillaric circuits, providing easy-to-use, multi-purpose valving functionality and autonomous flow control. To this end we present a set of switching valve designs that use trigger channels and liquid input alone to close or open connections between channels in a highly controllable fashion. The key element of all these valve designs is a new off trigger valve, which is characterised in detail here and holds the potential for transistor-like switching and resistance tuning. As an example for the potential applications of switching valves, we demonstrate how they can be used for flow resistance control in a complex microfluidic circuit and for sequential chemical loading into a reaction chamber. Use of the switching valves for the latter in particular allowed for the tuning of incubation times and volumetric measurement, thus confirming applicability of the valves for automated and self-powered immunoassays in point-of-care environments.
Introduction
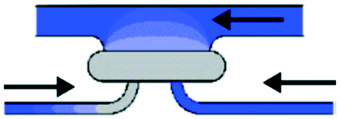
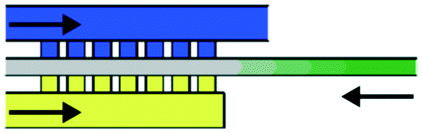
Capillarics is an emerging field within microfluidics where capillary systems are connected to circuit-like structures to enhance functionality,1,2 with uses in systems such as point-of-care devices. Such devices are driven by capillary pressure and require no external pumping, which enables easy sampling and autonomous laboratory operations such as on-chip mixing and analysis. For example, sandwich immunoassays that use capillarics to distribute chemicals to sensitive areas on a chip have been reported.3 Among these, the commercially available Biosite Triage® chip system uses capillarics to automate a fluorescence immunoassay for quantitative determination of cardiac proteins creatine-kinase-MB, myoglobin and troponin I, which are biomarkers for myocardial infarction and other acute coronary syndromes in whole blood and plasma.4Key to the success of these systems is the control of liquid flow, commonly achieved by sequential filling of the capillary channels.1,5–10 To enable autonomous on-chip control of liquid flow, several basic operation units have been developed. Key units include inlets ( ), reservoirs (
 ), vents (
 ), capillary pumps (
 ), resistors (
 ), reaction pads (
 ) and, perhaps most importantly, passive trigger valves (
 ),1,2,10 which are crucial for the construction of retention burst valves that allow autonomous sequential filling.10
All systems described so far only allow for linear or tree-like setups with input channels, whereby reaction units and output units/capillary pumps are arranged in a sequential manner. Currently, there are no reports of feedback loops that change conditions upstream of a channel depending on the arrival of the fluid meniscus at a point further downstream. In addition, mixing of components on these devices has proven problematic because of the high flow resistance from mixers.11 In particular, the dissolution of solid reagents can be difficult because it requires a dwelling time for complete dissolution. Thus, there is a need for operation units that enable timed retention of the liquid, which would increase the applicability of capillarics.
We present a novel valve system, termed switching valves in analogy to electronics,12 where a trigger input acts as an on or off gate for a main channel, as shown in Fig. 1(a). In this particular case, the valves act as binary switches, but they also hold the potential for more transistor-like switching and resistance tuning. Key to the on gates is a self-sealing trigger channel that uses the novel off valve to close right after the trigger event. Depending on the on-chip system requirements, on valves come in two basic setups. First, connecting valves are used to form a bridge between filled channels, enabling sequential filling or reduction of flow resistance in long capillaric systems. Second, releasing valves are used to retain liquid for chemical uptake or synchronisation of channels. Finally, trigger channels can also be designed to time the trigger event by introducing flow resistors. Here, we describe the working principle of the off valves, their fabrication and experimental validation. We further characterise the dynamics of valve closing, as well as the quality of the seal, and demonstrate the use of the valves to realise related fluid control structures: and-off functionality, or-off functionality, on valves, connecting valves and release valves. Finally, we demonstrate the application of the valves in trigger timing and the reduction of flow resistance. The resulting fluid control structures are unique in their simplicity, and are capable of adding improved and novel functionalities to capillarics devices.
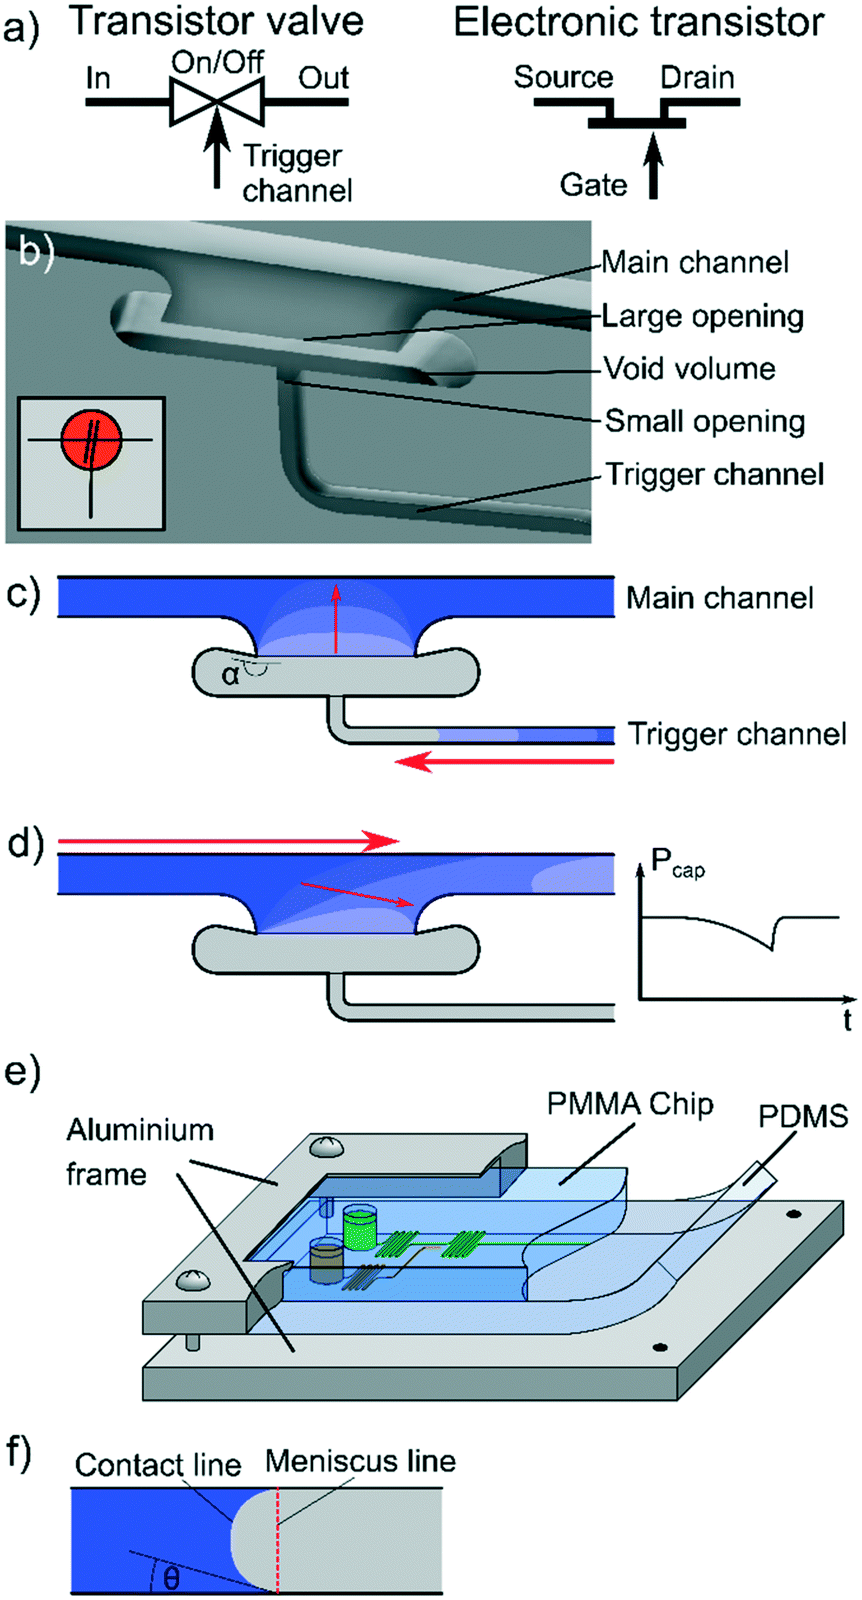 | ||
| Fig. 1 Concept of switching valves and operation of off valves. (a) Comparison of operation principles of switching valves and the closest electronic equivalent, a transistor. (b) CAD model of the off valve showing the differences in channel widths between the main and trigger channels and the deeper void volume. (c) Once the trigger channel is filled, displaced air is pressed against the meniscus at the large opening of the void volume. This forces the meniscus to recede into the main channel, effectively closing it. The void volume mainly acts as separator and does not require specific dimensions. The opening angle α is commonly 180° or larger to pin the meniscus at the large opening. (d) When filling the valve, the meniscus line extends until it reaches the other side where the contact line quickly catches up. This results in a drop of capillary pressure as the (perceived) channel width increases. (e) Schematic of chip assembly. All channels were enclosed with a PDMS lid. To maintain the seal, an aluminium frame was used and screwed onto the sample with minimal force. The total chip size was 30 × 60 mm. (f) Term explanation: the contact line is the line the meniscus describes at the bottom of the channel. Its shape is defined through the contact angles θ. The meniscus line is defined as the virtual line formed by the contact point of the meniscus on the bottom of the channel. | ||
Experimental
All samples were fabricated from cross-linked polymethylmethacrylate (PMMA; 4.5 mm general purpose acrylic; PSP plastics, Christchurch, New Zealand). This material was chosen as it provides good mechanical stiffness for milling, chemical resistance to solvents and is easily accessible. Channel milling was performed using a Mini-Mill/GX micro milling machine running a NSK-3000 Spindle (Minitech Machinery Corporation, Norcross, GA, USA), with a minimum step width of 1 μm. Machining tools were purchased from Performance Micro Tool (Janesville, WI, USA) in diameters of 3.175 mm (SR-4-1250-S), 250 μm (250M2X750S) and 100 μm (100M2X300S) for the square heads and 200 μm (TR-2-0080-BN) for the ball nose. Design files and milling parameters (G-code) were prepared using computer-aided design (CAD) software (Autodesk Fusion 360© 2019 Autodesk, Version 2.0.7421) for all functional units (CAD files provided in the ESI;† note: 200 μm channels are not depicted as round bottom in the files).In brief, each sample was fabricated by an initial face cut (3.175 mm cutter) to level out the surface, followed by milling of each channel. Milling shallower channels was carried out first to avoid burring on the edges, and all channel steps were repeated at bottom height at the end of milling to remove burrs. The surface was then polished using acrylic polish (aluminium oxide-based CRC, code 9230), followed by ultrasonication for 1 min in ∼5% (v/v) aqueous isopropyl alcohol solution, washing with acetone, isopropyl alcohol and water and blow drying with nitrogen. To close microscopic cracks that arose during the milling process, the surface was coated with high molecular weight PMMA solution (average Mw = 996![[thin space (1/6-em)]](https://www.rsc.org/images/entities/char_2009.gif) 000, 2.5% in xylene; Sigma Aldrich, St Louis, MO, USA). Any remaining solvent was removed by drying samples at 90 °C for 5 min on a hotplate and keeping the hot sample under vacuum for at least 1 min. This process did not significantly alter the geometry, although the edge flow that is common among rectangular channels13 was reduced, indicating a slight channel rounding. However, the geometry change was too small to be observed on a light microscope. Finally, samples were plasma-treated ten times for 1 min, each time at 25 W, pulsed mode (ratio 50) using oxygen gas (3 sccm; Tergeo plasma cleaner, Pie Scientific, Union City, CA, USA), and 30 nm of SiO2 were sputtered (Edwards Auto500 DC/RF magnetron sputtering system, Edwards, UK) onto the surface to generate a robust and permanently hydrophilic layer. The samples were covered with a thin (2–3 mm) polydimethylsiloxane (PDMS; Sylgard 184, Electropar, NZ; mixed as given in instructions (10:1 w:w base:curing agent) and then cured at 80 °C for 2 h) layer, which acted as a hydrophobic cover-film. A frame holder was used to ensure a tight seal.
000, 2.5% in xylene; Sigma Aldrich, St Louis, MO, USA). Any remaining solvent was removed by drying samples at 90 °C for 5 min on a hotplate and keeping the hot sample under vacuum for at least 1 min. This process did not significantly alter the geometry, although the edge flow that is common among rectangular channels13 was reduced, indicating a slight channel rounding. However, the geometry change was too small to be observed on a light microscope. Finally, samples were plasma-treated ten times for 1 min, each time at 25 W, pulsed mode (ratio 50) using oxygen gas (3 sccm; Tergeo plasma cleaner, Pie Scientific, Union City, CA, USA), and 30 nm of SiO2 were sputtered (Edwards Auto500 DC/RF magnetron sputtering system, Edwards, UK) onto the surface to generate a robust and permanently hydrophilic layer. The samples were covered with a thin (2–3 mm) polydimethylsiloxane (PDMS; Sylgard 184, Electropar, NZ; mixed as given in instructions (10:1 w:w base:curing agent) and then cured at 80 °C for 2 h) layer, which acted as a hydrophobic cover-film. A frame holder was used to ensure a tight seal.
Analysis
Contact angles were measured using a contact angle microscope (CAM200, KSV Instruments LTD, serial number: 7377) on the flat top surface of the chip used for trigger channel screening. The average static contact angle was 9.75° (±1.25°), while the receding contact angle was too small to be measured. Contact angles inside the channels could not be measured using the available tools but were expected to deviate based on the divergent morphology.Microscope images (ESI,† Fig. S1) were captured using an Olympus BX60 fluorescence microscope or, for angled views, with a digital microscope (AM411, Dino-Lite).
Channel depth and surface roughness from milling were determined by coating the surface with sodium fluorescein and confocal microscope-based measurement (SP5 confocal laser scanning microscope system with a DMI6000 inverted microscope, Leica). Channels were found to be milled with ±5 μm z-tolerance, which is in the same range as the measured height of each cut (ESI,† Fig. S2).
Device testing
All flow experiments were conducted by the addition of aqueous food dye solution (blue: Hansells Baking (brilliant blue FCF, 1.8%); red: Hansells Baking (ponceu 4R, 3.3%); yellow: Queen Fine Foods Pty. Ltd. (tartazine and azorubine, 2.3%)) into the reservoirs using a manual pipette. All food dyes contained potassium sorbate and sodium benzoate in unknown amounts, which have surfactant-like properties. Liquid movement was recorded using a digital camera (Canon EOS 760D using a Canon macro lens EF 100 mm 1:2.8 USM, recorded at 25 FPS), and the footage was evaluated by conversion into a .avi raw format using ffmpeg14 (v. N-94405-g43891ea8ab). Background subtraction, binarisation of the video and extraction of the mean brightness values over the region of interest were performed in ImageJ (Fiji 1.52p).15 Flow rates were estimated from the binarised pictures based on the volume calculated from the device geometry.
Results and discussion
Capillary systems are self-filling, which implies that each switching valve can only be used once during operation on a device. The mode of operation of a valve (switching on or off), and therefore its geometry, depend strongly on the placement within the overall system. In the following we present and discuss the various ways in which the valves can be placed, each resulting in different unit functionalities. The symbols used for the capillary circuits are in accordance with, or derived from, previous literature1 and summarized in Table 1.| Operation unit | Schematic | Notation | Function |
|---|---|---|---|
| Off valve |
|
|
Closes channel upon filling of a trigger channel |
| And-off valve |
|
|
Closes channel upon filling of two or more triggers |
| (On-) connecting valve |
|
|
Creates connection between channels |
| (On-) connecting valve, trigger only |

|
|
Trigger channel is self-sealing |
| (On-) releasing valve |
|

|
Releases liquid upon filling of a trigger channel |
| (On-) releasing valve, trigger only |
|

|
Trigger channel is self-sealing |
Off valves
The key element in the switching valve devices presented here is an off valve that closes channels through filling of a trigger channel. It operates without any moving parts and achieves near-perfect sealing of a channel. The system can be used in the trigger channels of all other switching valves to block backflow.

The main component of the valve is a void volume, indicated in Fig. 1(a and b), which connects a large opening to a trigger channel, such that the small trigger channel opening and the large opening are separated. The width and height of the trigger channel is significantly smaller than that of the large opening. The small opening can be placed at any non-connecting point but, as discussed below, a ≥90° opening angle is beneficial because it acts as a stop valve.16
Incoming liquid from the main channel is pinned on the first sharp corner of the large opening and the valve is filled by meniscus progression along the remaining three walls until the valve is filled, as shown in Fig. 1(c), effectively widening the meniscus radius. The large opening has an opening angle of ≥90° to pin17 the meniscus and stop it from progressing into the void volume of the valve. In this way, the system acts in a similar fashion to a capillary stop valve.18 Once water enters the trigger channel, the proceeding meniscus builds up pressure that forces the meniscus in the big opening to recede (see Fig. 1(d)). The volume of the trigger channel needs to be sufficient to create a bubble that closes the main channel. To facilitate these mechanisms, the channels were sealed reversibly with a pressed on PDMS layer as illustrated by Fig. 1(e). The difference between contact and meniscus line in this configuration is described in Fig. 1(f).
Fig. 2(a) shows a sequence of experimentally obtained images illustrating the capillary flow inside the trigger valve, as described. Initially, the meniscus was pinned on one side of the opening, slowing down the progression. When the fluid front reached the other side (after 0.2 s), it cut off the opening and rapidly caught up with the meniscus front (0.24 s). In the rectangular channel used here, capillary flow was dominated by edge-flow, a phenomenon that appears as a result of very high capillary pressure in sharp edges of a channel.13,19
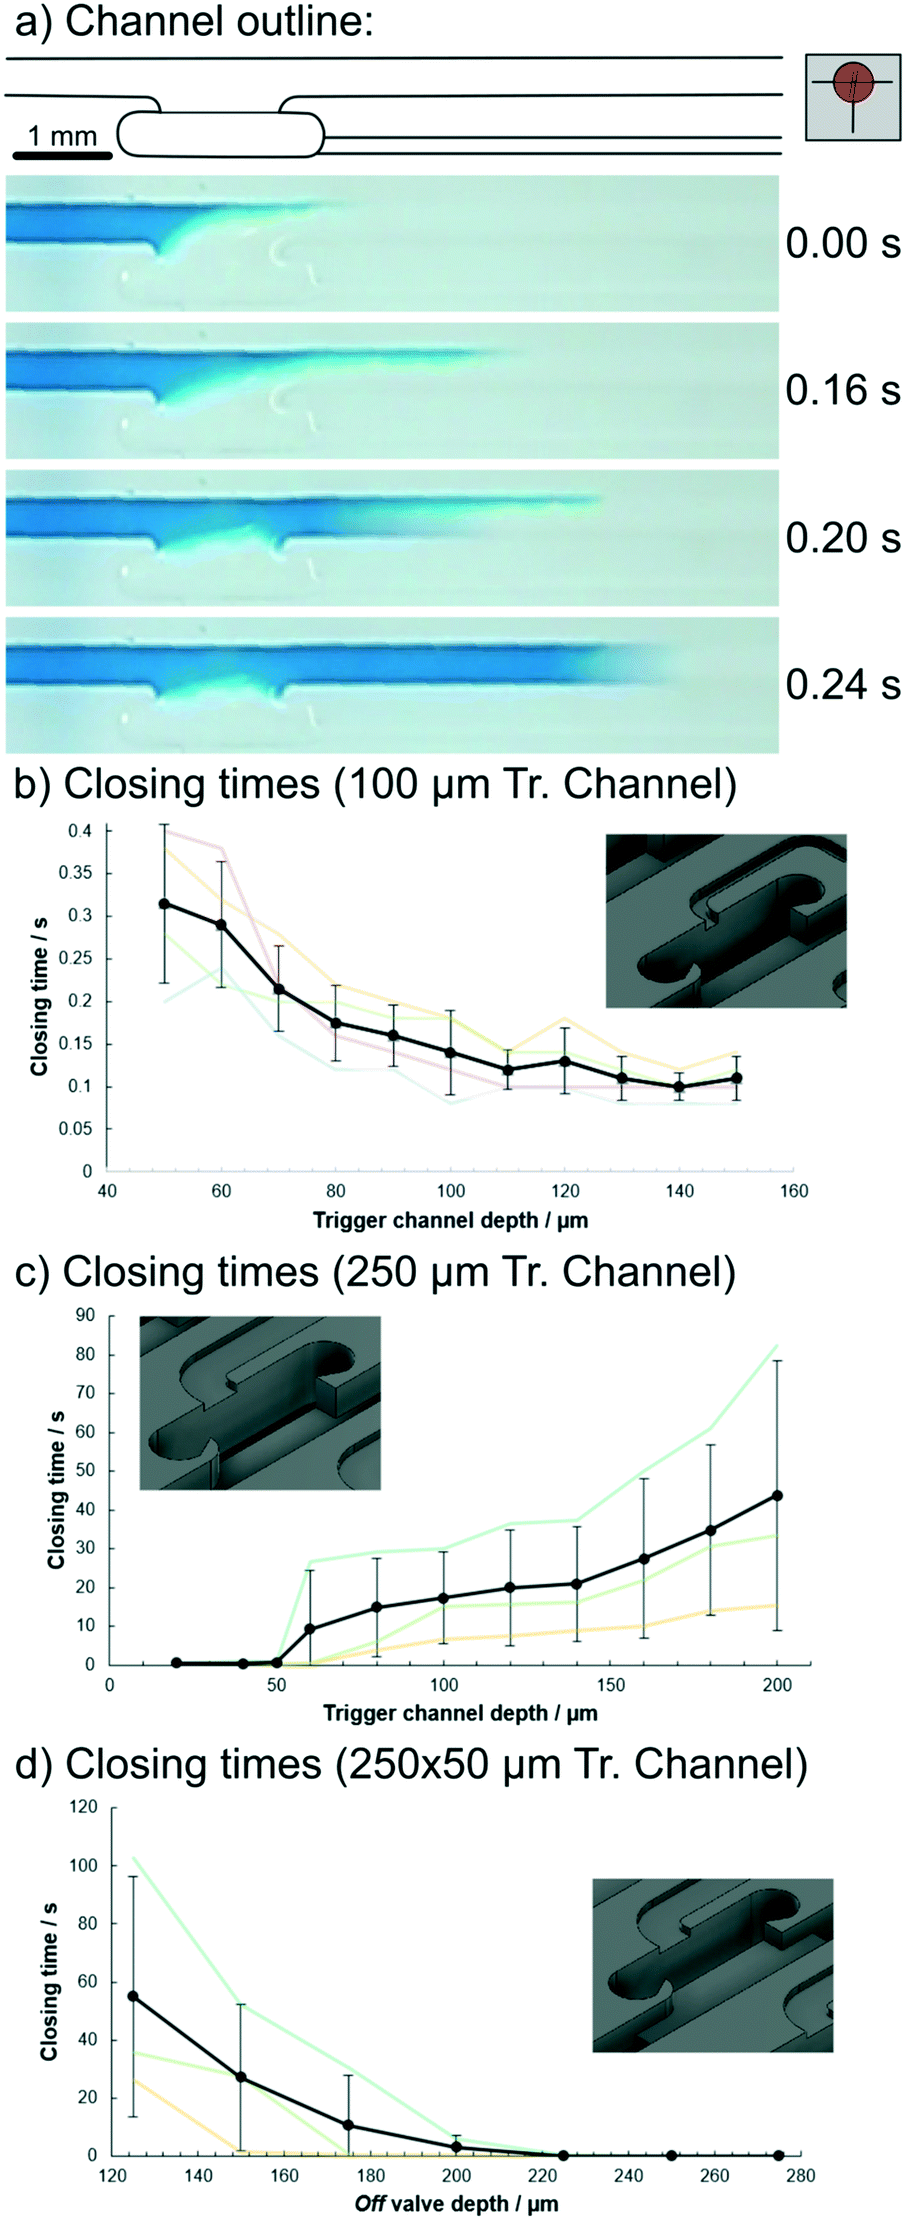 | ||
| Fig. 2 Top-down image sequence showing the operation of off valves while filling (a) and closing times (b–d). The black line indicates the average values and the pale coloured lines are single experiments each. Trigger channels were milled with a 100 μm (b) and 250 μm (c and d) cutter to minimise influences of the surface morphology. Off valve depth in (d) was only varied around the relevant area of the valve. | ||
The speed at which the meniscus recedes is determined by the difference in capillary pressure between the menisci in the trigger channel and by the size of the large opening. Receding contact angles are commonly much lower than the static contact angle,20 which reduces the closing speed. In the case presented here, contact angles of θstat = 9.75° (±1.25°, static) and θrec ∼ 0° (not detectable, receding) were measured, which is typical for freshly cleaned and stabilised silicon dioxide surfaces.21 This implies that the true capillary pressure for a receding meniscus would be significantly higher than for the proceeding meniscus in a channel of the same geometry. Therefore, the larger the size difference between the cross-sections of the opening and triggering channel, the faster and more effective the closing of the channel is expected to be.
Assuming a receding contact angle (θrec) of approximately 0°, the meniscus would form a half dome in the opening, which then further recedes. The necessary pressure to push back the meniscus can be determined by the Laplace equation,22 but the model needs to be adjusted for rectangular channels with different contact angles on each wall. In our experiments, the large opening and the trigger channel had a rectangular cross-section, were made from hydrophilised PMMA and were enclosed on the fourth side with PDMS. Therefore, the pressure can be approximated using the equations for capillary pressure in rectangular channels,23 which are derived from the Young–Laplace equations:24

As illustrated in Fig. 2(b–d), the time taken to close each valve was dependent on the geometry of the trigger channels and off valves. For narrow (100 μm) channels, closing was fast with times below 0.4 s and the main influence of the geometry appeared to be the flow resistance,2 as the closing times increased towards smaller channels. In wider channels, capillary action appeared to be the main influence, as channels above 50 μm depths had significantly increased closing times. For off valves, a depth of at least 200 μm appeared best for fast closing using 250 × 50 μm trigger channels. Note: errors here appear high, but the results suggest that this is largely due to the sealing method used, as the plots between experiments are offset from each other. Pressing PDMS onto the chip can result in small variations in effective channel height and thus offset the whole graph. Additionally, the environmental parameters air moisture and temperature also affect the chip. As such, within one experiment the error range could not be determined, but appears to be significantly smaller than the error bars suggest. Research is ongoing to find a more reliable sealing method, which can provide the ease of handling of the PDMS lid.
As time progressed, the bubble was pushed further into the main channel if the difference in capillary pressure was sufficiently high. This problem can be addressed by adding a small barrier at the in- and outlet sections of the off valve. We found this to be moderately stable at 25 μm height, with full stability achieved at 100 μm (total channel height 200 μm; ESI,† Fig. S3). Future designs could instead vary the width in the trigger channel to achieve fast closing. Other designs may feature connected trigger channels to close off several channels at once. Video footage of this experiment is provided in the ESI† (V1).
Occasionally, a thin fluid connection was observed within the valves, which was attributed to the air bubble being unable to push completely into the edges of the channel. This issue could be resolved by rounding the channel profile and further optimising the geometry, similar to previous work on valves in PDMS25 or as depicted in the following. The meniscus at the large opening of the off valve was bent slightly inwards during capillary filling, enhancing meniscus stability at the opening. This was attributed to the difference in capillary pressure. In later experiments, off valves were used in a channel that was not drained on one end, and minor manufacturing errors destabilised the meniscus, leading to valve failure. To counteract this, the opening angle was simply increased beyond 180° resulting in long-term stability.
Next, we performed a qualitative test of the seal provided by the gas bubble. The blue dye solution from the inlet reservoir was removed and yellow dye was added to the outlet reservoir to apply a counter pressure (ESI,† Fig. S4). Mixing at the inlet section and diffusion were observed. As a result of the counter-pressure applied from the yellow dye reservoir, the trigger channels continued to fill up, further increasing the size of the bubble. Additionally, the bubbles could be pushed in the direction of the blue dye reservoir, occasionally pushing them into the distributor channel. Because this channel had greater width and height, the bubble drained into it very quickly, leaving a smaller bubble to seal the channel. However, the seal remained intact, as indicated by the remaining blue dye. Issues like these may simply be addressed in future applications by limiting the trigger channel volume to about the volume of the maximum desired bubble or by adding a tight junction in the main channel. Video footage of this experiment is provided in the ESI† (V2). The valve setup in this video relates to valve width screening experiments, which were outside the relevant range as the soft PDMS lid starts bending into the wider channels, effectively reversing the expected effect. As such, this experiment is not discussed here other than as an example of valve sealing.
Off valve related designs
By using two or more trigger channels on one off valve, NAND (and-off) and NOR (or-off) operations can be achieved. If both channels are connected to the air chamber independently, both need to be filled to trigger the off valve, resembling NAND operation. A schematic and demonstration of this setup are shown in Fig. 3(a–c). Similarly, if two channels led into a single trigger channel, the valve could be closed if either one was filled, resembling an NOR operation (only shown as schematic in Fig. 3(d)). In theory, the number of trigger channels combined to form these operations could be increased beyond two; however, geometries would have to be optimised to guarantee reliable performance. Video footage of this experiment is provided in the ESI† (V3; note: experiments were done with plasma-treated PMMA only). | ||
| Fig. 3 Schematic and operation example of related off valve designs. (a–c) NAND valve constructed using an off valve with two trigger channels. (a) If only one channel is being filled, air is pushed out through the empty channel. (b) The off valve is only activated if both channels are filled. (c) Experimental demonstration of an NAND valve switching when both trigger channels are filled. (d) Proposed schematic setup for an NOR valve which could be triggered by either input 1 or 2. (e–g) Branching off valves have an optimised geometry to allow synchronised filling of two outlet channels. The geometry is optimised to accelerate closing of the valve. (e) On the branch, liquid enters in a radial fashion until it reaches the opposing channel walls. (f) Filling the trigger channel leads to closing of the branching structure by a symmetrical bubble along with blockage of the flow. (g) Experimental demonstration of the inlet flow being stopped at a branching junction by use of a trigger channel. | ||
As shown in Fig. 3(e–g), the off valve could also be embedded into a dividing main channel to turn off the two branches simultaneously. The geometry was symmetrical to guarantee similar filling speeds into both branches.
During these experiments, it was observed that by rounding the shape of the branching off valve, the edge-flow could be reduced, and thus the quality of the seal improved. We suggest that this results from the radius of the walls: the surface tension counteracts the capillary force that usually keeps the liquid at the edge, thus minimising edge flow. From these results, optimised designs (ESI,† Fig. S5(a) and Movie V1/V2) can be derived. The second design (ESI,† Fig. S5(b)) shows an improvement to stabilise the meniscus at the large opening. The concept of increasing the contact angle above 180° is based on previous literature.16 This is useful when there is a need for the meniscus to be pinned for a prolonged period or if the liquid has a low surface tension. This design was used in the sequential release setup described later.
On-switching valves


In contrast to off valves, a switching valve that can be turned on either creates a connection between channels, or releases liquid into an empty channel. To illustrate this operation, two different channel setups based on the same principles were generated. In both cases, an array of trigger valves creates the connection and is triggered by a smaller side channel. Because trigger channels are themselves liquid connections, fluid from the other channels may enter, generating backflow. In most cases, this is undesirable as it reduces flow control. To reduce backflow through the trigger channel, either a high flow resistance, or an off valve can be used.


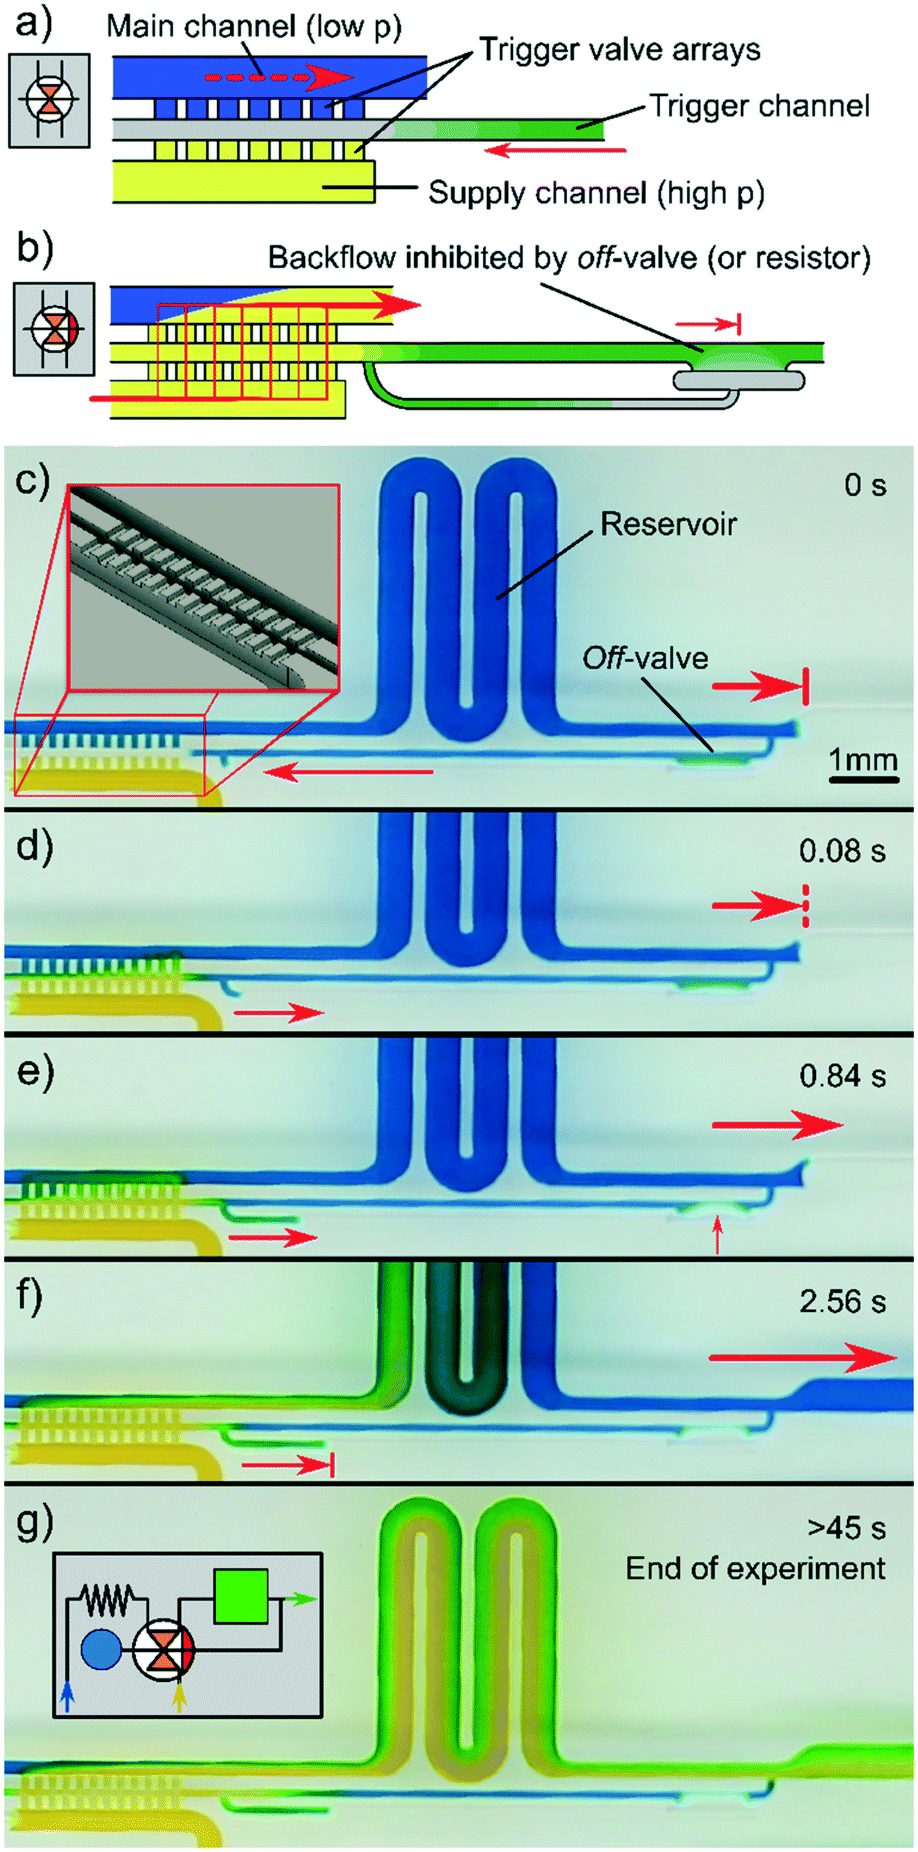 | ||
| Fig. 4 Schematic of the connecting on-switching valve setup. (a) High resistance main channel (blue) and low resistance supply channel (yellow) were connected through an array of trigger valves to an empty trigger channel that physically separates the liquids. (b) By filling the trigger channel (green), a connection was created. Backflow through the trigger channel could be minimised by using an off valve or a flow resistor. (c–f) Sequence of photographs showing the operation of the connecting switching valve with flow resistor and off valve in trigger path. (c) Filling of the trigger channel from the main channel. (d) Onset of the triggering event connecting the two main channels. (e) Off valve in the trigger channel closes, preventing backflow. (f) Reservoir drains and blue dye in main channel is replaced with yellow dye from bottom channel. (g) After sealing (at ∼1–2 s), the flow through the trigger channel is almost completely stopped, as evidenced by the blue colour being maintained at >45 s. Note: the channel behind the trigger channel inlet was widened to 3× the width over 2 mm to slow meniscus progression and allow the off valve to close before any backflow occurs. | ||
To visualise the flow behaviour inside the switching valve and channels, the supply channel was filled with yellow dye and the main channel with blue dye. The two colours were chosen to yield a large contrast so that even the faintest mixing would be visible. As shown in Fig. 4(c–d), triggering induced a flow that almost completely overtook the flow from the blue dye reservoir. The triggering of all trigger valves occurred almost instantaneously (at ∼0.04–0.08 s in this example) after the meniscus reached the first valve. This speed in triggering can be explained by the flow resistance from the (yellow) supply channel being negligible in comparison with the narrower trigger channel. Without the additional closing valve in the trigger channel, a very low residual backflow through the trigger channel remained visible even for large resistors. By introducing an off valve into the trigger channel, the latter could be sealed after ∼1–3 s, preventing any further backflow. The valve showed almost complete inhibition of backflow, as shown by the presence of blue dye in the trigger channel even after 45 s (end of experiment). Once triggered, the connecting on-valve acts as a bridge between channels, meaning mixing between the two is enabled. Flow ratios thus depend on the resistance or flow rates in the main and supply channel. Video footage of this experiment is provided in the ESI† (V4).
Application 1: trigger timing and reduction of flow resistance
To demonstrate the applicability and use of the switching valves, a setup was created to illustrate how switching valves can be used to reduce flow resistance and time the triggering event. Setups like this could be used to reduce measurement times in point-of-care devices with complex circuits. Fig. 5 shows the simplified circuit diagram of the demonstration setup and an example image of the test chips. Each chip contained three circuits, each with different resistors, to guarantee similar surface properties in all three channels. The resistors change in number of loops, each loop containing 2 straight channels and 2 turns (precise geometry available as CAD files in the ESI†). Both chips were milled at the same time. This way, the channels were equally affected by any production or decay process, minimising errors.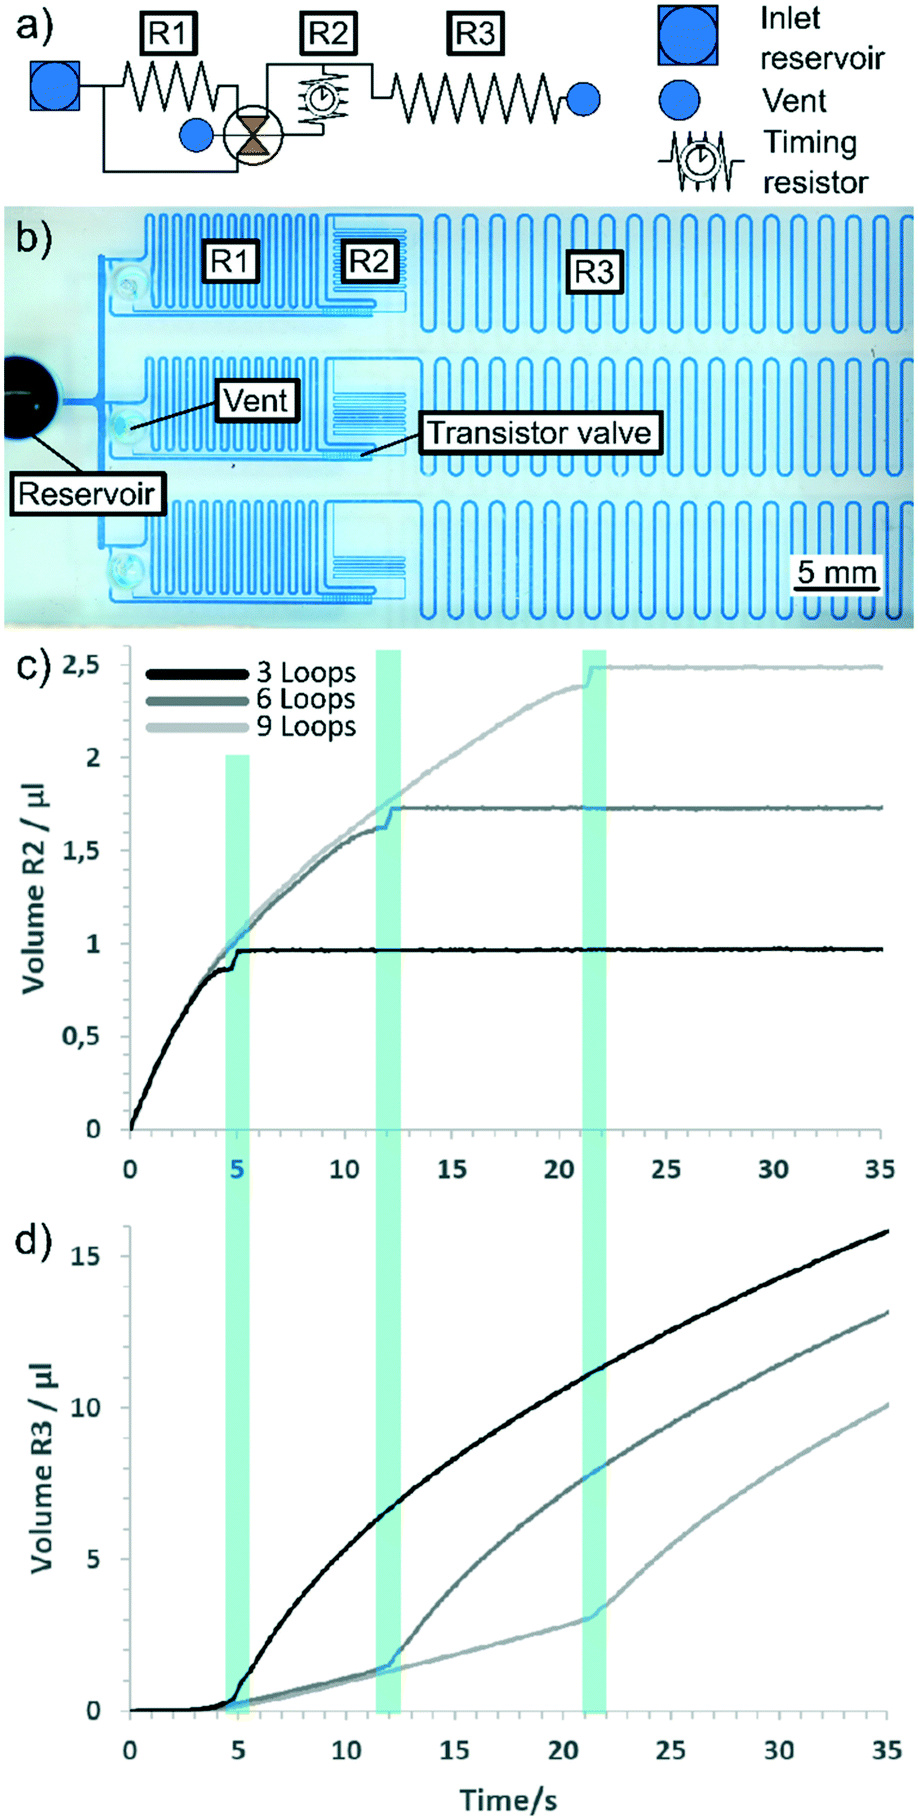 | ||
| Fig. 5 Experimental demonstration of flow resistance reduction and trigger timing. (a) Simplified circuit diagram for demonstration setup. Resistor R1 represents the resistance from a longer circuit (e.g., mixers, reaction pads and other structures). R2 is used to tune the timing of the trigger event, while the evaluation loop (R3) is used to measure flow rates. (b) Top-down photograph of the fabricated demonstration platform. Each chip contains three circuits with different-sized resistors. All draw liquid from the same reservoir through a wide channel to maximise comparability. The main and supply channels were milled with a round bottom tool to 200 μm in both width and depth. The trigger channels were rectangular, 100 μm wide and 150 μm deep. The trigger valves in the switching valve were 100 μm wide and deep. (c) Plot of the liquid volumes of trigger channel R2 over time (correlates with meniscus position). (d) Plot of the liquid volume of evaluation resistor R3. The triggering event is marked in (a) and (b) by the blue bars connecting the diagrams. Graphs at higher experiment times continue to show the behaviour of classic capillary flow.2,26 Time t = 0 was defined as the time at which water entered the trigger channel. | ||
In this setup, the primary resistor (R1) resembled the resistance of a longer capillary circuit. The main channel passed the switching valve and led to the inlet of a trigger channel, which contained a resistor (R2) for timing and to reduce backflow to a minimum. Resistor R3 was only used to monitor the filling volume and thus the flow rates. The supply channel on the switching valve was directly attached to the main inlet and had much lower flow resistance than R1. This resulted in bridging of R1 when the switching valve was activated.
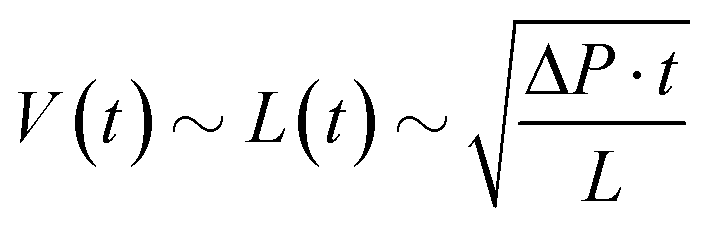
The results displayed in Fig. 5(c–d) demonstrate how timing is affected by trigger channel length. Each measurement was obtained from a single experiment. Graphs show the meniscus progression represented by the filling volume. Because surface properties vary slightly over time, the slope of each graph varied; however, the same general effect was observed across several experiments. When the liquid entered trigger channel R2, the flow behaviour in the trigger channel was similar to regular capillary flow in a straight capillary until shortly before the triggering event (see Fig. 5(c)). This type of capillary flow has been described previously2,26 by the formula:
In comparison, the flow in the evaluation resistor was strongly reduced during filling of the timing resistor. As illustrated in Fig. 5(d), liquid was drained into the significantly smaller trigger channel, reducing the flow in R3 to almost zero. With increasing filling of R2, the flow resistance increased and allowed liquid to be pulled into R3. Through the triggering event, the liquid in the evaluation resistor showed normal capillary flow behaviour, as described above.
Another observation from these experiments was a slowing in meniscus speed immediately prior to the triggering event which can be seen as the dip in the curves at the marked areas (Fig. 5). This behaviour was observed in all experiments with on-valves. Although the exact mechanism is yet unknown, we propose this might be caused by electrostatic repulsion of the contact lines due to the surface layer of surfactant that is contained in the dye, or by similar effects.27
Changes in the preset flow resistance caused by changes in the length of R1 resulted in a significant increase in the flow rate throughout the triggering event (ESI,† Fig. S7). The maximum and end flow rates were comparable, as the flow resistance was dominated by the low resistance through the switching valve. Differences in maximum flow rate mainly resulted from the higher volume in R3 at the point of the triggering event and noise arising from the binarization of the footage (noise correlates with the size of the black and white border). The latter did not increase with time, but was dependent on the filling volume (the black area on the binarized video). Trigger timing was influenced by the preset flow resistance (R1), as suggested by the blue markers in (ESI,† Fig. S7(a) and (b)). The filling of the trigger channel (R2) slowed, and the effect appeared to decrease with increasing preset resistance R1. Video footage is provided in the ESI† (V6 and V7). These results demonstrate how on-valves enable control of timing and flow resistances, which is necessary to ensure short experiment times in point-of-care diagnostics and for industrial application of microfluidics.
Application 2: automated sequential loading
As described in the introduction, capillaric systems can be used for immunoassays that require a timed sequence of different solutions.1,5–10 Switching valves can be used to automate this sequence so that only a single addition of water is required in place of multiple chemical additions. All chemicals can be pre-loaded into the system in a dry state or as needed which is benefitial to previous approaches that require liquid samples.10 To demonstrate this concept, a circuit was designed to draw liquid from only one reservoir into three channels containing dried dye, which was subsequently released into a chamber as shown in Fig. 6. An arrangement of switching valves was used to trigger the switch between each channel. Litering can be conducted through the volume of each capillary pump.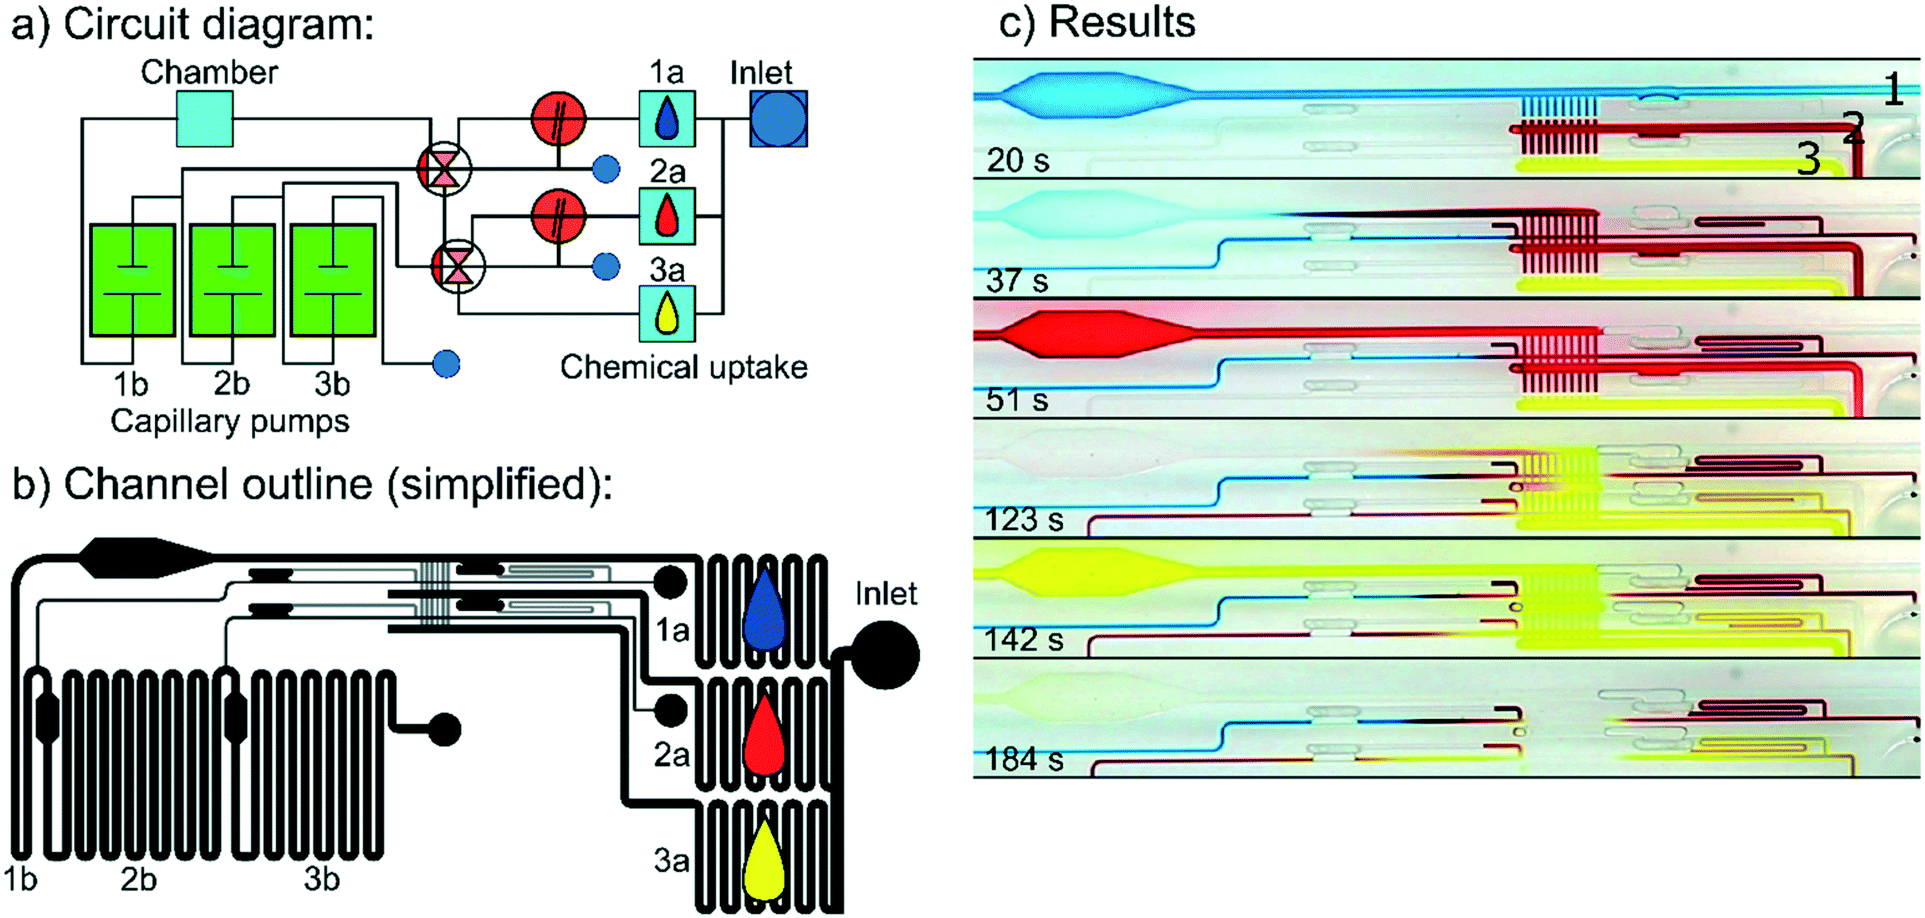 | ||
| Fig. 6 Automated sequential loading in capillarics. (a) Capillary circuit diagram of the test platform. Pads 1a–3a contained air-dried food dye (“reagent”), which was taken up by the water upon inlet filling. The valves were arranged to simultaneously switch on a connection to the next channel (2 or 3), while turning off the previous one (1 or 2, respectively). The capillary pumps (1b–3b) determined the volume of solution that was pumped before the next triggering event. (b) Simplified channel setup derived from the capillary circuit in (a). (c) Photographs showing the results of the experiments for sequential loading of chemicals into a “reaction” chamber. Note: the channel in each pump was widened to assist the meniscus in the trigger channels to reduce liquid draining during the triggering event. The off valves in the main channels were optimised by increasing the opening angle to 108° to stabilise the meniscus on the large opening. | ||
The design featured the combination of a connecting valve with self-sealing trigger channel and an off valve that closed the primary channel. By repeating this arrangement, any number of channels could be addressed. Each dye entered the chamber and was rinsed with water as the dye travelled through the system with the liquid front. Trigger channels were attached to the capillary pump (long channel) in distinct locations so that they triggered the switch between channels after the dye had passed and had been rinsed out of the chamber. When the trigger channels fill, the meniscus in the main channel is slowed down as the liquid is drained. With continued filling, this effect ceases and meniscus progression in the trigger channels slows down uncontrollably. The off valves contribute to that as the meniscus widens in them. Therefore, the main channel is widened just after the trigger channel inlets to temporarily decrease capillary pressure and thus drainage into the main channel. Because the device shown here was not fully optimised, some mixing occurred during the triggering events, and timing of the triggering events was not implemented. Benefits of this setup over others are thought to be the ease of prediction for triggering events, the versatility for different sample states (dry or liquid), simple volume and flow rate definition and simple fabrication and thus rapid prototyping. Video footage of this experiment is provided in the ESI† (V8).
While not shown here, we suggest that incubation times can be tuned by adjusting the flow rates through small volume flow resistors in front of each pump, as well as an arrangement of releasing switching valves to address each flow resistor individually if needed. In future designs, this setup could be used to deliver analyte and antibody solutions to a reaction pad with precise incubation timing to conduct immunosorbent assays, which is an advance on previously reported devices.5,6,8,9 As such a device would only require the input of analyte and water, it would be ideal for point-of-care diagnostics.
Conclusion & outlook
Autonomous off valves without moving parts for capillarics were designed and fabricated. These off valves were used in a binary fashion to turn individual channels off or on via the filling of a triggering channel, but hold the potential for more transistor-like switching and resistance tuning. Switching valves based on the off valves could be used for sequential delivery of chemicals to a reaction chamber or to reduce flow resistance in long capillary circuits, with the ability to time the triggering event. The presented valves enable a high level of autonomous flow control, facilitating autonomous lab operations for point-of-care diagnostics and capillary logics, or to simply stop the flow in capillary systems for a defined period.Authors' contribution
J. M. conceived the off valve and related designs, fabricated the devices, performed experiments and analysed data. C. M. extended the valve concepts, fabricated additional devices and performed additional experiments. J. M. wrote and revised the paper with input from F. D., C. F., R. D. and V. N. The work was supervised by R. D. and V. N.Conflicts of interest
J. M., F. D., C. F., R. D., and V. N. are joint inventors on US Patent application no. 62/975511, which covers the off valve concept.Acknowledgements
The authors would like to thank Helen Devereux and Gary Turner of the Nanofabrication Laboratory at the University of Canterbury for technical support, and Dr Ayelen Tayagui for confocal laser scanning microscopy measurements. Funding was provided by MBIE Grant UOCX1706.References
- R. Safavieh and D. Juncker, Lab Chip, 2013, 13, 4180–4189 RSC.
- A. Olanrewaju, M. Beaugrand, M. Yafia and D. Juncker, Lab Chip, 2018, 18, 2323–2347 RSC.
- (a) L. Gervais and E. Delamarche, Lab Chip, 2009, 9, 3330–3337 RSC; (b) L. Gervais, M. Hitzbleck and E. Delamarche, Biosens. Bioelectron., 2011, 27, 64–70 CrossRef CAS; (c) C. Jönsson, M. Aronsson, G. Rundström, C. Pettersson, I. Mendel-Hartvig, J. Bakker, E. Martinsson, B. Liedberg, B. MacCraith, O. Ohman and J. Melin, Lab Chip, 2008, 8, 1191–1197 RSC; (d) D. Juncker, H. Schmid, U. Drechsler, H. Wolf, M. Wolf, B. Michel, N. de Rooij and E. Delamarche, Anal. Chem., 2002, 74, 6139–6144 CrossRef CAS; (e) P. B. Lillehoj, F. Wei and C.-M. Ho, Lab Chip, 2010, 10, 2265–2270 RSC; (f) J. Wang, H. Ahmad, C. Ma, Q. Shi, O. Vermesh, U. Vermesh and J. Heath, Lab Chip, 2010, 10, 3157–3162 RSC; (g) M. Wolf, D. Juncker, B. Michel, P. Hunziker and E. Delamarche, Biosens. Bioelectron., 2004, 19, 1193–1202 CrossRef CAS; (h) M. Zimmermann, P. Hunziker and E. Delamarche, Biomed. Microdevices, 2009, 11, 1–8 CrossRef.
- T. J. Clark, P. H. McPherson and K. F. Buechler, Point Care, 2002, 1, 42–46 CrossRef.
- C. D. Chin, T. Laksanasopin, Y. K. Cheung, D. Steinmiller, V. Linder, H. Parsa, J. Wang, H. Moore, R. Rouse, G. Umviligihozo, E. Karita, L. Mwambarangwe, S. L. Braunstein, J. van de Wijgert, R. Sahabo, J. E. Justman, W. El-Sadr and S. K. Sia, Nat. Med., 2011, 17, 1015–1019 CrossRef CAS.
- E. Fu, T. Liang, J. Houghtaling, S. Ramachandran, S. A. Ramsey, B. Lutz and P. Yager, Anal. Chem., 2011, 83, 7941–7946 CrossRef CAS.
- S.-J. Kim, S. Paczesny, S. Takayama and K. Kurabayashi, Lab Chip, 2013, 13, 2091–2098 RSC.
- P. Novo, V. Chu and J. P. Conde, Biosens. Bioelectron., 2014, 57, 284–291 CrossRef CAS.
- P. Novo, F. Volpetti, V. Chu and J. P. Conde, Lab Chip, 2013, 13, 641–645 RSC.
- A. O. Olanrewaju, A. Robillard, M. Dagher and D. Juncker, Lab Chip, 2016, 16, 3804–3814 RSC.
- N.-T. Nguyen and Z. Wu, J. Micromech. Microeng., 2005, 15, R1–R16 CrossRef.
- J. R. Pierce, Proc. IEEE, 1998, 86, 37–45 CrossRef.
- E. Kim and G. M. Whitesides, J. Phys. Chem. B, 1997, 101, 855–863 CrossRef CAS.
- F. Korbel, FFmpeg basics. Multimedia handling with a fast audio and video encoder, CreateSpace Independent Publishing Platform, 2012 Search PubMed.
- J. Schindelin, I. Arganda-Carreras, E. Frise, V. Kaynig, M. Longair, T. Pietzsch, S. Preibisch, C. Rueden, S. Saalfeld, B. Schmid, J.-Y. Tinevez, D. J. White, V. Hartenstein, K. Eliceiri, P. Tomancak and A. Cardona, Nat. Methods, 2012, 9, 676–682 CrossRef CAS.
- M. Zimmermann, P. Hunziker and E. Delamarche, Microfluid. Nanofluid., 2008, 5, 395–402 CrossRef.
- W.-J. A. de Wijs, J. Laven and G. de With, AIChE J., 2016, 62, 4453–4465 CrossRef CAS.
- P. Man, C. Mastrangelo, M. Burns and D. Burke, Proc. IEEE MEMS '98, 1998, pp. 45–50 Search PubMed.
- Y. Chen, M. M. Weislogel and C. L. Nardin, J. Fluid Mech., 2006, 566, 235 CrossRef.
- H. B. Eral, D. J. C. M. ‘t Mannetje and J. M. Oh, Colloid Polym. Sci., 2013, 291, 247–260 CrossRef CAS.
- R. N. Lamb and D. N. Furlong, J. Chem. Soc., Faraday Trans. 1, 1982, 78, 61 RSC.
- F. Brochard-Wyart, D. Quéré and P.-G. d. Gennes, Drops, bubbles, pearls, waves. The world of capillarity, Springer, New York, 2003 Search PubMed.
- (a) E. Delamarche, A. Bernard, H. Schmid, A. Bietsch, B. Michel and H. Biebuyck, J. Am. Chem. Soc., 1998, 120, 500–508 CrossRef CAS; (b) David Juncker, PhD thesis, Universite de Neuchatel, 2002 Search PubMed.
- Thomas Young, Philos. Trans. R. Soc. London, 1805, 95, 65–87 CrossRef.
- P. M. Fordyce, C. A. Diaz-Botia, J. L. DeRisi and R. Gomez-Sjoberg, Lab Chip, 2012, 12, 4287–4295 RSC.
- H. Bruus, Theoretical Microfluidics,Oxford University Press, Oxford, 2008 Search PubMed.
- M. A. Bruning, M. Costalonga, S. Karpitschka and J. H. Snoeijer, Phys. Rev. Fluids, 2018, 3, 073605 CrossRef.
Footnote |
| † Electronic supplementary information (ESI) available. See DOI: 10.1039/d0lc00811g |
| This journal is © The Royal Society of Chemistry 2021 |