 Open Access Article
Nanomechanical behavior and interfacial deformation beyond the elastic limit in 2D metal–organic framework nanosheets†
Zhixin
Zeng
 a,
Irina S.
Flyagina
ab and
Jin-Chong
Tan
 *a
*a
aMultifunctional Materials & Composites (MMC) Laboratory, Department of Engineering Science, University of Oxford, Parks Road, Oxford, OX1 3PJ, UK. E-mail: jin-chong.tan@eng.ox.ac.uk
bFrumkin Institute of Physical Chemistry and Electrochemistry Russian Academy of Sciences, 31, bld.4, Leninsky prospect, Moscow, 119071, Russia
First published on 12th August 2020
Abstract
Nanoscale mechanical property measurements of nanoporous nanosheets face many challenges. Herein we show atomic force microscope (AFM)-based nanoindentation to probe the nanoscale mechanical properties of a 2-D metal–organic framework (MOF) nanosheet material containing atomic-sized pores, termed CuBDC [copper 1,4-benzenedicarboxylate]. The sample thickness ranged from ∼10 nm (tens of monolayers) up to ∼400 nm (a stack of multilayers). In terms of its elastic–plastic properties, the Young's modulus (E ∼ 23 GPa) and yield strength (σy ∼ 450 MPa) were determined in the through-thickness direction. Moreover, we characterized the failure mechanisms of the CuBDC nanosheets, where three failure mechanisms were identified: interfacial slippage, fracture of the framework, and delamination of multilayered nanosheets. Threshold forces and indentation depths corresponding to these failure modes were determined. To gain insights into the failure mechanisms, we employ finite-element models with cohesive elements to simulate the interfacial debonding of a stack of 2-D nanosheets during the indentation process. The nanomechanical AFM methodology elucidated here will pave the way for the study of other 2-D hybrid nanosheets and layered van der Waals solids.
1. Introduction
Because the underlying structure of crystalline nanomaterials controls their functions, understanding the fundamental structure–property relations is important to enable practical applications of new materials.1–4 Amongst the vast family of two-dimensional (2-D) nanomaterials, we will focus on metal–organic framework (MOF) nanosheets which show benefits in several potential applications. For example, novel devices constructed from 2-D nanosheets show good tunability and efficacy in capacitance,5,6 energy conversion,7 electrocatalysis,8 luminescence,9 and gas separation.10 While there are predictions of certain mechanical properties of 2-D structures at the nanoscale using theoretical techniques such as density functional theory11,12 and molecular dynamics,13–16 hitherto, to the best of our knowledge there is not yet any rigorous experimental study for quantifying the nanoscale mechanical behavior and interfacial effects of nanoporous MOF nanosheets (with atomic-sized pores) in the elastic–plastic regime. Lack of systematically characterized experimental data of mechanical properties is one of the limiting factors that hinders confident evaluation of the practicability of 2-D MOF nanosheets. The mechanical characterization of nanosheets via an experimental approach is challenging owing to the mutual interplay between the adjacent nanosheets (viz. interlayer interactions),17 compounded by several major obstacles, such as the difficulties of small sample preparation, precise implementation of the fine-scale force and displacement measuring techniques, and the accurate interpretation of material structural failure data.A number of mechanical characterization experiments on 2-D nanosheets have been reported to date, where depth-sensing indentation has been widely used.18–21 This includes the use of atomic force microscope (AFM)-based nanoindentation and the instrumented nanoindentation techniques.22 Thus far, studies have concentrated on either the ultra-stiff nanosheets, graphene (Young's modulus, E ∼ 1 TPa)20,23–25 and boron nitride (E ∼ 250 GPa) in particular,17,26 or the very soft biological samples such as protein nanosheets.27 Although there are a few experiments performed on nanosheets with stiffness lying in the range of a few gigapascals to tens of gigapascals, such as the dense 2-D hybrid framework of Mn 2,2-dimethylsuccinate nanosheets (E = 9.4–20.9 GPa depending on crystal orientation due to anisotropy)28 and the bismuth telluride nanosheets (E = 11.7–25.7 GPa),29 very few studies have systematically explored the mechanical behavior of nanoporous MOF nanosheets. There are recent examples using standard instrumented nanoindentation techniques to characterize the out-of-plane mechanical behavior of 2-D organic–inorganic perovskites, where E = 6–12 GPa has been reported for dense hybrid frameworks incorporating different organic spacer molecules.30 There is a report on the AFM nanoindentation of large flakes of [Cu(μ-pym2S2)(μ-Cl)]n MOF nanosheets, where the 2-D samples were suspended over a holey SiO2 substrate and probed by using an AFM tip in the bending mode to estimate the Young's modulus and rupture stress.31
In this work, we demonstrate a direct AFM-based nanoindentation approach (unlike the foregoing AFM bending method)20,31 to perform a quantitative study of the nanoscale mechanics of nanoporous 2-D MOF nanosheets containing atomic-sized pores. Using a combination of indentation measurements and finite-element modeling, we determined not only the elastic–plastic properties, but also gained a deeper understanding of the specific deformation mechanisms responsible for the structural failure of 2-D nanosheets. It is envisaged that the methodology and analysis exemplified in this study will be applicable for the characterization of a vast range of topical 2-D van der Waals materials in the field.32
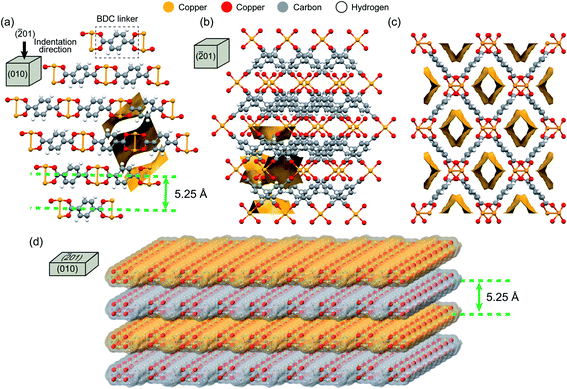
Copper 1,4-benzenedicarboxylate (CuBDC) nanosheets, an example of MOF nanosheets, were selected as the model material to develop the AFM nanoindentation technique for quantifying the nanoscale mechanical properties of 2-D MOF structures. CuBDC is composed of square-planar copper(II) dimers coordinated to the BDC linkers.33 CuBDC crystallizes in the monoclinic C2/m space group, where its adjacent nanosheets form a nanoporous layered architecture as depicted Fig. 1.
The CuBDC nanosheets form thin 2-D crystals with a rectangular morphology as shown in Fig. 2. The constituent CuBDC layers are stacked along the [![[2 with combining macron]](https://www.rsc.org/images/entities/char_0032_0304.gif) 01] crystal axis and held together by van der Waals forces, yielding a periodic framework structure (Fig. 1a). From the AFM topographic images, it can be seen that the thickness of the CuBDC nanosheets ranges from ∼10 nm (viz. the thinnest nanosheet consists of ∼19 monolayers as shown in Fig. 2c) to 400 nm (comprising hundreds of monolayers). Exfoliation of thin nanosheets out of the thicker multilayered stacks is important for a number of reasons; for example, thin nanosheets offer a source of building blocks for constructing 2-D thin-film devices and flexible electronics.7,34 Another example application lies in composite mixed-matrix membranes, by incorporating exfoliated nanosheets of CuBDC in a polymer matrix to enhance the gas separation performance for a mixture of CO2 and CH4.10
01] crystal axis and held together by van der Waals forces, yielding a periodic framework structure (Fig. 1a). From the AFM topographic images, it can be seen that the thickness of the CuBDC nanosheets ranges from ∼10 nm (viz. the thinnest nanosheet consists of ∼19 monolayers as shown in Fig. 2c) to 400 nm (comprising hundreds of monolayers). Exfoliation of thin nanosheets out of the thicker multilayered stacks is important for a number of reasons; for example, thin nanosheets offer a source of building blocks for constructing 2-D thin-film devices and flexible electronics.7,34 Another example application lies in composite mixed-matrix membranes, by incorporating exfoliated nanosheets of CuBDC in a polymer matrix to enhance the gas separation performance for a mixture of CO2 and CH4.10
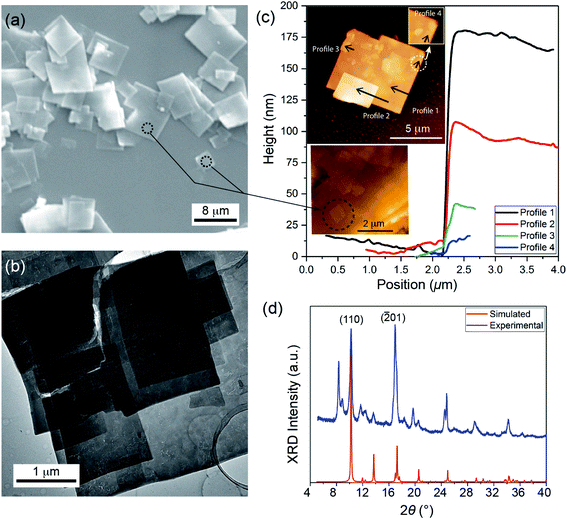 | ||
| Fig. 2 Characterization of the CuBDC nanosheets. (a) Scanning electron microscope (SEM) image; (b) transmission electron microscope (TEM) image; (c) AFM height topography of the multilayered CuBDC nanosheets, revealing the surface features of the nanosheet stacks (inset) not visible under the SEM; (d) experimental and simulated10 X-ray diffraction (XRD) patterns. Note that the extra peaks, for example at 2θ = 8.3°, 8.9°, and 19.6° are due to the thermal desolvation of the framework which is reversible upon the addition of solvent molecules; for further details see ref. 35. | ||
On account of the weak van der Waals forces, there is a risk of delamination and other forms of interfacial failure caused by the sliding of nanosheets during shear deformation. Therefore, design and fabrication of functional devices integrating nanosheets will require an improved understanding of not only the common mechanical properties such as the elastic moduli but also a better understanding of interfacial failure modes, because the sliding and rupture of nanosheets could affect the function of the devices. Furthermore, the interfacial failure between the nanosheets will impede accurate measurement of the depth-sensing indentation technique, resulting in distortion of the indenter load-penetration depth (P–h) data or an erroneous indenter-to-sample contact area. In this study, we address these challenges to enable quantitative determination of the intrinsic 2-D mechanical behavior.
2. Experimental section
2.1. Synthesis and characterization of CuBDC nanosheets
The CuBDC nanosheets were synthesized using the layering technique reported by Rodenas et al.10 The synthesis steps are described in the ESI S1.† The morphology of the nanosheets was examined using a Carl Zeiss Evo LS15 VP scanning electron microscope (Fig. 2a), a JEM-2100 LaB6 transmission electron microscope (Fig. 2b), and a Veeco Dimension 3100 atomic force microscope equipped with a Tap300Al-G probe operating in the tapping mode (Fig. 2c). The crystal structure of the CuBDC nanosheets was confirmed by powder X-ray diffraction (XRD) using a Rigaku Miniflex diffractometer (Fig. 2d).2.2. AFM nanoindentation using a diamond-tipped cantilever probe
The AFM nanoindentation measurements were performed using a Veeco Dimension 3100 instrument operating in the indentation mode, equipped with a Bruker PDNISP probe (a cube-corner diamond tip, see Fig. S1 in the ESI†). The probe has a 350 μm long cantilever made of stainless steel, where a cube-corner diamond indenter tip is mounted at the end of the cantilever. The spring constant and contact sensitivity of the probe were calibrated, and given as 152.285 N m−1 and 256.6 nm per volt, respectively. The high sensitivity of the AFM instrument facilitates the precise detection of the initial contact point between the indenter and the nanosheets. One of the main advantages of AFM is the ability to control and detect small indentation load (force sensitivity <0.05 nN) and to apply a shallow indentation (displacement sensitivity ≲0.05 nm).36 Here, we applied the criterion for identifying the contact point as and when the contact stiffness, dP/dh ≥ 25 N m−1, was reached. Further details on sample preparation are given in the ESI.†2.3. AFM nanoindentation methodology and analysis of P–h data
| σ = kεnp | (1) |
The work-hardening exponent n exerts an influence on the height of the pile-ups of the CuBDC nanosheets.37 In detail, the hardening of the material near the indenter restrains the rising flow towards the surface of the sample and this can be associated with the collapse of MOF nanopores, leading to densification of the open framework. At the end of the elastic regime of a stress–strain curve, the strength coefficient (k) can also be defined based on the elastic modulus:
 | (2) |
According to the empirical relation proposed by Matthews,40 the ratio between the height of residual pile-up, s, after the withdrawal of the indenter tip and the indentation depth at the maximum load, h (see Fig. 4c), is assigned based on the work-hardening exponent (n):
 | (3) |
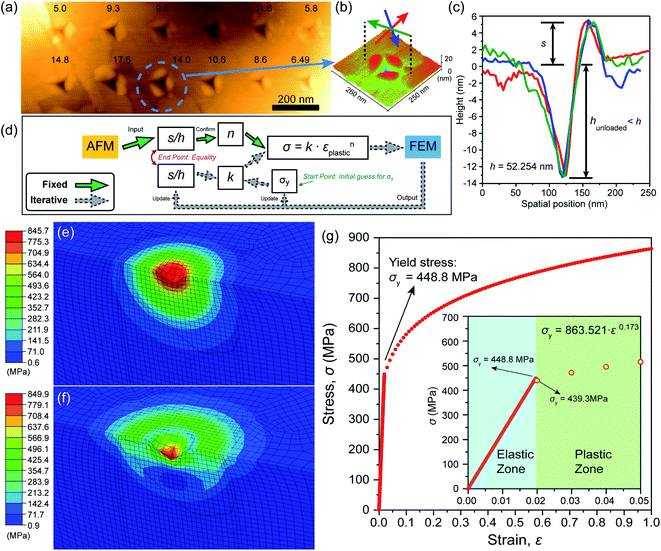 | ||
| Fig. 4 (a) AFM height images of the residual indents on a stack of CuBDC nanosheets, where the pile-ups generated by using the cube-corner indenter are clearly visible. The residual indentation depth (in nm) is marked above each indent. (b) Height profiles shown as a 3-D depth color map, where the sectional profiles marked by the three arrows are plotted in (c). (d) Procedure of the iterative method. (e and f) Finite-element (FE) model showing the Mises stress contour of the simulated indentation employing a contact-area equivalent conical tip (details in Table S1†): (e) indentation during the loading stage, and (f) the FE model at the fully unloaded stage (the indenter is not shown for clarity). (g) Stress–strain curve showing the elastic–plastic transition behavior of the CuBDC nanosheets around the yield point σy, derived from the converged outcome of the iterative method (d). | ||
The value of s was measured from the AFM images of the indents (Fig. 4a–c). The study of 32 indents gave us the arithmetic mean value of s/h ∼ 0.10551 (see Table S2 in the ESI†). By substituting the value into eqn (3), we obtained n = 0.17275.
The iterative method is conditioned upon acquisition of the work-hardening exponent, which is the fixed part in Fig. 4d. Initially, an estimated value of the yield stress (σy) was assigned to eqn (2), yielding a starting value of k. Subsequently, by substituting the values of k and n into eqn (1), the first predicted plasticity parameter of the CuBDC nanosheets was produced. Inputting the Young's modulus (E = 22.9 GPa) and the plastic property into the FE model, we obtained new values of s/h and σy. Through the iterative process, the convergence criterion was met when the updated values of σy = 448.8 MPa (Fig. 4g) and k = 863.52053 were used as inputs in the FE model, which returned the s/h ratio that matched the one measured in the AFM nanoindentation experiment, viz. s/h ∼ 0.10551.
In the FE models where the nanosheet interfacial failures were defined, the interaction between the adjacent nanosheets was modelled using the cohesive elements whose damage under stress is initiated in accordance with the maximum nominal stress criterion (ESI S6†). Moreover, we implemented the Johnson–Cook fracture criterion43 to model the failure of the nanosheets allowing the strain rate effects to be studied (ESI S7†). The Johnson–Cook model was initially proposed for metals, but has also been applied to softer materials like polymers.44
3. Nanoscale mechanical properties of CuBDC nanosheets
3.1. Quantification of through-thickness elasticity
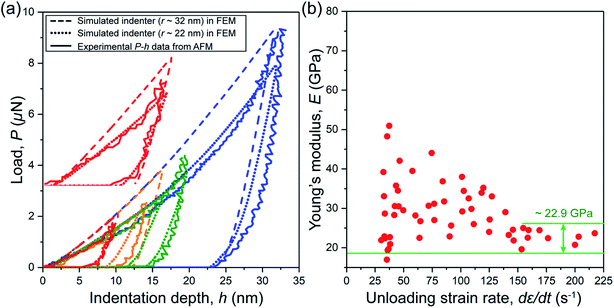
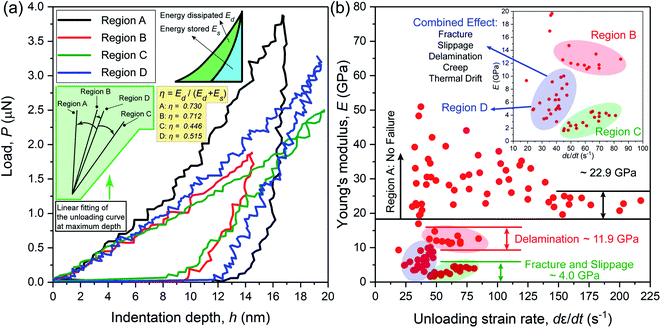
Fig. 3a shows the representative load-displacement (P–h) curves obtained from the AFM nanoindentation measurements for a series of experiments where the maximum surface penetration depth was varied from about 10 nm to 32 nm. Instead of indenting directly onto a thin stack of CuBDC nanosheets, on which the substrate effect on the elasticity measurement is prone to arise, we performed the AFM nanoindentation experiments on the nanosheet stacks of sufficient thickness to satisfy the 10% indentation depth rule in order to minimize the influence of the substrate. Fig. 3b presents the Young's modulus (E) values of the nanosheets derived from a total of 56 nanoindentation experiments. It can be seen that the through-thickness stiffness of the CuBDC nanosheets measured by a low unloading strain rate is highly scattered and overestimated (up to E ∼ 52 GPa). This is likely due to time-dependent deformations, such as creep deformation that exaggerates the stiffness value. Therefore, an augmented unloading strain rate method22 was implemented, with which we found the Young's modulus starts to converge with an increasing unloading strain rate.When the unloading strain rate surpasses ∼140 s−1, it was found that the through-thickness stiffness value converged to an arithmetic mean of E = 22.9 GPa (Fig. 3b). The Poisson's ratio of CuBDC was taken as ν = 0.4; its effect on the Young's modulus of the CuBDC nanosheets is given in the ESI (see Fig. S11†). The dashed and dotted curves in Fig. 3a are the resulting P–h curves predicted by the FE model by assuming an ideal material (without any material failure). The material properties defined in the model match the elastic constants determined from the AFM nanoindentation experiments and the plasticity parameters obtained from the iterative method (see the section below).
3.2. Quantification of plastic deformation: analysis using an iterative method
Plastic deformation is an important factor to be considered in indentation experiments and it can be characterized in relation to the height of the residual indentation pile-up (Fig. 4a–c). Systematic analysis of indentation pile-ups of (monolithic) elastic–plastic solids has been reported by Taljat and Pharr.45 In this study, we employed FE modeling (Fig. 4e and f) in combination with the iterative method to establish the plastic deformation behavior of the CuBDC nanosheets, on the basis of the correlation between the plasticity and the height of the pile-ups formed in the periphery of the indents. The flow chart in Fig. 4d summarizes the procedures of the iterative method we proposed, in which the results obtained from both the AFM-based nanoindentation experiments and the FE modeling were utilized to establish the value of the yield stress, σy (see the Experimental section).As shown in Fig. 4g, we found the yield stress of the CuBDC nanosheets to lie in the range of σy = 439–449 MPa, bridging the elastic and plastic zones. Herein we propose that the yield phenomenon is linked to the plastic flow of the 2-D layered architecture prevalent in the CuBDC nanosheets, as evidenced by the large pile-ups observed in the vicinity of the residual indents, see Fig. 4b and c. Nonetheless, hardness of a layered 2-D structure measured by the AFM-based nanoindentation is significantly influenced by the sliding movement of the interlayers (viz. the sliding tendency),17 where the indentation depth can no longer indicate the true resistance of the nanosheets against plastic deformation (Fig. S12 in the ESI†).
4. Identification of failure mechanisms
4.1. Nanoscale 2-D failures causing distortions of the indentation curves
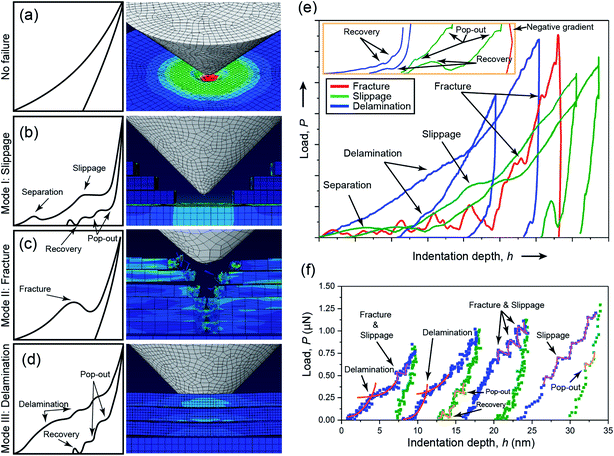
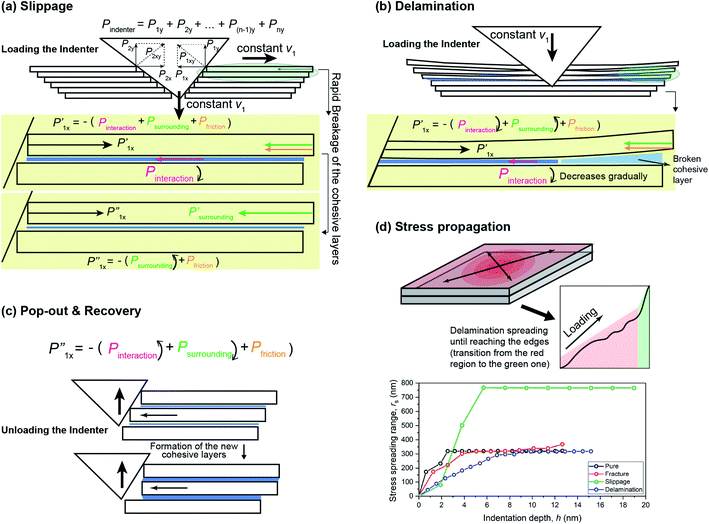
In this section, we employed AFM-based nanoindentation to characterize the mechanical failures of the CuBDC nanosheets. Fig. 5 shows the distortions of the P–h curves because of nanosheet failures induced by indentation. We propose three distinctive deformation modes underpinning the failure of the CuBDC nanosheets: Mode I – interfacial slippage between nanosheets, Mode II – fracture of nanosheets, and Mode III – interfacial delamination of nanosheets.In Mode I, the coplanar nanosheets are separated by the penetrating indenter that causes the nanosheets to slide sideways under shear deformation. Layer separation occurs because the coplanar nanosheets are weakly bound by van der Waals interactions. Typically, sliding of the nanosheets produces a stepwise distortion in the measured P–h curves, which resembles the “pop-in” phenomenon observed in other 2-D materials.28 During the slippage failure, a force analysis was conducted (Fig. 6a) to shed light on the underlying mechanism. For Mode II, we found that the fracture of the CuBDC framework was due to stress concentration generated by using the indenter, and the phenomenon can be identified as the “humps” in the P–h curves. A similar failure mode has been reported in the two-layer stacked graphene indented by AFM23 and the boron nitride nanosheets studied by in situ indentation.46 In the case of Mode III, bending of a stack of nanosheets can lead to interlayer delamination failure during the loading stage, ascribed to the bending moment from the peripheral regions of the indent. In other words, the stretching of the cohesive layer normal to the nanosheet plane eventually led to the breakage of the adjacent nanosheets (see Fig. 6b). In addition, the “pop-out” and recovery phenomena at the unloading stage were also observed and their mechanisms will be discussed in the next section.
4.2. Force analysis of the failure modes
Fig. 6a and b illustrate the origin of the distortions in the P–h curves, which occur due to the interfacial slippage and delamination of the nanosheets, respectively. Regarding the slippage mode, the indenter initially overcomes the interfacial forces that bind the nanosheets together (preventing separation of the nanosheets). The breakage of this interfacial constraint is indicated by the first broad hump shown in the schematic P–h curve (Fig. 5b). Subsequently, the indenter starts to push the nanosheets sideways apart, while the cohesive layers deform under the shear forces until the complete failure occurs. During this process, the resolved indention forces (P′ix, i = 1, 2, 3,…, n layers) which are horizontally exerted between the indenter and the nanosheets gradually decrease due to the growing detachment of the cohesive layers. Therefore, the interaction force between the adjacent nanosheets (Pinteraction) decreases gradually until the cohesive layer is fully damaged. This results in the pop-in segment of the P–h curve, corresponding to the slippage shown on the P–h curve (Fig. 5b). By contrast, the breakage of the cohesive layers progresses relatively slower in the delamination mode than in the slippage mode (see Fig. 6d), because the bending stress that leads to delamination propagates slower than the acting shear stress while the nanosheets slide relative to one another. Therefore, the gradient of the distorted loading curve in the delamination mode is declining at a lower rate compared with the more abrupt stepwise pop-in deformation detected in the slippage mode.We also observed a pop-out phenomenon while withdrawing the indenter. This suggests the formation of a new cohesive layer via restoration of the broken van der Waals interactions between the nanosheets. The resolved counter-acting forces from the indenter (P′nx) are equivalent to the sum of the forces provided by the new cohesive layers (Pinteraction), the restraining forces exerted by the surrounding materials (Psurrounding), and the friction force (Pfriction). In fact, the friction also changes with the penetration of the indenter as a result of the varying normal force, and it can also affect the resultant P–h curves.47 The model in Fig. 6c shows that the interaction force exerted by the new cohesive layer increases while the force exerted by the surrounding material decreases during unloading of the indenter. Thus, the interplay between the indenter and the nanosheets in a quasi-equilibrium state culminates in the pop-out deformation observed in the unloading curves. Interestingly, a force recovery process was witnessed in the experiment emerging right before the indenter-to-sample interaction was reduced to zero (Fig. 5f). The reason of the recovery is similar to the pop-out phenomenon, but instead of reaching the force equilibrium, the augmentation of Pinteraction was overwhelming compared with the reduction of Psurrounding. Therefore, the unloading P–h curve shows a rise in the resultant force (Fig. 5d). The force recovery in the P–h curve can be seen near the end of the indenter withdrawal when Psurrounding is close to being fully relaxed. In the FE model, both the pop-out and recovery phenomena were simulated as shown in Fig. 5e.
Additional indentation cycles were performed on two thin CuBDC nanosheet stacks (thickness, t ∼ 16 nm and ∼48 nm) placed on a glass substrate in order to investigate plasticity on the upper surface of the nanosheets when the substrate took effect. No visible radial cracks were observed at the residual indents (Fig. S4†), which suggests the relatively resilient nature of the surrounding CuBDC framework. In other words, the constraint imposed by the surrounding CuBDC framework has an impact (i.e. Psurrounding) on the indentation area, which is consistent with the force analysis in Fig. 6. In contrast to our findings, indentation experiments using a sharp indenter tip (e.g. cube-corner) on thin but stiffer layers such as the silicon (t ∼ 50 nm)48 and the hybrid YAS-GNP coatings (t = 169 ± 10 μm) on a silicon carbide substrate49 were reported to generate dramatic radial cracks.
The P–h curves from AFM nanoindentation may show large-scale distortions as shown in Fig. 5d. By characterizing such distortions, the threshold forces responsible for the failures of CuBDC nanosheets at the nanoscale can be quantified (Fig. S13†). We estimated the threshold conditions that trigger the failure modes I, II, and III of the CuBDC monolayer as summarized in Table 1; the evolution with indentation depth also was characterized (Fig. S14†). Fig. 6d shows that when the indentation depth is below ∼2 nm, the stress spreading area of the slippage mode is less than the ones for delamination and fracture modes. However, when the indentation depth exceeds ∼2 nm and ∼2.5 nm, the stress area for slippage surpasses the areas for delamination and fracture, respectively. Likewise, we found that the threshold forces of the three modes in Table 1 are ranked in the same order (slippage < delamination < fracture). Accordingly, the stresses required for delamination were found to be ∼1.8 times and ∼5.5 times greater than the ones needed to induce slippage and fracture, respectively.
| Failure modes | Threshold values | ||||
|---|---|---|---|---|---|
| Force (nN) | Depth (Å) | Projected area of indent (nm2) | Area of stress field (nm2) | Stress (MPa) | |
| I. Slippage | 42.6 | 6.5 | 1.1 | ∼2290 | 9.3 |
| II. Fracture | 70.4 | 6.4 | 1.1 | ∼23![[thin space (1/6-em)]](https://www.rsc.org/images/entities/char_2009.gif) 779 779 |
3.0 |
| III. Delamination | 56.0 | 5.8 | 0.9 | ∼3421 | 16.4 |
4.3. Small-scale continuous failures during AFM nanoindentation
In Fig. 7a, the P–h curve in black obtained from AFM nanoindentation typifies the response of the CuBDC nanosheet without experiencing material failure, while the other three representative P–h curves show distinct responses when indentation stress induces failure. Such a difference was exemplified in the scatter of the stiffness values in Fig. 7b depicting the four distribution regions, into which the data points fall. Only region A describes the intrinsic mechanical property of CuBDC owing to the absence of significant stress-induced framework failure and other time-dependent deformations (e.g. creep and thermal drift). Otherwise, the CuBDC framework could experience a varying degree of stiffness loss and reduced hardness (designated as regions B, C, and D) depending on the type of the failure mode. In addition, the energy loss (see Fig. 7a) of the indentations represented by the regions B, C, and D was observed to be lower than in region A. The results suggest that in the scenarios described by regions B, C, and D, part of the deformation was contributed by other forms of mechanical behavior (e.g. fracture, sliding, and delamination) dissipating less energy than the plastic deformation determined in region A.It is worth noting that the Young's moduli in regions B, C, and D in Fig. 7b were derived from the P–h curves that exhibit no abrupt distortions over the history of the entire P–h curve. The stiffness data thus suggest that the occurrence of failures is a continuous process, compared to the characteristic failure modes evidenced in Fig. 5d. The data points in region B might correspond to delamination of the CuBDC nanosheets (Mode III) induced by the AFM indenter. This inference is based on the observation that delamination causes less additional indentation displacement than the other two failure modes, and therefore, it brings about less stiffness loss. Conversely, the indentation tests that returned the data points in region C may be attributed to the coupled effect of interfacial sliding/slippage (Mode I) and fracture (Mode II) of the nanosheets that produced a higher level of stiffness loss. The interfacial sliding in this study mainly refers to the horizontal sliding of nanosheets normal to the indenter axis, although the sliding along the indentation direction may also cause stiffness loss, such as that reported in ref. 50.
Regions B and C are the steady states subsequent to region D with an increasing unloading strain rate. Akin to the effect of surpassing the time-dependent behavior such as creep and thermal drift in the indention direction, a sufficiently high unloading strain rate reduces the deformation of the nanosheets in the horizontal direction along,  and thus contributes to the convergence of the Young's modulus from region D to C. With this in mind, the unloading strain rate principle22 can also be extended to suppress failure since high loading-unloading strain rates shorten the time available for crack propagation. Fig. 7b also shows that the indentations in region D were implemented at a relatively lower unloading strain rate, therefore additional indentation displacements were accumulated by a combination of factors: fracture, sliding, delamination, creep, and thermal drift. In this case, the unwanted effects of time-dependent processes in region D could be mitigated by raising the unloading strain rate of the indenter.
5. Conclusions
In this work, a quantitative approach is demonstrated for using the AFM-based nanoindentation technique to study the mechanical properties of the CuBDC nanosheets. The main results are summarized as follows:• A quantitative study of the nanoscale mechanics of 2-D nanosheets is challenging especially for AFM-based nanoindentation.
• The elastic–plastic properties such as the Young's modulus and yield strength were characterized. We demonstrate the efficacy of the unloading strain rate principle for improving precision of the AFM nanoindentation measurements of MOF nanosheets.
• Three characteristic failure modes at loading of the nanosheets have been proposed, namely interfacial sliding/slippage (Mode I), framework fracture (Mode II), and delamination (Mode III). The mechanisms are controlled by shear deformation, framework rupture, and bending deformation, respectively. The threshold indentation forces and threshold indentation depths of each of the failure modes have been studied.
• Finite-element modeling has been employed to simulate the AFM nanoindentation of the CuBDC MOF nanosheets to gain insights into the deformation mechanisms underpinning plasticity and failure modes. The model also explains the pop-out and recovery phenomena observed in the nanosheets during the nanoindenter unloading.
• Although the CuBDC nanosheets were chosen in this study as a model material to develop the AFM nanoindentation of metal–organic nanosheets, the general methodologies described are transferrable to probe a wide range of 2-D van der Waals layered systems.
6. Author contributions
Z.X.Z. performed the AFM nanoindentation experiments and FEM simulations. I.S.F. synthesized the nanosheet samples and performed the SEM and TEM imaging. Z.X.Z. analyzed the data and prepared the figures under the supervision of J.C.T. Z.X.Z. and J.C.T. wrote the manuscript with input from all authors.7. Conflicts of interest
The authors declare no competing financial interest.Acknowledgements
This work was supported by the ERC Consolidator Grant through the grant agreement 771575 (PROMOFS). J. C. T. and I. S. F. thank the EPSRC Grant No. EP/N014960/1 for research funding. The authors acknowledge the Research Complex at Harwell (RCaH) for access to the materials characterization facilities. I.S.F. thanks Dr James Gilchrist for the training and assistance in collecting the TEM images. We are grateful to Dr Gavin Stenning and Dr Marek Jura at R53 Materials Characterization Laboratory (ISIS Rutherford Appleton Laboratory) for providing access to the XRD facilities.References
- J. C. Tan and A. K. Cheetham, Chem. Soc. Rev., 2011, 40, 1059–1080 RSC.
- M. D. Allendorf and V. Stavila, CrystEngComm, 2015, 17, 229–246 RSC.
- A. J. Howarth, Y. Liu, P. Li, Z. Li, T. C. Wang, J. T. Hupp and O. K. Farha, Nat. Rev. Mater., 2016, 1, 15018 CrossRef CAS.
- F. Cavallo, D. S. Grierson, K. T. Turner and M. G. Lagally, ACS Nano, 2011, 5, 5400–5407 CrossRef CAS.
- Z. Jiang, Z. Li, Z. Qin, H. Sun, X. Jiao and D. Chen, Nanoscale, 2013, 5, 11770–11775 RSC.
- F. Cao, M. Zhao, Y. Yu, B. Chen, Y. Huang, J. Yang, X. Cao, Q. Lu, X. Zhang, Z. Zhang, C. Tan and H. Zhang, J. Am. Chem. Soc., 2016, 138, 6924–6927 CrossRef CAS.
- M. Chhowalla, H. S. Shin, G. Eda, L. J. Li, K. P. Loh and H. Zhang, Nat. Chem., 2013, 5, 263 CrossRef.
- S. Zhao, Y. Wang, J. Dong, C. T. He, H. Yin, P. An, K. Zhao, X. Zhang, C. Gao, L. Zhang, J. Lv, J. Wang, J. Zhang, A. M. Khattak, N. A. Khan, Z. Wei, J. Zhang, S. Liu, H. Zhao and Z. Tang, Nat. Energy, 2016, 1, 16184 CrossRef CAS.
- A. K. Chaudhari, H. J. Kim, I. Han and J. C. Tan, Adv. Mater., 2017, 29, 1701463 CrossRef.
- T. Rodenas, I. Luz, G. Prieto, B. Seoane, H. Miro, A. Corma, F. Kapteijn, F. X. Llabrés i Xamena and J. Gascon, Nat. Mater., 2015, 14, 48 CrossRef CAS.
- W. Zhou, H. Wu and T. Yildirim, Chem. Phys. Lett., 2010, 499, 103–107 CrossRef CAS.
- E. Hosseini, M. Zakertabrizi, A. H. Korayem and Z. Chang, J. Chem. Phys., 2018, 149, 114701 CrossRef.
- K. E. Eshkalak, S. Sadeghzadeh and M. Jalaly, Comput. Mater. Sci., 2018, 149, 170–181 CrossRef CAS.
- R. Abadi, R. P. Uma, M. Izadifar and T. Rabczuk, Comput. Mater. Sci., 2017, 131, 86–99 CrossRef CAS.
- B. Mortazavi and G. Cuniberti, RSC Adv., 2014, 4, 19137–19143 RSC.
- R. Ansari, S. Rouhi and S. Ajori, Superlattices Microstruct., 2014, 65, 64–70 CrossRef CAS.
- A. Falin, Q. Cai, E. J. G. Santos, D. Scullion, D. Qian, R. Zhang, Z. Yang, S. Huang, K. Watanabe, T. Taniguchi, M. R. Barnett, Y. Chen, R. S. Ruoff and L. H. Li, Nat. Commun., 2017, 8, 15815 CrossRef CAS.
- O. V. Penkov, V. E. Pukha, A. Y. Devizenko, H. J. Kim and D. E. Kim, Nano Lett., 2014, 14, 2536–2540 CrossRef CAS.
- S. Ozden, Y. Yang, C. S. Tiwary, S. Bhowmick, S. Asif, E. S. Penev, B. I. Yakobson and P. M. Ajayan, Nano Lett., 2016, 16, 232–236 CrossRef CAS.
- C. Lee, X. Wei, J. W. Kysar and J. Hone, Science, 2008, 321, 385–388 CrossRef CAS.
- P. Payamyar, K. Kaja, C. Ruiz-Vargas, A. Stemmer, D. J. Murray, C. J. Johnson, B. T. King, F. Schiffmann, J. VandeVondele, A. Renn, S. Götzinger, P. Ceroni, A. Schütz, L. T. Lee, Z. Zheng, J. Sakamoto and A. D. Schlüter, Adv. Mater., 2014, 26, 2052–2058 CrossRef CAS.
- Z. Zeng and J. C. Tan, ACS Appl. Mater. Interfaces, 2017, 9, 39839–39854 CrossRef CAS.
- Q. Y. Lin, Y. H. Zeng, D. Liu, G. Y. Jing, Z. M. Liao and D. Yu, ACS Nano, 2014, 8, 10246–10251 CrossRef CAS.
- P. Huang, D. Guo, G. Xie and J. Li, Nano Lett., 2017, 17, 6280–6286 CrossRef CAS.
- J. Xu, G. Yuan, Q. Zhu, J. Wang, S. Tang and L. Gao, ACS Nano, 2018, 12, 4529–4535 CrossRef CAS.
- S. M. Kim, A. Hsu, M. H. Park, S. H. Chae, S. J. Yun, J. S. Lee, D. H. Cho, W. Fang, C. Lee, T. Palacios, M. Dresselhaus, K. K. Kim, Y. H. Lee and J. Kong, Nat. Commun., 2015, 6, 8662 CrossRef CAS.
- D. Kong, W. Megone, K. D. Q. Nguyen, S. Di Cio, M. Ramstedt and J. E. Gautrot, Nano Lett., 2018, 18, 1946–1951 CrossRef CAS.
- J. C. Tan, P. J. Saines, E. G. Bithell and A. K. Cheetham, ACS Nano, 2012, 6, 615–621 CrossRef CAS.
- L. Guo, H. Yan, Q. Moore, M. Buettner, J. Song, L. Li, P. T. Araujo and H. T. Wang, Nanoscale, 2015, 7, 11915–11921 RSC.
- Q. Tu, I. Spanopoulos, E. S. Vasileiadou, X. Li, M. G. Kanatzidis, G. S. Shekhawat and V. P. Dravid, ACS Appl. Mater. Interfaces, 2020, 12, 20440–20447 CrossRef CAS.
- C. Hermosa, B. R. Horrocks, J. I. Martínez, F. Liscio, J. Gómez-Herrero and F. Zamora, Chem. Sci., 2015, 6, 2553–2558 RSC.
- D. Jariwala, T. J. Marks and M. C. Hersam, Nat. Mater., 2017, 16, 170–181 CrossRef CAS.
- W. Mori, F. Inoue, K. Yoshida, H. Nakayama, S. Takamizawa and M. Kishita, Chem. Lett., 1997, 26, 1219–1220 CrossRef.
- J. N. Coleman, M. Lotya, A. O'Neill, S. D. Bergin, P. J. King, U. Khan, K. Young, A. Gaucher, S. De, R. J. Smith, I. V. Shvets, S. K. Arora, G. Stanton, H. Y. Kim, K. Lee, G. T. Kim, G. S. Duesberg, T. Hallam, J. J. Boland, J. J. Wang, J. F. Donegan, J. C. Grunlan, G. Moriarty, A. Shmeliov, R. J. Nicholls, J. M. Perkins, E. M. Grieveson, K. Theuwissen, D. W. McComb, P. D. Nellist and V. Nicolosi, Science, 2011, 331, 568–571 CrossRef CAS.
- C. G. Carson, K. Hardcastle, J. Schwartz, X. Liu, C. Hoffmann, R. A. Gerhardt and R. Tannenbaum, Eur. J. Inorg. Chem., 2009, 2009, 2338–2343 CrossRef.
- S. R. Cohen and E. Kalfon-Cohen, Beilstein J. Nanotechnol., 2013, 4, 815–833 CrossRef CAS.
- W. C. Oliver and G. M. Pharr, J. Mater. Res., 2004, 19, 3–20 CrossRef CAS.
- A. W. Bowen and P. G. Partridge, J. Phys. D: Appl. Phys., 1974, 7, 969–978 CrossRef CAS.
- J. H. Hollomon, Trans. Metall. Soc. AIME, 1945, 162, 268–290 Search PubMed.
- J. R. Matthews, Acta Metall., 1980, 28, 311–318 CrossRef CAS.
- M. Bocciarelli, G. Bolzon and G. Maier, Mech. Mater., 2005, 37, 855–868 CrossRef.
- Z. Chen, X. Wang, A. Atkinson and N. Brandon, J. Eur. Ceram. Soc., 2016, 36, 1435–1445 CrossRef CAS.
- G. R. Johnson and W. H. Cook, Eng. Fract. Mech., 1985, 21, 31–48 CrossRef.
- H. Louche, F. Piette-Coudol, R. Arrieux and J. Issartel, Int. J. Impact Eng., 2009, 36, 847–861 CrossRef.
- B. Taljat and G. M. Pharr, Int. J. Solids Struct., 2004, 41, 3891–3904 CrossRef.
- A. Loganathan, A. Sharma, C. Rudolf, C. Zhang, P. Nautiyal, S. Suwas, B. Boesl and A. Agarwal, Mater. Sci. Eng., A, 2017, 708, 440–450 CrossRef CAS.
- F. Bédoui, F. Sansoz and N. S. Murthy, Acta Mater., 2008, 56, 2296–2306 CrossRef.
- G. M. Pharr, W. C. Oliver and D. S. Harding, J. Mater. Res., 1991, 6, 1129–1130 CrossRef CAS.
- E. Garcia, A. Nistal, A. Khalifa, Y. Essa, F. Martín de la Escalera, M. I. Osendi and P. Miranzo, ACS Appl. Mater. Interfaces, 2015, 7, 17656–17662 CrossRef CAS.
- Y. Chen, S. R. Bakshi and A. Agarwal, ACS Appl. Mater. Interfaces, 2009, 1, 235–238 CrossRef CAS.
Footnote |
| † Electronic supplementary information (ESI) available: Synthesis method, characterization of the geometry of the cube-corner indenter tip, AFM topology of the nanosheets and the residual indents, the ratio of the pile-up height to the indentation depth, the iterative method for determining plasticity, finite element models, the influence of the varying Poisson's ratios on the quantification of the Young's modulus, and the threshold forces and depths resulting in the different failure modes. See DOI: 10.1039/d0na00475h |
| This journal is © The Royal Society of Chemistry 2020 |

