
 Open Access Article
 This Open Access Article is licensed under a Creative Commons Attribution-Non Commercial 3.0 Unported Licence
Multiscale 3D-printing of microfluidic AFM cantilevers†
Robert C. L. N.
Kramer
a,
Eleonoor J.
Verlinden
a,
Livia
Angeloni
ab,
Anita
van den Heuvel
c,
Lidy E.
Fratila-Apachitei
b,
Silvère M.
van der Maarel
c and
Murali K.
Ghatkesar
 *a
*a
aDepartment of Precision and Microsystems Engineering (PME), Faculty of Mechanical, Maritime, and Materials Engineering (3mE), Delft University of Technology, Mekelweg 2, 2628CD Delft, The Netherlands. E-mail: m.k.ghatkesar@tudelft.nl
bDepartment of Biomechanical Engineering (BME), Faculty of Mechanical, Maritime, and Materials Engineering (3mE), Delft University of Technology, The Netherlands
cDepartment of Human Genetics, Leiden University Medical Center (LUMC), Leiden, The Netherlands
First published on 28th November 2019
Abstract
Microfluidic atomic force microscopy (AFM) cantilever probes have all the functionalities of a standard AFM cantilever along with fluid pipetting. They have a channel inside the cantilever and an aperture at the tip. Such probes are useful for precise fluid manipulation at a desired location, for example near or inside cells. They are typically made by complex microfabrication process steps, resulting in expensive probes. Here, we used two different 3D additive manufacturing techniques, stereolithography and two-photon polymerization, to directly print ready-to-use microfluidic AFM cantilever probes. This approach has considerably reduced the fabrication time and increased the design freedom. One of the probes, 564 μm long, 30 μm wide, 30 μm high, with a 25 μm diameter channel and 2.5 μm wall thickness had a spring constant of 3.7 N m−1 and the polymer fabrication material had an elastic modulus of 4.2 GPa. Using these 3D printed probes, AFM imaging of a surface, puncturing of the cell membrane, and aspiration at the single cell level have been demonstrated.
1 Introduction
No two cells are identical. Moreover, cells are constantly responding to internal and external signals which result in highly dynamic cellular characteristics, for example in cell type and cellular state.1 This means that even purified cell populations are often composed of a heterogeneous mix of cells and bulk analyses often result in an averaged representation of a cell population's cellular characteristics. Fully unravelling cellular complexity in both healthy and diseased states will therefore require characterization and manipulation at single-cell resolution. Microsystem technologies are suitable for this task due to their similar size scale to the cells under study.2,3 To sort cells, passive methods such as micropillar arrays4 or active methods like microfluidic acoustic resonance5 have been used. To accurately quantify single cell characteristics, micro/nano-mechanical resonators6 have been used to determine cell density,7 growth rate8 and response to drugs.9 To manipulate single cells, atomic force microscopy (AFM) based methods are suitable.10,11 This manipulation of single cells can provide information on cellular characteristics such as elastic modulus,12 adhesion strength,13 and response to mechanical stimuli.14,15With the advent of the FluidFM technique,16 simultaneous precise force control and (sub)picolitre volume fluid manipulation inside a cell has become possible.17–20 The technique uses an AFM cantilever with an internal channel and aperture at the tip. These hollow microcantilever probes are fabricated by standard clean room microfabrication techniques with nanometer precise control over their shape and size.21,22 However, despite considerable progress in microfabrication, microfluidic AFM cantilever probes are not widely available due to the complex process steps leading to a high cost per probe. It takes at least two weeks of fabrication with about 6 masks depending on the process.19 They also need a fluidic interface to be attached before they are ready for use. Furthermore, exploring novel functional prototypes with existing process steps is an even more expensive endeavor.
3D additive manufacturing technologies have recently emerged as new bottom-up microfabrication methods for biological applications.23–25 They offer easy, rapid, and cost-effective prototyping and production. They also expand the design freedom (complex designs) and design space (in 3D) to directly print novel devices. Among many capable 3D-printing techniques, stereolithography (SL) and two-photon polymerization (2PP) are able to print with micro- and sub-micrometer resolution, respectively.23 In both techniques, light illuminates a liquid (positive)negative photoresist, thereby locally (de)polymerizing it to form a solid structure. Commercial SL-systems are able to fabricate objects that can be several cubic centimetres in size with an accuracy of 20 μm,26 and single- and two-photon polymerization set-ups have reached feature sizes of 430 nm (ref. 27) and 9 nm (ref. 28), respectively. These 2PP nanometer feature sizes come at the cost of printing speed, hence combination with SL-printing is desirable from a time reduction point of view.
Using 2PP, the following structures have been printed by others: embedded microfluidic channels with internal pillars to trap biological entities,29 a doubly-clamped suspended microchannel resonator,30 and custom designed AFM tips on commercial tip-less cantilevers.31 Furthermore, 2PP printing has been combined with SL printing to print a micro-filter.32 However, to the best of our knowledge, a complete polymeric microfluidic AFM cantilever as a ready-to-use device has not been printed so far.
In this work, several types of microfluidic AFM cantilevers were directly printed onto an SL-printed fluidic interface. Their functionality was proved by using them to image surface topography, dispense fluid, puncture cells, and aspirate selected cell(s).
2 Materials and methods
2.1 Fabrication methods
The printing of the microfluidic AFM cantilever probe was done in two parts: an interface part and a cantilever part. The fluidic interface was the connection between the hollow cantilever and the “external-world”. This interface part was printed with the SL method and the cantilever part was printed on top of this interface with the 2PP method as illustrated in Fig. 1.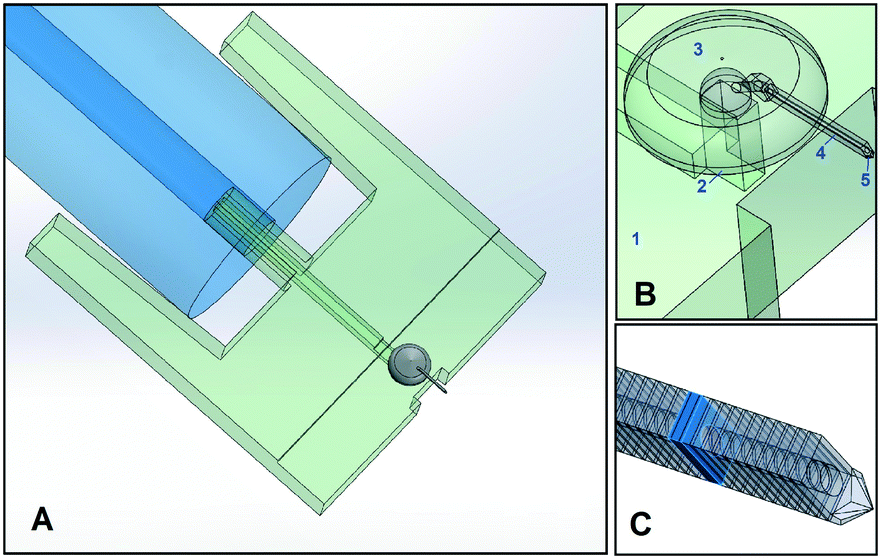 | ||
| Fig. 1 A. CAD drawings of the complete device with Tygon tubing connection at the back (in blue), fluidic interface (in green) and hollow cantilever (in grey). B. Zoom-in of the CAD drawing of the fluidic interface (1), base (2), yurt (3), cantilever (4), and tip (5). C. Further zoom-in of the CAD drawing of the 20 × 20 × 250 μm type 1 hollow cantilever with an internal circular channel of 10 μm diameter. The cantilever was printed as angled overlapping slabs (one of them shown in blue) with a hole at the center. | ||
The fluidic interface part was printed using standard system settings. The dimensions of the interface were chosen such that it fits in the AFM holder. After printing, all unwanted resin residues were removed from inside and outside the channel by blowing compressed air and two minutes of ultrasonic cleaning in isopropyl alcohol (IPA). Tygon® (ID 190.5 μm, OD 2 mm) tubing from Cole-Palmer was used as a connection to the fluidic interface from the “external world”. The design details are given in the ESI,† section 1.
To print the cantilever, the SL-printed interface was taped on an indium-tin-oxide (ITO) coated glass slide and mounted in the 2PP-printer. Then, a drop of resist was placed covering the area where polymerization was desired including the surrounding glass surface. The 2PP system can automatically find the smooth ITO interface on the glass surface. However, the surface of the SL-printed part was not smooth and it was therefore difficult to automatically identify its surface. Determining the surface height of the SL-printed interface was crucial to get a good seal between the SL-printed polymer and 2PP printed polymer. The height of the top side of the SL-printed surface was identified by printing 10 × 10 × 40 μm pillar structures in incremental height steps across the surface. A correct height was found when the printed pillar remained undeformed and attached to the surface when the stage repositions itself for the printing of the next pillar. After the surface was identified, the scan speed and laser power were optimized. All the optimized parameters used for printing are given in Table 1 and more details on this printing strategy are given in the ESI,† section 2.
| Laser power | 20 mW |
| Scanning speed | 60 mm s−3 |
| Objective | 25× NA 0.8 |
| Slicing distance | 0.5 μm |
| Hatching distance | 0.3 μm |
| Contour count | 3 |
| Contour distance | 0.2 μm |
2PP printing was done in four different parts connected with each other: a structured base, yurt, hollow cantilever, and tip (with or without an aperture), see Fig. 1. A structured base (see the ESI,† section 2) with a large surface area was chosen to be printed on the SL-printed part. This base structure was crucial to get a good seal between the two polymers of both printing methods. On this base, a yurt-shape structure was printed and this particular shape was chosen to reduce the printing time, as compared to a dome. The hollow cantilever was then printed attached to this yurt as a series of overlapping vertical square slices positioned at an angle. Finally, the desired tip shape was printed.
2.2 Characterization and functional testing of the device
The printed devices were tested for their mechanical characteristics and their functionality with cells.3 Results and discussion
3.1 Fluidic interface
The SL printed fluidic interface part is shown in Fig. 2. It was printed with an “external world” connector fluidic channel that was oriented vertical to the build plate. Each 25 μm thick print layer took approximately 24 s. There were 30 interface units printed for every run, which took 2 hours and 10 minutes for the chosen height (3.6 mm) including scaffolding. The total printing time depended on the height of the structure and not much on the number of interfaces printed. The computer-aided design (CAD) drawing and the details of the anchor points can be found in the ESI,† section 1.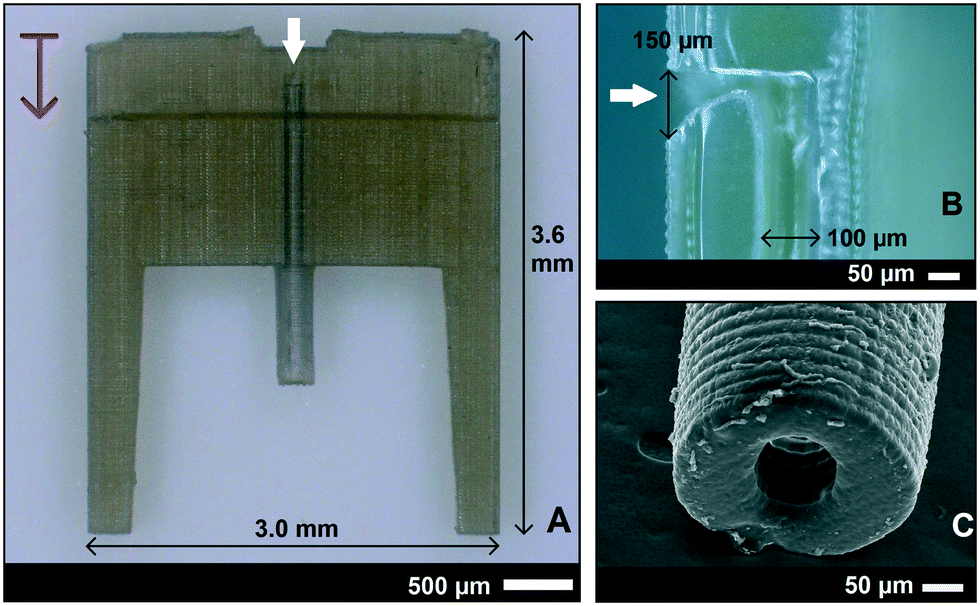 | ||
| Fig. 2 A. The SL printed fluidic interface part. Two long solid legs on either side act as a guide for the Tygon tube connected to the fluidic channel in the middle. The internal channel is visible through the semi-transparent material. The white arrows in these images indicate the location of the channel opening, on top of which the base, yurt, and cantilever will be printed. The red arrow on the top left indicates the printing direction. B. A cross-section image of the channel sliced vertically along its length. C. The scanning electron microscopy (SEM) image of the connector to the external tubing shows that the internal diameter (ID) of the channel was 100 μm and the outer diameter (OD) was 400 μm. | ||
The interface was designed with a thickness of 400 μm and a channel size of 150 × 90 μm. The interface had an extension for attaching the tubing to the “external world” for future downstream analysis of aspirated intracellular factors. There were also two guide/protection bars around the extension to insert a 2 mm OD and 200 μm ID Tygon tube, see Fig. 2A. The channel took a 90 degree turn inside the interface in the front for the fluid connection to the cantilever. Even though the channel size was designed to be uniform throughout the interface, it turned out to be printed narrow near the exit (Fig. 2B), possibly due to undesired exposure at this 90 degree overhang. Even though a rectangular channel was designed, the outcome was a circular channel of 100 μm diameter (Fig. 2C) because it was at the resolution limits of the SL-printer. It should also be noted that the resolution limits differ between external features and internal voids such as microchannels. This difference is due to partial exposure of the unpolymerized resin inside the channels, which is influenced by the type of resin, number of printed layers above the channel, and channel dimensions.35,36
3.2 Microfluidic AFM cantilever
The microfluidic AFM cantilever was printed using the 2PP method. The main challenge was to write on top of an SL printed polymeric surface that had these ridges as a result of the SL printing process. Furthermore, it was desirable that the 100 to 200 femtosecond laser beam of the 2PP writing process doesn't ablate the SL printed polymer but yet soften it to make a good connection between the two polymers. Therefore, optimisation of the laser power and scan speed was needed, which was done by printing 10 × 10 × 40 μm pillar structures on the SL printed interface surface in a grid in which the laser power and scanning speed were varied. For laser powers 21 mW and above, bubbles were formed (seen as the dark circles in Fig. 3A), irrespective of the scan speed. This happened because the laser of the 2PP system locally ablated the SL printed polymer and transformed it into a gaseous plasma37 that reforms into gaseous carbon compounds. When this local ablation occurred it left marks on the substrate, visible as the black spots in Fig. 3B. These bubbles effectively block laser irradiation by physically displacing the liquid resist and scattering the laser beam. The gas inside the bubbles dissolved in the resist when they're smaller than about 5 μm, but coalesce into larger bubbles that remain as a hole in the structure after developing. Therefore to avoid any bubbles and ensure a strong interface between the two polymers, a laser power of 20 mW and a scan speed of 60 mm s−1 were used for subsequent prints. The adhesion strength of the pillars written with these settings were found to be strong enough to withstand pressures of up to 15 bar (1500 kPa). More details are presented in the ESI,† section 2.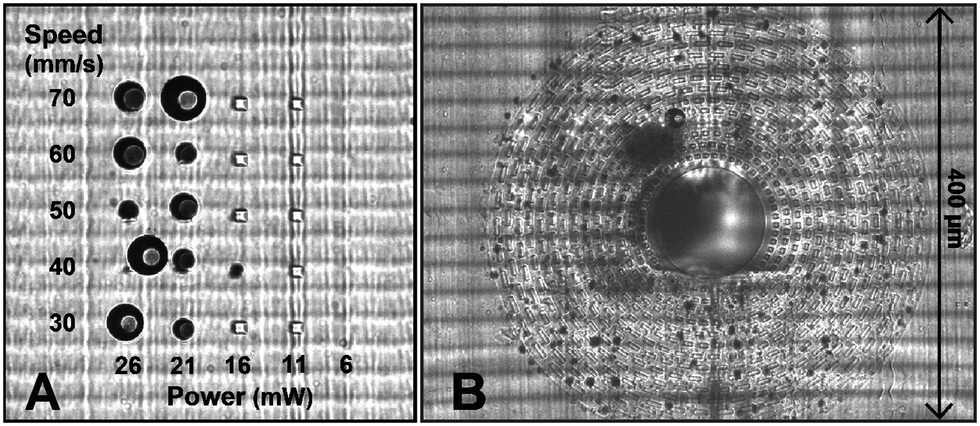 | ||
| Fig. 3 A. Optimization of 2PP printing parameters by printing arrays of rectangular 10 × 10 × 40 μm pillars on an SL-surface. The laser power (on the horizontal axis) and scan speed (on the vertical axis) were varied. None of the pillars were printed below 11 mW and excessive bubble formation took place above 16 mW. In subsequent prints, laser power values between 16 and 21 mW were used. The scan speed had no significant effect. The striated horizontal lines are the individually printed layers of the SL-print. B. The 2PP printed structured base that was printed around the aperture of an interfacing device. The damage to the surface caused by the laser illumination is visible as small black circular spots. At these locations, gas bubbles had formed and eventually dissolved in the resist. The open spacing pattern in the base structure ensured that the bubbles did not merge to create a bigger bubble. The printing direction was out-of-plane towards the reader. | ||
To increase the sealing strength and avoid coalescence of any small bubbles that may form during a continuous writing process, open spaces were written in the base structure in a discontinuous circular pattern. This structured base layer in the form of a doughnut shape with a 400 μm outer diameter and 100 μm inner diameter was printed around the aperture of the fluidic interface (see Fig. 3B). The random dark spots in the figure are locations where laser ablation occurred. The regular gaps in the base structure reduced the chances of coalescence of the bubbles that were formed by the laser ablation. These bubbles remained localised in the gaps and eventually disappeared. In fact these tiny dark spots gave a visual confirmation that 2PP writing was happening at the interface ensuring a good seal. The corresponding CAD drawing of the doughnut shape structure is given in the ESI,† section 2.
On top of the doughnut-shaped base structure surface, a yurt-shaped structure was printed. Printing time for the doughnut base and yurt was approximately 50 minutes. Near the top of the yurt, the hollow cantilever was printed. The cantilever was printed in vertical overlapping slab slices instead of horizontal layers, for the reason that when these horizontal layers were attempted, the very first printed layer of a slender cantilever with dimensions of 500 μm × 30 μm was highly compliant due to its single voxel thickness (approximately 650 nm (ref. 34)). This layer was displaced during printing of the subsequent layers leading to discontinuous layers and a leaky channel surface structure. By printing in vertical slab slices this compliant initial layer problem was resolved. However, vertical printing was hindered by a shading effect, which occurs when structures are printed close together. One structure casts a shadow that reduces the amount of laser illumination in the shaded areas, effectively blocking parts of the other slab structures being printed. This was resolved by printing vertical slab structures at a 55° angle. Slab sizes of 5 μm and 3 μm thickness were tested and results of various writing tests performed are given in the ESI,† section 2.
The resulting full device with superimposed CAD drawings of the corresponding designs is shown in Fig. 4. The different cantilever types (type 1, 2, 3, and 4) with different tip shapes are also shown. The dimensions, volume, and stiffness of all cantilever types are given in Table 2. Note that cantilever type 5 (shown in Fig. 5) was a tipless version of cantilever types 2 and 3. It was printed in slab slices of 3 μm instead of 5 μm which resulted in a longer printing time. The sizes of the multi nuclear cells used in this work (human myoblasts/myotubes) ranged between 50 and 500 μm long, with nuclei sizes of about 10 μm in diameter. The dimensions for the cantilever tips and apertures were chosen such that an entire cell (a myoblast) or nucleus (from inside a myotube) could be non-destructively aspirated. This could be useful in the analysis of facioscapulohumeral muscular dystrophy disease etiology and development.38
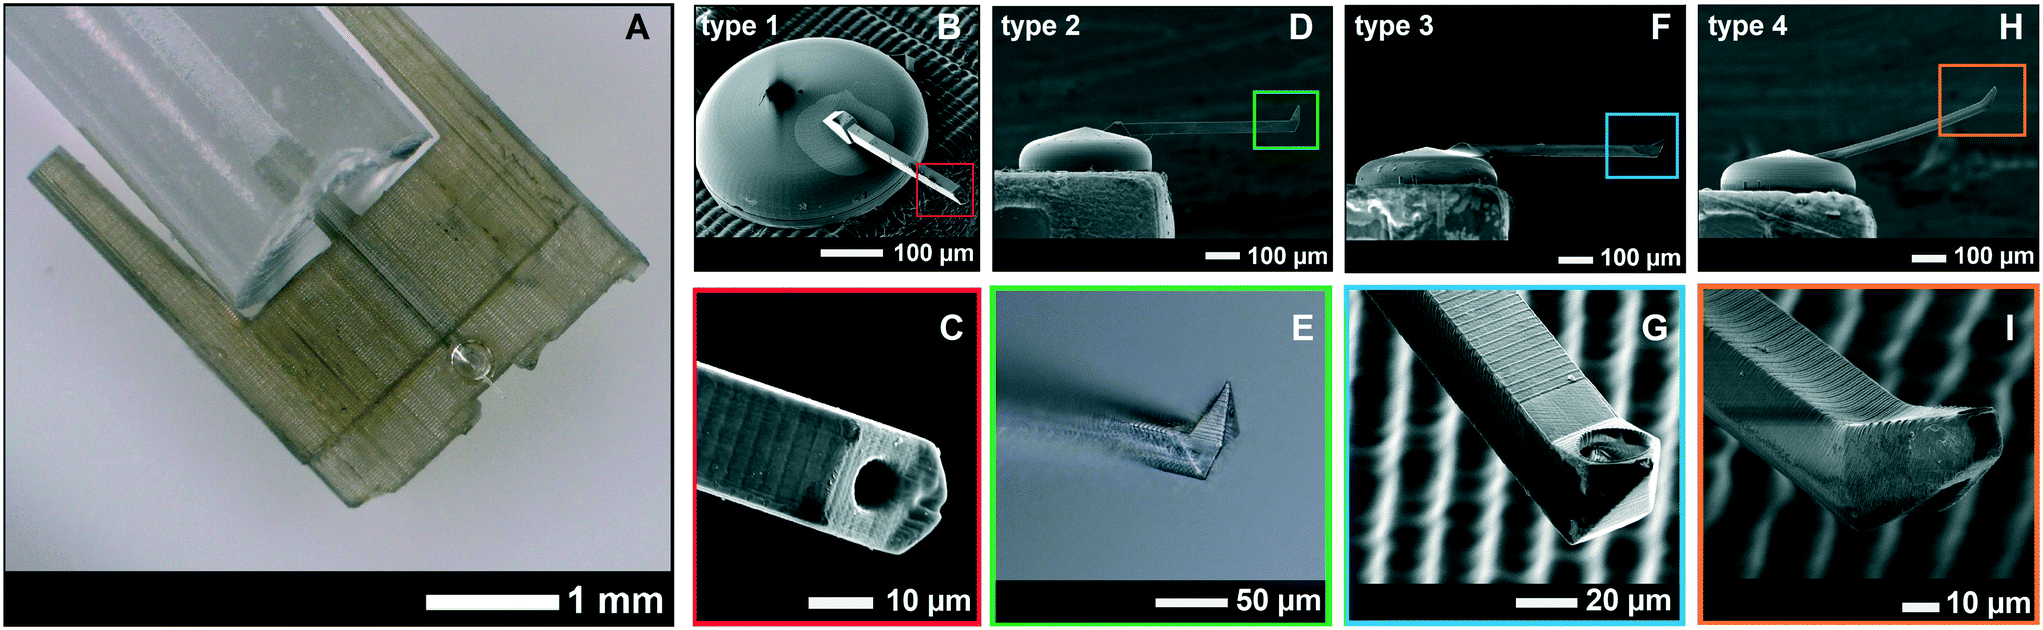 | ||
| Fig. 4 A. The entire 3D-printed device with the transparent yurt and cantilever. B. Zoomed-in SEM-image of the yurt and cantilever, showing the difference in resolution between the SL printed interface (with ridges) and 2PP printed yurt and cantilever. C. Zoomed-in image of a type 1 cantilever tip. The figures D, F, and H show cantilever types 2, 3, and 4, which were all 30 × 30 × 500 μm in dimensions. The first three cantilever types were printed in 5 μm slices that overlap each other by 1 μm. The type 2 cantilever had a sharp tip (E) that was used for AFM imaging and a side aperture of 25 μm on the pyramid wall in the front. The type 3 cantilever (G) had a 87° angled sharp tip and a side-aperture of 25 μm diameter next to the tip. The type 4 cantilever (I) was not printed in slices, but as a single entity with the parameter settings from Table 1. Its tip was printed at an angle of 30° with a 10 μm aperture at the apex. | ||
| w (μm) | h (μm) | l (μm) | t w (μm) | d i (μm) | V i (pl) | k (N m−1) | |
|---|---|---|---|---|---|---|---|
| Type 1 | 20 | 20 | 255 | 5 | 10 | 20 | 10.6 |
| Type 2 | 30 | 30 | 552 | 2.5 | 25 | 271 | 3.9 |
| Type 3 | 30 | 30 | 564 | 2.5 | 25 | 277 | 3.7 |
| Type 4 | 30 | 30 | 553 | 2.5 | 25 | 271 | 3.9 |
| Type 5 | 30 | 30 | 350 | 2.5 | 25 | 172 | 15.5 |
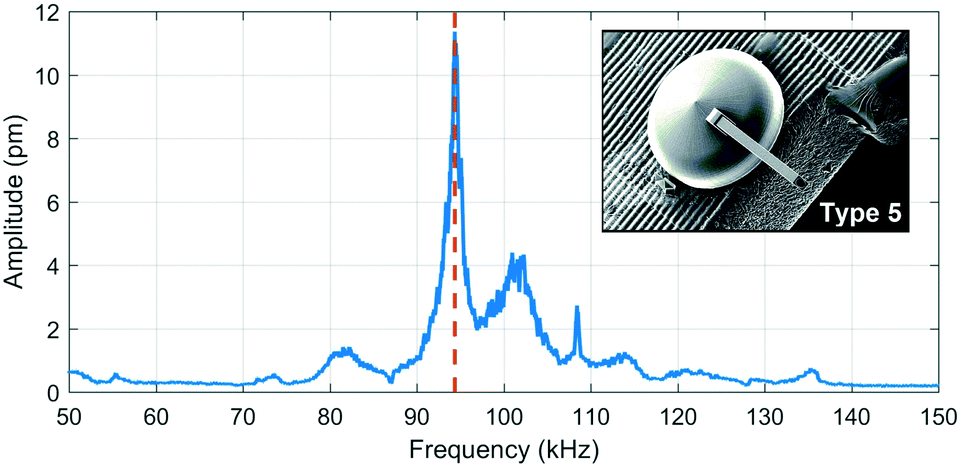 | ||
| Fig. 5 The frequency response of cantilever type 5 with the frequency of the first resonance mode at 94.3 kHz indicated by a vertical red dashed line. The inset is the SEM picture of the yurt and tipless cantilever printed on top of the interface. | ||
The printing time for the cantilever and tip depended on its type: the type 1 cantilever took ∼10 minutes to print, types 2 and 3 took ∼25 minutes, type 4 took ∼8.5 minutes, and type 5 took ∼35 minutes. After printing, they were placed in the developer for 48 hours at room temperature to ensure full development even inside the channels. Many devices were developed simultaneously to save on the total fabrication time. However, the printing method can be further automated and optimized together with other strategies that have been developed by others to decrease the printing time.30
3.3 Mechanical and fluidic characterization
The graph in Fig. 5 is the frequency response of a type 5 cantilever measured by laser Doppler vibrometry. The highest amplitude corresponds to the first flexural resonance mode. The other peaks could be modal influences of the yurt and SL printed part.The experimental values in Table 3 were obtained through LDV measurements on a type 5 cantilever and are compared with the analytical- and finite element models. A possible explanation for the discrepancies between them is that the elastic modulus depends on the degree of crosslinking between monomers, which, in acrylate-based photoresists, depends on the writing speed and laser power.39
The stiffness has been calculated analytically as 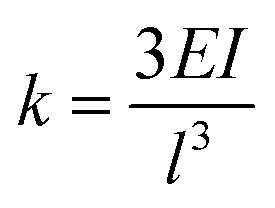 , where E is the elastic modulus, I is the moment of inertia, and l is the length of the cantilever. The moment of inertia of a rectangular cross-section cantilever with a circular hole is given by
 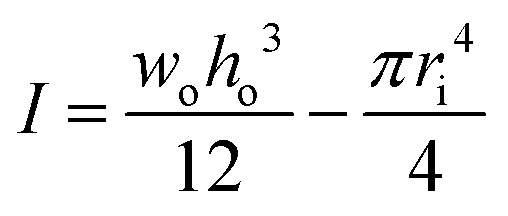 , where wo, ho and ri are the cantilever width, cantilever height, and channel radius, respectively. The eigenfrequency is given by
 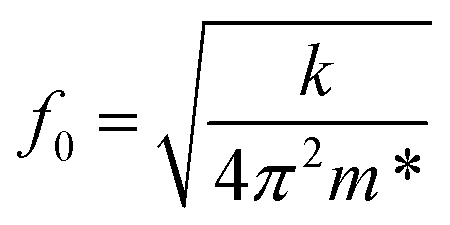 , where m* is the effective mass of the cantilever, m* = 0.24 m = 0.24 × rho × (Vcl − Vch), with ρ, m, Vcl, and Vch being the 2PP polymer density, cantilever mass, cantilever volume and channel volume, respectively. The volumes are calculated as Vcl = l × w × h and Vch = π × r2 × l.
A quality factor of 174 was measured in air under ambient conditions. This value is about three times larger than a 2PP-written doubly clamped suspended hollow SU-8 structure (Q ∼ 60).30 The fact that the 2PP-printed cantilever is only singly clamped could be one of the reasons for the higher quality factor, as energy dissipation through the supports only occurs on one side. For a U-shaped SiO2 hollow cantilever of 155 μm long, a 3.7 μm × 2.2 μm channel cross section and a wall thickness of 1 μm with a stiffness of 4.3 N m−1 had a quality factor of 457 in air.17 The low quality factor in the polymer cantilever is mainly due to more energy dissipation in the low elastic modulus material (4.2 GPa for the 2PP polymer compared to 87 GPa for SiO2). The large quality factors are important to obtain high sensitivity if used as a mass sensor.40
To test for any leakage, the cantilever was filled with deionised water by applying a constant flow rate of 10 μL min−1 with a syringe pump (SP100i, WPI Inc.). The frames at different time instances from a movie (see ESI† Movie M1) are shown in Fig. 6. The hydraulic model of the system is shown in the ESI,† section 3.
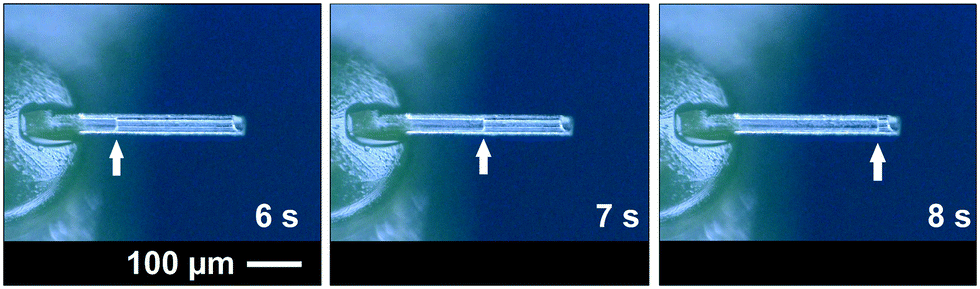 | ||
| Fig. 6 Fluid flow inside the channel at different instances of time. The yurt, transparent cantilever and tip aperture can be seen. The moving meniscus inside the channel is indicated by the white arrows. The corresponding video is shown in ESI† Movie M1. | ||
3.4 AFM imaging
The type 2 cantilever with a sharp tip shown in Fig. 4D and E was used for surface imaging. The device was mounted in the BioAFM cantilever holder (see the ESI,† section 1), and a standard calibration sample with 10 μm wide, 100 nm high ridges was used for imaging. Imaging was done with the sample submerged in deionised water at a line scan rate of 0.5 Hz in contact mode. The resulting images of the surface topography and its height profile are shown in Fig. 7. | ||
| Fig. 7 A. An AFM image obtained using a type 2 cantilever of a standard silicon test sample with 10 μm wide- and 100 nm high ridges. B. The height profile and the height difference between the two vertical red lines measured to be 85.3 nm, with an average surface roughness (Ra) of 40.83 nm, and a peak-to-valley roughness (Rt) of 92.48 nm. | ||
From Fig. 4E the tip radius was measured to be 2.5 μm for a type 2 cantilever. This radius can be further reduced by printing it using a microscope objective with a higher magnification than the 25× objective used here, for example 63×. Others31 have 3D-printed cantilever tips with a radius of 25 nm, which is comparable with tip radii of silicon AFM cantilevers fabricated by standard microfabrication.41
3.5 Cell puncture and aspiration
The force feedback in the AFM system enables controlled approach and puncturing of the cell membrane.18 The puncturing of the membrane was monitored by the force-distance curve by choosing an appropriate force setpoint using a type 3 cantilever, see Fig. 8. | ||
| Fig. 8 Force-distance curve obtained with a type 3 cantilever. The membrane puncture is indicated by the arrow, where the cantilever experiences a force resistance before the force increases again until the setpoint is reached. | ||
The deflection sensitivity of the cantilever was calibrated with the contact method, i.e., by acquiring a deflection vs. displacement curve on a glass surface, and it was found to be 33.9 nm V−1. The Hertz contact mechanics model was used to calculate the elastic modulus of the cell.42 The tip was considered spherical with a tip radius of 5 μm. By fitting the first part of the curve, i.e. the part of the curve which is not affected by the underneath rigid substrate (indentation depth 200 nm), the elastic modulus of the cell was calculated to be 44.3 kPa. Comparable values between 11.5 kPa and 45.3 kPa have been reported for in vitro differentiated myogenic cell cultures.43 The kink in the graph is an indication of the puncture of the cell membrane. Typically it is expected to see two kinks due to the top and bottom bilayers of the cell membrane, however only one is observed here. This could be because of high cantilever stiffness, or perhaps the top bilayer is pushed to the bottom bilayer and the rupture of both is measured as a single puncture event.
With the same type 3 cantilever a desired location for aspirating a cell was chosen and approached until it was near the cell membrane surface. An under-pressure of 1 bar was applied and the targeted myotube was aspirated. As other cells were also in contact with the aspirated cells, more cells got aspirated, resulting in detachment of more than one cell from the surface of the Petri dish (Fig. 9). A video of this is added as ESI† Video M2.
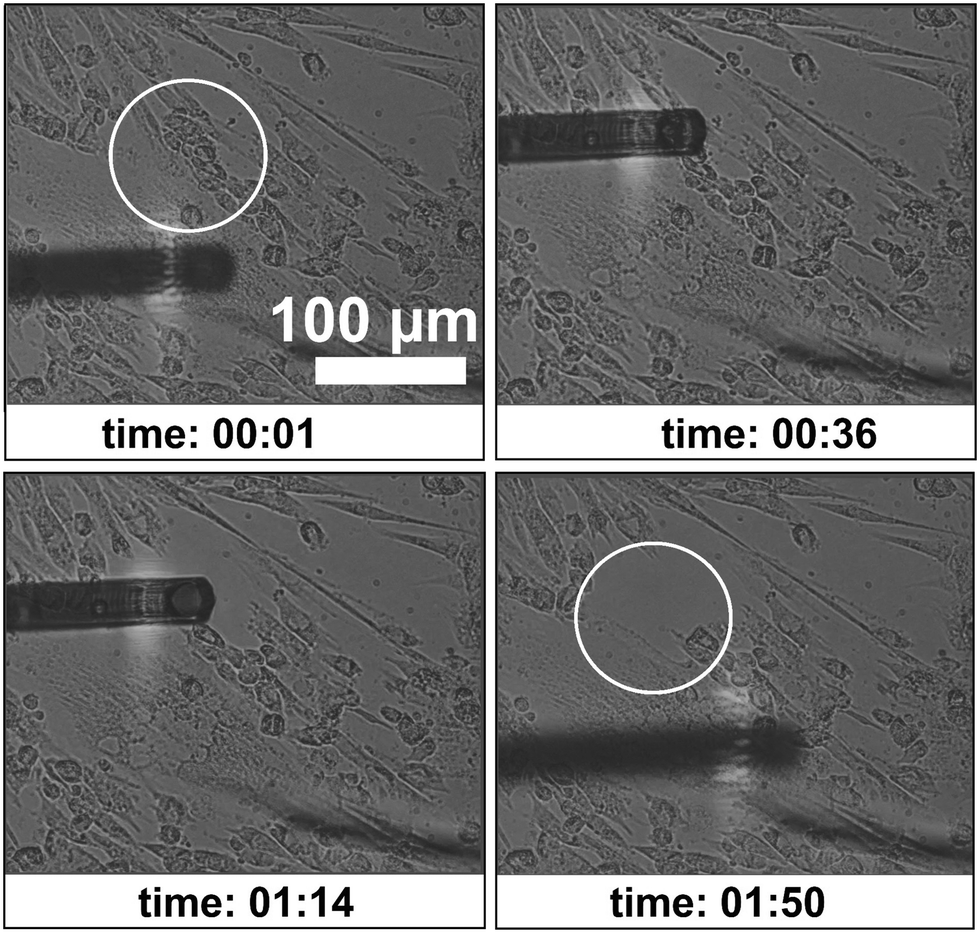 | ||
| Fig. 9 Different instances of time during the cell aspiration procedure. The white circle indicates the aspirated portion of differentiated muscle cells. See ESI† Video M2. | ||
4 Conclusions
In this work, microfluidic AFM cantilevers were printed in a ready-to-use format using multiple 3D printing methods for the first time. A fabrication method has been developed to print a polymer microfluidic hollow cantilever with the 2PP printing method onto an SL-printed fluidic interface. A base structure with closely spaced rectangular slits was printed at the interface between the two polymers to avoid coalescence of bubbles during the 2PP printing process and also to enhance the adhesion strength at the SL/2PP polymer interface. The adhesion strength of the interface was found to withstand 15 bars of pressure. Five different types of cantilevers were printed that can either exclusively image, exclusively pipette, or perform both force spectroscopy and pipetting. The 350 μm long, 30 μm square sided type 5 tipless cantilever with a 25 μm diameter channel and 2.5 μm wall thickness had a fundamental resonance frequency of 94.3 kHz, a material elastic modulus of 4.2 GPa, and a device stiffness of 14.2 N m−1. The surface imaging capability of these polymeric cantilevers was demonstrated in contact mode AFM on a standard silicon 1D line grating that was submerged in deionized water. A controlled puncturing of human-derived myoblasts fused into myotubes was performed and a cell membrane elastic modulus of 44.3 kPa was found. Finally, selected myotubes were aspirated, demonstrating controlled extraction and microfluidic AFM functionality of the 3D printed polymeric cantilevers.The major advantage of 3D printing of microfluidic polymeric AFM cantilevers is the reduction of fabrication and prototyping time and the increase in design freedom as compared to standard clean room microfabrication. The SL- and 2PP printing takes about 90 min in total to print a single device. The developing process after 2PP printing took about 48 hours to ensure full development of the narrow channels; however, this process can be further optimized resulting in reduced developing time. Some of the designs that are impossible (or difficult) by standard lithography processes become possible with these 3D printing methods. As the devices are made out of polymer, they have a low elastic modulus (4.2 GPa) and hence have higher damping and a lower quality factor compared to their silicon counterparts. Once the parameters are optimized for both printing methods, the settings can be used to produce many devices with all the design freedom, including in 3D. The SL based printers are affordable and have become ubiquitous but 2PP based printers are quite expensive. However, 2PP based printers are becoming more popular and hopefully will become cheaper eventually. So for now, the devices could be ordered from 2PP print service providers at a low cost, simply by submitting a design drawing. At the outset, the multi scale printing (combining SL and 2PP printing) will still outweigh the high infrastructure maintenance cost of a cleanroom and very limited design freedom of the standard lithography based microfabrication, at least for design prototyping and small volume production. Overall, 3D additive manufacturing is a rapid and cost effective way of printing microfluidic AFM cantilevers useful for many applications.
Author contributions
MKG and EJV conceived the idea of printing hollow cantilevers. RCLNK printed and tested the cantilevers. RCLNK, EJV and MKG discussed and analyzed the results of the printing process. SMvdM, AvdH and MKG conceived the idea of experiments on myotubes. AvdH prepared the myotubes. RCLNK, AvdH and LA did the experiments on myotubes. RCLNK, AvdH, LA, SMvdM, MKG discussed and analyzed the results on myotubes. RCLNK and MKG wrote the initial draft. MKG, LEFA and SMvdM arranged the funding. All the authors gave their comments on the manuscript and improved the writing.Conflicts of interest
All authors declare no conflict of interest.Acknowledgements
This work is part of the research project titled NFP4CryoEM with project number 13711, which is (partly) financed by the Netherlands Organisation for Scientific Research (NWO-TTW). It is also partially funded by TU Delft Health Initiative's “Health Prototypes” grant (2018), TU Delft Bioengineering Institute's “Bioengineering for health: preproposal grant” and Cohesion grant of 3mE faculty. SvdM is supported by funds from Prinses Beatrix Spierfonds (W.OP14-01 and W.OB17-01) and Spieren voor Spieren.References
- C. Trapnell, Genome Res., 2015, 25, 1491–1498 CrossRef CAS PubMed.
- S. M. Weiz, M. Medina-Sánchez and O. G. Schmidt, Adv. Biosyst., 2018, 2, 1700193 CrossRef.
- W. Lee, P. Tseng and D. D. Carlo, Microtechnology for Cell Manipulation and Sorting, Springer International Publishing, 2017 Search PubMed.
- N. Mehendale, O. Sharma, C. D'Costa and D. Paul, Biomed. Microdevices, 2017, 20, 6 CrossRef PubMed.
- P. Li, Z. Mao, Z. Peng, L. Zhou, Y. Chen, P.-H. Huang, C. I. Truica, J. J. Drabick, W. S. El-Deiry, M. D. S. Suresh and T. J. Huang, Proc. Natl. Acad. Sci. U. S. A., 2015, 112, 4970–4975 CrossRef CAS PubMed.
- T. P. Burg, M. Godin, S. M. Knudsen, W. Shen, G. Carlson, J. S. Foster, K. Babcock and S. R. Manalis, Nature, 2007, 446, 1066–1069 CrossRef CAS PubMed.
- A. K. Bryan, V. C. Hecht, W. Shen, K. Payer, W. H. Grover and S. R. Manalis, Lab Chip, 2014, 14, 569–576 RSC.
- N. Cermak, S. Olcum, F. F. Delgado, S. C. Wasserman, K. R. Payer, M. A. Murakami, S. M. Knudsen, R. J. Kimmerling, M. M. Stevens, Y. Kikuchi, A. Sandikci, M. Ogawa, V. Agache, F. Baléras, D. M. Weinstock and S. R. Manalis, Nat. Biotechnol., 2016, 34, 1052–1059 CrossRef CAS PubMed.
- M. M. Stevens, C. L. Maire, N. Chou, M. A. Murakami, D. S. Knoff, Y. Kikuchi, R. J. Kimmerling, H. Liu, S. Haidar, N. L. Calistri, N. Cermak, S. Olcum, N. A. Cordero, A. Idbaih, P. Y. Wen, D. M. Weinstock, K. L. Ligon and S. R. Manalis, Nat. Biotechnol., 2016, 34, 1161–1167 CrossRef CAS PubMed.
- D. J. Müller and Y. F. Dufrêne, Nat. Nanotechnol., 2008, 3, 261–269 CrossRef PubMed.
- S. E. Cross, Y.-S. Jin, J. Rao and J. K. Gimzewski, Nat. Nanotechnol., 2007, 2, 780 CrossRef CAS PubMed.
- K. Tomankova, P. Kolar, J. Malohlava and H. Kolarova, Current microscopy contributions to advances in science and technology, 2012, vol. 1, pp. 549–554 Search PubMed.
- J. Helenius, C.-P. Heisenberg, H. E. Gaub and D. J. Muller, J. Cell Sci., 2008, 121, 1785–1791 CrossRef CAS PubMed.
- K. Haase and A. E. Pelling, J. R. Soc., Interface, 2015, 12, 20140970 CrossRef PubMed.
- A. Raman, S. Trigueros, A. Cartagena, A. P. Z. Stevenson, M. Susilo, E. Nauman and S. A. Contera, Nat. Nanotechnol., 2011, 6, 809–814 CrossRef CAS PubMed.
- A. Meister, M. Gabi, P. Behr, P. Studer, J. Vörös, P. Niedermann, J. Bitterli, J. Polesel-Maris, M. Liley, H. Heinzelmann and T. Zambelli, Nano Lett., 2009, 9, 2501–2507 CrossRef CAS PubMed.
- M. K. Ghatkesar, H. H. P. Perez and U. Staufer, Microelectron. Eng., 2014, 124, 22–25 CrossRef CAS.
- O. Guillaume-Gentil, E. Potthoff, D. Ossola, C. M. Franz, T. Zambelli and J. A. Vorholt, Trends Biotechnol., 2014, 32, 381–388 CrossRef CAS PubMed.
- M. K. Ghatkesar, H. H. P. Garza, F. Heuck and U. Staufer, Micromachines, 2014, 5, 954–1001 CrossRef.
- O. Guillaume-Gentil, R. V. Grindberg, R. Kooger, L. Dorwling-Carter, V. Martinez, D. Ossola, M. Pilhofer, T. Zambelli and J. A. Vorholt, Cell, 2016, 166, 506–516 CrossRef CAS PubMed.
- N. Moldovan, K.-H. Kim and H. D. Espinosa, J. Microelectromech. Syst., 2006, 15, 204–213 CrossRef.
- V. Martinez, P. Behr, U. Drechsler, J. Polesel-Maris, E. Potthoff, J. Vörös and T. Zambelli, J. Micromech. Microeng., 2016, 26, 055006 CrossRef.
- M. Vaezi, H. Seitz and S. Yang, Int. J. Adv. Manuf. Technol., 2013, 67, 1721–1754 CrossRef.
- S. Waheed, J. M. Cabot, N. P. Macdonald, T. Lewis, R. M. Guijt, B. Paull and M. C. Breadmore, Lab Chip, 2016, 16, 1993–2013 RSC.
- R. Amin, S. Knowlton, A. Hart, B. Yenilmez, F. Ghaderinezhad, S. Katebifar, M. Messina, A. Khademhosseini and S. Tasoglu, Biofabrication, 2016, 8, 022001 CrossRef PubMed.
- F. P. W. Melchels, J. Feijen and D. W. Grijpma, Biomaterials, 2010, 31, 6121–6130 CrossRef CAS PubMed.
- S. Maruo and K. Ikuta, Sens. Actuators, A, 2002, 100, 70–76 CrossRef CAS.
- Z. Gan, Y. Cao, R. A. Evans and M. Gu, Nat. Commun., 2013, 4, 2061 CrossRef PubMed.
- E. Montinaro, M. Grisi, L. Pethö, M. A. M. Gijs, R. Guidetti, J. Michler, J. Brugger and G. Boero, PLoS One, 2018, 13, e0192780 CrossRef CAS PubMed.
- C. Accoto, A. Qualtieri, F. Pisanello, C. Ricciardi, C. F. Pirri, M. D. Vittorio and F. Rizzi, J. Microelectromech. Syst., 2015, 24, 1038–1042 CAS.
- G. Göring, P.-I. Dietrich, M. Blaicher, S. Sharma, J. G. K. T. Schimmel, C. Koos and H. Hölscher, Appl. Phys. Lett., 2016, 109, 063101 CrossRef.
- F. Perrucci, V. Bertana, S. L. Marasso, G. Scordo, S. Ferrero, C. F. Pirri, M. Cocuzza, A. El-Tamer, U. Hinze, B. N. Chichkov, G. Ganavese and L. Scaltrito, Microelectron. Eng., 2018, 195, 95–100 CrossRef CAS.
- J. T. Fourkas, in Three-Dimensional Microfabrication Using Two-photon Polymerization, ed. T. Baldacchini, William Andrew Publishing, Oxford, 2016, pp. 45–61 Search PubMed.
- Y. Liu, O. Stein, J. H. Campbell, L. Jiang, N. Petta and Y. Lu, Nanoengineering: Fabrication, Properties, Optics, and Devices XIV, International Society for Optics and Photonics, 2017, vol. 10354, p. 103541U Search PubMed.
- H. Gong, M. Beauchamp, S. Perry, A. T. Woolley and G. P. Nordin, RSC Adv., 2015, 5, 106621–106632 RSC.
- H. Gong, B. P. Bickham, A. T. Woolley and G. P. Nordin, Lab Chip, 2017, 17, 2899–2909 RSC.
- C. Liao, W. Anderson, F. Antaw and M. Trau, ACS Appl. Mater. Interfaces, 2018, 10, 4315–4323 CrossRef CAS PubMed.
- A. van den Heuvel, A. Mahfouz, S. L. Kloet, J. Balog, B. G. van Engelen, R. Tawil, S. J. Tapscott and S. M. van der Maarel, Hum. Mol. Genet., 2018, 28, 1064–1075 CrossRef PubMed.
- L. J. Jiang, Y. S. Zhou, W. Xiong, Y. Gao, X. Huang, L. Jiang, T. Baldacchini, J.-F. Silvain and Y. F. Lu, Opt. Lett., 2014, 39, 3034–3037 CrossRef PubMed.
- J. Lee, A. K. Bryan and S. R. Manalis, Rev. Sci. Instrum., 2011, 82, 023704 CrossRef PubMed.
- F. Yu, J. Liu, X. Zhang, A.-L. Lin, N. Khan, Y. Pan, N. Gao, Q. Zou and J. Jeon, J. Vac. Sci. Technol., B: Nanotechnol. Microelectron.: Mater., Process., Meas., Phenom., 2016, 34, 06KI01 Search PubMed.
- B. Cappella and G. Dietler, Surf. Sci. Rep., 1999, 34(1–3), 5–104 Search PubMed.
- A. M. Collinsworth, S. Zhang, W. E. Kraus and G. A. Truskey, Am. J. Physiol., 2002, 283, C1219–C1227 CrossRef CAS PubMed.
Footnote |
| † Electronic supplementary information (ESI) available: Movie M1 – dispensing cantilever. Movie M2 – live cell aspiration. Additional information and figures for the fabrication, cantilever slicing, adhesion experiment, and hydraulic model. See DOI: 10.1039/c9lc00668k |
| This journal is © The Royal Society of Chemistry 2020 |