DOI:
10.1039/C7RA07158B
(Paper)
RSC Adv., 2017,
7, 40592-40599
Multiwalled carbon nanotubes enhanced the friction layer evolution and self-lubricating property of TiAl-10 wt% Ag-1 wt% MWCNTs sample†
Received
28th June 2017
, Accepted 3rd August 2017
First published on 21st August 2017
Abstract
The necessity of reducing energy consumption and usage of material in aerospace and aviation industries drives the further optimization of friction and wear properties of TiAl alloys. Herein, the effect of MWCNTs on the friction layer evolution and lubrication properties of TiAl-10 wt% Ag-1 wt% MWCNT (TAM) composites sliding against Si3N4 balls are studied on a ball-on-disk tribometer. The research results show that the friction coefficients and wear rates of TAM sample at 0–160 min are smaller than those of TiAl-10 wt% Ag (TA). During the process of sliding wear, MWCNTs in TAM were gradually exposed to wear scar and were tightly combined with silver, which was beneficial for the formation of lubrication film on the wear scar. Consequently, the formation of lubricating film was accelerated by the MWCNTs, and the evolution process of the friction layer of TAM sample was shortened. The excellent synergetic lubrication behavior of MWCNTs and silver in the lubricating film effectively reduced friction resistance and material loss, resulting in TAM with smaller friction coefficient and lower wear rate in comparison to TA.
1. Introduction
Because of their outstanding properties, such as low density, high elastic modulus and creep resistance, TiAl alloys are widely applied in the manufacturing of aerospace components and automobile accessories, such as turbine blades and exhaust valves.1–3 However, poor friction and wear behaviour of TiAl alloys are obstacles in the improvement of thrust load and also for increasing the service life of TiAl alloy-based mechanical parts under some extreme conditions.4–6
In order to realize low friction and less wear, several researchers have devoted their attention to optimizing the friction and wear behaviors of TiAl alloys by fabricating TiAl based self-lubricating composites containing solid lubricants such as silver,7 graphene8 and MoS2.9 During the sliding friction and wear process, massive amount of silver is gathered on the wear scar to form a silver-rich lubricating film with the evolution of friction layer, resulting in excellent anti-friction and anti-wear properties.8–10 Tribology researchers such as Xu et al.10 and Yang et al.11 probed the friction and wear behavior of TiAl-10 wt% Ag (TA) sliding against fixed Si3N4 ball and found that silver was gradually squeezed out of TA with the structure evolution of the friction layer and enriched the wear scar, which caused TA to obtain the small friction coefficient and less wear rate. Xu et al.12 studied the anti-friction and anti-wear property of silver lubricating film, and found that silver lubricating film exhibited low friction and less wear for the plastic deformation of silver. In addition, it was also found that silver lubricating film possessing low tensile strength of about 140–170 MPa was easily destroyed by the high von Mises contact stress,13 which was not advantageous towards the improvement of the anti-friction and anti-wear properties. Zou et al.14 utilized graphene to improve the tensile strength of the lubricating film and found that graphene could effectively enhance the lubricating property of silver film, which further caused the TiAl–graphene–Ag to exhibit small friction and low wear. Multiwalled carbon nanotubes (MWCNTs) possessing excellent mechanical properties, such as elastic modulus of 1 TPa and tensile strength of 50–200 GPa,15 are considered to enhance the tensile strength of the lubricating film.16 It was found that the tensile strength of the silver film was significantly improved by the enhanced phase MWCNTs, which could effectively protect the lubricating film from destroying the matching pair, resulting in the excellent tribological behavior of TiAl–MWCNTs–Ag sample. To the best of our knowledge, there are only few papers reporting the influence of MWCNTs on friction layer evolution and self-lubricating properties of TAM sample.
Herein, in order to explore the effect of MWCNTs on the friction layer evolution and lubricating behavior of TAM sample, TiAl-10 wt% Ag-1 wt% MWCNTs (TAM) sample was fabricated using spark plasma sintering with reference to the research result of Yang et al.16 According to ASTM Standard of G99-95 (ref 17), HT-1000 ball-on-disk tribometer was adopted to measure the friction and wear performance of TiAl-10 wt% Ag-1 wt% MWCNTs by sliding against Si4N3 balls. With the assistance of electron probe microanalyzer (EPMA), the primary wear mechanism was analyzed by observing wear scar micro-morphology. Field emission scanning electron microscopy (FESEM) was adopted to observe the cross-sectional micro-morphologies of the friction layers. The main elemental contents in the friction layer were measured by energy dispersive spectroscopy (EDS). X-ray photo electron spectroscopy (XPS) was performed to characterize the main existing phases on wear scars.
2. Experimental
2.1 TAM sample fabrication
Table 1 exhibits the representative main element components of the TAM sample. As exhibited in Table 1, the commercial powders of Ti, Al, B, Nb, Cr, Ag and MWCNTs (1–25 μm in mean size, ≥95.5 wt% in purity) were adopted to fabricate the TA and TAM samples using spark plasma sintering (SPS) of D.R. Sinter® SPS3.20. Before SPS process, the raw powders were mixed for 45 min using vibration milling at 45 Hz frequency in a Teflon vial with 50 mm inner diameter and loaded into a cylindrical graphite mold with 25 mm inner diameter. After loading, the TA and TAM samples were fabricated by SPS under the protection of pure Ar atmosphere. The operational parameters chosen for preparing TA and TAM samples include 100–115 °C min heating rate, 900–1100 °C sintering temperature, 10–15 min holding time and 35–45 MPa holding pressure.
Table 1 Representative main element component of TAM sample
| Material |
Ti |
Al |
Cr |
Nb |
B |
Ag |
MWCNTs |
| Matching (at%/wt%) |
48 at% |
47 at% |
2 at% |
2 at% |
1 at% |
10 wt% |
1 wt% |
| Purity (wt%) |
≥99% |
≥99% |
≥99% |
≥99% |
≥99% |
≥95.5% |
≥97.5% |
| Particle size |
≤20 μm |
≤20 μm |
≤20 μm |
≤20 μm |
≤20 μm |
≤25 μm |
≤50 nm |
Fig. 1 exhibits the typical FESEM morphologies and XRD patterns of MWCNTs and silver. As can be seen from Fig. 1, with the assistance of FESEM instrument, the typical micro-morphologies of MWCNTs (see Fig. 1a) and sliver (see Fig. 1c) are better observed. According to the XRD intensities of phase diffraction peaks in Fig. 1b and d, the high purity powders of MWCNTs and sliver were used to improve the friction and wear behavior of TiAl alloys.
 |
| | Fig. 1 Typical FESEM morphology (a) and XRD pattern (b) of MWCNTs, as well as FESEM morphology (c) and XRD pattern of (d) of silver. | |
2.2 Measured density and Vicker's hardness
Before being measured, the as-prepared specimens were ground to remove the surface layer mechanically polished using emery papers of 1000–1200 grit and polishing diamond paste of 0.02–0.05 μm. In accordance with ASTM standard of E92-82,18 with the assistance of Vicker's hardness instrument of HVS-1000, the micro-hardness of each as-received sample was measured for the dwell time of 8 s at an applied load of 10 N. To contradict the Vicker's indenter to impact reinforced particles like MWCNTs, seven testing locations are chosen herein. After the test, the mean Vicker's hardness (approximate 6.08 GPa) of the TAM sample was found to be higher than that (about 5.97 GPa) of the TA sample. ASTM Standard of B962-08 (ref. 19) and the Archimedes' principle were used to obtain the mean density (about 3.78 g cm−3) of TAM and it was found to be smaller than that (approximate 4.22 g cm−3) of TA.
3. Results and discussion
3.1 Phase research and element distribution
Fig. S1 in the ESI† is the FESEM cross-sectional morphology of MWCNTs in TAM and XRD pattern of the TAM sample prepared by SPS. As shown in Fig. S1a,† massive MWCNTs and slight silver appeared in the TAM cross-section, which were tightly combined with the TiAl alloys. As can be seen from Fig. S1b,† the main phase compositions of the TAM sample were TiAl alloys, silver, MWCNTs and slight TiC in accordance with the XRD intensities of the phase diffraction peaks.
As described by Xu et al.20 and Yang et al.,21 with particular reference to the second law of thermodynamics, the synthetic reaction of slight TiC can be written as follows:
| |
 | (1) |
| ΔG01 = −390.49 + (74.44 × 3) + 127.09 = −40.08 < 0 |
| | |
4Ti + TiAl3 → Ti3Al + 2TiAl
| (3) |
| ΔG02 = −364.77 + (−205.44 × 2) + (127.09 × 2) + 390.49 = −130.98 < 0 |
| ΔG03 = −184.80 + 15.55 × 1373/1000 = −163.45 < 0 |
| ΔG04 = −89.61 + 32.84 × 1373/1000 = −44.52 < 0 |
| | |
TiAl3 + C → TiC + 3Al
| (6) |
| ΔG05 = −152.85 + 7.64 × 1373/1000 = −143.84 < 0 |
| | |
TiAl3 + 1/3Al4C3 → TiC + 13/3Al
| (7) |
| ΔG06 = −63.24 + 25.21 × 1373/1000 = −28.63 < 0 |
where Δ
G01, Δ
G02, Δ
G03, Δ
G04, Δ
G05 and Δ
G06 are Gibbs free energy. As shown in the above-mentioned formulas, Al
4C
3, Ti
3Al and TiAl
3 act as the intermediate phases during the process of the synthesis reaction, leading to the formation of slight TiC.
The typical EPMA morphology and main elemental distributions of TAM sample prepared by SPS are exhibited in ESI Fig. S2.† As can be seen from Fig. S2,† after being polished, silver and MWCNTs are uniformly distributed on the surface of the TAM sample fabricated by SPS.
3.2 Friction coefficients and wear rates
Fig. 2a exhibits the typical schematic diagram of the matching tribopair of the as-prepared sample/Si3N4 ball. As shown in Fig. 2a, according to ASTM Standard of G99-95,20 the friction and wear properties of TA and TAM samples, sliding against the Si3N4 balls of 6 mm in diameter and 15 GPa in hardness, were measured on a HT-1000 ball-on-disk tribometer at a high temperature (Zhong Ke Kai Hua Corporation, China). The measuring conditions (12 N and 450 °C) were chosen on the basis of the ones proposed by Yang et al.,11 and it was found that better friction and wear behaviour of TiAl-10 wt% Ag was achieved at 450 °C compared to other temperatures. Before being measured, the rotating disks of the TA and TAM samples were cleaned by liquid acetone and dried in hot air. During the friction and wear process for 0–160 min, the friction coefficients were continuously recorded using the computer-controlled system of HT-1000. The wear rates W of the TA and TAM samples were mainly determined by the computational formula of W = (2Aπr)/(LF). Herein, F, L and r are the applied load, sliding distance and friction radius, respectively. A is the mean cross-sectional area of the wear scars, which could be calculated using the surface profiler of ST400 (Nanovea Corporation, America). Fig. 2b and c are the representative measured 3D and 2D profiles of the wear scars. As can be seen from Fig. 2b and c, when the tested stylus of the ST400 profiler slowly moved across the wear scar along the measured line of AB (see Fig. 2b), the coordinate positions of the tested stylus were continuously recorded to form the 2D profile of the wear scar (see Fig. 2c). Similarly, other tests such as CD, EF and HI were also carried out. After being tested, the three wear scars were examined by ST400 to obtain the mean cross-sectional area A for calculating the wear rates of the TA and TAM samples.
 |
| | Fig. 2 Typical schematic diagram of matching tribopair of the as-prepared sample/Si3N4 balls (a), measured profiles of wear scars: 3D (b) and 2D (c). | |
Fig. 3 shows the typical friction coefficients and wear rates of the TA and TAM samples after 160 min of sliding wear at 12 N-450 °C. As can be seen from Fig. 3, compared to TA, the TAM sample obtained smaller friction coefficients and less wear rates. According to the friction coefficients and wear rates of TAM, the friction and wear measurement at 160 min sliding could be divided into two wear stages: initial wear stage (0–20 min) and stable wear stage (20–160 min). Similarly, the friction and wear process of the TA sample is mainly composed of initial wear stage (0–25 min), fast wear stage (25–60 min) and stable wear stage (60–160 min). Hence, compared to that of the TA sample, the friction and wear process of the TAM sample was shortened into two wear stages from three wear stages at the effect of the enhanced phase MWCNTs.
 |
| | Fig. 3 Typical friction coefficients and wear rates of TA and TAM samples after 160 min sliding wear at 12 N-450 °C. | |
In order to further understand the effect of MWCNTs on the friction layer evolution and self-lubricating property of TA and TAM samples, it was necessary to analyze the structural evolution of the friction layer with increase in the sliding time.
3.3 Analysis of the friction layer
Herein, the cross-sectional structures of the friction layers were obtained using the method of cooling fracture to prevent the damage to the organization structure of the material. After being cleaned, the as-prepared samples were incised down to a residual thickness of 1–1.5 mm at the relative side of the wear scars. After being incised, the tested samples were cooled for 40 min in liquid nitrogen, and were then divided into two parts at the effect of high shearing stress.
Fig. 4 shows the typical FESEM cross-sectional micro-morphologies of friction layers of TA sample at 20 min, 40 min and 60 min. As shown in Fig. 4, during the 60 min sliding wear process, the organizational microstructure of the friction layer, which existed above the micro-deformation layer, gradually evolved to particle refinement layer at 40 min from the work hardening layer at 20 min. When sliding time was increased up to 60 min from 40 min, the friction layer microstructure of the TA sample transformed into a lubricating film, grain refined layer and micro-deformation layer.
 |
| | Fig. 4 Typical FESEM cross-sectional micro-morphologies of friction layers of TA sample at 20 min (a), 40 min (b) and 60 min (c). | |
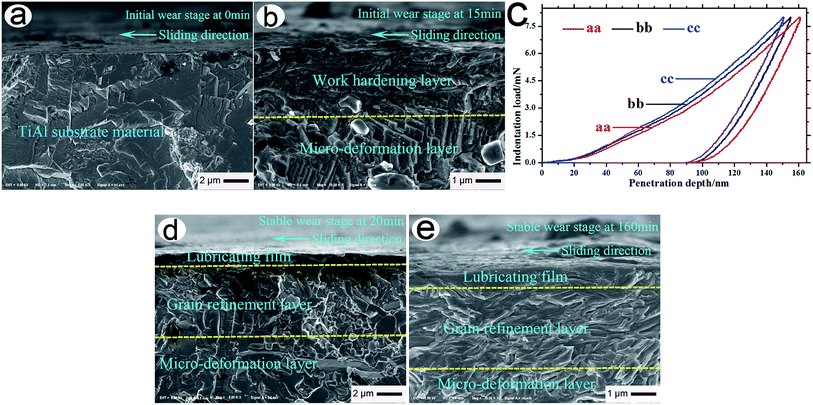
Fig. 5 shows the typical FESEM cross-sectional micro-morphologies of the friction layers of TAM sample at different sliding times and indentation curves in cross-section at 15 min. As shown in Fig. 5a and b, when the sliding time was increased up to 15 min from 0 min, at the repeating effect of high von Mises stress, the subsurface material of wear scar underwent plastic deformation to form the friction layer, which mainly consisted of the work hardening layer and the micro-deformation layer (see Fig. 5b). As shown in Fig. 5c, in accordance with the nanoindentation curves at 15 min, the mean nanohardness and elasticity modulus (EM) of the work hardening layer are equal to 10.2 GPa and 193 GPa. As shown in Fig. 5d and e, when the sliding time is increased up to 160 min from 60 min, the friction layer, which is mainly composed of the lubricating film (0.8–0.9 GPa in nanohardness, 72.1–77.5 GPa in EM), grain refinement layer (10.4–11.2 GPa in nanohardness, 190.3–197.8 GPa in EM) and micro-deformation layer (5.2–5.9 GPa in nanohardness, 142.2–147.6 GPa in EM) is gradually formed.
 |
| | Fig. 5 Typical FESEM cross-sectional micro-morphologies of friction layers of TAM sample at 0 min (a), 15 min (b), 20 min (d) and 160 min (e), as well as nanoindentation curves in cross-section at 15 min (c). | |
Further to the above-mentioned discussions in Fig. 3–5, we found that the MWCNTs accelerated the structure evolution of the friction layer, and caused the evolution time to be shortened down to 20 min from 60 min. Namely, the evolution process of the friction layer was converted into two stages (see Fig. 5) from three stages (see Fig. 4).
3.4 Analysis of the wear scar
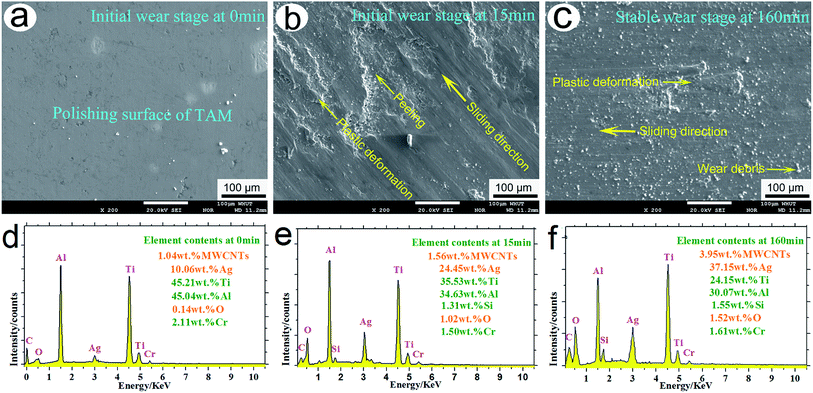
Fig. 6 shows the representative EPMA surface morphologies and main element contents on wear scars of the TAM sample at the sliding time of 0–160 min. As shown in Fig. 6b, when the sliding time was increased to 15 min, the main wear mechanisms of the TAM were peeling and plastic deformation resulting in the appearance of peeled pits and a plastic deformation body. As shown in Fig. 6c, when sliding time was further increased to 160 min, the plastic deformation body appeared on the wear scar, indicating that the main wear mechanism was plastic deformation at 160 min. As shown in Fig. 6d and e, when the sliding time increased to 15 min from 0 min, the silver content on the wear scar increased to 24.45 wt% from 10.06 wt%. MWCNT content also increased to 1.56 wt% from 1.04 wt%. As can be seen from Fig. 6e and f, during the sliding wear process of 15–160 min, silver content ascended to 37.15 wt% from 24.45 wt%, whereas the MWCNT content increased to 3.95 wt% from 1.56 wt%. Additionally, oxygen element (O) content increased to 1.52 wt% from 0.14 wt% with an increase in sliding time from 0 to 160 min. It indicates that massive metallic oxides are formed at 0–160 min sliding.
 |
| | Fig. 6 Representative EPMA surface morphologies (a–c) and main element contents on wear scars (d–f) of TAM sample at the sliding time of 0–160 min. | |
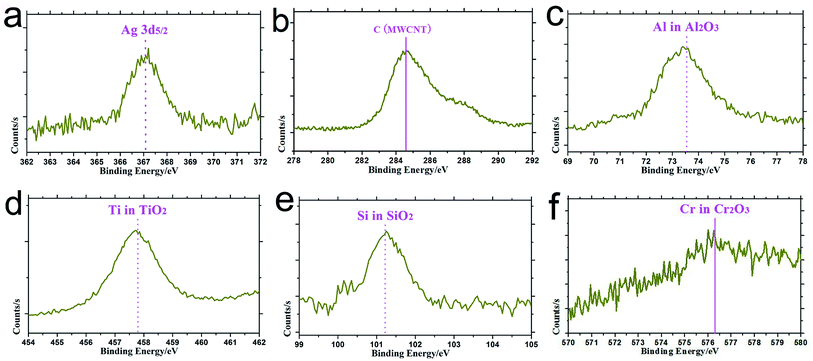
In ESI, Fig. S3† shows the representative EPMA morphology and main elemental distributions of the TAM sample at 160 min. As exhibited in Fig. S3,† the MWCNT, Ag and O elements are uniformly distributed on the wear scar. Fig. 7 is the typical XPS characterization of phases on wear scar of the TAM sample at 160 min sliding. As shown in Fig. 7, solid lubricant silver (see Fig. 7a) and enhanced phase MWCNTs (see Fig. 7b) appear on the wear scar. After 160 min, main metal oxides such as Al2O3, TiO2, SiO2 and Cr2O3 are gradually formed. The oxide synthesis reactions could be written as 2Al + 3O → Al2O3, Ti + 2O → TiO2, Si + 2O → SiO2 and 2Cr + 3O → Cr2O3. For attaining high mechanical strength and Vicker's hardness, the metal oxides formed were subjected to normal stress during the sliding wear process and it prevented the destruction of the lubrication film, resulting in small friction and less wear of the TAM sample.
 |
| | Fig. 7 Typical XPS characterization of phases on wear scar of TAM sample at 160 min sliding. | |
Fig. 8 shows the typical FESEM micro-morphologies of the wear scars of the TAM sample at 5 min, 10 min and 15 min. As shown in Fig. 8a, at 0–20 min (initial wear stage), when sliding time increased to 5 min, a small amount of silver and slight MWCNTs was gradually exposed to the wear scar. As exhibited in Fig. 8b, with increasing sliding time from 5 min to 10 min, sliver and MWCNTs abundantly gathered at the wear scar. As can be seen from Fig. 8c, when the sliding time is increased to 15 min from 10 min, massive amount of sliver gets tightly combined with MWCNTs on the wear scar.
 |
| | Fig. 8 Typical FESEM micro-morphologies of wear scars of TAM sample at 5 min (a), 10 min (b) and 15 min (c). | |
Fig. 9 shows the representative FESEM morphology of the wear scar of the TAM sample. Back-scattering morphology and FESEM micro-morphology of the wear scar are marked by the rectangle in Fig. 9a. As shown in Fig. 9, at 20 min (stable wear stage), solid lubricant silver in white region and enhanced phase MWCNTs in black region are uniformly distributed on the wear scar (see Fig. 9b) which then spread out to form the lubricating film at the effect of the friction force, resulting in the smooth morphology of the wear scar (see Fig. 9a). As shown in Fig. 9c, the FESEM amplified micro-morphology of the wear scar marked by rectangle in Fig. 9a is beneficial in better understanding the friction interface of the matching pairs. The smooth wear scar is beneficial to the lowering of friction resistance and material loss. The synergetic lubrication of MWCNTs and silver in the lubricating film effectively improves the anti-friction and anti-wear properties of the TAM sample. It then leads to small friction and less wear of the TAM sample.
 |
| | Fig. 9 Typical FESEM morphology of wear scar of TAM sample (a), back-scattering morphology (b) and FESEM micro-morphology (c) of wear scar marked by rectangle in (a) at 20 min. | |
Fig. S4 in ESI† is the typical EPMA morphology of the wear scar of the TA sample. Main element content and FESEM micro-morphology of the silver lubricating film is in the region of rectangle A in Fig. S4a.† As shown in Fig. S4a,† the plastic deformation body appears on the wear scar, indicating that the main wear mechanism of the TA sample is the plastic deformation at 160 min. As can be seen from Fig. S4b,† the main element contents in the region of rectangle A in Fig. S4a† are approximately 32.14 wt% Al, 34.45 wt% Ti and 33.41 wt% Ag. As shown in Fig. S4c,† solid lubricant silver gets abundantly enriched on the wear scar to form the lubricating film at 160 min. The micro-morphology of the lubricating film in the region of rectangle A is clearly observable with the help of FESEM testing instrument.
Based on the above-mentioned discussions on lubricating property of the friction layer, when the sliding wear is executed up to 160 min, the friction layers of TA and TAM samples are mainly composed of the lubricating film, grain refined layer and micro-deformation layer (see Fig. 4 and 5). However, at the effect of the friction layers, TAM sample obtained the smaller friction coefficient and less wear rate, compared to the TA sample. During the sliding wear process, the MWCNTs in TAM were gradually exposed to the wear scar and were tightly combined with silver, which was beneficial to the stable existence of silver lubrication film on the wear scar. Consequently, the formation of the lubricating film was accelerated by the MWCNTs, and the evolution process of the friction layer of the TAM sample was shortened. The excellent synergetic lubrication behavior of MWCNTs and silver in the lubricating film can effectively reduce friction resistance and material loss, resulting in TAM with smaller friction coefficients and less wear rates compared to TA.
4. Conclusions
Herein, we primarily explored the influence of MWCNTs on friction layer evolution and lubrication property of TAM sample prepared by SPS. The obtained conclusions are listed as follows:
(1) TAM sample obtained lower friction coefficients and less wear rates at 0–160 min compared to the TA sample at 12 N-450 °C.
(2) MWCNTs accelerated the structure evolution of the friction layer of TAM and caused the evolution time to be shortened down to 20 min from 60 min compared to that of the TA sample.
(3) MWCNTs were tightly combined with silver to form the lubricating film, which exhibited excellent synergetic lubrication behavior, resulting in the lower friction coefficients and less wear rates of TAM in comparison to those of the TA sample.
Conflicts of interest
There are no conflicts to declare.
Acknowledgements
The research is supported by the National Natural Science Foundation of China (51275370) and the Foundation of the Henan Educational Committee (16A460001). Authors are also appreciative to Nanjing XFNANO Materials Tech Co., Ltd for their kind help with powders.
References
- S. Y. Sung and Y. J. Kim, Intermetallics, 2007, 15, 468 CrossRef CAS.
- X. H. Wu, Intermetallics, 2006, 14, 1114 CrossRef CAS.
- F. Klocke, L. Settineri and D. Lung, Wear, 2013, 302(1–2), 1136–1144 CrossRef CAS.
- Z. Y. He, Z. X. Wang and F. Zhang, Surf. Coat. Technol., 2013, 228(8), 287 CrossRef.
- W. G. Liu, X. B. Liu and Z. G. Zhang, J. Alloys Compd., 2009, 470, 25 CrossRef.
- X. L. Shi, Z. S. Xu and M. Wang, Wear, 2013, 303, 486 CrossRef CAS.
- V. Arash, K. Anoush and S. M. Rabiee, Scanning, 2015, 37(4), 294 CrossRef CAS PubMed.
- K. Yang, X. L. Shi, W. Z. Zhai, L. Chen and A. Zhang, RSC Adv., 2015, 5, 44618 RSC.
- L. Zhang, J. K. Xiao and K. C. Zhou, Tribol. Trans., 2012, 55(4), 473 CrossRef CAS.
- Z. S. Xu, Q. X. Zhang and X. J. Huang, Tribol. Int., 2016, 93, 104 CrossRef CAS.
- K. Yang, X. L. Shi, Y. C. Huang and Z. H. Wang, Mater. Chem. Phys., 2017, 186, 317 CrossRef CAS.
- Z. S. Xu, Q. X. Zhang and W. Z. Zhai, RSC Adv., 2015, 5(91), 74850 RSC.
- G. X. Chen, Y. Y. Cui and Y. Yang, Appl. Mech. Mater., 2013, 469, 59 CrossRef.
- J. L. Zou, X. L. Shi and Q. Shen, Acta Metall. Sin., 2017, 30(3), 193 CrossRef CAS.
- I. Ahmad, A. Kennedy and Y. Q. Zhu, Wear, 2010, 269, 71 CrossRef CAS.
- K. Yang, X. L. Shi, A. Zhang, Z. H. Wang and Y. C. Wang, RSC Adv., 2016, 6, 74269 RSC.
- American Society for Testing and Materials, Standard Test Method for Wear Testing with Pin-on-Disk Apparatus, ASTM G99-95, ASTM Int., West Conshohocken, PA, 1995 Search PubMed.
- ASTM E92-82, Standard test method for vickers hardness of metallic materials, ASTM International, 2003 Search PubMed.
- ASTM B962-08, Standard test methods for density of compacted or sintered powder metallurgy (PM) products using Archimedes' principle, ASTM International, 2008 Search PubMed.
- Z. S. Xu, X. L. Shi, W. Z. Zhai, J. Yao and S. Y. Song, Carbon, 2014, 67, 168 CrossRef CAS.
- K. Yang, X. L. Shi and J. L. Zou, RSC Adv., 2016, 6, 29334 RSC.
Footnote |
| † Electronic supplementary information (ESI) available. See DOI: 10.1039/c7ra07158b |
|
| This journal is © The Royal Society of Chemistry 2017 |
Click here to see how this site uses Cookies. View our privacy policy here.  Open Access Article
 a,
Hongru Ma*a,
Xiyao Liub,
Yangming Zhanga and
Qiang He
 *a
*a


