
 Open Access Article
 This Open Access Article is licensed under a
 Creative Commons Attribution 3.0 Unported Licence
A microfluidic neuronal platform for neuron axotomy and controlled regenerative studies†
Ziqiu
Tong
a,
Miriam
Segura-Feliu
ade,
Oscar
Seira‡
a,
Antoni
Homs-Corbera§
 abc,
José Antonio
Del Río
*ade and
Josep
Samitier
*abc
abc,
José Antonio
Del Río
*ade and
Josep
Samitier
*abc
aInstitute for Bioengineering of Catalonia (IBEC), Baldiri Reixac 15-21, 08028 Barcelona, Spain. E-mail: jadelrio@ibecbarcelona.eu; jsamitier@ibecbarcelona.eu
bCentro de Investigación Biomédica en Red de Bioingeniería, Biomateriales y Nanomedicina (CIBERBBN), Zaragoza, Spain
cDepartment of Electronics, Universitat de Barcelona, Barcelona, Spain
dDepartment of Cell Biology, University of Barcelona, Barcelona, Spain
eCentro de Investigación Biomédica en Red de Enfermedades Neurodegenerativas (CIBERNED), Barcelona, Spain
First published on 20th August 2015
Abstract
Understanding the basic mechanisms of neural regeneration after injury is a pre-requisite for developing appropriate treatments. Traditional approaches to model axonal lesions, such as high intensity power laser ablation or sharp metal scratching, are complex to implement, have low throughputs, and generate cuts that are difficult to modulate. We present here a novel reproducible microfluidic approach to model in vitro mechanical lesion of tens to hundreds of axons simultaneously in a controlled manner. The dimensions of the induced axonal injury and its distance from the neuronal cell body are precisely controlled while preserving both the proximal and distal portions of axons. We have observed that distal axons undergo Wallerian-like anterograde degeneration after axotomy; in contrast, proximal portions of the axons remain un-degenerated, possessing the potential to re-grow. More importantly, surpassing the previous axotomy methods performed in Petridishes in which local microenvironments cannot be tailored, our platform holds the capability to implement fine-tuned treatments to lesioned axon stumps in a local, controlled manner. Specifically, molecules such as chondroitin sulphate proteoglycans and its degrading enzyme chondroitinase ABC, hydrogels, and supporting cells have been shown to be deliverable to the lesioned site of injured axons. In addition, this system also permits double interventions at the level of the lesioned axons and the perikaryon. This proves the potential of our model by demonstrating how axonal regrowth can be evaluated under circumstances that are better mimics of biological problems. We believe that this novel mechanical microfluidic axotomy approach is easy to perform, yields high throughput axon lesions, is physiologically relevant, and offers a simplified platform for screening of potential new neurological drugs.
Introduction
Traumatic injuries of spinal cord can lead to life-long disability, and in some more severe cases, can cause deaths. Survivors of the injuries usually suffer sustained physical and emotional problems resulting in a reduced quality of life; long-term care of these patients can be extremely expensive.1,2 Understanding the basic mechanisms involved in the neuronal injury process hence becomes an important aspect of translational research aiming to establish therapeutic interventions to alleviate the disability condition and to help patients to reintegrate into society.3Neuronal cell response after injury depends on the distance from the axotomy site to the cell body, and the number of remaining axonal collaterals.4 The proximal lesioned axons undergo membrane reseal to prevent further damage, while the distal axons progress to anterograde degeneration.5 A critical step for axon regeneration is the transformation of damaged proximal stump into a new growth cone recapitulating a developmental process, which then must cross the injury site of glial scar to reconnect with its original target.6 Factors that control the growth cone formation and axonal re-growth include the intrinsic regenerative ability of neuron cells as well as the extrinsic microenvironment that impedes the regrowth of damaged axon.7
Researchers have used combined in vivo models as well as in vitro models in the attempt to better understand the complex mechanisms of axon regeneration.8–11In vitro models can complement in vivo research and allow for exploitation of different issues. The advantages of using in vitro models include lower cost, ease of use, tighter control of experimental variables, and, on occasion, single cell analysis. Moreover, in vitro systems increase experimental throughput, and can offer a simplified platform for pharmacological screening. To this end, various in vitro neuronal injury models have been used in the past to study neuronal responses after axotomy. For example, axonal bundles have been sectioned with sharp metal blades, glass microelectrodes, rubber impactors controlled by electrically driven shaft, detergents, nano-knives, and high intensity power lasers.1,2,12–20 Although these in vitro techniques have yielded a wealth of knowledge on axon regeneration, they generally require highly trained technical skills and often demand sophisticated computer-controlled micro-manipulators. Moreover, these techniques invariably alter the molecular integrity of culture substrate, relevant for axonal regrowth.21
Microfluidics approach has alleviated some of these drawbacks.19,20,22 In this study, we have utilized a multi-compartment microfluidic model based on our previous device,23 which enables controlled, simultaneous axotomy of a large number of axons. This method maintains the distal as well as proximal axon remains after lesion, while preserving its supporting substrate coating. Indeed, this in vitro microfluidic system setup is ideal as a model for neuronal injury studies of long-range axon projections (e.g., corticospinal tract). More importantly, our system can be easily adapted to present inhibitory or positive molecules to the lesioned axonal terminals. In vivo, a meningo-glial scar forms after injury to the central nervous system.21,24,25 Chondroitin proteoglycans (CSPG) are inhibitory extracellular matrix molecules that are produced by reactive cells found in the meningo-glial scar.25–27 With microfluidics approach, we are aiming to engineer the in vivo-like microenvironments in chip. As a proof of concept, we have introduced CSPG as inhibitory molecule inside the device after performing the axotomy, exposing the lesioned axonal ends to the local influence mimicking the CSPG upregulation by reactive cells observed in vivo after lesion. Lastly, this system also allows us to successfully incorporate hydrogels at the lesioned site after axotomy to access more 3D-like in vivo conditions as apposing to axonal regrowth on flat 2D surfaces.
Results
Design, fabrication, and characterization of mechanical axotomy chip
The microfluidic-based mechanical axotomy chip was an optimized modification from our previous design of large dual chamber, open neuronal co-culture platform.23 The axotomy chip consists of two main open chambers interconnected by microchannels and intersected perpendicularly by an axotomy channel (Fig. 1a). The large chamber areas (5 mm × 5 mm) facilitate effective cell culture and easy handling. Fig. 1b illustrates a 3D representation of the overall chip design and Fig. 1c shows a final assembled PDMS device bonded over a glass coverslip. Cortical neurons were plated in one of the two open chambers, which were pre-coated with poly-D-lysine. The small cross-section area of microchannels (2.5 μm × 10 μm) restricts the crossing of cortical neuron cell bodies, but permits the passage of neuritic processes (Fig. 1d and e). An axotomy channel was designed to be perpendicular to these microchannels with varying width and position relative to cell seeding chamber (Fig. 1f). Our chip design includes a total of 100 microchannels and with reference ID numbers to identify individual microchannels (Fig. 1e). The axotomy channel has an inlet well 3 mm in diameter and an outlet well of 1 mm in diameter. The inlet well was designed to be large enough for easy subsequent handling using common laboratory micropipettes, as when introducing exchanging fluid into the axotomy channel. The 1 mm outlet hole forms a tight seal with a connecting tubing (24 gauge) for handling fluids (ESI Video 1and 2†), or, alternatively, with laboratory micropipette tips (0.1–10 μL) for manual aspiration (ESI Video 3†). Unlike the approach of using sharp objects or chemicals to induce axonal injury, which inevitably violates the substrate ECM coating, a microfluidics approach is non-destructive and preserves the integrity of the substrate coating (ESI Fig. S1†). Furthermore, since the chips are assembled on thin coverslip, high resolution imaging with confocal microscopy is highly suitable (ESI Fig. S2†).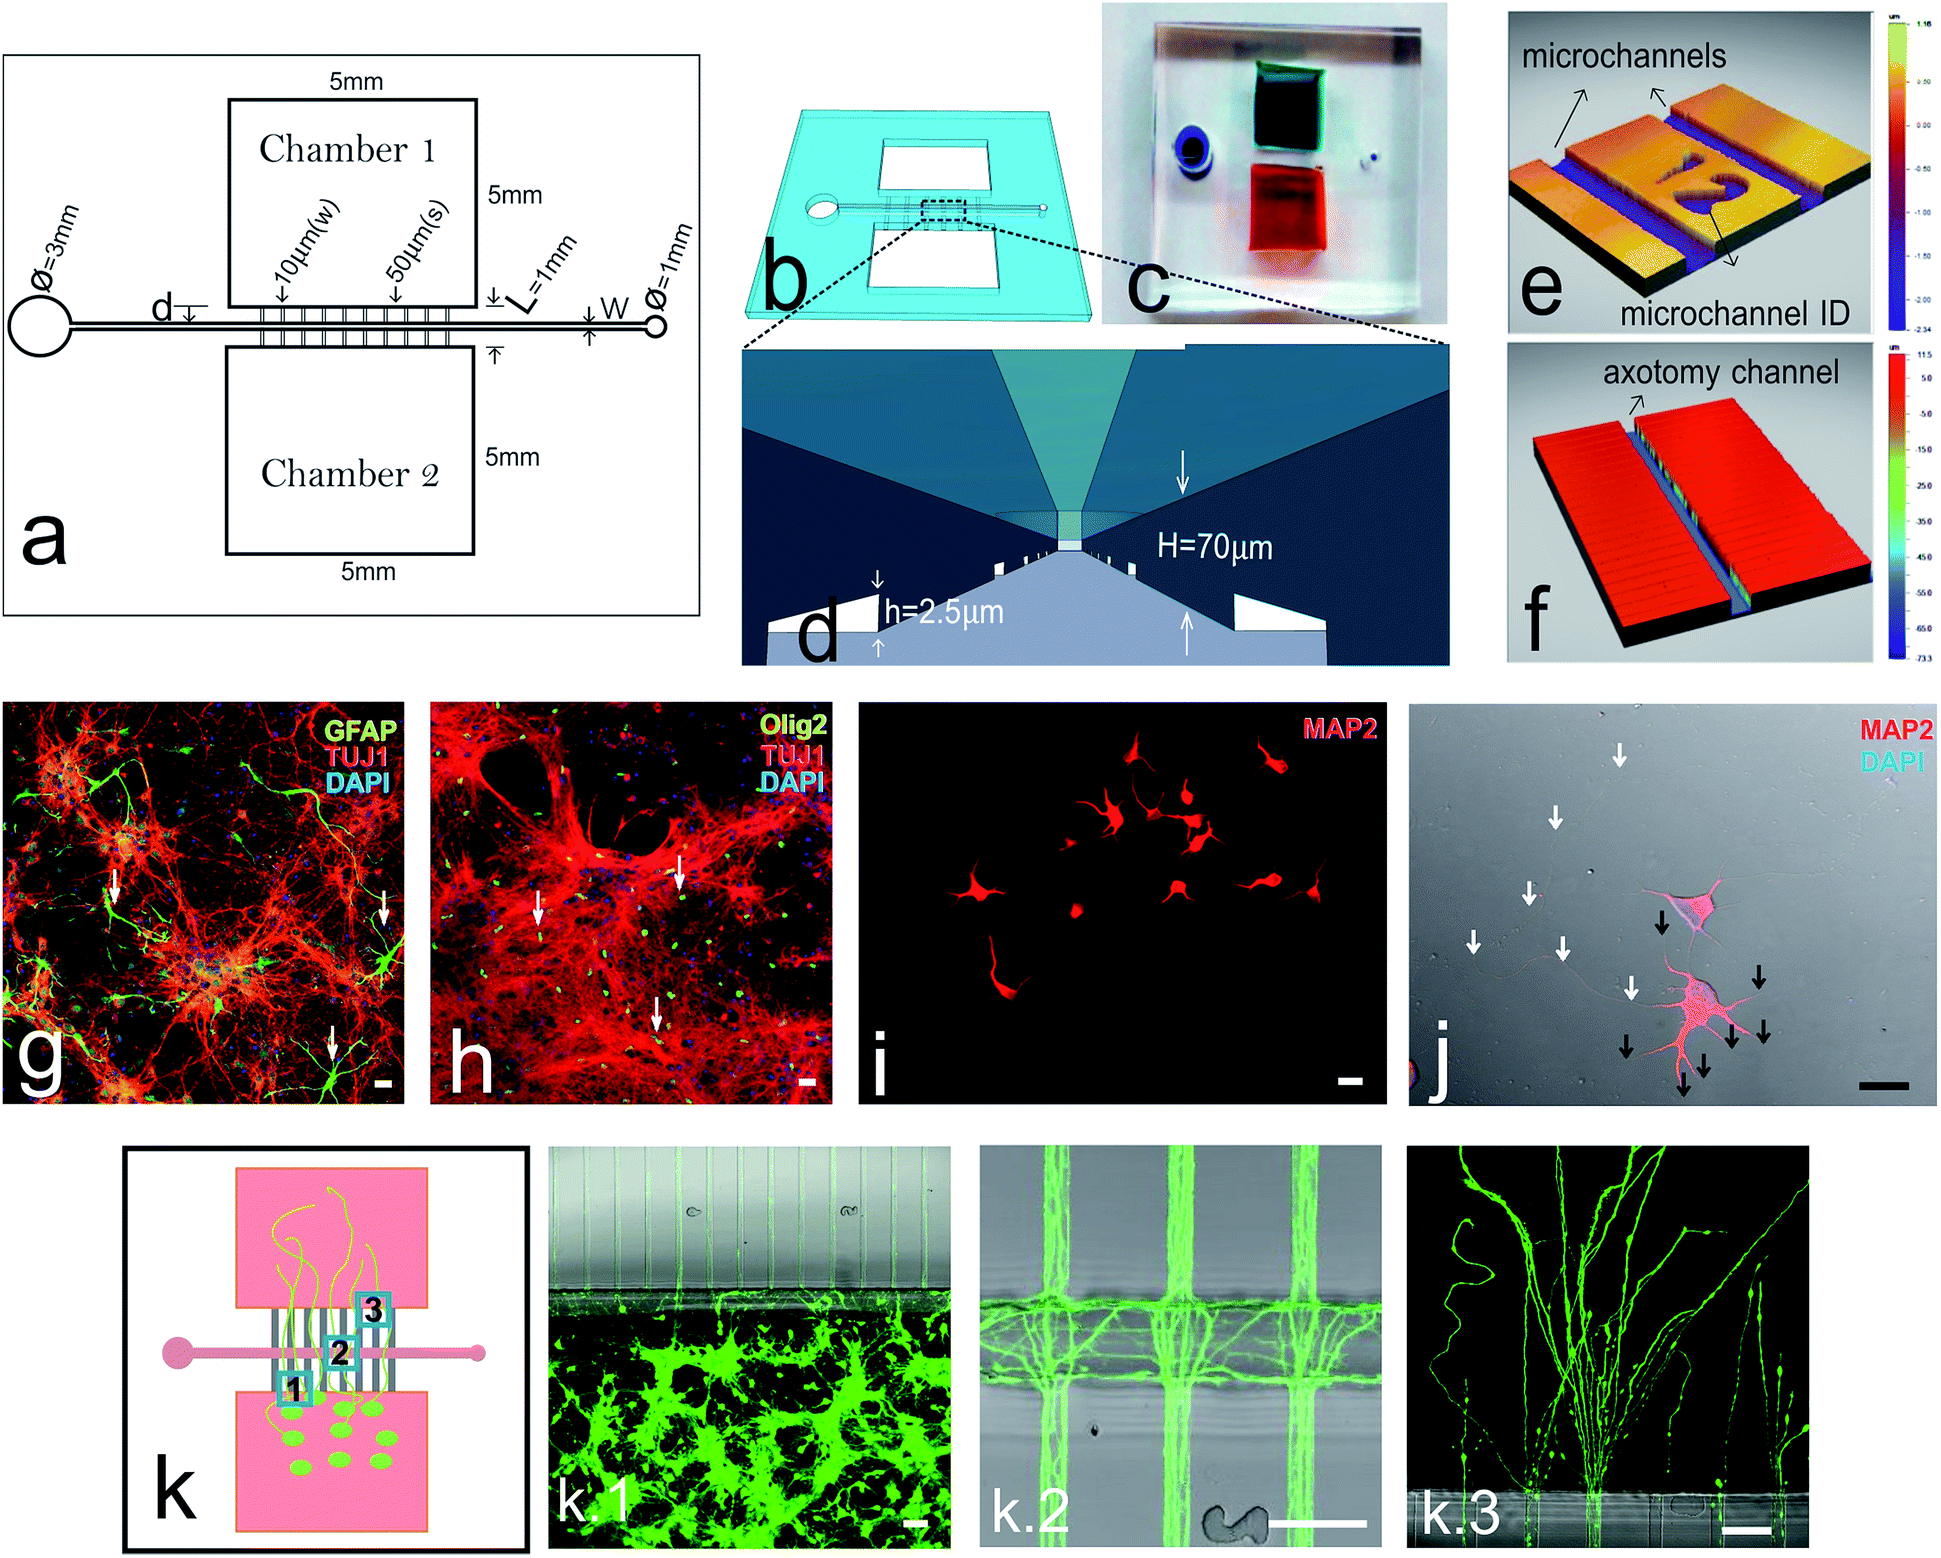 | ||
| Fig. 1 Axotomy device schematics and characterizations. (a) Schematic diagram of microfluidic-based axotomy chip showing dimensions of different components. (b) 3D representation and a photograph (c) of the final axotomy device. (d) Schematic drawing showing the view from the axotomy channel which connects microchannels. Interferometry measurements of the dimensions of axotomy channel (e) and microchannels (f). Confocal photomicrographs of cortical neurons (DIV7) growing on chip showing a mixed co-culture of cortical neurons (α-TUJ1 positive), (g) astrocytes (α-GFAP positive), and (h) oligodendrocytes (α-olig2 positive). (i) Low density seeding of cortical neurons showing the neurites (α-MAP2 positive) (i) and axons (j). Photomicrographs of different parts of the axotomy chip when seeded with cortical neurons for 7 DIV (k): (k.1) microchannel entrances; (k.2) axons entering the axotomy channel, (k.3) axons exiting the microchannels and entering the opposite chamber. Scale bars = 20 μm (g–j) and 50 μm (k.1–k.3). | ||
As a proof-of-concept to demonstrate the applicability of our microfluidic-based mechanical axotomy, primary cultures of cortical neurons from E16.5 embryos were used. Although a large percentage of neurons can be identified using TUJ1 antibodies, astrocytes (Fig. 1g) and oligodendrocytes (Fig. 1h) in moderate percentages were also present. Cultured neurons expand dendrites (identified using MAP2 antibodies) to a maximum of 200 μm (ref. 22) (Fig. 1i and j), while their axons can extend up to 2 mm in length over time (ESI Fig. S2†). Growing axons were able to enter the microchannels from the cell culture chamber area (Fig. 1k.1), cross the axotomy channel (Fig. 1k.2), and finally exit the distal half of the microchannels into the opposite chamber (Fig. 1k.3) after 5–7 days in culture. Interestingly, some axons were able to cross straight through the axotomy channel and enter directly into the opposite microchannels, while some axons were growing randomly inside the axotomy channel (Fig. 1k.1–3).
To demonstrate the tunability of our chip, we designed and fabricated axotomy chips with axotomy channel widths of 30 μm, 50 μm, and 100 μm. In all cases, axons were able to successfully cross these axotomy channels, when axotomy were performed around 7 DIV (ESI Fig. S3a–d†). We also modified the distance from the axotomy channel to the neuronal reservoir (100 μm, 250 μm, and 500 μm) (ESI Fig. S3†). After these modifications we were unable to determine increased neuronal dead in the neuronal reservoir. However, regenerating neurites were more abundant after lesioning at 100 μm of distance (ESI Fig. S3f–h†). Morphologically, growing neurites were thicker, thus corresponding to the classical description of growing dendrites.4 In addition and to ensure that we were severing the axons and not the dendrites, the subsequent microfluidic chips were designed to have minimum distances of 500 μm from the cell bodies (ESI Fig. S3h†).
High throughput mechanical axotomy via vacuum aspiration in chip
Axotomy of cortical neurons via vacuum aspiration was performed at 7 DIV and 15 DIV (not shown). Cortical neurons were chosen to be axotomized at 7 DIV, because at this age, axons still are able to regrow after injury.18Fig. 2a is a schematic drawing of the process of axotomy via vacuum aspiration using a common laboratory micropipette (i.e., PIPETMAN or similar). The media inside the inlet well (Ø = 3 mm) was first removed using a micropipette. Pipette tip (size 0.1–10 μL) was small enough to form a tight seal with the outlet well (Ø = 1 mm) due to the elastic property of PDMS material. An air bubble was induced inside the axotomy channel when all the residual liquid was emptied out by aspirating from the outlet well (Fig. 2b). New fresh media can be reintroduced from the inlet well, and the aspiration process is repeated to bring new media into the axotomy channel. This simple aspiration method can effectively cut all the axons crossing the axotomy channel simultaneously (Fig. 2c and d). However, in certain cultures, some axon bundles could become quite strong, requiring the refill and aspiration procedure to be repeated to ensure the complete axotomy of axon bundles (data not shown). To this end, we designed and successfully severed axon bundles using axotomy chips with different channel widths, of 30, 50, and 100 μm (Fig. 2e–g).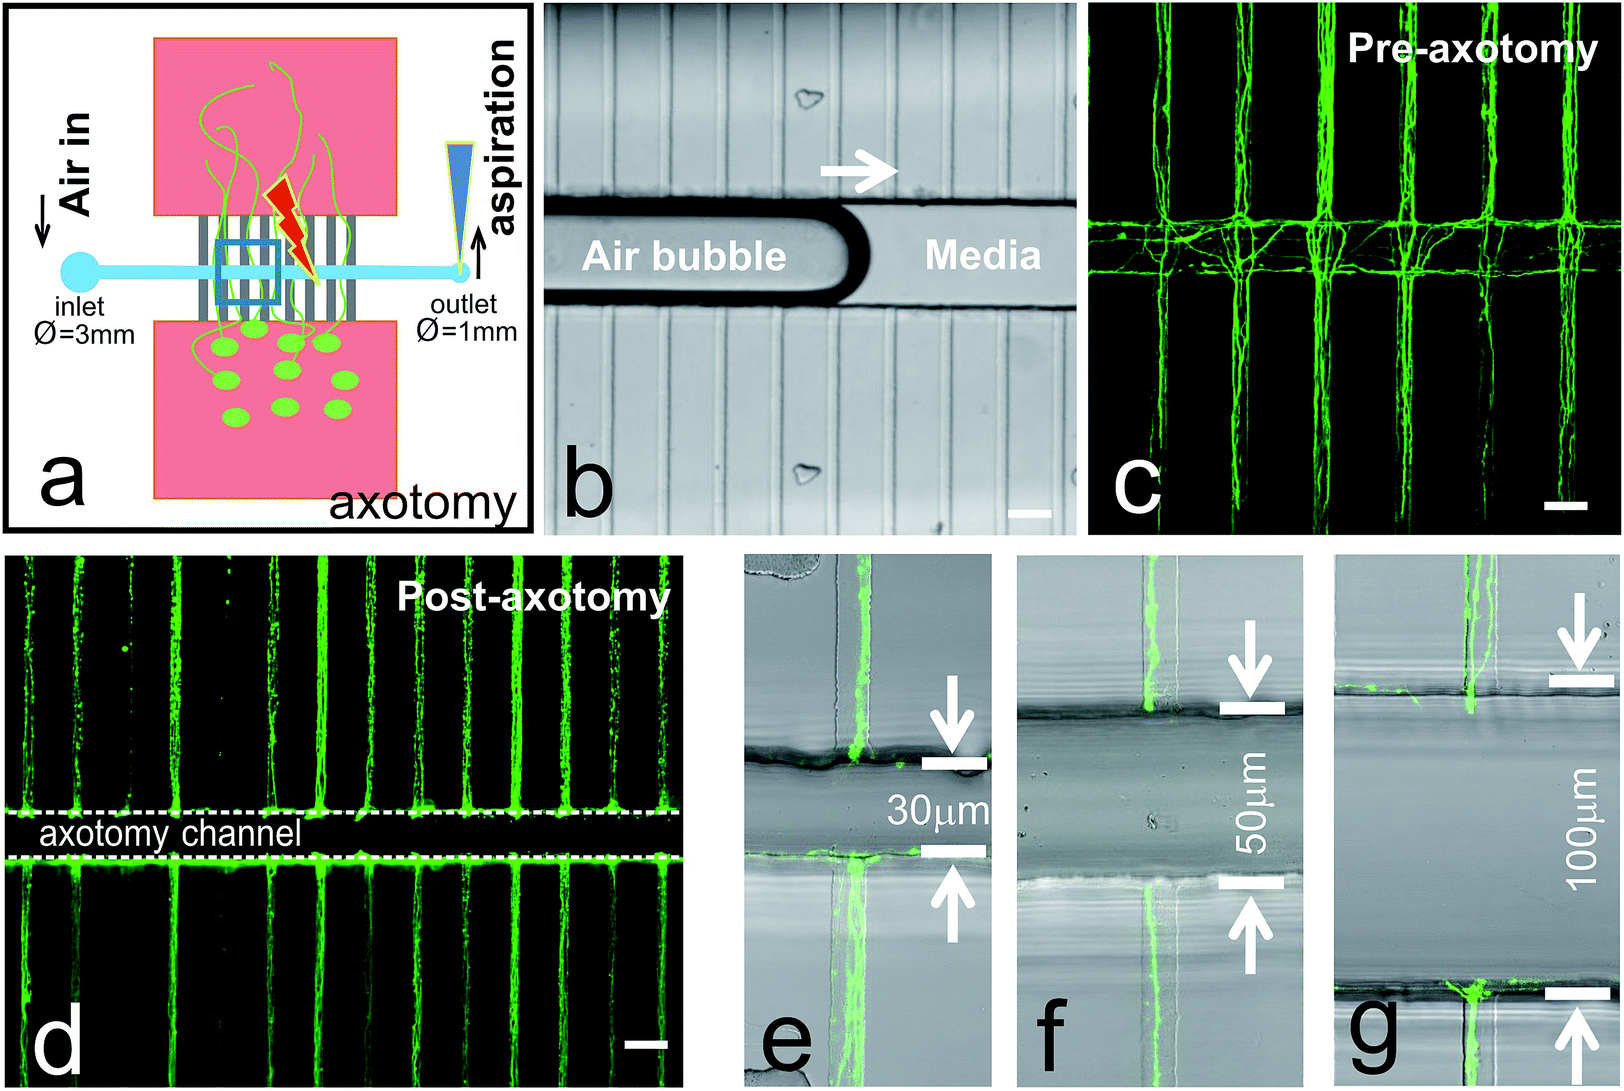 | ||
| Fig. 2 Mechanical axotomy via vacuum aspiration. (a) Schematic representation of axotomy process using laboratory pipette. (b) Photomicrograph shows air bubble was moving across the axotomy channel. (c) Cortical neuron culture (7DIV) showing axons crossing the axotomy channel prior to axotomy process. (d) Photomicrograph shows the high throughput of axotomy via vacuum aspiration. High magnification micrographs depicting portions of axons of lengths of (e) 30 μm, (f) 50 μm, and (g) 100 μm being axotomized by microfluidic devices. Scale bars = 50 μm. | ||
Distal portion of axons showed Wallerian-like anterograde degeneration
Using our microfluidic device approach, we observed Wallerian-like axon degradation after axotomy, irrespective of the distance from the lesion to the soma or the width of the axotomy channel (Fig. 3). Axon degeneration started shortly after performing mechanical axotomy in chip. One hour after the axotomy, quick responses from the distal axon terminals could be observed: their filopodia had been retracted, axons had started to break down the cytoskeletons, and bead formation had begun to appear (Fig. 3b and c). Three hours later, the axon bead formation phenomenon was more pronounced and the axons were becoming fragmented (Fig. 3d). By 24 hours post-axotomy, we could already notice the axons had become completely degraded and a large amount of cellular debris was observed (Fig. 3e). In contrast, the proximal portions of axons within the microchannels did not show this degradation as expected (Fig. 3f and h), but the distal portions of the axons within the microchannels showed clear degradation at the same time points (Fig. 3g and i).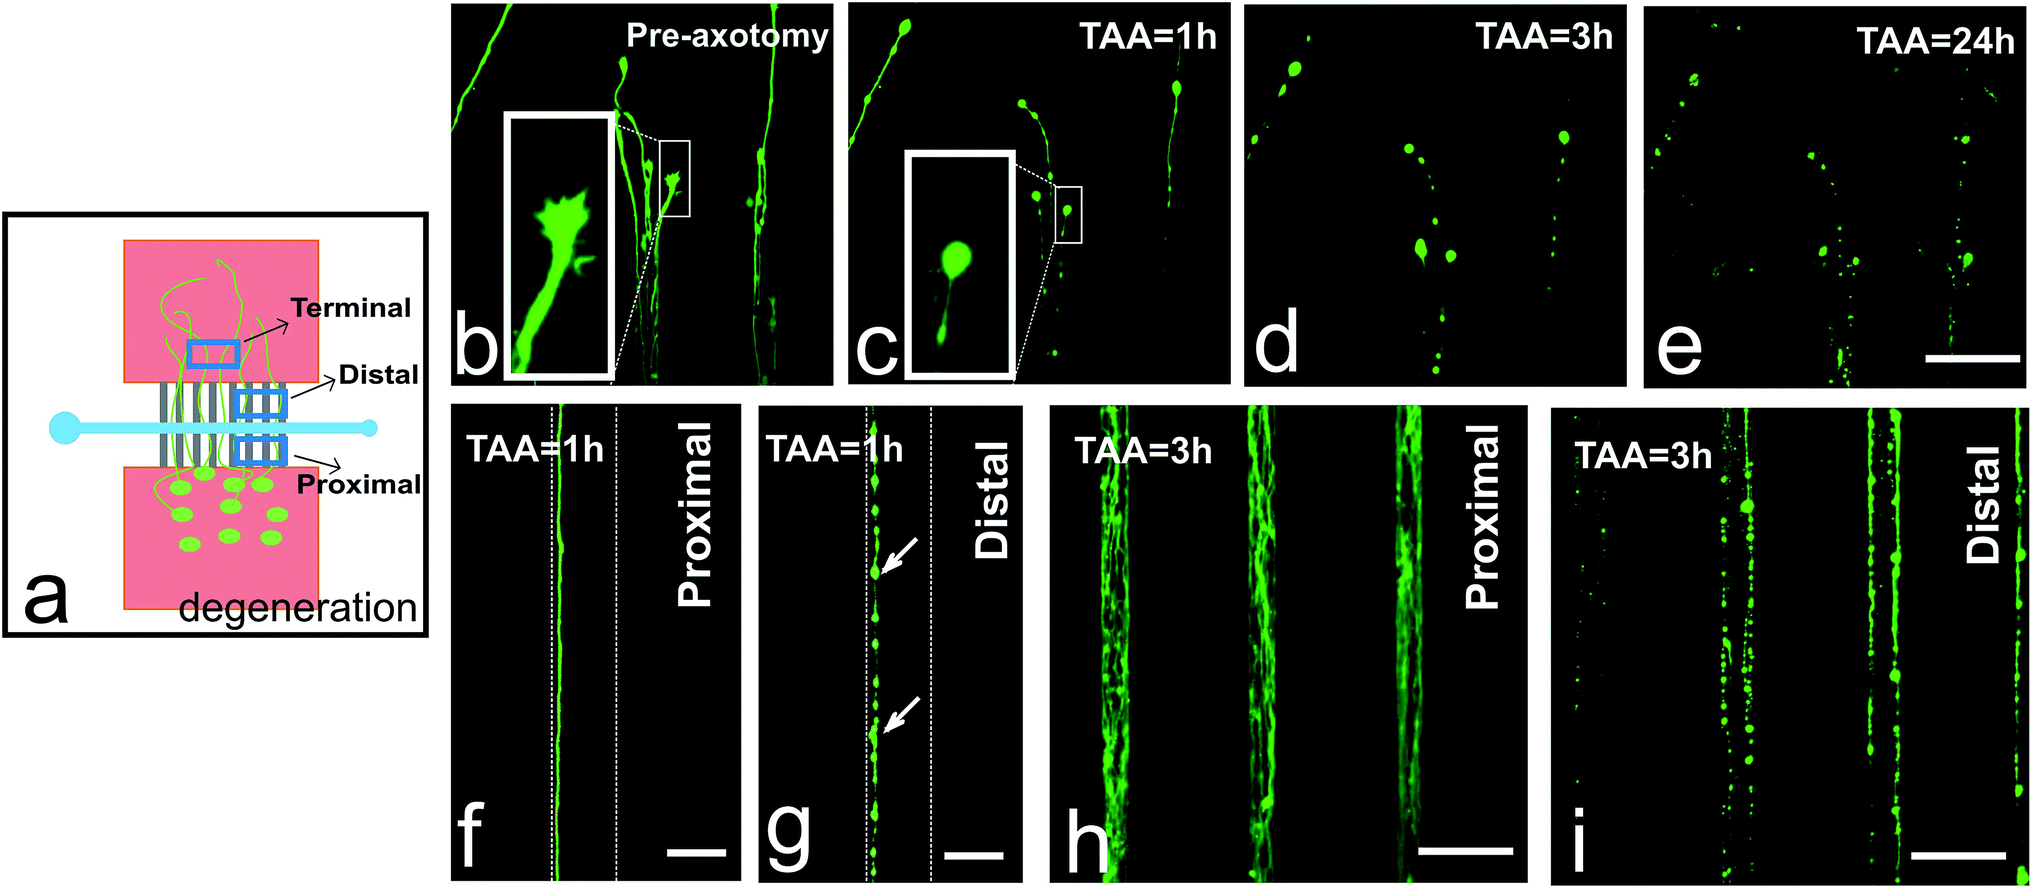 | ||
| Fig. 3 Distal segments of severed axons show Wallerian-like degeneration. (a) Schematic representation of axon degeneration after axotomy, indicating terminal, distal, and proximal portions of axons. (b) Axon terminals exhibit healthy normal growing morphology before axotomy. 1 hour (c), 3 hours (d), and 24 hours (e) after axotomy process they show degradation. Proximal segments of axons show normal growth morphology 1 hour (f) and 3 hours (h) after axotomy, compared to distal parts of the axons at 1 hour (g) and 3 hours (i), respectively. The arrows indicating axon bead formation. TAA: time after axotomy. Scale bars = 50 μm (b–e); 10 μm (f and g) and 50 μm (h and i). | ||
The proximal portion of axons showed regrowth after mechanical axotomy
Young lesioned axons have an intrinsic capacity to regenerate when not posed with a hostile environment.18,26 We performed time-lapse experiments to track the responses from the proximal segments of the axons (Fig. 4). Prior to axotomy, we could see axon bundles crossing the 100 μm wide axotomy channel and reaching the opposite microchannels (Fig. 4b). After performing the axotomy, the axonal portions inside the axotomy channel were completely removed (Fig. 4c). However, 2 hours after the axotomy, we could already observe axons sprouting from the cut axon bundle (Fig. 4d). Six hours after axotomy, extensive elongation of the axons was detected (Fig. 4e), and this axonal extension continued even up to 24 hours (Fig. 4f). Please note, we have also observed the typical end bulb morphology of lesioned axons changed to a large growth cone with relevant filopodia (Fig. 4b–f). These processes also occurred when a 50 μm wide axotomy channel is used (Fig. 4i and j).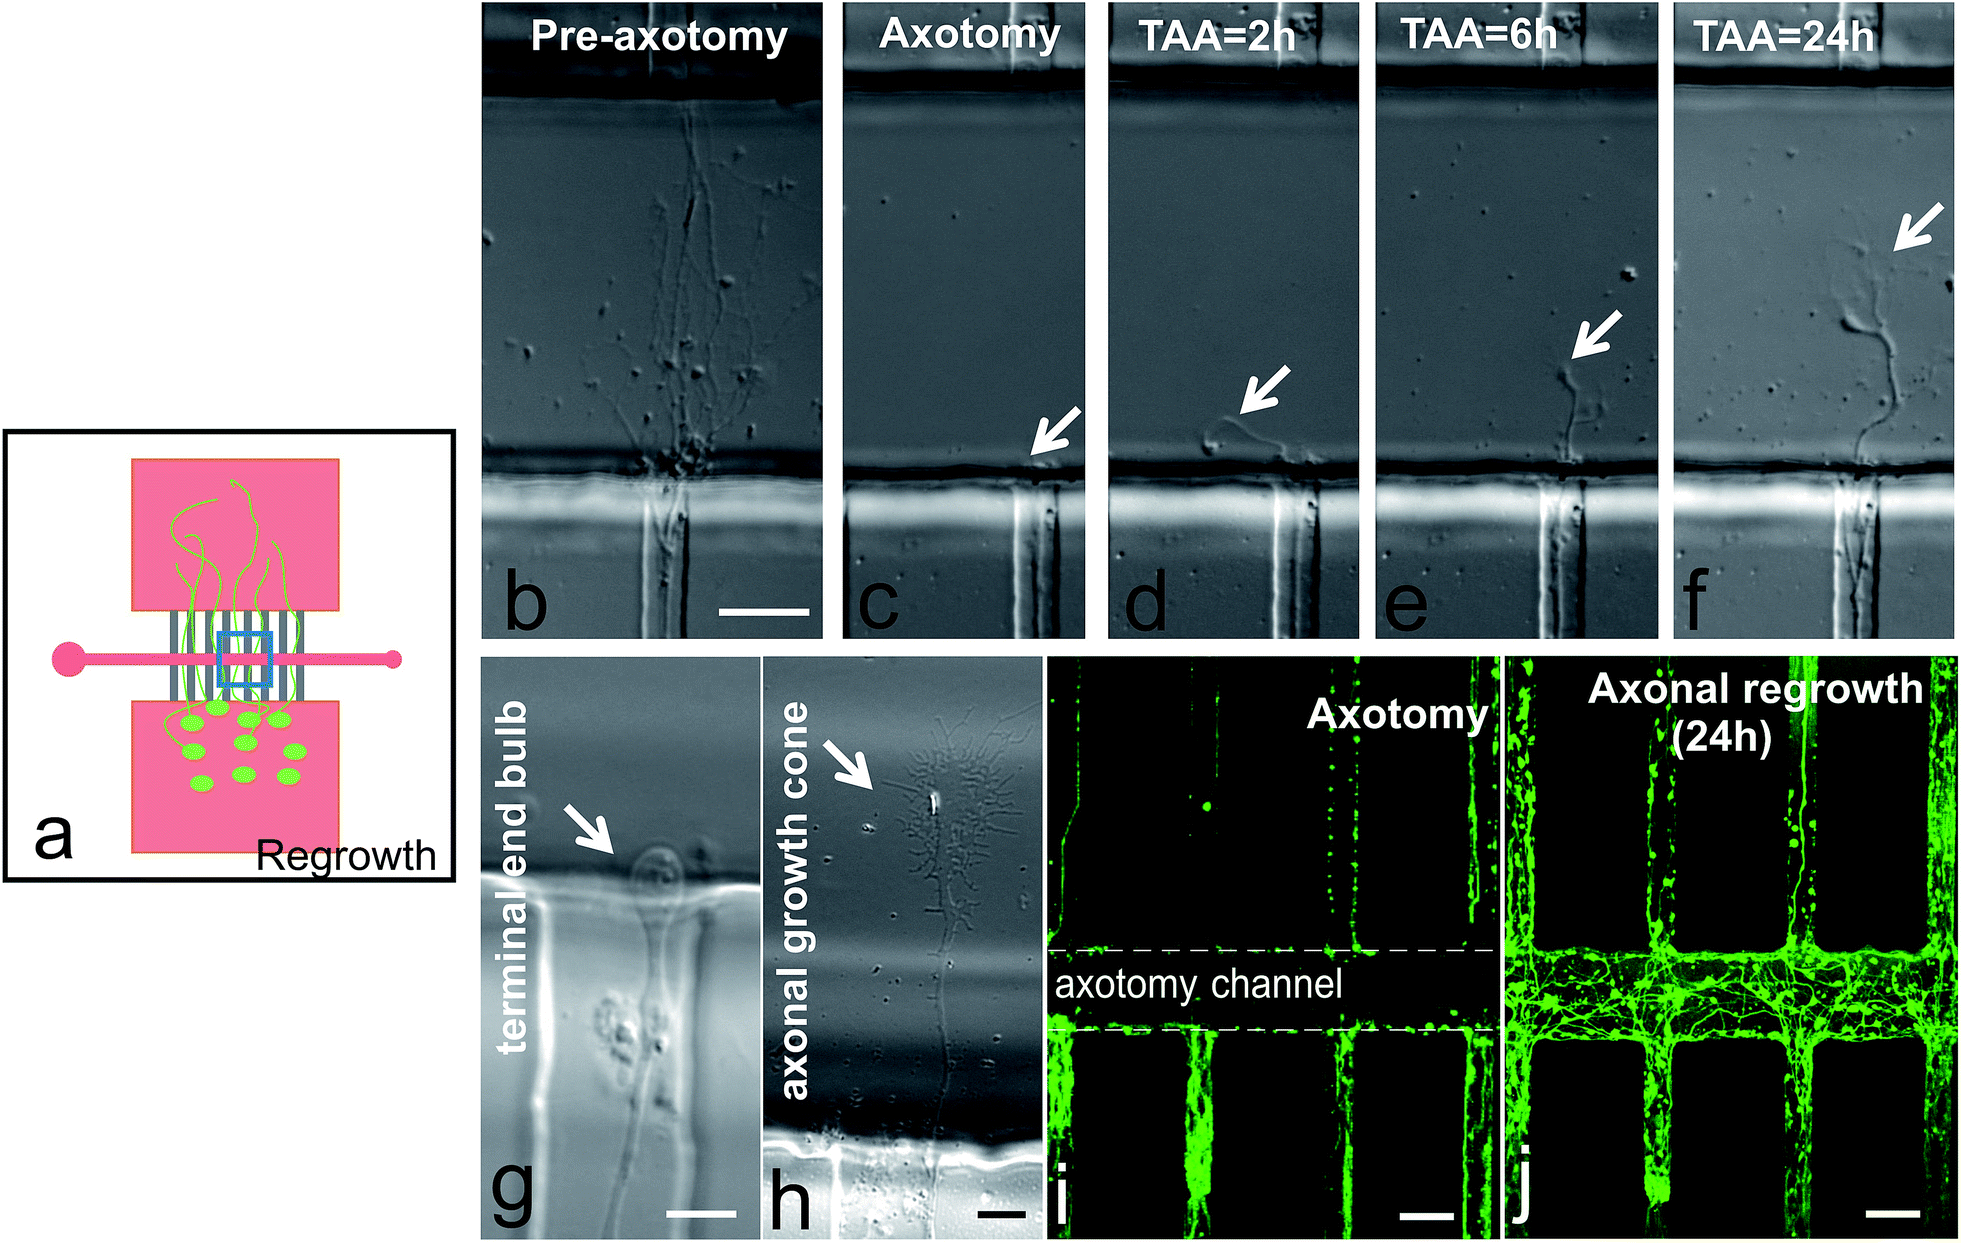 | ||
| Fig. 4 Proximal segments of axons showing regeneration after axotomy. (a) Schematic drawing representing the regrowth of axons after axotomy. (b) Axons growing across the 100 μm axotomy channel before axotomy process. Time-lapse micrographs showing the regrowth of severed proximal axons at 0 (c), 2 (d), 6 (e), and 24 hours (f) after axotomy. (g) Photomicrographs of an axon terminal end bulb after axotomy and (h) new growth cone. Axons were stained with calcein AM (i) prior to axotomy and re-stained (j) after 24 hours regrowth (j). TAA: time after axotomy. Scale bars = 20 μm (b–f) and (i and j); 5 μm (g and h). | ||
CSPG incubation after axotomy showed limited regrowth, while ChABC treatment restored axon regrowth
In vivo, CSPG has been reported to be the main inhibitory molecule up-regulated by scar associated cells.26 To this end, we wanted to determine whether our in vitro system was suitable for controlled drug application aimed at enhancing the regeneration of lesioned axons when exposed to inhibitory molecules (Fig. 5). First we used a fluorescent dye as a control solution to demonstrate that the chemicals were introduced inside the axotomy channel (Fig. 5b). A complete sequence of the experiments can be seen in Fig. 5c to f. Namely, after lesion, CSPG was added and incubated inside the axotomy channel overnight (Fig. 5d). 24 hours later, very limited regrowth of the cut axons was observed (Fig. 5e). CSPG solution was then removed, and the axotomy channel was reconditioned with fresh media. Additional 24 hours after the removal of CSPG, no axonal regrowth was observed (data not shown). However, axonal regrowth was restored upon treatment with ChABC, 24 hours after enzyme treatment (Fig. 5f).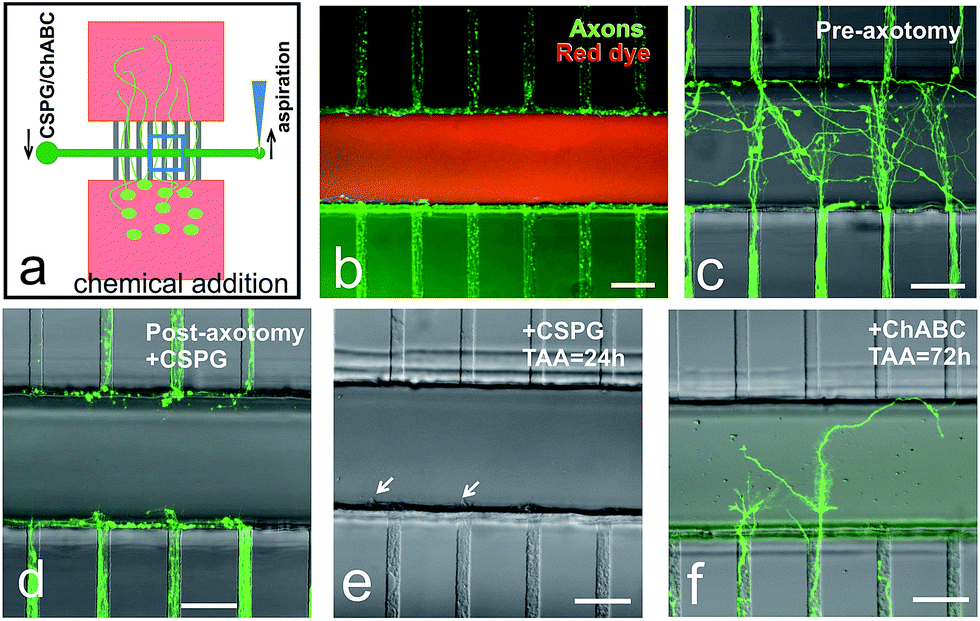 | ||
| Fig. 5 Axotomy chip was treated with CSPG and then ChABC. (a) Schematic representation of introduction of a chemical inside the axotomy channel. (b) Axons were stained with calcein AM prior to axotomy, and then a red fluorescent dye was used to visualize the flow of fluid inside the axotomy channel. Photomicrographs show the axons before (c) and after (d) axotomy. (e) CSPG was introduced inside the axotomy channel after the axotomy, and photomicrograph was taken 24 hours after the incubation of CSPG. (f) Photomicrograph was taken 24 hours after ChABC treatment, which is 72 hours after initial axotomy. TAA: time after axotomy. Scale bars = 50 μm. | ||
Matrigel inside the axotomy channel allowed 3D regrowth of lesioned axons after axotomy
We also wanted to determine whether we would be able to create a denser, 3D-like matrix inside the axotomy channel after axotomy. Hence, we chose Matrigel as our extracellular matrix model (Fig. 6a). First, we incorporated fluorescent microbeads with Matrigel to demonstrate that this dense matrix could be created inside the chips (Fig. 6b). After lesion, the axotomy channel was successfully incorporated with Matrigel (Fig. 6c and d). Twenty-four hours after axotomy, we observed relevant axonal growth inside the Matrigel and some of the axons were able to exit the matrix and enter the opposite distal region of the microchannels (Fig. 6e–g). However, upon closer examination, the majority of the axons were still growing closer on the glass substrate (Fig. 6f). Fig. 6g shows axons growing inside the Matrigel reaching up to 25 μm height. In fact, some axons were able to reach the top of the axotomy channel, i.e., 60 μm (data not shown). We could also observe that new axonal growth cone with clearly visible filopodia had reentered the distal parts of the microchannel where previous debris from degraded axons was still present (Fig. 6h). Lastly, as a proof-of-concept, we introduced and maintained the growth of TEG3-eGFP cells inside the axotomy channel (ESI Fig. S4†).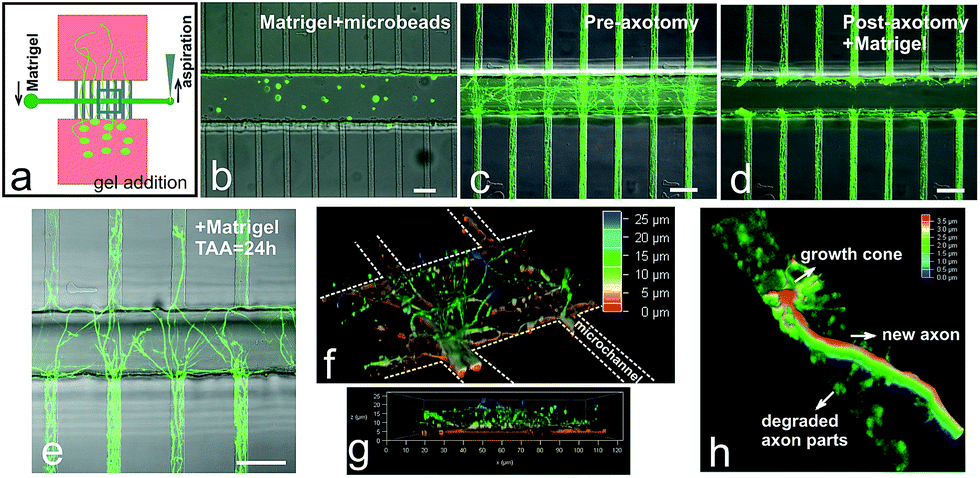 | ||
| Fig. 6 Introduction of Matrigel inside axotomy channel after axotomy. (a) Schematic representation of introduction of Matrigel inside the axotomy channel. (b) Matrigel mixed with fluorescent beads was introduced inside the axotomy channel (with = 100 μm). Axons were stained with calcein AM; photomicrographs were taken before (c) and after (d) axotomy process and incorporation of Matrigel (d). (e) Confocal micrograph of axons growing inside the Matrigel 24 hours after axotomy. (f) 3D reconstruction of axotomy channel embedded with Matrigel and with axon regrowth in the scaffold. (g) Cross-section view shows the axons growing at a different z-plane. (h) New axons grow into the distal parts of the microchannels where the old axons have been degraded. TAA: time after axotomy. Scale bars = 50 μm. | ||
Discussion and conclusion
In this paper, we have designed a microfluidic device to generate controlled lesion of hundred of axons by using a simple air bubble approach. Indeed, by passing through air bubbles, we have demonstrated to be able to sever axons and hence representing a simple model for mechanical axotomy.The principle of operation of the microfluidic axotomy device relies on the effect of the accelerations experienced by the portion of the axons crossing the axotomy channel. As it was demonstrated by performing COMSOL Multiphysics experiments and by using a simpler equivalent circuits theory model (see ESI file†), flow through the axotomy channel is accelerated in each microchannel producing a perpendicular force resulting from this drag. Furthermore and most importantly, the sudden velocity change induces a strong shear stress that affects the portion of the axons which is caught just between each slow flow axon microchannel and the fast flow axotomy channel. The velocity change is due to the large differences of hydraulic resistance between the axon microchannels and the axotomy channel. This effect becomes more dramatic at the central axotomy channel where the fluidic resistance is the lowest, and can be reinforced by increasing the axotomy cross section channel or thinning the axon microchannels. The sudden appearance of air in the central axotomy channel decreases its hydraulic resistance producing an increase of forces tending to break the axon. As a mode of example, calculations done with the model (presented in the ESI† file), with the 30 μm wide axotomy channel and 485 μm long axon microchannels, all filled with buffer solution, resulted in dragging forces in the crossing regions ranging from 6 pN to 12 pN, which changed to a 485–970 pN range when air crossed the axotomy channel. These values are in the threshold range of previously reported values to create axonal injury (300 pN–4 nN).28 However, evaluating the shear force due to the rapid velocity change in the channels crossing region, axon experience forces larger than 24 μN, when being crossed by air. The breaking of axons in the small region defined by the two fluids interface is almost instantaneous.
Some key advantages of using our air bubble-induced axotomy over traditional approaches includes: (1) high throughput: it is achieved by cutting hundreds of aligned axons with single passage of an air bubble; (2) simple manipulation: our setup requires only an ordinary syringe pump, or common laboratory micropipettes to create fluid flow, comparing to expensive laser power sources or other sophisticated computer-aided manipulations; (3) protecting substrate coating: air bubble fluidic flow is less invasive to the substrate coating material than other approaches, such as metal scratching; (4) mechanical axotomy: fluidic flow mimicking more physiological relevant condition than other methods, such as laser, electrical, or chemical approaches; and (5) precise control of local microenvironments: alteration of the environment surrounding the axons independently from the cell bodies can be achieved from our setup. In our device, the open reservoirs of cell culture area allow up to 100 μL of media or alternative fluids, which significantly reduces the amount of reagents needed for cell culturing and labeling, and drug applications. Cortical neurons harvested from a single pregnant mouse (E16.5) have the capacity to seed a minimum of 30 to 50 chips. Moreover, this open chamber approach has increased the simplicity of cell culture handling and enhanced cell survival.23 In our chip, axotomy can be performed by using a common laboratory micropipette. Advantages of using a micropipette include the fact that it is a fast process, a minimum of equipment is needed, it involves fewer technical skills, and it can be carried out under sterilized cell culture hood condition in contrast to microscope-aided axotomy approaches which are carried out in environments prone to contamination.
Maintaining integrity of substrate coating is an essential and reliable characteristic of using our microfluidic model. Directionality of axonal growth depends largely on supporting substrate information. Hence, to study axonal regrowth after axotomy, it's important to preserve an intact substrate to exclude the substrate factor. We have demonstrated that manipulation with fluidics inside the chip is not invasive to the supporting coating material, in contrast to metal or glass sharp object approaches, which invariably disrupt the ECM substrate. Although the altered substrates might not directly influence the outgrowth ability from axonal bulb end, they could affect the directionality and elongation of the newly-generated growth cones.29–31 Furthermore, manipulating fluidics is purely mechanical, which offers more physiological relevance than alternative methods such as using laser beams,14 electrical,32 and chemical19 approaches. The ability of a damaged axon to regenerate could be influenced by which method that we choose to perform the axotomy. For example, by using chemical mean for axon ablation, no axonal re-growths were reported.19
Although similar approach of using a microfluidics setup to cut axons has been described before,22 the previous assay completely removed the distal portion of the axons. Further study of the influence on degenerating distal axons after axotomy hence becomes impossible. In fact, to restore the complete function of damaged neuronal tract of lower organisms, proximal re-grown axons should recognize and reconnect with the separated distal fragments.33 This axon fusion phenomenon has been reported in several invertebrate models, such as sea slug,34 leech,35 roundworm,36 and zebrafish.32 However, it has been estimated that the fusion events occur in only 1–10% and the molecular mechanisms regarding this complex process are still largely unknown.37 In most cases, the separated distal portions of damaged axons undergo Wallerian-like degeneration. In our experiments, we also observed this degradation phenomenon similar to a previous report by using saponin.19 In fact, the distal axons start to degenerate even within the first hour of injury, which has also been reported elsewhere.38
Formation of glial scar after axonal injury impairs axon regeneration.21 Proteoglycans such as CSPG and KSPG have been found to be up-regulated in glial scar tissue.26 We have demonstrated that a microfluidics approach is suitable to introduce CSPG inside the axotomy channel after performing the axotomy. Our results have shown the limited regrowth of axons after treatment with CSPG. However, upon cleavage of chondroitin sulphate chains with ChABC, we have seen regrowth of lesioned axons. Furthermore, we have also demonstrated the feasibility of the introduction of Matrigel (a highly permissive extracellular matrix) inside the microfluidics chip to mimic a 3D microenvironment for severed axons.
In summary, we have presented here a proof-of-concept of a simple microfluidic approach to model mechanical and synchronized axotomy of a large number of axons, which preserves substrate coating as well as distal transected axonal segments in a high throughput manner. More importantly, our novel approach can mimic axonal changes after axotomy in chip, which is more physiologically relevant. Thus it is a powerful tool to study axonal regeneration, and to facilitate the rapid screening and discovery of novel pharmaceutical compounds that may enhance axonal recovery and functional neurotransmission.
Materials and methods
Microfluidic axotomy device design and fabrication
The microfluidic-based axotomy chip was fabricated in poly(dimethylsiloxane) (PDMS) by standard photolithography and soft lithography as previously described.23 The overall chip design and dimensions can be seen in Fig. 1. Polystyrene transparent masks were designed using CAD file and printed via a high-resolution printer (CAD/Art Services, OR). A glass slide (75 × 25 mm, Corning Inc., NY) was pre-cleaned by immersing in Piranha solution for 10 minutes and dried at 200 °C for 30 minutes. SU8 10 photoresist (Microchem, MA) was spun at a rate of 5000 rpm for 30 seconds to form a thin coating layer to facilitate the adhesion of subsequent layers of photoresist. It was then exposed to UV light for 10 seconds and heated for 1 minute at 95 °C. A second layer of SU8 2 was then spin-coated at a rate of 1500 rpm to achieve a thickness of 2.5 μm. A polystyrene transparent mask defining the microchannels (10 μm width by 50 μm spacing, Fig. 1) was then used to pattern the second layer of SU8 2 by exposure to UV light for 4.5 seconds. After being resolved with SU8 Developer (MicroChem, MA), the master was rinsed with isopropanol and dried with nitrogen gas. The process was repeated with a denser photoresist to create the third layer. In particular, SU8 50 was spun at 2000 rpm for 30 seconds (resulting 60 μm in height) and a second polystyrene transparent mask was aligned to the microchannels to pattern axotomy channel and two cell culture chambers. The slide was then resolved again with SU8 developer. The final complete slide was treated with trichloro(1H,1H,2H,2H-perfluorooctyl)silane (Sigma) for 30 minutes before casting PDMS mixture (10![[thin space (1/6-em)]](https://www.rsc.org/images/entities/char_2009.gif) :1 base to catalyst ratio) onto it. The PDMS was cured on a hot plate at 90 °C for an hour. The two large chambers were hollowed out using a 5 mm cutter (Martor KG, Germany). The inlet (Ø = 3 mm) and outlet of axotomy channel (Ø = 1 mm) were created by using Harris Uni-Core cutters with corresponding sizes (Ted Pella, CA). The final PDMS molds were cleaned by sonication in ethanol (15 minutes) and then in Milli-Q water (15 minutes). Features of SU8 on glass and PDMS molds were analyzed and verified with a mechanical profilometer (DEKTAK 6M, Veeco, NY), optical profilometry (WYKO NT1100, Veeco, NY), or scanning electron microscopy (SEM) (FEI, Oregon) before their subsequent use.
:1 base to catalyst ratio) onto it. The PDMS was cured on a hot plate at 90 °C for an hour. The two large chambers were hollowed out using a 5 mm cutter (Martor KG, Germany). The inlet (Ø = 3 mm) and outlet of axotomy channel (Ø = 1 mm) were created by using Harris Uni-Core cutters with corresponding sizes (Ted Pella, CA). The final PDMS molds were cleaned by sonication in ethanol (15 minutes) and then in Milli-Q water (15 minutes). Features of SU8 on glass and PDMS molds were analyzed and verified with a mechanical profilometer (DEKTAK 6M, Veeco, NY), optical profilometry (WYKO NT1100, Veeco, NY), or scanning electron microscopy (SEM) (FEI, Oregon) before their subsequent use.
Device assembly and chip coating
Thin glass cover slides (24 × 60 mm, Menzel Gläser, Germany) were cleaned with Piranha solution, and then with ethanol and Milli-Q water. The PDMS molds and glass cover slides were surface-activated using a plasma-cleaner (Harrick Scientific, NY) for 2 minutes. Then the PDMS molds were placed onto the cover slides by applying gentle pressure with a pair of tweezers. The assembled devices were placed on a hot plate for 2 minutes at 90 °C to facilitate the strong irreversible bonding of the PDMS molds to the cover slides. We have observed that this additional treatment with heat can effectively prevent axons growing underneath the space between microchannels. The chips were then subjected to autoclave process for sterilization. The fully-assembled PDMS chips can be stored until later use. The chips were re-activated by being placed inside the plasma-cleaner for an additional 5 minutes. Poly-D-lysine (10 μg mL−1, Sigma) was then pipetted into the two large culture chambers and the inlet of the axotomy channel for surface coating. Due to the temporarily-induced hydrophilicity of the PDMS, all the surfaces of the microchannels were coated effectively with poly-D-lysine. The chips were further sterilized under UV light for 10 minutes inside a cell culture hood and then were kept overnight in a humidified incubator (37 °C, 5% CO2). For control experiments to test whether the axotomy process affected surface coating, FITC-poly-L-lysine (100 μg mL−1, Sigma) was used as coating protein overnight. The following day, coating solution was removed, and the chips were washed with PBS. Images before and after axotomy were acquired with Leica AF7000 microscopy and the images were further processed using ImageJ software.Mouse embryonic cortical neuron isolation and culture
Neuron-enriched cultures were prepared from mouse cortices, specifically purified from embryonic day 16.5 (E16.5).9,39 Experiments were approved by the University of Barcelona Animal Care (Protocol 7855) and Use Committee and performed in accordance with Spanish (RD223/88) and European (86/609/ECC) regulations. Cortical tissue was dissected from embryos and collected in a cold dissection medium consisting of PBS (Invitrogen) and 0.65% glucose (Sigma). The tissues were mechanically chopped and dissociated with 0.05% trypsin–EDTA (Invitrogen) for 15 minutes at 37 °C. Trypsin was inactivated with one third of the initial volume with Normal Horse Serum (Invitrogen). After the cells settled to the bottom of the tube, the supernatant was removed. Cells were re-suspended with 2 mL of DNAse I (Applied Biosystems) and incubated for 10 minutes at 37 °C. The fragments were then mechanically dissociated with a pipette tip (1 mL). Neurobasal medium (Invitrogen) containing L-glutamine, penicillin/streptomycin, glucose, and sodium bicarbonate was added to a final volume of 10 mL, followed by centrifugation at 800 rpm for 5 minutes at RT. The final pellet was re-suspended in Neurobasal medium and the cortical neurons were ready for seeding. The microfluidic devices were sequentially washed three times with PBS, neural basal media, and finally with culture media to condition the chips before plating cells with a cell seeding density of 1–2 × 10⁶ cells per mL.Immunostaining
Cell cultures were fixed in 4% buffered paraformaldehyde for 30 minutes at 4 °C, washed three times with 0.1 M PBS, and then permeabilized with 0.1% Triton X-100 in 0.1 M PBS for 20 minutes. Cultures were then blocked with 10% FBS containing 0.1% Triton X-100 and 0.2% gelatin for 45 minutes at RT. Primary antibody dilutions were prepared as followed: polyclonal GFAP (Invitrogen) was diluted at 1:500, polyclonal olig2 (Millipore) at 1:500, and monoclonal TUJ1 (Covance) at 1:2000. Cultures were incubated in primary antibodies diluted in PBS containing 0.2% gelatin, 5% FBS, and 0.1% Triton X-100 at 4 °C overnight. Cultures were then rinsed three times with 0.1 M PBS and incubated for 2 hours at RT with secondary antibodies (Alexa Fluor 488, 568, 1:500; Invitrogen) diluted in PBS containing 0.2% gelatin, 5% FBS, and 0.1% Triton X-100. Images were acquired with a Leica TCS SP5 confocal microscope or inverted Leica TCS SP5 microscope and were further analyzed and processed with ImageJ software.
Mechanical axotomy via vacuum aspiration
After 6 to 7 days culture in chip, cortical axons have already reached the opposite chamber. At this stage, axotomy via vacuum aspiration was performed. First, the medium inside the inlet well (Ø = 3 mm) was removed. A laboratory micropipette (P20) with a pipette tip (0.1–10 μL) attached was used with volume adjusted to 10 μL. While pressing down fully on the push button, the micropipette was gently inserted into the outlet (Ø = 1 mm) of the axotomy channel. And then the push button was slowly released to withdraw all the medium inside the axotomy channel (ESI Video 3†), hence introducing an air bubble inside the axotomy channel. The micropipette was then detached from the outlet well. New medium was introduced into the inlet well to refill the axotomy channel by inserting a new micropipette tip and withdrawing it from the outlet hole. This refill and withdraw process can be repeated several times to ensure the complete ablation of denser axon bundles. In selected experiments, instead of using a micropipette to perform the axotomy manually, a syringe pump with 24 gauge PTFE tubing with luer lock fittings (Hamilton, NJ) attached to a plastic 1 cm3 syringe (Becton Dickinson) can also be used to withdraw medium systematically with a more controlled fluid flow rate (ESI Video 1 and 2†).Treatment with CSPG and ChABC
After performing the axotomy process, 20 μL of CSPG (20 μg mL−1, Millipore) was introduced into the inlet opening (Ø = 3 mm) of the axotomy channel. With gentle aspiration from the outlet opening (Ø = 1 mm), CSPG solution was induced inside the chip in contact with the severed parts of axon stumps. The chips were incubated overnight inside the cell incubator. After 24 hours, unbound CSPG was removed and the chips were washed 2 times with growth medium inside the axotomy channel before microscope imaging. The chips were re-acclimatized with fresh medium for an additional 24 hours to examine the ability of axonal regrowth. Finally, the axotomy channel was treated with chondroitinase-ABC (ChABC, at 0.2 U mL−1, Seikagaku Corporation) for 2 hours inside a cell incubator, and then replaced with fresh medium. Additional images were acquired using a Leica AF7000 inverted microscope 24 hours after the initial treatment with ChABC.Introduction of Matrigel into the axotomy channel
Matrigel (BD Biosciences) was thawed slowly in the fridge the night before its use. After axotomy, the chip was briefly chilled on ice for less than 10 seconds, 20 μL of Matrigel or Matrigel mixed with fluorescent bead (Ø = 0.75 μm, Polysciences, Inc.) was pipetted into the inlet of the axotomy channel, and aspiration was quickly performed from the outlet to transport Matrigel or Matrigel/beads mixture into the chips. Matrigel embedded chips were then placed inside an incubator. 24 hours after the initial embedding of Matrigel, cell cultures were stained with calcein AM (1 μg mL−1, eBioscience) and were subjected to confocal microscopy imaging using Leica TCS SP5.TEG3·eGFP cell culture and incorporation into the axotomy channel
TEG3·eGFP were generated and cultured as reported.40–42 20 μL cell suspension (3 × 10⁶ cells per mL) was placed in the inlet well of the axotomy channel. Applying gentle aspiration from the outlet of the axotomy channel, cell suspension was introduced inside the axotomy channel. The chips embedded with TEG3·eGFP cells were placed inside an incubator for cell attachment and growth. Cell cultures were then stained with calcein, AM (1 μM) and were further imaged with the Leica AF7000 inverted microscope.Acknowledgements
The authors would like to acknowledge the technical support of David Izquierdo and Juan Manuel Alvarez of IBEC Nanobioengineering group, and to thank IBEC Nanotechnology Platform staff for their generous help. We would like to acknowledge Dr Elena Rebollo for her assistance with confocal imaging. This research was supported by the Botin Foundation (JS), the Spanish Ministry of Science and Innovation (BFU2012-32617) (JADR), CIBERNED (2014/02) (JADR), the Fundacion Vasca de Innovacion e Investigacion Sanitarias (BIO12/AL/004) (JADR), the Generalitat de Catalunya (SGR2012-1218) (JADR), La Caixa Obra Social Foundation (LCOSF) (JS and JADR), the Instituto de Salud Carlos III (PI11/03028) and the Marato TV3 Foundation (JADR). CIBER-BBN Plan 2008–2011, Iniciativa Ingenio 2010, Consolider Program to JS. OS was supported by MINECO, IBEC (Strategic Research Initiative program funded by LCOSF) and CIBERNED. The Nanobioengineering group also has support from the Commission for Universities and Research of the Department of Innovation, Universities, and Enterprise of the Generalitat de Catalunya (SGR2012-1442). MS was supported by CIBERNED.References
- I. Fayaz and C. H. Tator, J. Neurosci. Methods, 2000, 102, 69–79 CrossRef CAS PubMed.
- C. Yaka, P. Bjork, T. Schonberg and A. Erlandsson, J. Neurotrauma, 2013, 30, 392–402 CrossRef PubMed.
- S. Rossignol, M. Schwab, M. Schwartz and M. G. Fehlings, J. Neurosci., 2007, 27, 11782–11792 CrossRef CAS PubMed.
- K. Liu, A. Tedeschi, K. K. Park and Z. He, Annu. Rev. Neurosci., 2011, 34, 131–152 CrossRef CAS PubMed.
- L. Conforti, J. Gilley and M. P. Coleman, Nat. Rev. Neurosci., 2014, 15, 394–409 CrossRef CAS PubMed.
- F. Bradke, J. W. Fawcett and M. E. Spira, Nat. Rev. Neurosci., 2012, 13, 183–193 CAS.
- J. A. Del Rio and E. Soriano, Curr. Pharm. Des., 2007, 13, 2485–2492 CrossRef CAS PubMed.
- A. Kumaria and C. M. Tolias, Br. J. Neurosurg, 2008, 22, 200–206 CrossRef CAS PubMed.
- O. Seira, R. Gavin, V. Gil, F. Llorens, A. Rangel, E. Soriano and J. A. del Rio, J. Neurochem., 2010, 113, 1644–1658 CAS.
- J. A. del Rio and E. Soriano, Nat. Protoc., 2010, 5, 217–226 CrossRef CAS PubMed.
- I. B. Wanner, A. Deik, M. Torres, A. Rosendahl, J. T. Neary, V. P. Lemmon and J. L. Bixby, Glia, 2008, 56, 1691–1709 CrossRef PubMed.
- M. C. Quilty, W. P. Gai, D. L. Pountney, A. K. West and J. C. Vickers, Exp. Neurol., 2003, 182, 195–207 CrossRef CAS PubMed.
- G. Mandolesi, F. Madeddu, Y. Bozzi, L. Maffei and G. M. Ratto, FASEB J., 2004, 18, 1934–1936 CAS.
- M. W. Berns, Methods Cell Biol., 2007, 82, 1–58 Search PubMed.
- P. A. Quinto-Su and V. Venugopalan, Methods Cell Biol., 2007, 82, 113–151 CAS.
- W. C. Chang, C. G. Keller and D. W. Sretavan, J. Neurosci. Methods, 2006, 152, 83–90 CrossRef PubMed.
- W. C. Chang, E. A. Hawkes, M. Kliot and D. W. Sretavan, Neurosurgery, 2007, 61, 683–691 CrossRef PubMed.
- J. A. del Rio, M. Sole, V. Borrell, A. Martinez and E. Soriano, Eur. J. Neurosci., 2002, 15, 1881–1890 CrossRef PubMed.
- D. Kilinc, J. M. Peyrin, V. Soubeyre, S. Magnifico, L. Saias, J. L. Viovy and B. Brugg, Neurotoxic. Res., 2011, 19, 149–161 CrossRef PubMed.
- C. Tsantoulas, C. Farmer, P. Machado, K. Baba, S. B. McMahon and R. Raouf, PLoS One, 2013, 8, e80722 Search PubMed.
- S. A. Busch and J. Silver, Curr. Opin. Neurobiol., 2007, 17, 120–127 CrossRef CAS PubMed.
- A. M. Taylor, M. Blurton-Jones, S. W. Rhee, D. H. Cribbs, C. W. Cotman and N. L. Jeon, Nat. Methods, 2005, 2, 599–605 CrossRef CAS PubMed.
- Z. Tong, O. Seira, C. Casas, D. Reginensi, A. Homs-Corbera, J. Samitier and J. A. Del Rio, RSC Adv., 2014, 4, 54788–54797 RSC.
- J. W. Fawcett, J. Biol., 2008, 7, 25 CrossRef PubMed.
- M. T. Fitch and J. Silver, Exp. Neurol., 2008, 209, 294–301 CrossRef CAS PubMed.
- J. Silver and J. H. Miller, Nat. Rev. Neurosci., 2004, 5, 146–156 CrossRef CAS PubMed.
- P. Bovolenta, F. Wandosell and M. Nieto-Sampedro, Prog. Brain Res., 1992, 94, 367–379 CAS.
- M. H. Magdesian, F. S. Sanchez, M. Lopez, P. Thostrup, N. Durisic, W. Belkaid, D. Liazoghli, P. Grütter and D. R. Colman, Biophys. J., 2012, 103, 405–414 CrossRef CAS PubMed.
- Y. W. Fan, F. Z. Cui, S. P. Hou, Q. Y. Xu, L. N. Chen and I. S. Lee, J. Neurosci. Methods, 2002, 120, 17–23 CrossRef CAS PubMed.
- A. M. Leclair, S. S. Ferguson and F. Lagugne-Labarthet, Biomaterials, 2011, 32, 1351–1360 CrossRef CAS PubMed.
- A. N. Hellman, B. Vahidi, H. J. Kim, W. Mismar, O. Steward, N. L. Jeon and V. Venugopalan, Lab Chip, 2010, 10, 2083–2092 RSC.
- J. Moya-Diaz, O. A. Pena, M. Sanchez, D. A. Ureta, N. G. Reynaert, C. Anguita-Salinas, G. Marin and M. L. Allende, BMC Dev. Biol., 2014, 14, 7 CrossRef PubMed.
- B. Neumann, K. C. Nguyen, D. H. Hall, A. Ben-Yakar and M. A. Hilliard, Dev. Dyn., 2011, 240, 1365–1372 CrossRef PubMed.
- S. S. Bedi and D. L. Glanzman, J. Neurosci., 2001, 21, 9667–9677 CAS.
- S. A. Deriemer, E. J. Elliott, E. R. Macagno and K. J. Muller, Brain Res., 1983, 272, 157–161 CrossRef CAS PubMed.
- M. F. Yanik, H. Cinar, H. N. Cinar, A. D. Chisholm, Y. Jin and A. Ben-Yakar, Nature, 2004, 432, 822 CrossRef CAS PubMed.
- W. C. Chang, E. Hawkes, C. G. Keller and D. W. Sretavan, Wiley Interdiscip. Rev.: Nanomed. Nanobiotechnol., 2010, 2, 151–161 CrossRef CAS PubMed.
- D. Kilinc, G. Gallo and K. A. Barbee, Exp. Neurol., 2009, 219, 553–561 CrossRef CAS PubMed.
- V. Gil and J. A. del Rio, Nat. Protoc., 2012, 7, 268–280 CrossRef CAS PubMed.
- D. Reginensi, P. Carulla, S. Nocentini, O. Seira, X. Serra-Picamal, A. Torres-Espin, A. Matamoros-Angles, R. Gavin, M. T. Moreno-Flores, F. Wandosell, J. Samitier, X. Trepat, X. Navarro and J. A. Del Rio, Cell. Mol. Life Sci., 2015, 72, 2719–2737 CrossRef CAS PubMed.
- S. Nocentini, D. Reginensi, S. Garcia, P. Carulla, M. T. Moreno-Flores, F. Wandosell, X. Trepat, A. Bribian and J. A. del Rio, Cell. Mol. Life Sci., 2012, 69, 1689–1703 CrossRef CAS PubMed.
- C. Riggio, S. Nocentini, M. P. Catalayud, G. F. Goya, A. Cuschieri, V. Raffa and J. A. del Rio, Int. J. Mol. Sci., 2013, 14, 10852–10868 CrossRef PubMed.
Footnotes |
| † Electronic supplementary information (ESI) available. See DOI: 10.1039/c5ra11522a |
| ‡ Current address: International Collaboration On Repair Discoveries (ICORD) Blusson Spinal Cord Centre and Department of Zoology, Faculty of Science, University of British Columbia, Vancouver, Canada. |
| § Current address: Catalan Institute of Nanoscience and Nanotechnology (ICN2), UAB Campus, 08193 Bellaterra (Barcelona), Spain. |
| This journal is © The Royal Society of Chemistry 2015 |