
Tensile mechanical analysis in cultural heritage
Analytical Methods Committee, AMCTB No. 115
First published on 2nd September 2024
Abstract
Mechanical analysis, for example tensile testing, in cultural heritage looks at materials including textiles, paper and cement, focusing on properties such as their strength and elasticity. It is used to monitor changes and assess conservation materials. This Technical Brief examines two tensile testing case studies and examines the limitations and advantages of mechanical analysis of materials.
Introduction
Mechanical analysis has been used to study a range of materials found in cultural heritage collections, including textiles, paper, parchment, adhesives, film, bone, cement and mortars. The primary material properties studied within cultural heritage have tended to be strength, deformation, elasticity, creep behaviour and changes in these due to the local environment or chemical degradation. In conservation, it is often helpful to monitor changes in physical properties during ageing and degradation processes or to assess a material’s strength prior to its application as a conservation treatment. Whilst tensile testing is an invasive technique, it has been successfully applied where samples do not need to be retained following analysis or where surrogate materials have been prepared to mimic naturally aged material. Examples include determining the creep behaviour of historic textiles prior to display,1 monitoring the strain hardening of degraded film2 and assessing the strength of adhesives for conservation treatments.3All materials will deform to some extent on the application of a high enough load. Deformation is defined as a change in the shape or dimensions of an object resulting from stress. Mechanical testing instruments are one of the main characterisation techniques used in materials manufacturing and industry, although they are likely to be overtaken within the next decade by computational materials modelling.
The physical properties of materials depend on underlying chemical and physical structures. They are governed by a range of factors including the type and strength of the chemical bonds, atomic and molecular packing, processing methods and the homogeneity of the material. These factors govern the materials’ response to external stresses and therefore their suitability for a particular application. Whilst there are several types of testing that provide information about mechanical properties of materials subjected to different stresses, such as cantilever or compression tests, by far the most common mechanical analysis method in cultural heritage involves placing samples under tension. During tensile analysis a force is applied at opposite ends of a sample. The sample is clamped at each end and stretched at a constant rate, whilst the force required to do this is measured.

Tensile tester
Depending on the type of material being tested, tensile systems will vary in size from benchtop instruments suitable for polymers to larger, floor mounted hydraulic instruments designed for metals and cementitious materials. During a tensile test the sample is held at each end by an upper and lower grip. The upper grip is attached to a force transducer, known as a load cell, which measures the downwards force as the upper grip is extended along the testing column. Testing is performed on samples with a width not normally less than 5 mm, unless testing single yarns or fibres.Tensile data
The raw data derived from a tensile test will be load force (N), extension (m) and time (s), from which other metrics are derived, such as the modulus of elasticity (the material’s resistance to deformation) and the energy at break (the energy required to rupture the material). The data are affected by experimental design and are specific to the material and sample size. Therefore, to enable comparisons between different types of samples or materials it is important to factor in the different cross-sectional areas of each sample. This is done by calculating stress and strain.The stress exerted on an object is defined as the (measured) force (F) divided by the cross-sectional area (A) (Fig. 1). This is termed the stress, σ. Its units are N m−2.
| σ = F/A |
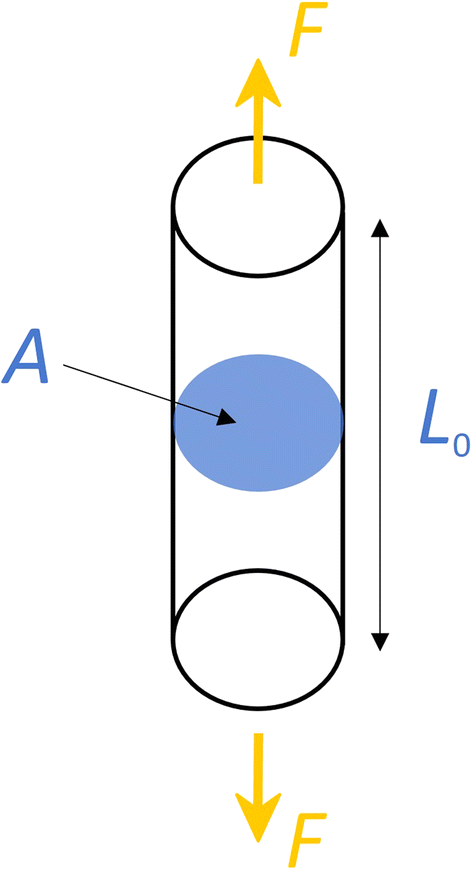 | ||
| Fig. 1 Schematic of a rod with the cross-sectional area perpendicular to the tensile force. | ||
If the initial length of a rod (L0) is subjected to a tensile force (Ft) there will be a change in length (δ). The elongation of the sample is known as the strain (ε) and is defined as the extension per unit length. It is a dimensionless quantity.
| ε = δ/L0 |
The modulus of elasticity is the stress divided by the strain (σ/ε) in the linear part of the curve; the energy at break is the area under the stress/strain curve up to the point of fracture.
Appendix 1 provides more details about a typical experimental procedure.
Case studies
Case 1
Semi-synthetic polymers, such as cellulose acetate, constitute a significant portion of archival collections. Owing to its transparency and flexibility, cellulose acetate film was widely employed as the base material for photographic film stock. Over time many of these films have been found to lose their mechanical integrity, which impacts on the handling, display and photographic image reproduction. The working properties of such materials are governed by the underlying chemistry and microstructure, with the presence of plasticisers and other additives greatly affecting mechanical response. However, these substances often migrate to the surface of plastics altering the working properties of the material and causing brittle behaviour.Fig. 2 shows the tensile data for four cellulose acetate films containing different quantities of the plasticiser diethyl phthalate (DEP). The cellulose acetate sample containing 20% plasticiser displays a few key features in its stress/strain curve (Fig. 2, dashed dark blue curve).
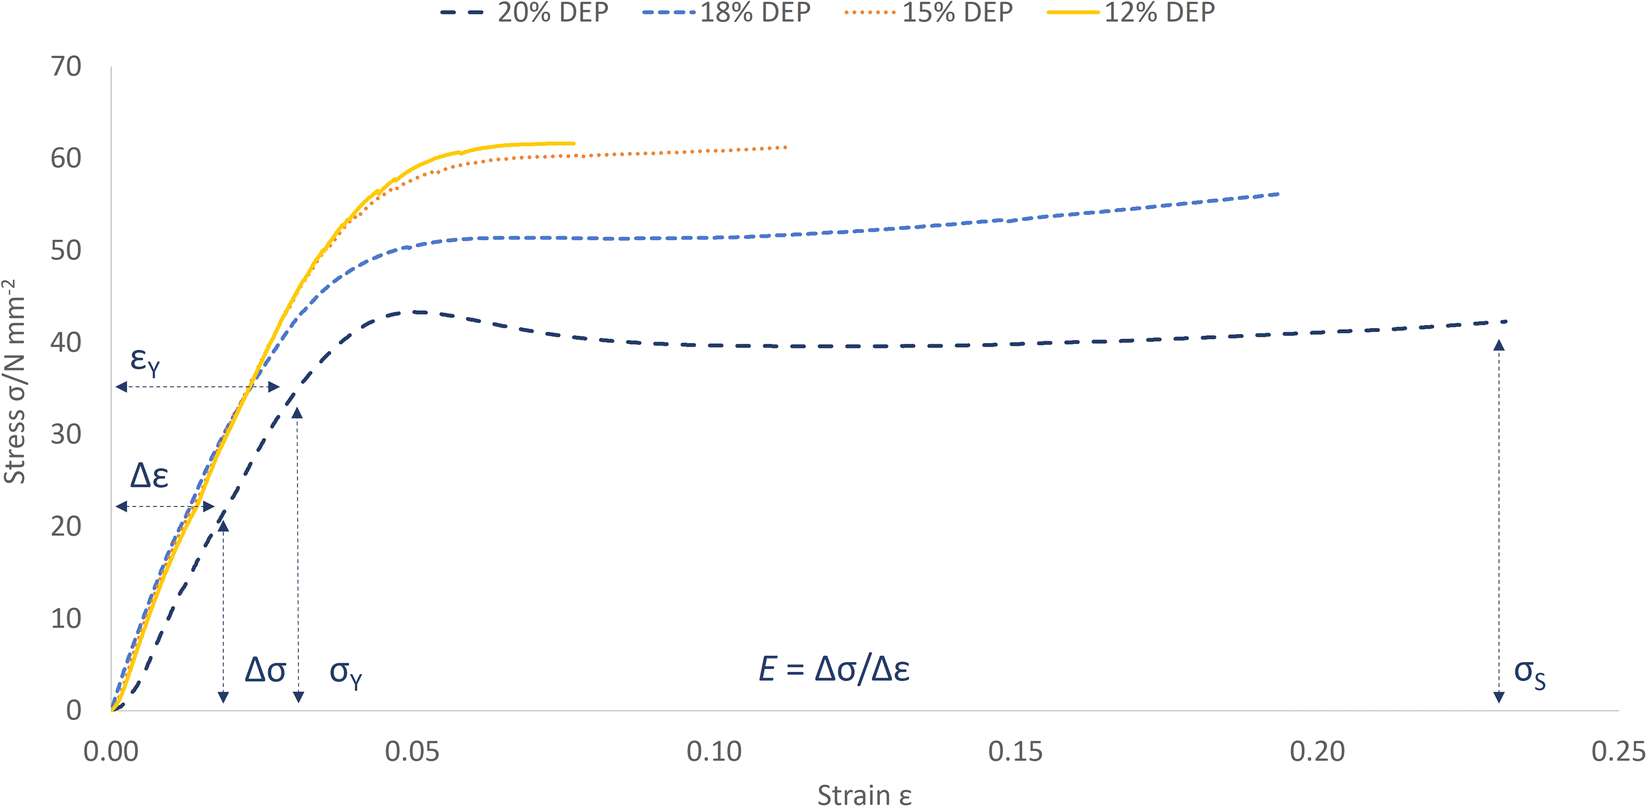 | ||
| Fig. 2 Tensile stress versus strain of four cellulose acetate films containing different quantities of diethyl phthalate plasticiser. | ||
The slope of the initial, linear region of the curve is the modulus of elasticity (E) and allows a comparison of the relative strengths of materials – the steeper the slope in this region the greater the amount of force required to deform the material. Extension of the samples within this linear, elastic region will be reversible.
The next region of interest is the yield point (Y), which is where the stress/strain relationship is no longer linear and eventually reaches a maximum. The yield stress, σY, identifies the force required to cause irreversible, plastic deformation. Beyond this point the removal of the external stress does not fully reverse the extension of the material. Understanding the amount of stress that causes permanent change is critical for safe handling. In this particular case study, identifying the level of force that causes irreversible deformation can help determine whether a film may be safely handled, such as being passed through a film projector, or whether it has passed its useful lifespan and requires digitisation.
The ultimate tensile strength, σS, is the final stress at the point of failure. For ductile plastics the point of rupture usually follows a process known as cold-drawing. After the yield point the sample elongates and forms a neck, which propagates along the length of the sample. The load remains stable as the amorphous regions become oriented in the direction of drawing, until ultimately the neck reaches the clamps, the load increases and the neck fractures. In brittle plastics cold-drawing is not seen and the material will fail at, or soon after, the yield point (Fig. 2, solid orange curve).
Case 2
Many textile artefacts will be hung vertically for display in museums, such as tapestries and garments displayed on mannequins. Depending on the size and weight of an artefact, when fibres and yarns are vertical they can be subject to significant loads along their lengths. This can lead to permanent deformation to the underlying microstructure of the fibres and rupture of the weave structure of the textile.Tensile creep testing under different environmental conditions can help to assess the physical forces within an object and determine whether displaying a textile vertically will cause irreversible mechanical damage over time. During a creep experiment a constant stress is applied to the sample, whilst the resultant elongation is measured isothermally over time. After a specified period, the load is removed and degree of recovery of extension is measured.
Fig. 3 shows a typical creep and recovery curve for a woven textile under tension. At the start of the creep section of the experiment an instantaneous elongation is seen (5 min) when the load is applied at room temperature (dashed dark blue curve). This displacement is a combination of the extension of the woven yarns in combination with elastic polymer deformation. There is then progressive contraction of the sample which suggests strain-induced crystallisation† (5–155 min).
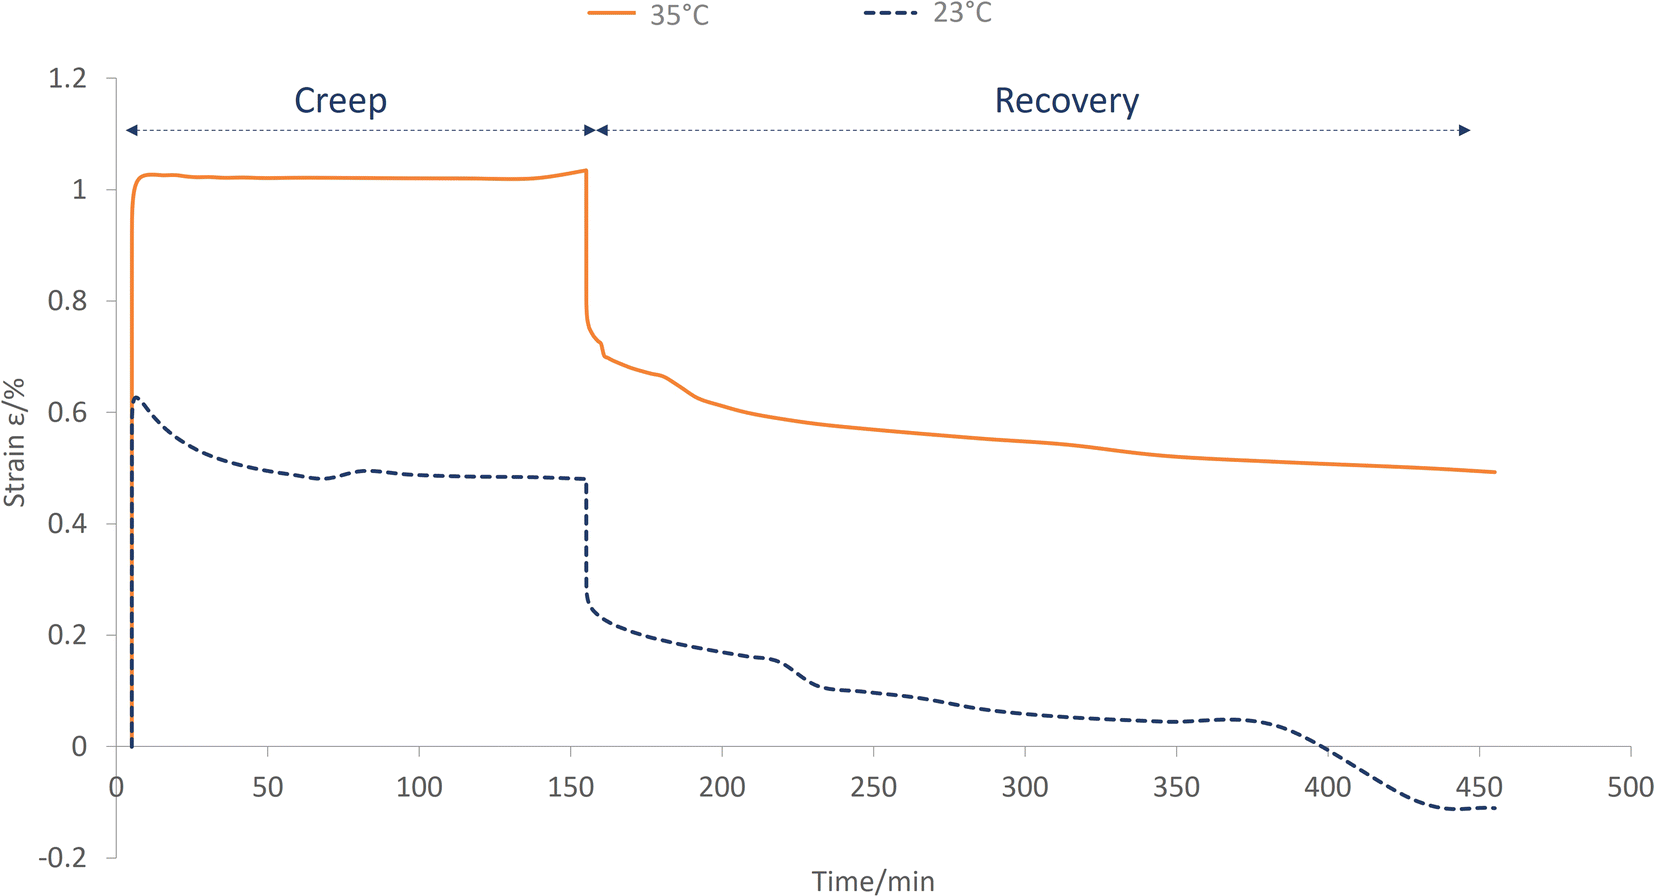 | ||
| Fig. 3 Creep and recovery experiment of woven nylon fibres held at 23 and 35 °C. | ||
After the static load is removed (155 min) the strain is instantaneously reduced due to relaxation of the woven yarns, followed by further gradual contraction of the sample. At the end of the experiment (455 min) the sample is shorter than the initial length, indicating a small degree of irreversible contraction.
At temperatures above ambient, the response differs as the fibres near their softening temperature (Fig. 3, solid orange curve). By the end of the recovery period (455 min) the sample does not return to the original length, showing permanent elongation.
Limitations and advantages
The chief advantage of mechanical analysis is its ability to provide information on the bulk strength of materials and to identify points of irreversible change and ultimately failure. It readily allows for comparisons between materials, enabling different conservation treatments to be compared or the condition of an object to be monitored over time.One of the key limitations is that mechanical analysis is always invasive, although not always destructive. Due to the need to extend, compress or bend the sample, testing will generally require the removal of a sample from an object. If elastic, reversible properties are being studied, it may be possible to retain the sample for further analysis. However, if the sample is taken beyond its elastic limit, permanent changes will be induced and subsequent analysis will reflect these changes. An additional drawback stems from the variability in bulk physical properties along the length of a sample that necessitates replicate measurements. The degree of variability will depend on factors such as the degree of crystallinity, manufacturing processes, age and condition of the material, and test sample production.
Appendix
Appendix 1 – tensile testing procedure
Mechanical tests under tension are generally classified as destructive, during which the sample is clamped at each end and subjected to a constant extension rate, recording the maximum load achieved at the point of rupture (N), the total tensile extension (m) and the energy required to take the sample to failure (J).The gauge length (GL) refers to the initial distance between the jaws of the machine and is taken as the starting length of the sample. Reducing the gauge length will often cause an increase in the maximum load at break due to the reduction of defects or molecular chain ends within the test length. The gauge length of the specimen should ideally be between 100 and 250 mm unless it can be experimentally shown that there is no appreciable effect on the results (ASTM D882-09).4 Regardless of the chosen GL this distance needs to be constant between samples to enable comparisons between elongation measurements. The rate of extension also has an appreciable effect on the results and therefore needs to be kept constant.
Depending on the types of materials being analysed, different load cells are required with a working range similar to the material being tested. These commonly range from 10 N load cells for single-fibre analysis up to 500 kN for harder materials such as concrete. Each type of load cell will have an upper and lower working limit, outside of which the uncertainty of measurement increases, and the results are unreliable. It is important to understand the linear working range of each cell.
Positioned between the load cells and the sample will be the clamping system, which will differ depending on material type. At loads of up to 10 kN, pneumatic side action grips are usually used, with rubber faced grips. For samples with higher breaking loads, such as metals and composites, hydraulic wedge action grips are needed. For fibre and yarn analysis, specially designed grips are used that enable the threads to be looped over the clamps.
Emma J. Richardson, Image Permanence Institute, Rochester Institute of Technology, Rochester, NY, USA.
This Technical Brief was prepared for the Analytical Methods Committee with contributions from members of AMC Heritage Science Working Group and approved by the AMC on 29th June 2024.

Notes and references
- P. Garside and P. Wyeth, Assessing the Physical State of the Fore-topsail of HMS Victory, in Postprints First Annual Conference of the HRC Research Centre for Textile Conservation and Textile Studies, Scientific Analysis of Ancient and Historic Textiles: Informing Preservation, Display and Interpretation, ed. R. Janaway and P. Wyeth, Archetype, London, 2005, pp. 118–125 Search PubMed.
- E. Richardson, M. Truffa Giachet, M. Schilling and T. Learner, Assessing the physical stability of archival cellulose acetate films by monitoring plasticizer loss, Polym. Degrad. Stab., 2014, 107, 231–236 CrossRef CAS.
- J. Olender and C. Young, The Applicability of Gecko-inspired Dry Adhesives to the Conservation of Photographic Prints, in ICOM-CC 18th Triennial Conference Preprints, International Council of Museums, Copenhagen, 2017 Search PubMed.
- ASTM D882-09, Standard Test Method for Tensile Properties of Thin Plastic Sheeting, American Society of Testing and Materials, 2009, DOI:10.1520/D0882-09.
Footnote |
| † Referring to the phenomenon of strain-induced ordering of the molecular chains within the disordered regions of amorphous and semi-crystalline polymers, which results in shorter interchain distance and an increase in bulk strength. |
| This journal is © The Royal Society of Chemistry 2024 |