
A re-evaluation of diffraction from Si(111) 7 × 7: decoding the encoded phase information in the 7 × 7 diffraction pattern
J. E.
Demuth
 ab
ab
aNaples, Florida 34114. E-mail: jedemuth7x7@gmail.com
bIBM Research Division, Thomas J Watson Research Center in Yorktown Heights, NY 10598, USA (Retired)
First published on 26th March 2021
Abstract
The diffraction features of Si(111) 7 × 7 are analyzed and related to various structural models of the Si(111) 7 × 7 surface as one part of a multivariate analysis of this system. The limitations in early sample preparation and measurements produce some uncertainty in previously proposed structures. More recent data is considered here. In addition, models used early on to evaluate the structure of 7 × 7 have been over simplified, idealized models. More complex models are considered within the projection rod method as used for surface crystallography. The origin of numerous diffraction features can be determined via their Fourier components for a wide range of 2-D layers, which provides new insight into the structure as well as the limitations of prior projection analyses. Structures which produce the key elements of the 7 × 7 diffraction are presented and various distortions are considered consistent with other experimental results. In general it is found that the presence of a strong set of 3/7th order beams and near extinction of neighbouring fractional order beams are features which are found experimentally and distinguish an important class of structures. This class has a particular type of 3-fold mirror symmetry, which is not apparent in the widely accepted dimer-adatom-stacking fault, DAS, model. Higher order diffraction features, of which many are weak, are also considered and provide important new structural information. Several new polymorphs of the 7 × 7 are identified which may also satisfy the diffraction derived features and possess some degree of pi-bonding so as to enable magnetic surface states not possible in a pure covalently bonded system such as DAS. The Patterson map of the 7 × 7 surface provide insight into the lost phase information encoded in diffraction and reveal why the DAS structure was experimentally favored. An unusual non-primitive 7 × 7 unit cell is also derived from the Patterson map that possesses unusual symmetry properties, a non-standard surface Brillouin zone with potentially unusual electronic properties.
1. Introduction
In the annals of surface science the 7 × 7 surface has long been considered a solved problem and a triumph of a wide range of experimental and theoretical techniques to resolve its complex structure. This structure was designated as the ‘dimer-adatom-stacking fault structure’ or DAS.1 More recent research efforts have focused on new nanostructures and 2-D systems such as graphene, silicene and other topological materials with unusual properties2 that have numerous applications.3 One of the most significant 2-D systems from a technology point of view is the silicenes, which are understood for a monolayer structure4,5 but which are controversial for multi-layers.6,7The significance of understanding such silicene systems and related 2-D Si structures cannot be overstated. The ability to integrate the unusual properties of such topological systems into current day silicon technology may represent as significant a breakthrough as previously realized from the transition from vacuum tubes to transistors. The next transition from 3-D bulk materials to 2-D materials will inevitably utilize their novel topological properties. Further, the compatibility of a Si 2-D material with existing VLSI silicon technology removes one obstacle for their integration into the next generation of solid state devices. The topological and symmetry properties of such 2-D materials may also lend them to use in quantum (qubit) computing.8 As a result it is important to understand the details of these silicon systems.
Recently, a thorough examination of the wide body of work on the 7 × 7 surface has revealed many paradoxes that were simply too numerous to be ignored.9–11 This has led me on an unusual journey through a 7 × 7 ‘rabbit hole’ and to a ‘mad hatter's tea party’ where many things no longer made sense. Once considered a solved problem years ago, the 7 × 7 still shows some very unusual properties that appear to have been brushed aside! Nature has created an arrangement of atoms which apparently we do not fully understand.
Through a process of reverse engineering and pattern recognition of what Nature has provided, a new model was proposed which resolves many paradoxes.9–11 This model is referred to as the ‘inter-digitated faulted adatom’, or DFA, structure, and has similar topological atomic features to the DAS. The DFA structure is thereby referred to as a polymorph of the DAS. However, the DFA lacks dimers, which have never been directly or clearly observed, but instead inferred from various measurements and analyses. In addition, based on the diffraction pattern, it was assumed that 7 × 7 had 6-fold symmetry and was treated as such in most analyses.1,13,14 However, various measurements of the 7 × 7 reveal its C3v symmetry, which is present in the DFA but not obvious in the DAS model.10,11,15
Further evaluation of several earlier measurements of the 7 × 7 has also recently led to the discovery of a magnetic surface state11 as well as an instability in 7 × 7 that leads to a Jahn–Teller distortion of its atoms and an insulating ground state.12 Additional charge density distortions are also found experimentally that occur with increasing temperature and appear related to the 7 × 7's observed insulator to metal transition.
The mirror symmetry of the two sides of the 7 × 7 unit cell was proposed to also be essential for the creation of its insulating ground state.12 Here the extra degree of freedom allowed by electron spin provides a way to remove the degeneracy of the two symmetric sides of the unit cell and lower the system energy. Presumably the various atomic distortions facilitate this magnetic ground state. Very recently, spin polarized calculations suggested that the electronic structure of the DAS structure is not as simple as once believed, and called for a re-examination of the electronic structure of the 7 × 7.64 Hence, the structure of the 7 × 7 becomes even more important in understanding these unusual properties of the Si(111) surface.
Diffraction has long been the method of choice to resolve atomic structure and was applied from the mid 80s to the late 90s in attempts to define the structure of the 7 × 7.16 Since then many new experimental results and insights were obtained including detailed ab initio calculations17,18 of the equilibrium structure itself. These effective one electron calculations have also favoured the DAS structure.
With these many experimental results, this paper focuses on a re-examination of the diffraction features and the underlying simplifying assumptions made in kinematic diffraction analyses to date, starting with the original Takayanagi analysis in 1985,1 followed by X-ray analyses in 1988,13 199219 and 1999,20 as well as including more recent X-ray data in 201121 obtained with improved instrumentation. While variations in the data exist as discussed here, a simplified 2-D but conventional X-ray analysis of all this data continues to strongly favour the DAS structure.20,46,63
Given the complexity of the 7 × 7 structure, this problem is parsed into several components to better understand what may be happening. These include (1) the variations and differences in the experimental data itself, (2) examination of the Fourier components of the 7 × 7 STM image – a true 2-D 7 × 7 structure, (3) alternate models that cannot be distinguished by diffraction alone, (4) the use of Fourier analysis to understand the interference structures possible in a multilayer 3-D adlayer and (4) examination of the scattering phase information available in the Patterson maps of the experimental 7 × 7 pattern and the optimized DAS model. As a result this paper has essentially seven sections that address these issues.
A cornerstone in this work is the fact that ab initio calculations all favor a DAS 7 × 7 structure having strong covalent, tetrahedral bonding which produces a highly stressed multi-layer adlayer. Such an adlayer has yet to be accurately modelled in any 7 × 7 diffraction analysis. The Fourier analysis presented here enables a better understand of these limitations. It also suggests new (modified) structures that can replicate many of the diffraction features observed. Finally, for this particular case, one can resolve part of the phase problem in diffraction from the 7 × 7,24 which suggests why these paradoxes have arisen and points to a different structure for the 7 × 7 surface. The details of the 7 × 7 structure however remain elusive.
2. Background
The structure of Si surfaces has been widely pursued starting with Farnsworth's first LEED measurement of Si(111).26 Work continued using a variety of new techniques but it remained elusive for decades. In 1982 a theoretical model of the cleaved Si(111) 2 × 1 surface was proposed27 that matched the energy bands measured in PES and has, with minor modifications,28 been widely accepted. This surface when annealed produces a very stable 7 × 7 structure with a complex diffraction pattern. Over the years many experiments were performed and a wide range of models proposed for this structure. Such semiconductor systems became challenging systems and the object of many studies, even a testing ground for new methods to better define or understand the features of Si surfaces.The 7 × 7 was particularly interesting due to its complex structure and intriguing diffraction pattern. The first breakthrough in these studies of 7 × 7 was the observation of atomic scale features seen in scanning tunnelling microscopy, STM.29 However, there were different ways to interpret these STM ‘bumps’. Combining chemical intuition with the presence of a faulted adlayer structure led Takayanagi to propose the DAS model, which he validated with his TEM diffraction data.1 This new structure was consistent with all the data at the time, including the STM image.
His analysis did not determine vertical displacements but considered only lateral locations of the surface atoms projected onto a plane, referred to later by Robinson as “rod projection”.22 Most of the atoms were assumed to be in normal bulk like tetrahedral positions except for pairs of atoms called dimers that occur along the unit cell boundary. Here the faulted structure was proposed to be a bulk like stacking fault which allows the two sides of the unit cell to symmetrically bond together. Within this 2-D model Takayanagi varied the lateral location and spacing of the dimers along the unit cell boundary. He originally referred to this as the refined DAS structure but in view of later refinements by Robinson13,20 it is referred to here as his optimized model.
After the first TEM diffraction work on 7 × 7, it became apparent that the weak interaction of X-rays would permit a more reliable kinematic analysis of the diffraction intensities. The extension of such diffraction studies using X-rays became possible with the advent of X-ray synchrotron sources. These provided X-ray intensities 1000 greater than lab sources, important given the need to maintain a clean surface during the still lengthy data acquisition time.30,31 The period from 1986 to 1992 saw a large number of surface X-ray studies, first to address many types of semiconductor systems and ordered layers on them, and, later, of metal surfaces as well as many other topical problems in surface science.22,23
As is the case with new methods or techniques that become available, there are always challenging problems that stand out and are attempted. The 7 × 7 surface was a timely, controversial system, but in retrospect involved over simplified modelling which at the time was very reasonable.
2.1 Bulk versus surface crystallography
The goal of all crystallography is to use the diffraction features to determine the arrangement of atoms. There are many methods to obtain the diffraction patterns from surfaces using different probes, such as electrons, He atoms or X-rays to name a few. X-rays have the advantage of being weakly scattered so as to allow a straightforward kinematic analysis of the diffraction from a periodic structure.22,23,32 X-ray diffraction/crystallography is also the most developed and understood method to determine bulk structures.32However, surface X-ray crystallography is not as straightforward as bulk X-ray crystallography. There are many differences and experimental requirements that make X-ray surface crystallography far more challenging and tricky to execute. This occurs in both the measurement and then in the analysis. In addition the 7 × 7 is perhaps one of the more complex structures in surface science.
On the experimental side there are many issues that must be addressed and overcome. First is the general problem that the surface has about a million fewer atoms to sample relative to a corresponding bulk volume. This reduced number of surface scatters dramatically reduces the surface signal relative to the bulk signal. Now one must be able to separate the signal from the top surface layers from that of the bulk. This is where the classic surface science dilemma arises between maintaining surface cleanliness versus acquiring adequate signals. Unlike probing a bulk sample which in air is “protected” by a stable, usually amorphous, contamination layer, the surface is exposed and needs to remain “pristine” during measurements. This requires enclosing the sample in a clean ultra high vacuum, UHV, environment and creating the surface of interest directly in this environment. Enclosing the sample in a metal vacuum chamber places constraints on what X-ray beams can be measured.22,23,30,31 This also leads to restrictions as to what scattering conditions are possible, which usually depends on the types of experiments that are planned.
The nominal UHV chamber walls attenuate the scattered X-rays, making it necessary to have a section of the chamber made of a material that is secure, strong and UHV compatible but passes X-rays, such as Be. This material is typically fabricated as a cylindrical swath in the UHV chamber whose shape and size restrict what diffraction beams can be measured. The high intensity X-rays possible from a synchrotron source have to be collimated and energy selected using a monochromator that also needs to be UHV compatible. To measure various scatting conditions, the sample has to be precisely rotated around several axes, which requires transferring such rotational motion into the vacuum chamber, or having UHV compatible synchronous motors drive various gimbals to modify the scattering conditions/angles within the chamber.
The first synchrotron based UHV X-ray system used for early studies of the 7 × 7 used rotary seals.30 These can introduce small pressure leaks into the chamber if not properly out-gassed during the thermal processing required to achieve UHV conditions. Thus, surface X-ray diffraction measurements are difficult and require making many trade-offs not required in bulk X-ray studies.
2.2 Surface diffraction 101
Another important issue is in the analysis of diffraction from a surface versus from a crystal. In the bulk, the well defined periodicities in all three directions lead to diffraction features or Bragg peaks with well defined Miller indices (h,k,l). Ideally these are delta function singularities for a perfectly collimated, monochromatic X-ray beam. However, due to the beam divergence, its energy spread and beam coherence, the Bragg peaks are relatively well defined symmetric Gaussian-like features that can have Lorenzian tails. These two components arise from the convolution of instrumental factors as well as particular structural features of the surface.Fig. 1 shows an energy momentum schematic of diffraction using the Ewald sphere construct for an ideally truncated Si(111) surface33 for two cases: X-rays on the left (for λ ∼ 1 Å) and in low energy electron diffraction, LEED, on the right (λ ∼ 1.35 Å). Here the sphere represents a constant energy surface, in which the incident waves of momentum ki are changed using a wave vector, q, characteristic of the crystal momentum that permits a scattered wave with momentum kf. This intersection allows momentum conservation on a constant energy surface that defines the directions and intensities of the diffracted X-ray or electron waves.
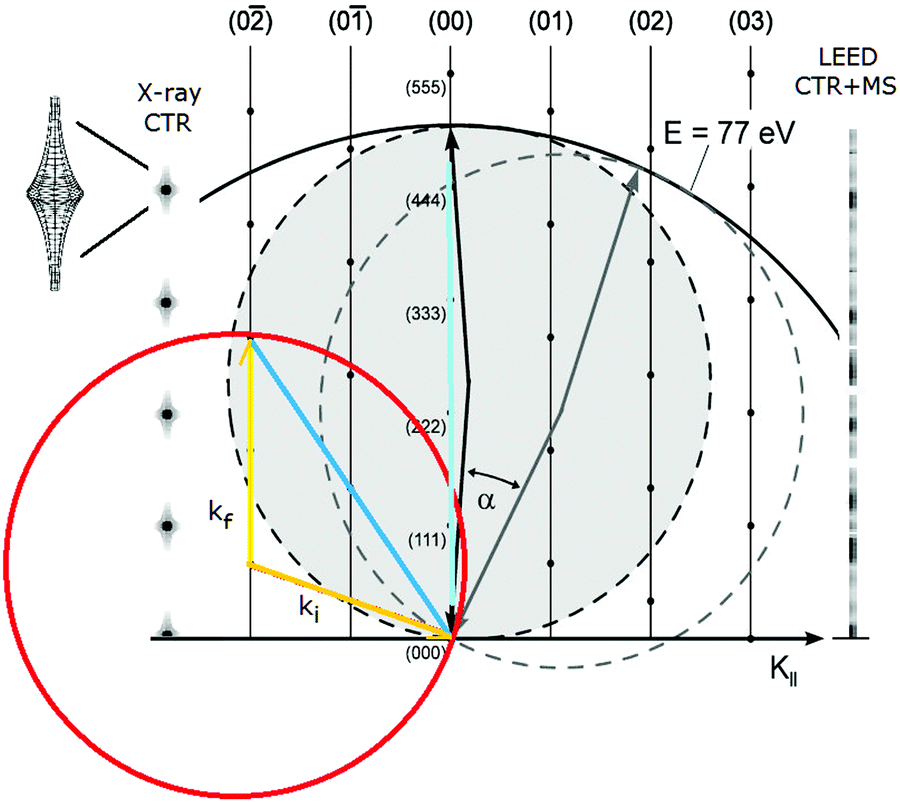 | ||
| Fig. 1 Ewald sphere construction of the diffraction conditions for X-rays (left) and for LEED (right) for an ideal crystal. The rods on the left and right indicate changes in diffraction due to the nature of scattering arising from the 2-D surface atoms (see the text). Adapted with permission.33 | ||
At a surface the interference condition normal to the surface is relaxed, which creates vertical rods normal to the surface that are indexed (hk). For a planar (2-D) layer of surface atoms, i.e. l = 0, these (h,k) rods are the same for any l value. For a fictitious surface created by removing half of the crystal (atoms frozen in place), the bulk (hkl) peaks appear, but are streaked as shown on the left in Fig. 1, and called crystal truncation rods, CTRs. In reality, the atoms at the very surface of such a ‘terminated’ crystal do move and will change the intensity modulations along the (h,k) rods. As shown on the right for LEED, the rod intensities are severely modulated due to the strong multiple scattering by electrons.
In considering a truncated crystal, the X-ray scattering from the top terminal layer has its interferences modified, which produces a streaky feature along this rod referred to in the original literature as “stacheln”.34 (Translated this means a spine or a barb without a sharp point.) Here, the interference of the surface scattering with the underlying bulk Bragg scattering has created this new interference structure. Similarly, if two regions arise where X-rays sample both regions, one sees a superposition of the two periodic subcomponents.22 If there is a structural difference in the atoms at such a boundary they too will modify the interference features.
This is a very important point since any change in the periodic positions of the atoms in this last layer, two layers or in a transition region will modify the interferences of the original 2-D or CTR structures to introduce new interference features along these rods.22
The surface ‘adlayer’ thereby has its own set of Miller indices of (h,k,L) where L is no longer strictly a Bragg peak. The collapse of the periodicities normal to the surface allows (h,k) to satisfy the Bragg condition in a 2-D plane, which is rigorously correct only if L → 0, i.e. kz → 0.22 This represents the condition for Robinson's rod projection theorem. The surface wave vector along these rods can be expressed as a ratio, L, to their nominal full value of l. So for example 0.2L corresponds to 1/5 of the nominal kz Bragg value.
Determining the diffraction intensities for the surface layer, in particular for a single purely 2-D layer, is straightforward, but becomes more complex if surface atoms in several layers are displaced. This appears to be the central issue for the 7 × 7 surface as discussed and illustrated in more detail later.
In the case of low energy electron diffraction, LEED, the lattice rods have a more complex modulation of these rods, referred to as I–V curves. In LEED the shallow penetration depth and strong electron scattering produce broadened Bragg features that have additional interferences associated with multiple scattering. Multiple scattering theory is well developed for LEED, but performing a structure analysis on as complex a structure as 7 × 7 makes such calculations nearly intractable, but doable if various assumptions are made.35
In contrast, surface X-ray diffraction has used a very simple 2-D model for diffraction that allows a straightforward analysis of the diffraction intensities. However, here too as the structure gets more complicated, with more complex variations relative to an ideal periodic layer, surface X-ray analysis can become an equally formidable problem. Namely, if there are more atoms with distortions and distinct vibrational properties than the number of independent diffraction features/beams measured, the experimentally observable beams may be insufficient to accurately determine all the atomic parameters. Again, remember that the UHV apparatus and the overlap of surface scattering with bulk scattering peaks limit the number of diffracted beams that can be measured. For simple, small unit cells this is not a problem, but, as discussed later, the complexity of the 7 × 7 forces various assumptions to be made so as to make the problem tractable.
Probes that do not penetrate the surface but manifest their wavelike properties, such as He atoms37 or positrons,38 scatter from only the top layer and have the advantage of not being influenced by the atoms below the surface. Their diffraction represents a true surface probe and produces diffraction from a 2-D layer. As presented later, the STM images reflect a 2-D surface contour and can be analyzed accurately using the rod projection theorem.
One final experimental point is that in LEED the preferred geometry is to have the electron beam incident at normal incidence (or in TED to pass through a thinned sample), which allows direct viewing of the diffraction pattern and a precise alignment of the sample to define normal incidence. In contrast, high intensity X-rays require a massive fixed synchrotron and monochromator to provide an X-ray beam that typically comes into the UHV chamber at a glancing angle as shown in Fig. 1. This does two things: First, glancing incidence is also an important condition under which the rod projection theorem/approximation can be applied. Second, such an incidence condition makes it more challenging to check the alignment of the sample's crystallographic normal given the low signal levels and lengthy times required to measure X-ray diffraction intensities. For example, the first X-ray study found that the symmetry related beam intensities varied on average by 12%.13 Optical alignment of the sample normal may be possible if permitted by the ports in the UHV chamber.23
2.3 Considerations in prior 7 × 7 diffraction analyses
To facilitate this discussion early models of the 7 × 7 are shown in Fig. 2. Fig. 2(a and b) shows a DAS model as originally conceived and used by many people.1,22 This consists of idealized Si bilayers that are repeating into the bulk with an adatom (yellow) atop the terminal bilayer. The first bilayer also contains the dimer atoms (red) at the same vertical height as the lower bilayer atoms. Each bilayer was originally considered as rigid and moved up and down to simulate an overall compression or relaxations of each layer.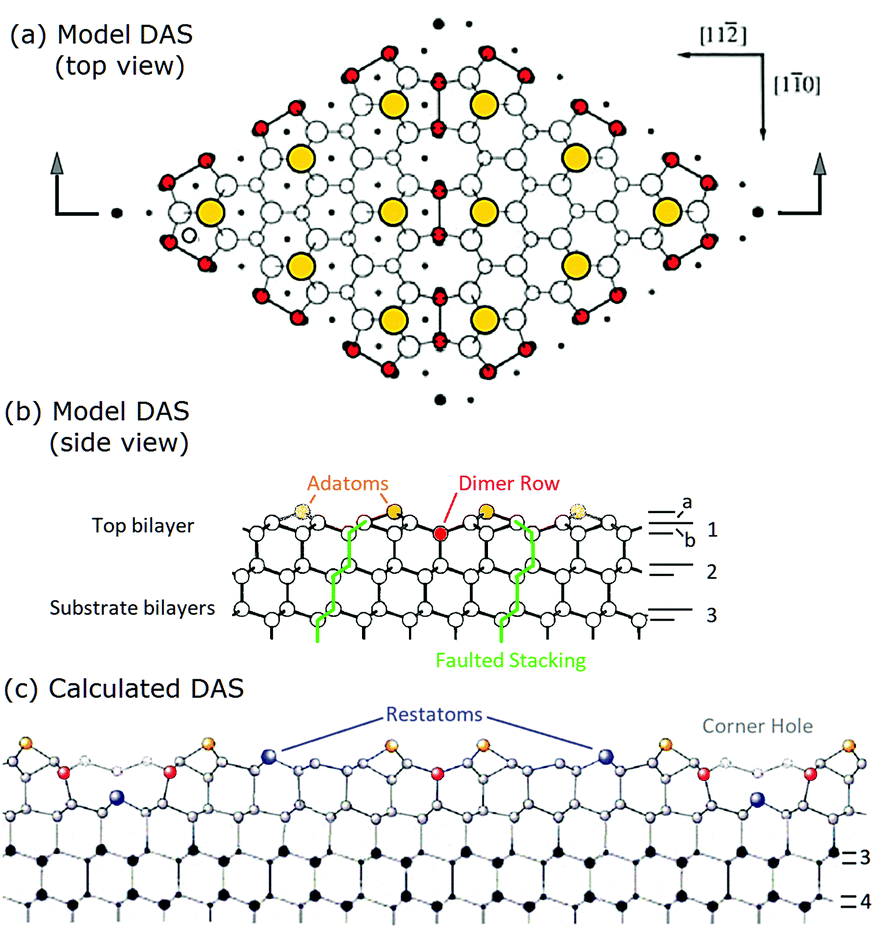 | ||
| Fig. 2 Model DAS structures (a and b) used in prior diffraction analyses compared in (c) to the atomic positions determined from recent density functional theory calculations.18 In (b) the idealized bilayers are numbered with the adatom and first bilayer spacing noted as a and b. In (c) the first two bilayers show significant vertical and lateral distortions. Lower layers eventually return to their idealized bulk positions. | ||
In the first successful analysis of the 7 × 71 the top layer was considered as tetrahedrally bonded and the dimers moved laterally to define the structure. A few years later the vertical structure of the adatom and bilayers was examined by measuring the modulations in the truncation rod intensities.19 Seven years later additional data was taken and a new analysis was pursued to determine the location of each atom in the adlayer.20
Some of the important features of these initial analyses are summarized here. Takayangi1 considered a bulk stacking fault on one side of the top layer (highlighted in green) of the unit cell to allow the top bilayers to rebond to each other via a dimer between them. He assumed an ideal top bilayer with atoms tetrahedrally coordinated as in bulk Si, which placed the adatoms directly atop one of the bilayer atoms in the so called symmetric T4 bonding site, consistent with STM.29 The lateral positions of the atoms in this top layer were projected onto a surface plane and used to calculate the diffraction pattern. Identical dimers were assumed to occur on the same plane as the lower atoms in this bilayer and their bond length was varied to compare and optimize his observed diffraction features to those calculated using planar structure factors. This model was called a refined DAS but here it is considered as a ‘dimer’ optimized DAS structure.
As can be seen in Fig. 2, this idealized structure (a and b) is similar to the calculated structure18 shown in Fig. 2(c) except that when examined more carefully many vertical and lateral distortions arise in the first and second bilayers, particularly near the corner hole and around the dimers. It turns out that the missing atoms that form the corner hole as well as all these small distortions become important and contribute to interferences that can significantly modify the resulting diffraction patterns.
The first X-ray diffraction analyses of 7 × 7 in 1988![[thin space (1/6-em)]](https://www.rsc.org/images/entities/char_2009.gif) 13 confirmed the overall DAS model by applying standard (bulk) X-ray structural optimization procedures32 to refine the in-plane structural coordinates. Here the atomic positions were projected onto the surface plane assuming the rod projection theorem.13,22 This resulted in modest changes (2–3%) in lateral positions, which were interpreted as reflecting stress in the structure.
13 confirmed the overall DAS model by applying standard (bulk) X-ray structural optimization procedures32 to refine the in-plane structural coordinates. Here the atomic positions were projected onto the surface plane assuming the rod projection theorem.13,22 This resulted in modest changes (2–3%) in lateral positions, which were interpreted as reflecting stress in the structure.
Following bulk X-ray crystallography,32 the structure was optimized by minimizing the error between the calculated and measured beam intensities, using a least squares fitting procedure, referred to here as the χ2 procedure. This optimizes the fit by mimimizing the differences between the measured and calculated peak intensities. Such a refinement procedure was used in early LEED work but was found to limit the reliability of a matching structure for two reasons. First, there were a limited number of peaks, and, secondly, it did not account for differences in peak intensities.36 Namely, not normalizing the difference error to the peak intensity distorts the contributions of various peaks to the overall match between experiment and theory. In the X-ray comparison the χ2 procedure heavily weights the most intense features at the expense of the weaker features.
The reason to consider all beams on an equal footing is that diffraction is quantum mechanical and determined by the interference of scattered waves of different phase and amplitude. A small phase difference between two waves will reduce the maximum amplitude slightly whereas near the wave's node any phase shift can produce larger relative changes. There are also many diffraction peaks in the 7 × 7 patterns of low intensity and near beam extinctions. Such an R-factor method or intensity weighted χ2 error function has also been discussed for more recent X-ray diffraction analyses.39 This point is discussed further and illustrated in a later section.
The second X-ray analysis of the 7 × 7 performed in 199119 considered the intensity variations along a reciprocal lattice rod of the 7 × 7 to obtain vertical information. Even with a brighter X-ray source, the data collection times for the 7 × 7 were of the order of two days due to weak signals from many diffraction features. Some parameters, i.e., atom vibrations, were chosen to be the same as found from the original intensity optimization in ′88 and were again applied in this 1992 analysis. As discussed elsewhere10 the vibrational amplitudes determined earlier from fitting the structure were unrealistic and unphysical,10 but provided a markedly better fit to the data (again using the χ2 procedure). The 5× enhanced vibrational amplitudes found for the adatoms can be alternately interpreted as arising from adatom disorder associated with sputter cleaning damage or residual water contamination,10 which is known to preferentially disrupt the adatoms.42
After relocating to the University of Illinois in 1992, Robinson and Ghosh eventually re-measured the in plane diffraction of the 7 × 7 with an improved monochromator and confirmed the earlier DAS structure. Starting in 1999, more accurate ab initio density functional theory, DFT, calculations were performed which indicated various atomic distortions not considered in earlier diffraction analyses. As a result, with new measurements the Illinois group attempted a full 3-D X-ray analysis using more diffracted beams but never published the results.20 Part of the issue with a 3-D analysis of the 7 × 7 surface is that the number of variables required to describe the 98 atoms per bilayer of the 7 × 7 requires many more measured beam intensities to accurately and uniquely determine the structural variables. Certain atoms may also require different vibrational parameters to be considered in the fit.
Vlieg recently re-analysed Robinson's new data63 again within this single layer projection model, using the same χ2 optimization procedure, and found a good fit of this 7 × 7 data to the DAS structure with essentially the same in-plane displacements as found earlier.13,63 However, this new analysis found the full adatom scattering/occupation values now reasonable versus the earlier values of 50%. This is consistent with fewer defects, i.e. improved sample preparation, than in the earlier in-plane mesurements.13 Vlieg also compared and analyzed Miceli's new X-ray data,47 including a fit to the DFA model, and found little reason to doubt the in-plane DAS model. Several of these points will be discussed in further detail within the context of the subsequent discussions.
2.4 Atomic distortions in the DAS structure
Fig. 3 shows a more detailed side view of Fig. 2(c) of a representative portion of the 7 × 7 surface as optimized by density functional theory, DFT, calculations.18 Such detailed calculations started to appear at the end of 1999 and improved over time as calculational capabilities and procedures improved.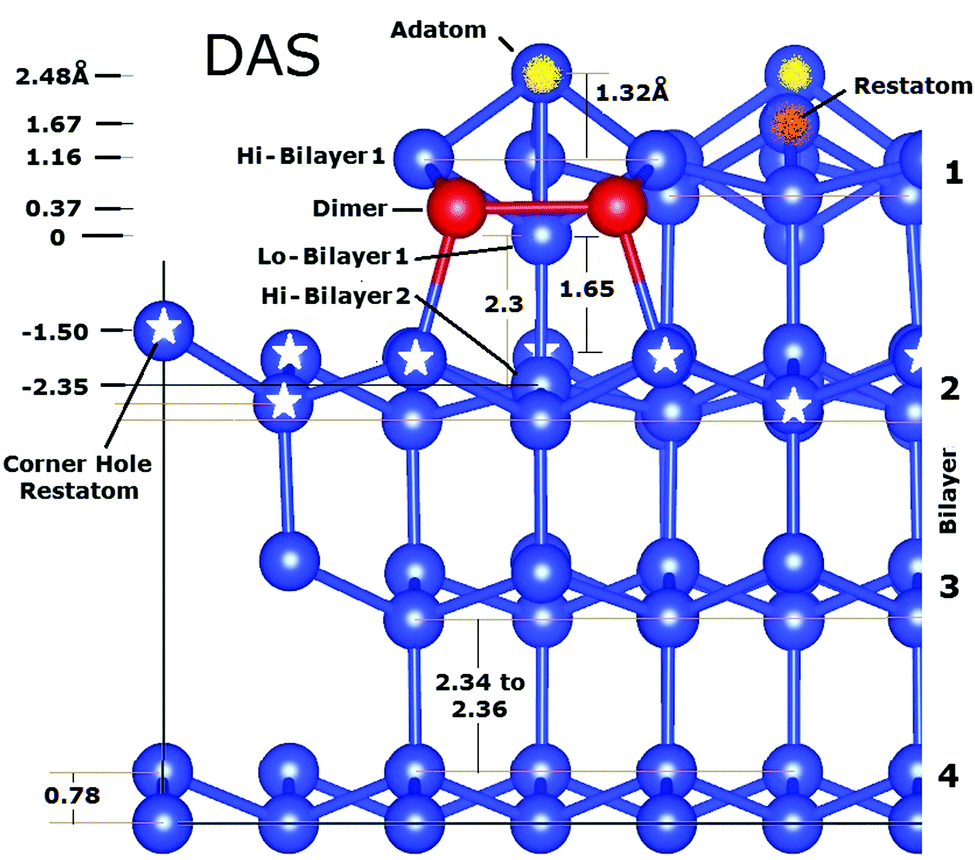 | ||
| Fig. 3 Side view of a portion of the faulted side of the 7 × 7 DAS structure cut along the side of a unit cell as calculated by Geisler.18 (Reproduced with permission.) The origin for the scale on the left corresponds to the bilayer atom below the adatom. | ||
One of the most recent, accurate DFT calculations of the 7 × 7 was performed by Geisler and Kratzer in 201318 and reveals many details of the structure now shown in Fig. 3. Namely, the strong bonding interactions in the DAS model move many atoms around from their bulk positions. These distortions also propagate beyond the original top bilayer into the second layer and to a few atoms in the third layer. In Fig. 3 these changes are visible in the differences in the criss-crossing bonds between the first and second substrate bilayers, with the most significant changes marked by stars. The strong covalent bonding of the 7 × 7 that uses dimers to bond the two sides of the 7 × 7 cell together has created large stress and atomic displacements that propagate inward.
Considering the distinct atom layers in Fig. 3, one has to consider 7 layers: the adatom layer, the restatom layer, the top atoms in the first bilayer, the dimer layer, and the top and lower atoms of the second bilayer. These different atomic layers are marked on the left of Fig. 3. These displaced layers and atom positions make any structural refinement significantly more difficult.
Again, the interferences and diffraction features for 7 × 7 are affected by all the displacements in these 7 layers, since any change in the relative locations of the periodic atoms from their bulk position will contribute to and modify their interference with scattering from the other periodic atoms.22 It is reasonable to believe that once the distortions of these subsurface atoms are of the order of lattice vibrations, then such distortions are no longer important in altering the interference function. An additional consideration is that while the distortions in this second bilayer are relatively small (∼0.2–0.3 Å), this 7 × 7 layer has MANY displaced atoms that will contribute to modify the interference features. As a result both the adlayer and the distorted first substrate layer will produce interferences and contribute to the diffraction pattern.
Fig. 4 shows a top view of the atoms for the calculated DAS,18 presented in such a way to accentuate the lateral displacements of the atoms on each side of the unit cell. A pencil rendering of (a) is shown in (b). Interestingly, not only are the top atoms on the two side of the unit cell slightly different but so are many of the atoms in the second bilayer. This is where the stacking fault alters the symmetry of the charge densities from that of the bulk below. The rectangular boxes shown indicate atomic structures that are distorted by ∼0.2 Å and which occur primarily in the second bilayer.
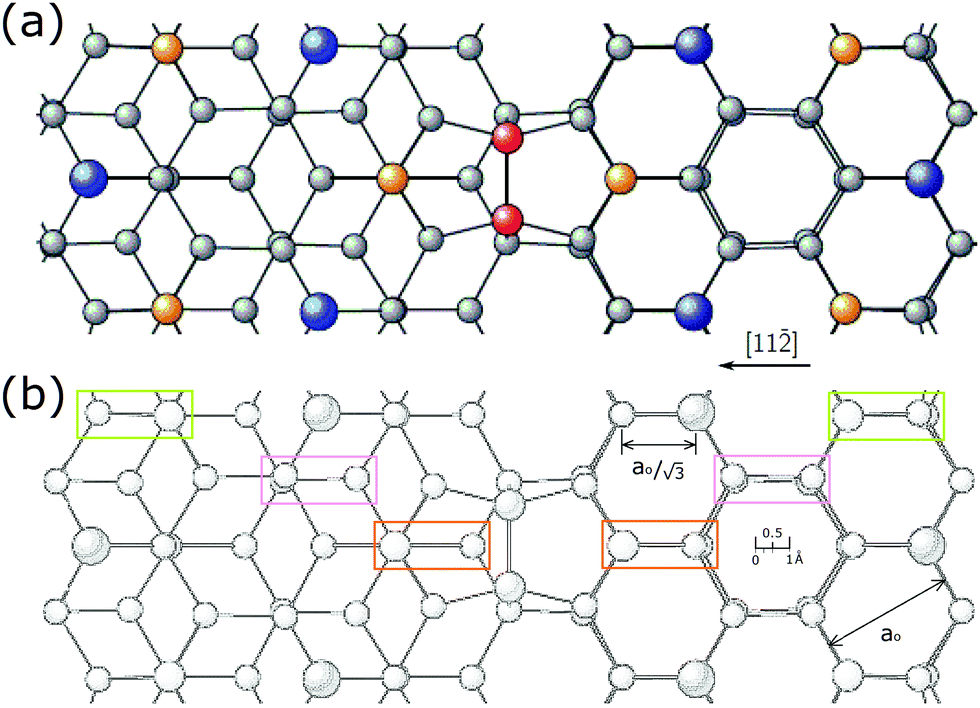 | ||
| Fig. 4 (a) Top view of a section of the upper layer of the calculated 7 × 718 and (b) a pencil rendering of (a). The faulted side of the unit cell is on the right. The green, pink and orange boxes correspond to the same areas on opposite sides of the unit cell boundary. | ||
In such a DAS model the displacement of these 7 layers of atoms must be considered in modelling the diffraction from it. Fig. 4(a) and the offset in (b) also show that the DAS structure lacks mirror symmetry planes along the unit cell boundary, which is one of several reasons why alternative structures to DAS were initially considered.10,11
Thus, the complexities of this calculated DAS structure provide the crux of the problem discussed here: whether earlier analyses of a projected layer accurately reflect the interference features of the 7 × 7 and whether other structures would be equal or do better. The premise here is that all TEM and X-ray structural analyses to date have utilized over simplified, idealized projection models. In addition, diffraction analysis and fitting procedures relied on the most intense features to optimize the structure. These together with a ‘quirk of nature’ provided an ‘almost perfect’ fit between the lower order diffraction beams measured and the simple 2-D DAS models.
Summarizing, the original DAS structure was based on a simple idealized tetrahedrally bonded top layer which was optimized to reflect the lateral location and bond distances of the dimers as part of a planar top bilayer. The first X-ray analyses in 1988 provided a refined DAS structure by analyzing the 2-D diffraction pattern assuming that the adatoms, top bilayer atoms and dimers were all coplanar and optimized their lateral positions. These changes were ∼0.09 Å10 or less, and considered to reflect surface stresses.13
The second X-ray analysis in 1992 considered the variations along a surface truncation rod, i.e., the reciprocal lattice rods perpendicular to the surface, to determine the displacements of the adatoms above the first bilayer as well as possible changes in the separation(s) of the bilayers. Again, this was performed for the simplified model by assuming well defined coplanar layers, for each bilayer, with the dimer atoms coplanar to the lower atoms of the first bilayer. Such coplanar layers do not occur in the calculated structure. Similar analyses of subsequent X-ray data in 199920 and 201121 by Vlieg63 again favored the DAS model structure.
2.5 The approach taken in this work
In this study a Fourier transform, FT, analysis of the periodic features of these structures is used to understand the interfering waves and the intensities of the reciprocal lattice, RL, rods as compared to the observed diffraction patterns. A test case is also performed to directly compare this FT approach to algorithmic structure factor calculations. In general, the periodic potential of the surface defines several related properties: the wave interferences in diffraction, the RL points of the crystal as well as the waves that constitute solutions to the wave equation and the resulting atomic locations of the surface lattice/atoms. As a result the terminology of beams and waves as used here more generally reflect the quantum mechanical wave nature of matter, whether electrons or atoms. These terms are sometimes used interchangeably, depending on the context.While the limitations of earlier in-plane projection modelling of diffraction from the 7 × 7 are clear, the application of the 2-D rod projection theorem can provide some useful insight into the nature of diffraction from the 7 × 7 surface. And certainly any comparison of the calculated DAS structure to the polymorph is a useful and an educational exercise. While no detailed structures of the DFA polymorph have been independently determined, e.g., from theoretical calculations, the stereochemistry and absence of dimers suggest a less stressed/distorted structure than DAS. As a result the DFA may be more amenable to 2-D projection rod modelling, especially for new X-ray data that more closely approaches the conditions more favourable for rod projection modelling.
The FT modelling performed here also provides more insight into these diffraction features and assumptions made in prior analyses. Even with these limitations, a key set of interference features are discussed which appear to arise for a particular structural class that stems from the C3v symmetry of the 7 × 7. In addition, the use of primarily the lower order diffraction features that have been measured is a significant limitation of these earlier analyses. As shown here the weaker higher order beams contain important structural information that has not been considered.
In principle, the FT approach used here can be generalized to 3-D FT modelling to be more rigorously applied and automated to search over a wider range of structures than possible here. The insights provided here, in particular the limitations of projection rod modelling, should be useful for such structural searches.
This paper continues as follows. First, the reliability and limitations of the experimental diffraction patterns are reviewed. An introduction to the Fourier transform, FT, analysis used here is given and its validation provided from a previous structure factor analysis. This FT approach is then used to better understand the origins of various diffraction features observed for the 7 × 7, and finally to show the limitations of 2-D truncation rod models. While simple truncation rod models cannot provide an accurate answer for this system, analyzing different structural models on the same footing, e.g. the DAS or the DFA polymorph, is warranted. Such diffraction modelling suggests additional hybrid structures for the 7 × 7, referred to as the h-DAS structure, a symmetrised DAS structure, s-DAS, and a compressed symmetrised DAS structure, cs-DAS. Distortions in the originally proposed DFA are also considered and suggest an unusual non-primitive tiled structure, referred to here as the “Hexomi” structure or lattice.
2.6. The measured 7 × 7 diffraction patterns
The diffraction patterns are considered first to acclimate the reader to the variations and unusual features they possess as well as their uncertainties and limitations. Fig. 5 shows an assembly of 7 × 7 patterns measured over time that are discussed. These patterns represent different sample preparation and scattering conditions and sense slightly different aspects in the surface structure which are all important to this discussion.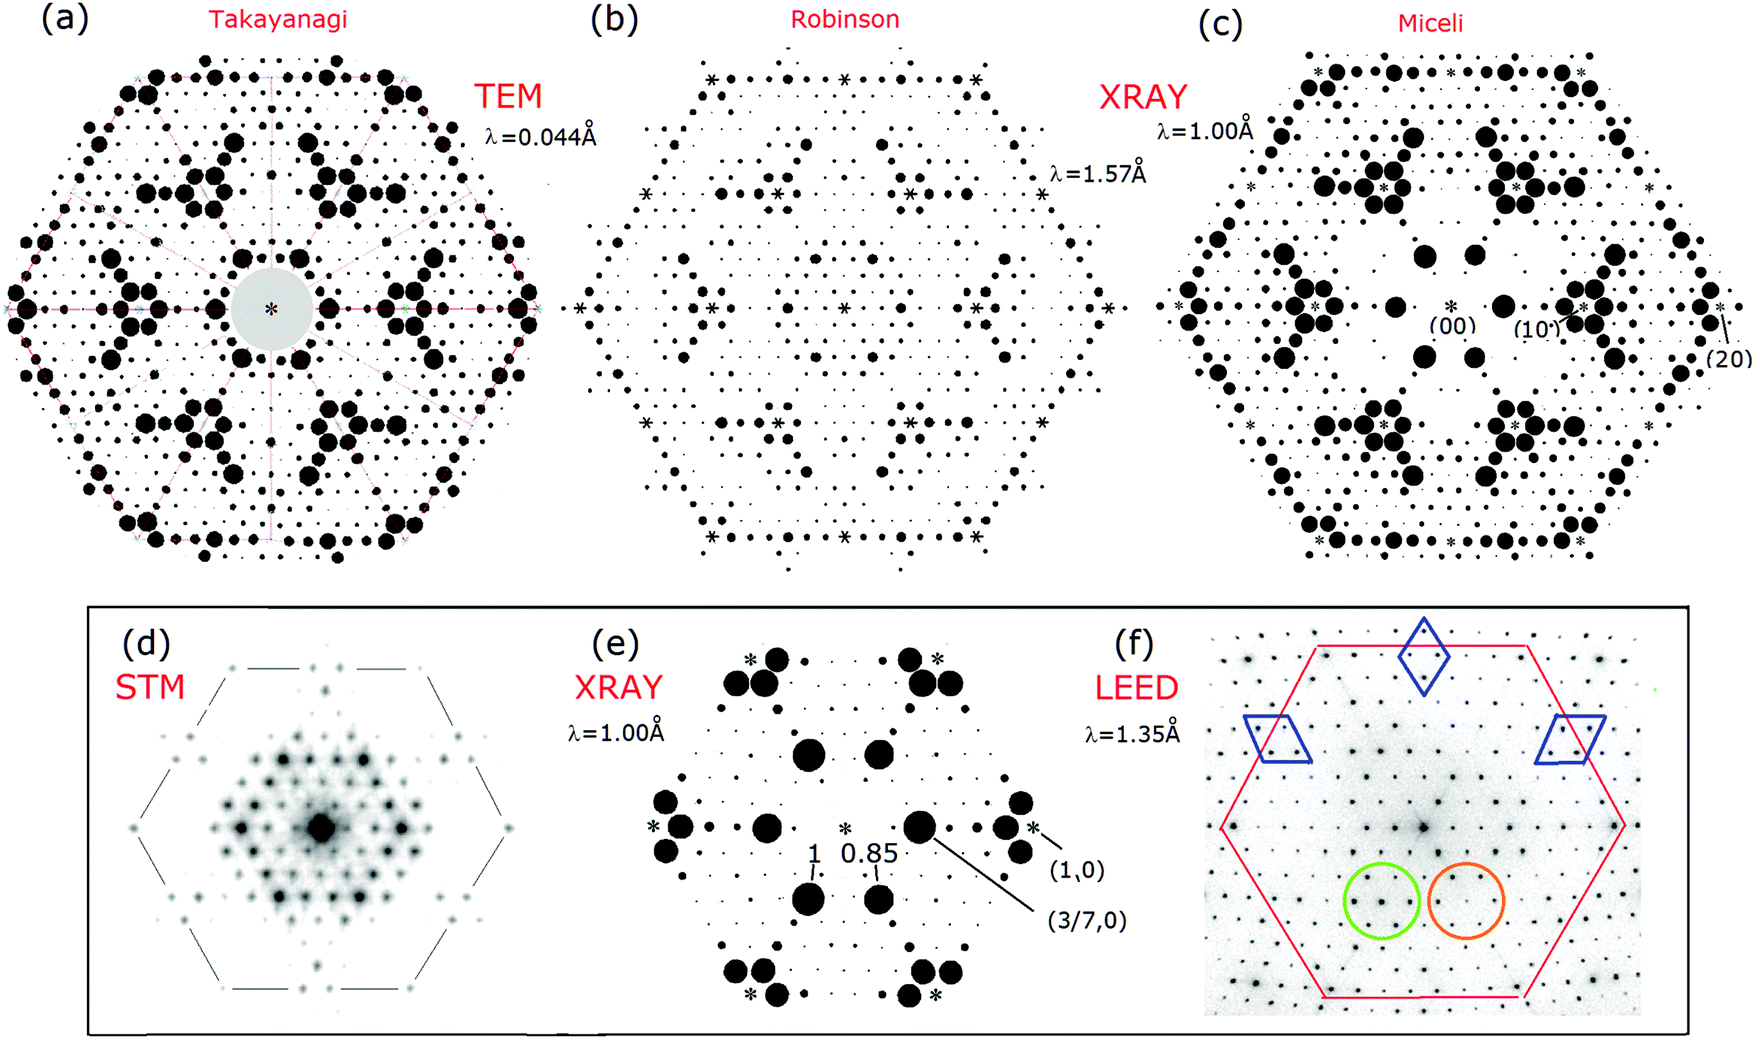 | ||
| Fig. 5 7 × 7 diffraction patterns from different approaches: TEM1 in (a) with λ = 0.044 Å; X-ray diffraction with λ = 1.57 Å20 in (b), or with λ = 1.0 Å21 in (c) and (e); the FT of an STM image (+2 V, 1 nA) in (d); and LEED33 in (f). Asterisks mark the intense bulk integral order beams that were not measured. In (a) the background of the intense 00 beam precluded measuring beams in the grey area. These relative intensities are shown on their original scales. | ||
Takayanagi's TEM pattern shown in Fig. 5(a) represents only a small fraction of the 460 beams that were measured.1 In 1984 the 7 × 7 pattern was found to have a small asymmetry showing two sets of three fold symmetric features indicating a projected symmetry of p3n1.1 In 1985 considerations of dynamical electron scattering and the angular variations in the pattern led to the assumption of a 6-fold symmetry and the appropriate averaging of these beams in his analysis.1 The assumption of a 6-fold symmetry and the averaging of the diffraction beams was subsequently adopted by others13,14,19,20 including (b) Robinson in 198813 and 199920 as well as in new X-ray measurements by Miceli in 201121 shown in (c).
The lower panel shows comparisons of the diffraction features from various measurements, all slightly enlarged on a common scale. The STM diffraction pattern is obtained by a Fourier transform, FT, of the STM topograph to show its periodic structure.40,41,68 Since STM senses only the topmost atoms, it represents a true 2-D structure whose Fourier components can be directly related to the STM derived diffraction pattern. As a result it is considered in further detail in this study.
The X-ray patterns in (b and c) show similar features but have important differences, such as many weaker fractional order beams, the brighter innermost (3/7,0) set of beams and different trends in the weaker higher order fractional order beams. This newest X-ray data21 is repeated in (e) and shows the (3/7,0) beams to have a slight 3-fold symmetry. In the first X-ray measurements in 1988 the symmetry related beams differed on average by 12% and were assumed to be symmetric: they were thereby averaged. In later X-ray work some of these asymmetries were confirmed and later attributed to anharmonic effects but never published.20
A LEED pattern is shown in (f) from a high quality spot profiling LEED instrument, SPA-LEED, that allows quantitative measurements and interpretations of the beam profiles.33 It is taken at an energy where almost all the diffraction features are visible, unlike most energies where strong modulations in the beam intensities occur. The clover leaf shaped diffuse area around the set of (3/7,0) beams, as well as the circled diffraction features themselves, reflects the 3-fold symmetry as found in the brighter (3/7,0) X-ray beams in (e). Such 3-fold symmetry in LEED is expected from strong electron scattering from the subsurface, which has 3-fold symmetry characteristic of tetrahedral bonding in the diamond lattice.
Overall (a–c) reflect similar features while most workers agree that the TEM diffraction features may have small non-kinematic contributions. The X-ray data in (b) are the unpublished 1999 results while the ’88 results are shown later for comparison. Even in 1999, X-ray intensities were low and the measurements required 84 hours at a pressure as high as 5 × 10⁻¹⁰ Torr.20 Such background pressures are on the borderline for contamination free UHV conditions where trace water contamination is known to disrupt the adatoms.42
In 2010, Miceli's new surface X-ray instrument became operational on a later generation X-ray beam line at Argonne. This was a full UHV system without rotary seals but still included additional cryogenic pumping to scour active residual contaminants.21 This new X-ray source was another 1000× brighter than the earlier synchrotron X-ray source at Brookhaven used by Robinson.
The X-ray results in 199920 and 201121 were obtained using different wavelengths and more importantly with different scattering conditions. The 2011 X-ray measurements used a more glancing incident beam corresponding to scattering with L = 0.1 versus L = 0.2 used earlier.13,20 As a result these later X-ray results are closer to the L → 0 requirement for the projection rod theorem to apply.22 This provides yet another reason for favouring this newer data in the comparisons made here.
In the 2011 X-ray work, the family of the (3/7,0) beams, referred to more generally as the 3/7th beams, are the most intense beams with several weak groups of fractional order beams, almost extinctions, surrounding them. For example, in the 1999 data20 the (2/7,0) beam is 9% the intensity of the (3/7,0) beam. In contrast in the 2011 data14 it is 0.2%, a factor of 45× weaker than the relative intensities of the 1999 measurements. Many of the neighbouring fractional order peaks nearby are similarly low. These near extinctions of the fractional order beams are important distinctive features of the 7 × 7.
The 3/7 and 4/7 beams become particularly important in this analysis and overall characterize the uncertainties in the diffraction data. The variations in these beams over time are shown in Table 1. The relative intensities of the unaveraged beams measured in 2011 are also shown as are the final ratios of the model derived from the earlier sets of data.
| Year | Ref. | Ratio of (3/7,0) to (4/7,0) beam intensities | Ratio for optimised projection rod structural model | Scattering condition | Cleaning method |
|---|---|---|---|---|---|
| 1985 | 1 | 17.7 | 12 (18.8 DAS) | Transmission | Oxide flash |
| 1988 | 13 | 13.4 | 9.3 | L = 0.2 | Sputter/anneal |
| 1999 | 20 | 8 | 10.1 | L = 0.2 | Oxide flash + |
| 2011 | 21 | 18.5 (21.3) | NA | L = 0.1 | Oxide flash + |
For the record, a summary of how the diffraction patterns differed over time is provided in Fig. 6 for a region of these patterns. The relative intensities of the 198813 and 199920 patterns are very similar while again the 2011 pattern21 shows weaker relative intensities of the lower order fractional order peaks near the 3/7 set of beams. The 1985 TEM data1 is also similar to these earlier X-ray patterns, but, in the transmission mode of TEM, intense diffuse forward scattering obscures the low order peaks near the (0,0) beam. As a result these peaks are blanked out in Fig. 6(d) and elsewhere.
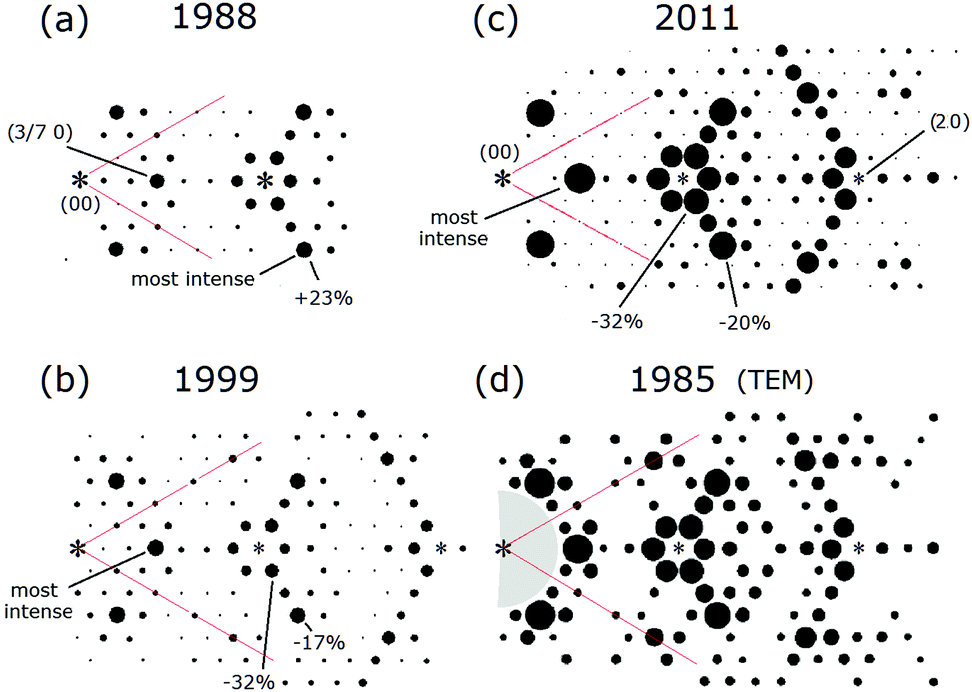 | ||
| Fig. 6 Similar areas of the X-ray diffraction patterns over time compared to the early, most complete TEM study/pattern to date in (d). In (a–d) the intensities of several peaks are shown relative to the (3/7,0) beam. In (d) the peaks below the (3/7,0) beams could not be measured and are blanked out. Note that such circle representations of diffraction intensities commonly used in such renditions of diffraction patterns can be misleading.43 | ||
While non-kinematic contributions to Takayanagi's TEM diffraction intensities are frequently cited as limiting his analysis, his data does have a very important redeeming factor. Takayanagi measured 460 independent (symmetry unrelated) beams, documented their agreement to a structure factor analysis for his proposed and optimized structure, and created a Patterson map from his extensive data set. This number of beams is far greater than the 120 independent X-ray beams measured by Robinson in 198813 or those measured in 1999.20 The later 2011 X-ray work measured 172 independent diffracted beams of the 7 × 7.14 Again, this number of measured X-ray beams excludes the integral order beams and is considered a small number of beams by bulk X-ray analysis standards.63
TEM work was also performed by Twesten44 to better address non kinematic scattering but was done in a non-UHV system. This measurement only considered 40 symmetry unrelated beams and analyzed a carbon contaminated, sputter cleaned 7 × 7 sample. For these reasons these particular TEM results are not considered further.
In contrast, Takayanagi's sample preparation and measurements involved a cryogenic shield around the sample and an oxide flash off to clean the surface, similar to that used in STM studies (which are known to produce high quality 7 × 7's). Thus, his 7 × 7 surface is likely more ideal. As shown later, this large number of fractional order beams provides additional interference information which essentially supplements the interferences from the integral order beams that are neglected due to their overlap with the substrate beams. These higher order beams turn out to be very important for image reconstruction as well as for an accurate Patterson map.
The occurrence of 3 fold symmetry for the 7 × 7 X-ray data as originally noted by Takayanagi in 19841 was also discussed in a user meeting abstract by Robinson and Ghose45 in the mid 90s. Complete new measurements were finalized by 1999 with a new set of diffraction data that also showed 3 fold symmetry, but were never published.20 A portion of their original abstract is quoted below:
“Previous X-ray measurements have found that all the 7 × 7 superstructure reflections are symmetric between the (h,k,L) and (h,k,−L) positions. New measurements of the (10,0,L) rod, shown in the figure, clearly break the symmetry. This rod had not been studied before because of its low intensity near L = 0. As can be seen the structure factor rises strongly on both sides, and is indeed one of the strongest reflections by the time it reaches L = 4. Yet the rise is clearly asymmetric between the +L and −L sides. This asymmetry will result in modifications in the structure models of Si(111) 7 × 7 to include p3m1 symmetry in place of the current p6mm.”
Before many of these studies, independent of any structural model, second harmonic studies of the Si(111) 2 × 1 and 7 × 7 surfaces revealed that the 7 × 7 itself had C3v symmetry, i.e. three symmetry planes, and a point group symmetry of 3pm1.15 This symmetry as well as three mirror planes also shows up and was confirmed in Takayanagi's Patterson maps but was never recognized nor discussed.1,10
The newer X-ray measurements by Robinson and Ghose in 199920 utilized oxide flash off sample preparation procedures and a UHV monochromator. These new measurements found several other beams with asymmetries as just noted, but their projection rod modelling of the averaged beams did not alter the original 1988 conclusions.20 An explanation for these asymmetries was proposed in unpublished work21 based on the effect of Si surface atom anharmonicity on the Debye Waller factors. In addition, measurements of more diffraction beams was attempted for a more complete 3-D diffraction analysis, but, in the end, it lacked the high number of beams required to pin down the many structural and model variables required. These new measurements, the 3-D analysis and this new interpretation of the asymmetries were never published. By this time the widespread belief in the DAS structure provided little justification, and perhaps more importantly, little funding for further work on an ‘established’ structure.
More than a decade later the new high intensity Advanced Photon Source at Argonne became available, which was three orders of magnitude brighter than the Brookhaven source and enabled leeway to improve the monochromator resolution and collimation as well as to reduce data acquisition times. Paul Miceli designed a new X-ray system for the APS and, with a PhD student, Michael Gramlich, initiated studies of Pb epitaxy on Si(111) surfaces.21 His new X-ray system amongst other improvements was totally UHV and included cryogenic pumping. Best practice cleaning procedures as now firmly established from STM work were also used. The X-ray beam spread also indicated the quality of this improved instrument, which allowed a beam coherence of at least 6000 Å−1 limited by the perfection of his surface versus the 1500 Å−1 coherence possible for the 1988 X-ray surface work.13
One of the important results already pointed out in Miceli's pattern is the slight inequality of the 0, 3/7 order beams, i.e., their 3-fold symmetry. Excluding this and the weaker lower order beams, the overall pattern was very similar to Robinson's 1999 results. Since Miceli's focus was on epitaxy and island growth of Pb on Si(111), and by that time 7 × 7 was considered to be well understood, they too assumed 6-fold symmetry and averaged thee equivalent beams. These new 7 × 7 results were presented as background material in Gramlich's PhD thesis.
A data set of this unaveraged data21 was provided later to the author by Miceli21 and later analyzed by Vlieg.46 These were averaged to provide 159 independent beams.46 The differences between various averaged data and Miceli's unaveraged data are highlighted in red in Fig. 7 and oriented so as to simplify comparisons of the 〈h,k〉 and 〈h,−k〉 features. Miceli ascribes this asymmetry to the complex beam profile correction factors required.21 However, the direction of this asymmetry follows the stacking offsets of the bulk lattice in the 〈11![[2 with combining macron]](https://www.rsc.org/images/entities/char_0032_0304.gif) 〉 direction and changes direction with higher momentum transfer. Such differences suggest remnants of interference from bulk atoms below the adatoms. (Note that the following year Vlieg further analyzed Miceli's as well as Robinson's unpublished data under the p3m1 point group symmetry but found no significant differences.)
〉 direction and changes direction with higher momentum transfer. Such differences suggest remnants of interference from bulk atoms below the adatoms. (Note that the following year Vlieg further analyzed Miceli's as well as Robinson's unpublished data under the p3m1 point group symmetry but found no significant differences.)
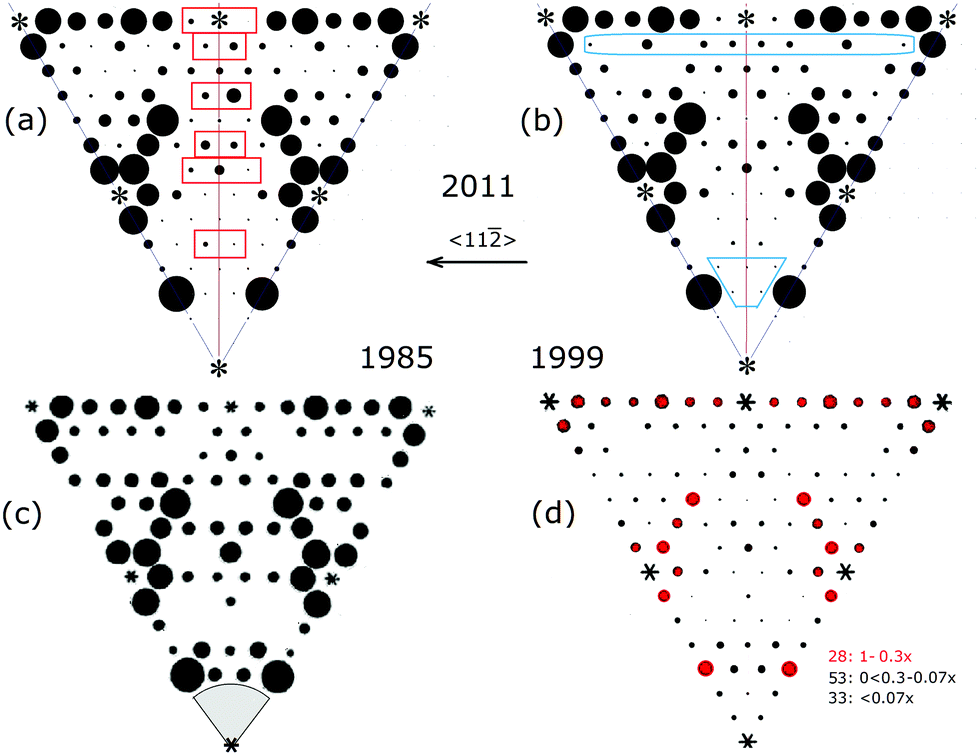 | ||
| Fig. 7 Comparison of X-ray measurements: (a) Gramlich's unaveraged and (b) averaged data,21 (c) the original TEM pattern and (d) Robinson's most recent ′99 X-ray measurement. The ‘unaveraged’ data in (a) clearly show the intensity differences across the 〈11〉 symmetry plane. (Integral order beams not measured are indicated by asterisks.) In (d) the red beams represent 28 of the highest intensity beams and the remaining black beams represent two groups of lower intensities beams relative to the 3/7 beam intensity as indicated. | ||
The unpublished suggestion by Ghose that surface anharmonicity produced these asymmetries20 is reasonable based on recent work on the anomalous thermal expansion of Si.47 In addition, as discussed elsewhere, evidence suggests that electron phonon coupling in the 7 × 7 system arises from an electron phonon instability that creates static lattice distortions in the 7 × 7 itself.12
Considering the averaged beams in Fig. 7(b–d), these show slightly different intensity patterns with significant differences in many of the weaker fractional order beams. These are highlighted for a few outlined in blue boxes in (b). Overall these differences can be attributed to many beneficial attributes of Miceli's instrument, in particular the shallower incidence angles, which makes a 2-D projected truncation rod analysis of this data more reasonable. Such differences, however, did not change Vlieg's X-ray analysis of this new data46 using the same χ2 intensity analysis and in-plane modelling approach as done in 1988. The best agreement was still found for the DAS model. Later attempts to fit the DFA polymorph structure63 led to a larger χ2 error than found for the DAS structure. As discussed earlier, errors in χ2 can arise from under weighting the contributions of the (many) weaker fractional order beams which are more evident in Miceli's data.
One can argue that the weaker intensities do not matter. However, the strongest beams, the 3/7th down to 30% of their value, represent only 25% of the 114 beams shown. If these weaker beams are intensity weighted in a χ2 error analysis, they can dominate this error analysis. Consider also that a 120–172 beam analysis is considered small, even marginal, by bulk X-ray analysis standards.32,39 For a realistic 3-D structure analysis as attempted in 1999, the number of unknown variables dramatically increases and requires a far larger set of beams for a reliable analysis.20
In addition to the variations of the 3/7 and 4/7 beams over time, Fig. 8 shows a direct comparison of the relative intensities of the weaker and stronger fractional order beams in these different measurements. On a linear scale the differences are most readily observed for the higher intensity peaks but rather dramatic variations occur for the weaker fractional order peaks. Focusing on the 1999 data (in yellow) versus the 2011 data (in blue), the weak 2/7 and 4/7 (and 5/7) beams from ′99 are 3× (2×) stronger that those of ′11 while just the opposite difference occurs for the 11/7 beams. Of the 5 stronger beams shown, the 8/7 beam in ′11 is almost twice as strong as in ′99, while the weaker 9/7, 10/7 and 12/7 beams are comparable to the 99 beams. While the magnitudes of these variations of the weaker beams are small, these beams contain critical phase information from the interfering waves due to the quantum mechanical nature of diffraction.
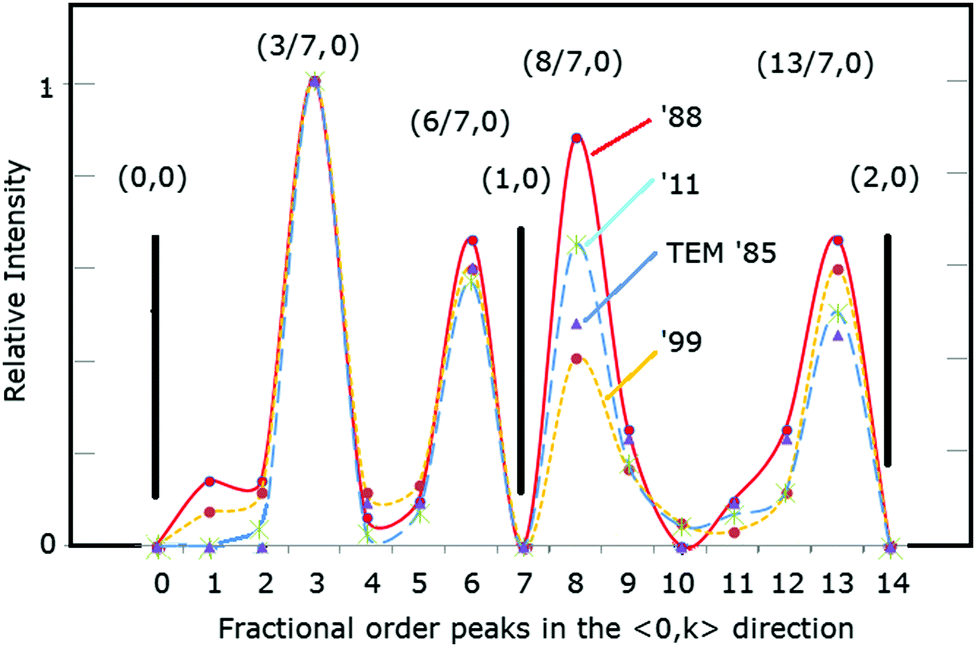 | ||
| Fig. 8 Relative peak intensities measured experimentally and optimized by a least squares fit of the diffraction beams. Note that between each data point the intensity goes to zero but for simplicity only the peak intensities of these beams are shown. | ||
Basically the DAS model is supported based on a projection analysis of in-plane scattering that relies on the strongest intensity beams as measured in 1988,13 199920 and 2011.21 As noted this leaves open the possibility for inaccuracies in the conventional χ2 fitting procedure which underweights the contributions of the many weaker intensity fractional order beams. As shown later there are many more weak fractional order beams and beam extinctions than the higher intensity peaks, which carry important phase information.
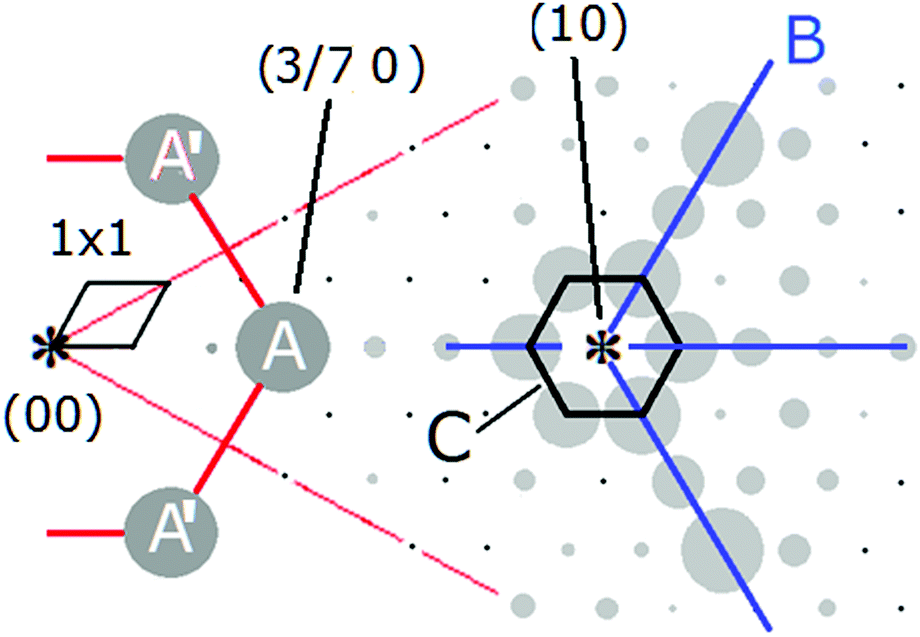
One approach to fit the 7 × 7 diffraction pattern is to separate the patterns of the stronger beams from those of the weaker fractional order beams. These dominant beams are shown in Fig. 9 and correspond to the diffraction features between the (1/7,0) and slightly beyond the (1,0) beams. The ‘A’ feature comprises the two sets of 3/7 order beams. ‘B’ has wave vectors spanning a Si inter-atomic spacing of ∼2.35 Å to ∼7 Å within the 7 × 7 unit cell. The ‘C’ feature is a smaller hexagonal feature around all the equivalent (1,0) beams. The asymmetry in the 'B' features together with the “C” feature produces the appearance of wings on a airplane fuselage with landing gear and a rudder. This combined structure is referred to here as the 'wing feature'. One strategy to define the 7 × 7 structure is to match these features first and then the features of the weaker fractional order beams and beam extinctions. This is explored further after introducing the Fourier transform method of analysis used here.
 | ||
| Fig. 9 Dominant features of kinematic diffraction from 7 × 7 shown atop a section of the Miceli X-ray data.21 | ||
2.7 Fourier components of periodic arrangements
The Fourier function has played a central role in mathematical physics. In quantum mechanics Fourier series and their additive properties lend them to efficiently define the solutions to the wave equation. They also can be used to describe the periodic nature of matter and the behaviour of scattered waves, i.e. wave interference.The application of an FT to examine the periodicities of atomically imaged surfaces was originally applied to better determine the periodic structures in complex, often disorganized, structures observed in STM. It was initially used to examine the quasi periodicities of STM images for the ‘5 × 5’ Cu on Si(111) system40 and the effect of missing dimer defects on the Si(100) 2 × 1 diffraction pattern.68 The advantage of using FTs versus simply determining a diffraction pattern is that the phase information of all the Fourier components is known and can be used to examine the waves and to understand where and how, or how not, various diffraction features arise. FTs also pick out periodic features that may not be obvious by visual inspection alone.
Diffraction patterns can also be generated mathematically using the structure factor, SF, to model 2-D diffraction. In contrast to a mathematical SF, the FT approach used here relies on FTs of physical models. This is more cumbersome than a numerical SF analysis but allows one to visualize how structural changes alter diffraction, and more importantly how various diffraction features relate to the atomic structures via their back transforms.
2.8 Fourier analysis versus structure factor analysis
A validation of such FT analysis for 2-D models as complex as the 7 × 7 and its ability to accurately simulate diffraction images is shown in Fig. 10. This compares the SF calculation from Takayanagi's original DAS structure1 shown in Fig. 2(a) to an FT of his 2-D projected adlayer structure but with a slightly smaller dimer bond length of 2.35 Å (versus 2.40 Å). Here various lines and symbols have been drawn to show the close similarities in the diffraction pattern of these two methods, particularly for the higher order fractional order features. Note that the 2.35 Å choice of the dimer bond length was initially arbitrary but was later found to not significantly alter the local interference patterns for most beams shown in Fig. 10(a and b). This relative insensitivity of the 7 × 7 pattern to the dimer bond length may account for why the first X-ray analysis13 had to use very small, physically unreasonable Debye–Waller factors for the dimers.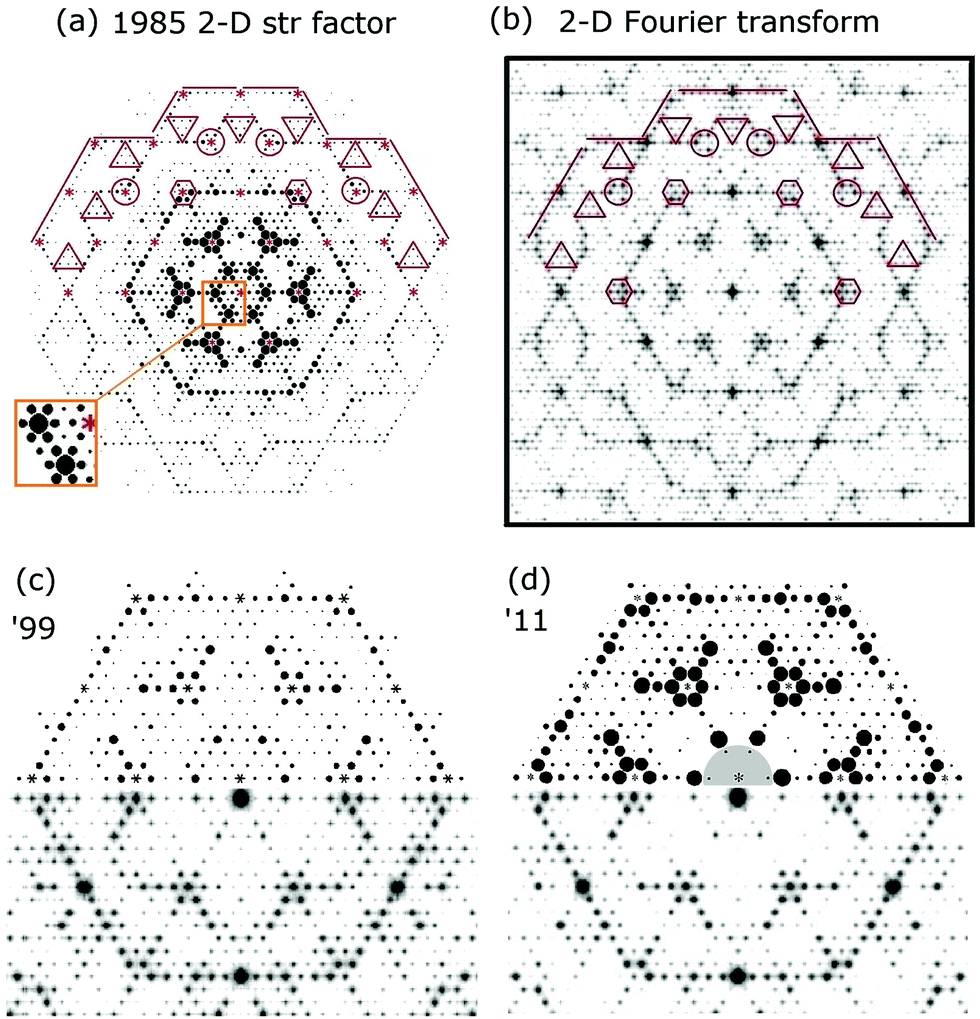 | ||
| Fig. 10 Comparison of the calculated structure factor for a 2-D truncation rod model of the optimized DAS model in (a) to the 2-D FT of the same model except with a dimer bond length of 2.35 Å in (b). Enlarged sections of the top half of the 1999 and 2011 X-ray data are shown in (c) and (d) and are compared to the calculated intensities of the DAS and s-DAS models shown below (see the text). In (d) the 2/7th beams are observed but are more inaccurate due to beam profile corrections. | ||
Fig. 10(c) shows a split screen view of the experimental pattern from 1999 (top) with the enlarged FT shown in (b) below for the DAS model. Similarly (d) compares the 2011 X-ray data (top) to the FT of a C3v symmetrised DAS model (bottom). This symmetrised DAS, i.e., s-DAS, model uses the most recent calculated atom positions from the faulted side of the unit cell from Geisler18 and mirrors them across the unit cell boundary to produce a DAS adlayer with mirror symmetry. This makes the two sides of the unit cell identical. It also suppresses the intensities of many of the lower order fractional order beams referred to earlier as near extinctions, which better describes the 2011 data. This symmetrised model is even superior to the FT from the calculated atomic positions that has not been symmetrized. As noted earlier the smaller X-ray incident angle in (d) also improves the accuracy of the rod projection theorem for a 2-D layer, but makes it difficult to obtain accurate intensities below the 3/7th beams as indicated by the shaded area in (d). The validity of the rod projection model as well as the origin of interference nulls in such complex adlayers will be discussed further in later sections.
3. Results from the truncation rod projection method
3.1 Atom distortions in the DAS model
Even though the FT modelling for the original DAS model shows reasonably good agreement with either data set, it falls short in matching several I(k) patterns of the low intensity fractional order beams as shown earlier in Fig. 7 and 8. The s-DAS model in Fig. 10 does better in replicating the lower order fractional order beams but can be further improved by considering additional lattice distortions and their effect on the higher order fractional order beams.Fig. 11(a) shows the unaveraged X-ray data from 2011 and compares it to two extended diffraction patterns from very slightly different models. Fig. 11(b) is the s-DAS symmetrised pattern from Fig. 10(d) while Fig. 11(c) is the pattern with an additional distortion of the atoms around the corner hole (red) referred to here as the compressed s-DAS model or cs-DAS. (d) Indicates how the red atoms are shifted by an arbitrary 10% compression and the next neighbours half that. Such a compression was considered based on the stereochemistry of bonding proposed earlier9,10 and the distortions observed11 near the corner hole in the Patterson map of the 7 × 7.1 This additional distortion changes several fractional order beam patterns as highlighted by the red circles to qualitatively improve the agreement with this data. On the right side of Fig. 11(b and c) the blue box highlights even stronger calculated fractional order beam differences, but were not completely measured as shown in (a). Clearly, the higher order fractional order beams contain more structural information.
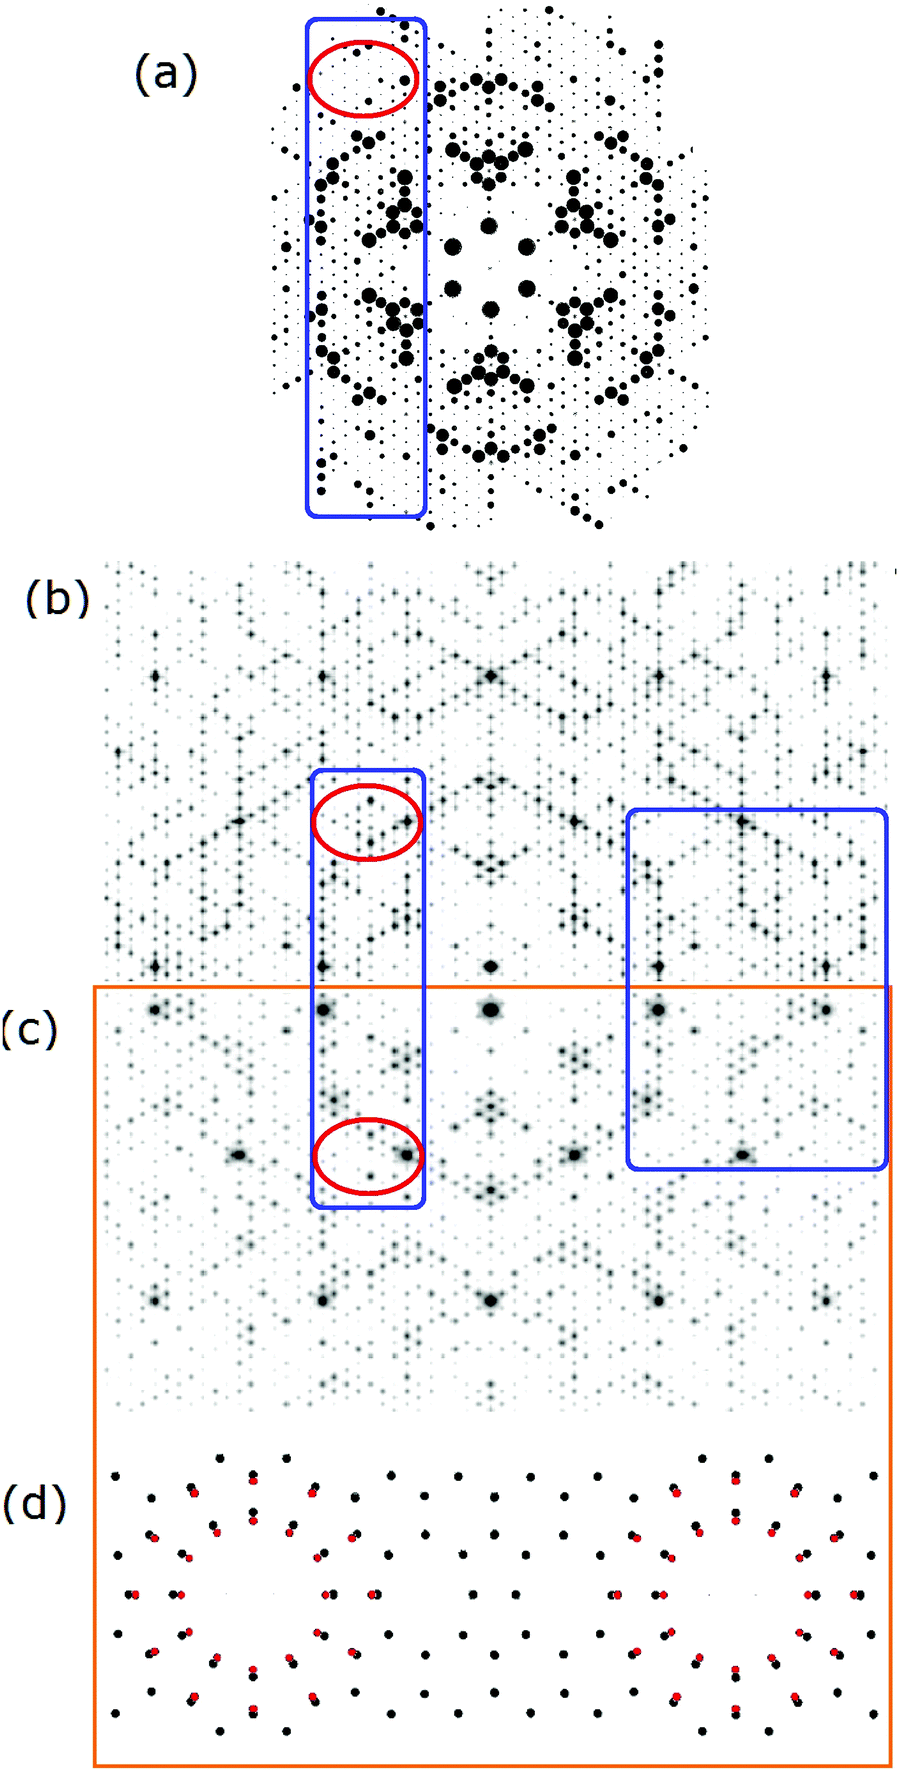 | ||
| Fig. 11 The unaveraged 2011 X-ray pattern21 in (a) compared to a split screen view of the calculated diffraction pattern for the s-DAS (top) in (b) and the cs-DAS model in (c) (below). The areas enclosed by the blue boxes and red circles are intended to allow comparisons of the patterns of these two slightly different structures (see the text). (d) Represents the atoms near the corner hole and how they were shifted (in red) for the cs-DAS model. | ||
As discussed later these higher order fractional order beams are critical to defining the structure in back transforms of these patterns. However, without a numerical search and optimization procedure, finding the best match in this work is impractical, and, as later shown, may be irrelevant if truncation rod modelling is not accurate for realistic or calculated 7 × 7 structures.
As reported elsewhere12 evidence has been presented that the side adatoms of the 7 × 7 are slightly distorted. Interestingly, the type of distortion shown in Fig. 11(d) has a component that pulls these corner hole adatoms toward the central unit cell boundary, making them different than the side adatoms. This is opposite to the side atom distortions proposed from a Jahn–Teller effect in other work,12 but has not been explored further due to additional interference effects expected in the complex 7 × 7 adlayer as discussed in Section 6.
An interesting aspect of the distortion evaluation performed here is that many arbitrary distortions can create 1/14 order beams or other coincident peaks which are not observed in any diffraction study of the clean 7 × 7. This implies that whatever distortions may occur they should remain in some type of 7 × 7 coincidence with the underlying lattice. From a quantum mechanical viewpoint this makes sense since the stationary electron waves that occur on this surface to satisfy the wave equation arise from the same periodicities of the waves that define the atomic structure and RLs of the surface atoms. The diffracted waves occur when these RL rods intersect the Ewald sphere to satisfy energy momentum conservation between the incident wave, the momentum of the lattice and the scattered wave.
The exploration of various distortions to match the experiment within a simple rod projection model was abandoned after realizing the limitations of such modelling for the 7 × 7. Next, the general diffraction features of a true 2-D adlayer and later an ideal honeycomb lattice are explored within the 2-D lattice truncation rod model. Here the diffraction features for the 7 × 7 DFA polymorph are also discussed. After that alternative models are described which are consistent with the observed diffraction patterns.
It is also noted that the accuracy of these atom arrays is important for the quality of the FT derived. For example, in Fig. 12(c), to be discussed later, the model atoms are 0.6 Å (9 pixels) in diameter with the two unit cells shown being 379 pixels wide and placed within a 1 pixel accuracy over a 13180 × 13180 pixel grid corresponding to ∼260 × 260 Å. (These were the largest grids that the current software could handle.)
The accuracy of placing the adatoms on this grid is estimated to be better than 0.015%. A variety of atom sizes were also evaluated as small as 0.4 Å in diameter up to 1.5 Å but all showed very similar FTs as did ‘fuzzy atoms’ and atom rings to simulate possible atom motion. The effects of slightly displaced atoms (small random variations) and even the effects of surface vibrations allow an understanding of the effect of such disorder on the resulting FT. Disorder effectively creates a background, and blurs and weakens the intensities of the FT features. It is expected that a mathematically formulated transform, i.e. the structure factor, is numerically precise and will produce a more intense delta function feature unless broadened by small distortions or, for example, thermal vibrations. This may explain why for example the 3/7 beams of these FTs have significantly lower relative intensities than the structure factor calculated by Takayanagi as shown in Fig. 10.
3.2 Diffraction from an ideal 2-D structure
As noted earlier the features observed in STM reflect the periodicities of the surface charge density of the adatoms. This represents a case where the rod projection theorem is valid and can be accurately applied. Fig. 12(a and b) shows the FT of the empty state STM topographs (+2 V, 1 nA) for different images48 that are apertured differently to eliminate possible boundary artefacts in the FT. The FT of both STM images are shown below and have similar features. Fig. 12(c) shows 2-D adatoms of a 7 × 7 array and its FT, assuming that all the adatoms lie on a 111 lattice as proposed initially.1,29 Since the adatoms on the two sides of the unit cell are mirror images and otherwise identical, there is no asymmetry between the 3/7th order beams as seen in Fig. 5(e and f). In the FTs of Fig. 12(b and c) a split screen mode is used to extend the dynamic range for visual comparisons. | ||
| Fig. 12 STM images48 in (a) and (b) with their corresponding 2D-FT below. (c) Is the ideal model of the 7 × 7 adatoms that are placed in registry, i.e. aligned, with the underlying substrate lattice. Below (b and c) are respective FTs shown in split screen mode with different intensity levels. Note that the FTs of the STM images have been rotated in post processing to compare to the FT in (d). | ||
The FT of the ideal model in (c) shows the criss-crossed bands of the 3/7th and 4/7th features with similar intensities that approximately doubles where they overlap. This differs from the more intense 3/7th order beams seen in both of the STM FTs. The FTs of the STM images also show a shaded region within a hexagonal area bounded by the 4/7 peaks, unlike the ideal model, which only shows a darker band about and along the 3/7 and 4/7th order bands.
An important feature revealed in Fig. 12(c) is that the FT of this ideal 7 × 7 model produces (1,0), (0,1) and (1,1) peaks characteristic of an underlying 1 × 1 surface, even though there are no 1 × 1 substrate atoms in the model. These 1 × 1 peaks arise from the registry of the adatoms to the underlying 1 × 1 substrate whose atoms are not present in the model of Fig. 12(c). Thus, ignoring the so called integral order beams in any analysis of the 7 × 7 diffraction intensities can neglect important scattering contributions from the adlayer. Thus, the idea that the integral order peaks reflect the substrate is a fallacy, particularly if these substrate beams are weak to begin with.
3.3 The strong 3/7th order X-ray diffraction features
The origin of the stronger 3/7th order features from the STM images is not at all obvious from even the closest visual examination of the STM image. As shown already in Fig. 5, both electron and X-ray diffraction also show more intense 3/7th features/peaks as seen in the STM image. These features become ever more intense in the latest 2011 X-ray data shown in Fig. 8. As a result attention is now shifted to the properties and origin of these strong 3/7th beams in the 2-D model.Fig. 13 shows a line scan across the −1,0 to 1,0 beam direction of the FT of the full 260 × 260 Å lattice used in Fig. 12(c). An estimated background is shown in black and subtracted to leave the estimated beam intensities in red. This shows the 3/7 beams to be almost as intense but less intense than the 4/7 beams. However, the 3/7th order beam is about twice as broad as the 4/7th beam. While this broadening is at the borderline of the resolution in this early measurement, the beam profiles shown in the SPA-LEED work33 also show evidence of very small beam broadening of the 3/7th order beam relative to the 2/7th order beam which is of comparable LEED intensity. While more accurate SPA LEED measurements need to confirm this broadening, it is similar to but on a much smaller scale than the broadening expected from island structures on a 111 surface.33 Such broadening may be the result of the nano structure of the ‘tiled’ Hexomi lattice discussed in Section 7.10.
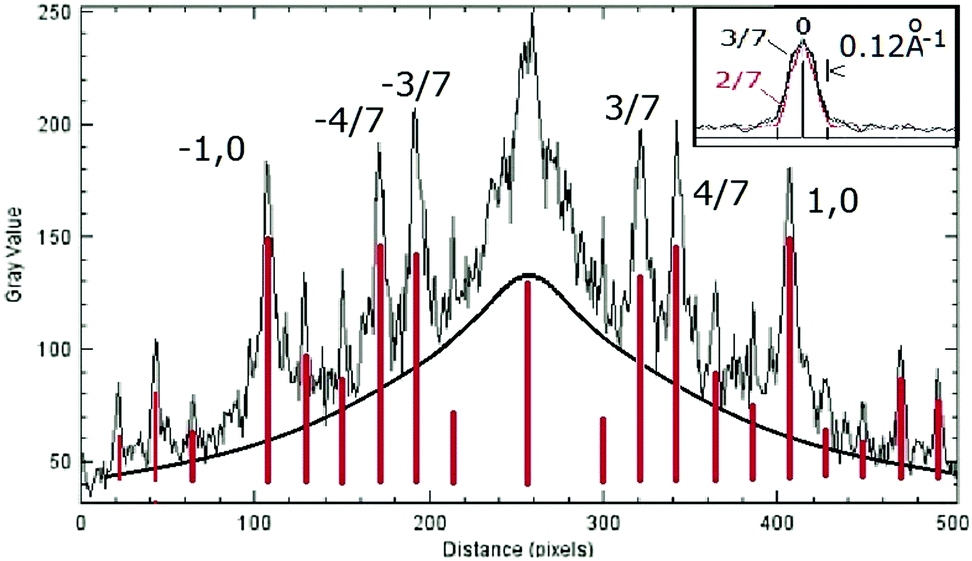 | ||
| Fig. 13 STM FT profiles along the (0k) direction with an estimated background profile (in black) and with the estimated peak heights (in red). The inset shows the spot profiles measured from published SPA-LEED measurements.33 | ||
Fig. 14 shows the beam extinction features arising from 2-D adatom structures that have different adatom charge density sizes. This can intensify the 3/7th order beams as the size of the charge density profile of the adatom is increased. The split screen view shows 2-D 7 × 7s with much larger adatoms of 2.3 and 4.7 Å in diameter versus 0.6 Å in Fig. 12(c). The large dimension of these atoms shown in the lower section produces Fourier components that interfere to create several extinction rings (harmonics) about the (0,0) beam. This interference suppresses the intensities of the 4/7 out to 9/7 beams and repeats itself for higher order Fourier components. As a result the stronger 3/7 Fourier components seen in STM may be a result of the very broad adatom charge density as detected by STM. The large size of such a scattering center would be very unusual in as X-ray scattering which occurs from the much smaller ‘ion core’ typical of the atom. This broad STM adatom size persists at low temperatures,12 which precludes it from arising from its vibrational properties.
 | ||
| Fig. 14 FT of the adatoms of the 2-D DAS structure for adatoms with diameters of 2.3 and 4.7 Å (top and bottom) as shown by an enlarged area about the DASs corner hole (see the text). Extinction rings are indicated by the red lines. | ||
In considering a shift in the 3/7–4/7 peak intensities to the 3/7th order peaks in the X-ray data, it can also be argued that an interference envelope of the double spaced adatoms has been shifted to enhance the 3/7th order peaks. In Fig. 12(c) the interference fringes from the half order envelope of the adatoms equally affect them since 3.5 order periodicity does not exist in a 7 × 7 surface. The intensity shift to the 3/7 envelope could arise from a slight distortion of the adatom positions that shifts the half order interference envelope toward the 3/7 interference condition. This distortion would need to occur equally in all three directions to produce a 3-fold symmetric pattern and can arise from an expansion or contraction of different groups of atoms in the 7 × 7. The other alternative is that a 3/7 repeat pattern occurs in the structure along the unit cell boundary within the adlayer which may include several atomic layers.
To summarize this section, the ‘stronger’ intensity of the 3/7 peaks is an important feature of the 7 × 7. In the most recent 2011 X-ray data21 it is most likely the result of the nearly 5× higher coherence of this X-ray beam as well as the different scattering conditions, i.e. L = 0.1. As will be shown next, these 3/7 and 4/7th order beams and their waves contribute in a unique way to the 7 × 7 diffraction pattern.
4. 2-D image reconstruction from Fourier waves
As noted, a practical advantage of an FT analysis of model structures is that one can understand the role that different Fourier waves play in the synthesis of a periodic image, in this case how different fractional order beams, i.e., waves, contribute to define the different atomic features of the 7 × 7 structure.How these waves contribute to define the structure is important as a limited number of the most intense lower order beams were essentially used in all the X-ray diffraction analyses that confirmed the DAS structure.1,13,20,46,63 As shown in Fig. 10 and 11 there are a large number of weaker fractional order beams and beam extinctions that have been essentially excluded in the χ2 analysis as well as many higher order beams that were never measured by X-ray diffraction.
Examining the FT of these allows one to understand the importance of the lower and higher order waves in image reconstruction. How image reconstruction arises in such back transforms is directly relevant to understanding the relation of the diffraction features to the atomic structure. As will be shown later, the advantage of Takayanagi's TEM diffraction data is that it has measured a large number of beams which become crucial in determining the structure.
4.1 Contributions from expanding ranges of waves/momentum involving both wavelength and phase changes
Fig. 15(a) shows the FT of the 7 × 7 STM image from Fig. 12(c) with increasing (color coded) wavevectors around the 0,0 beam up to and including the first order beams. These ranges of wavevectors are then used to reconstruct the STM image in (b) which are shown in (c) for the area indicated by the yellow box in (b). In aligning the back transforms in (c) to the original larger image, the defects in the image (b) provide a double check on whether the final images are aligned precisely.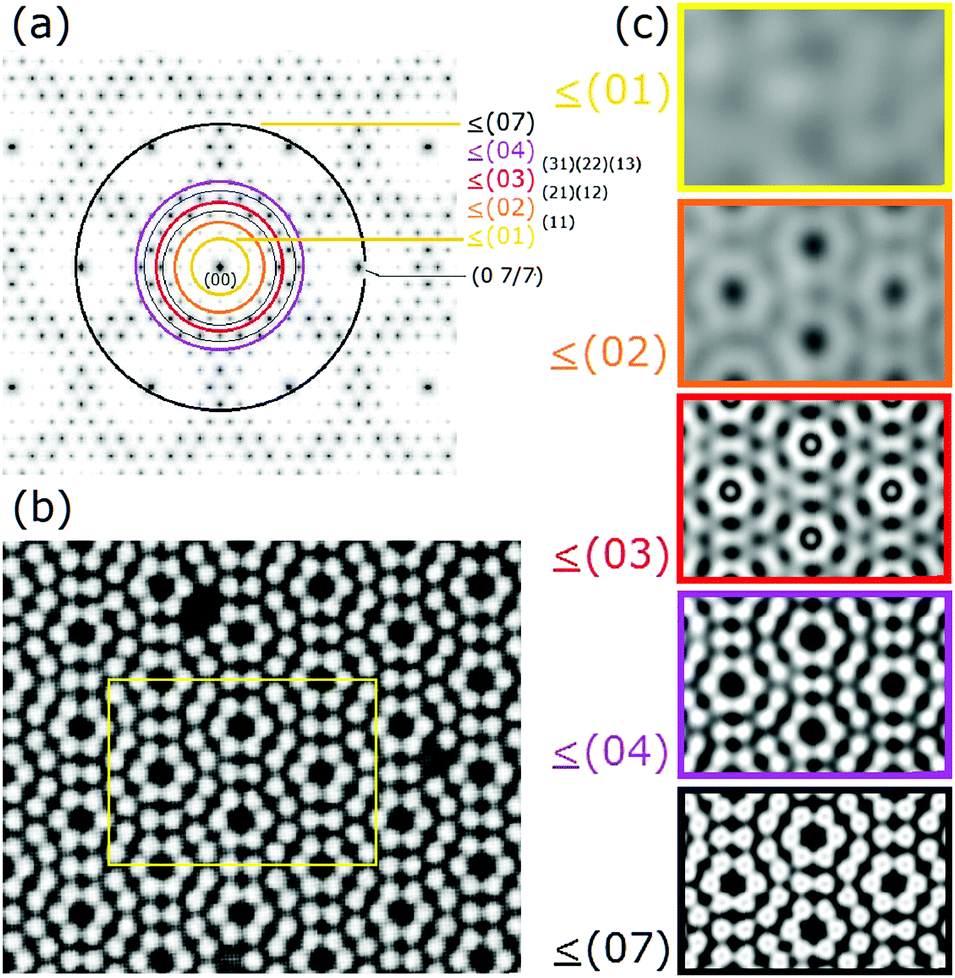 | ||
| Fig. 15 Reconstruction of a 2-D FT of a 7 × 7 STM image (b) using increasingly larger waves indicated in (a) as concentric rings of this FT of an ideal 2-D adatom model. (c) Shows the progression of the image reconstruction with the increase in Fourier wave vectors for the rings shown in (b). | ||
In Fig. 15(c), as the wave vector cut offs are expanded, the back transforms produce increasingly finer structure. However, in this process of defining the atomic features, unexpected features arise that later become negated by higher order waves that occur from different directions. For example, for a back transform using the red ring (<03), the adatom features around and in the center of the corner hole intensify. The next ring (<04) cancels out this feature in the center of the corner hole and equalized the intensities of the adatoms. This image actually has sharper features than the original image. Adding additional waves up to the first order (<07) broadens the adatom features and in doing so places a dimple in the center of each. This addition and subtraction of waves produce more subtle features and requires beams up to 5th order for a detailed replication of the original adatom structure.
4.2 Contributions from specific waves and a striking phase effect
The contributions of specific waves to the atomic image are considered next, with particular emphasis on the waves defined by the 3/7 and 4/7 wavevectors. Fig. 16(a) shows the FT again of the ideal adatom only 2-D DAS model. Shown below is the adatom arrangement. The Fourier back transforms of the 3/7 and 4/7 features are selected within the lighter annuli in (b) and (d), respectively. (c) Shows the Fourier components for the waves just between the 3/7th and 4/7th beams. (e) Shows all waves below the integral order beams and (f) includes the 10 set of beams. Here, to better visualize the atoms in all these image reconstructions, the atoms are dark on a white background. Also the intensities of each reconstructed image have been scaled/stretched to cover the dynamic range of each image to more clearly see their features.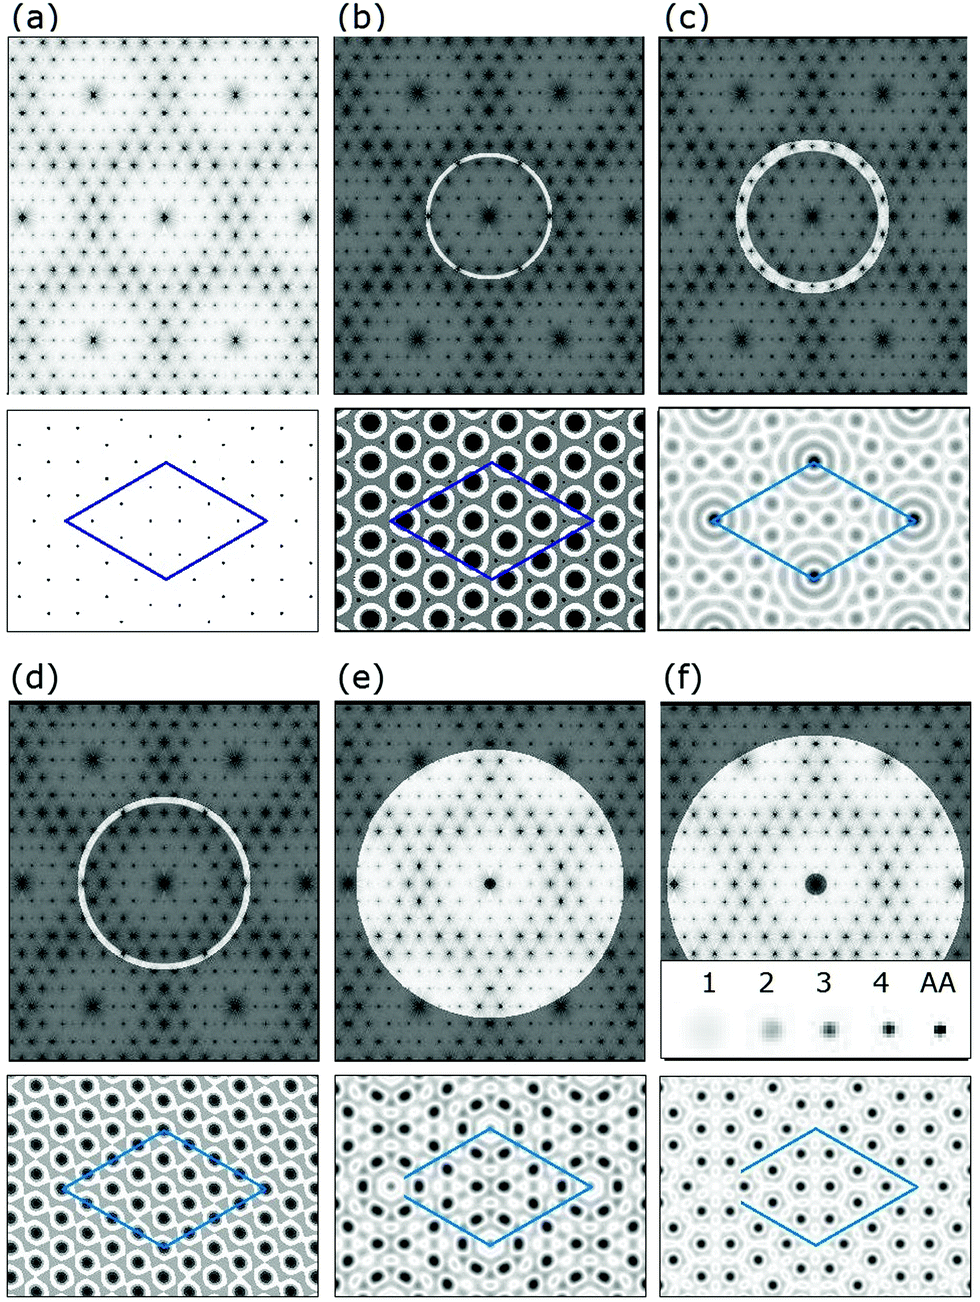 | ||
| Fig. 16 FT in (a) of an ideal model adatom structure (as used in Fig. 12(c)) shown below. (b–f) Selects various regions of reciprocal space as highlighted for back transforms that produce the reconstituted atom structures below them. The lower panel in (f) shows the reconstruction up to and including all first order beams as indicated above it. The inset below shows an adatom image reconstruction magnified ×4 using an increasing larger wavevector windows from first (1) to fourth (4) order beams relative to its original size indicated by AA. | ||
As before, higher order diffraction features, i.e. smaller wavelength waves, are required to reconstruct the finer details of the atomic image. The inset in Fig. 16(f) shows the refinement of the adatom structure with increasing wavevectors. Here the adatom labelled as 1 is from the image construction in (f) which is magnified ×4. The sizes of these reconstructed adatoms are shown for reconstructions involving up to and including 4th order beams and compared to the original adatom, AA. Here too, the strong atomic features in the corner of the unit cell i.e., corner holes in Fig. 16(c and d) become negated by higher order waves as shown in Fig. 16(e and f). Again constructive and destructive interference of these different Fourier waves gradually contribute to refine the features of these atoms. The image reconstruction in Fig. 16(f) of the adatoms is almost complete after including up to 4th order waves, which accurately reconstructs the original adatoms, marked as AA in the inset of (f).
The importance of the phase of these different waves has already shown up in Fig. 15(c) for the 0,3/7 ring, but is seen more dramatically for the 3/7 and 4/7 beams in Fig. 16(b and d). Here the phase of the 3/7 wave is offset or shifted from the higher order waves and is no longer in coincidence with the unit cell as seen in (c) and above. This is a direct result of a phase mismatch of the (03) Fourier component as it contributes to create the adatoms in the 7 × 7. The higher Fourier components then negate this (03) contribution to return the corner of the unit cell to a 'missing' atom.
In looking at these same (3/7 and 4/7) FT components for the STM image as shown in Fig. 15(c), these Fourier components are strongly modified by any adatom irregularities and exhibit less coherent phasing (same phase but different wavelengths). They appear to bifurcate in trying to describe the longer range coherent structure. Such bifurcation can be best resolved if smaller adatom scattering points are used by selecting only the very tops of the CDs of Fig. 15(c), as shown in Fig. 17(c).
 | ||
| Fig. 17 Nodes of the 0 3/7 and 0 4/7 waves of an 7 × 7 STM image in (a) and (b) compared to the adatom features of the STM image in (c). In all images the contrast is reversed from that used in Fig. 16 or in the STM image show in Fig. 15b. | ||
Such a modified STM image is used for an image reconstruction using the 3/7 and 4/7 beams in Fig. 17(a and b), respectively. This inverts the FT intensities in Fig. 17 making the dark areas in Fig. 16(b and d) appear white and the nodes appear black. To the right are clips of these nodes with a section of the inverted back transforms superimposed on them and a color schematic of their nodes relative to the faint 1 × 1 lattice below.
As shown by the colored geometric overlays in (a–c) on the left side of Fig. 17, there is no one geometric structure that allows the 3/7 waves to have a common reciprocal space origin with the 4/7 waves, i.e., a different phase occurs. The direct spatial overlay of the nodes of these two waves shown on the right of Fig. 17(c) also shows the lack of any coincidences in these waves with each other. These particular waves and this peculiar phasing would appear to arise from this anti-phase or bipartite arrangement of adatoms in the 7 × 7 structure. It would seem that the repeat periods of the 7 × 7 do not fall on a simple primitive lattice but instead on a unusual non-primitive lattice.
Such phasing together with waves of different wavelengths leads to refining the details in these atomic images. This is why Takayangi's Patterson map is significant, since, even though it loses some information from altered intensities from multiple scattering and avoiding the integral order substrate peaks, the higher fractional order beams restore many of these details from the addition of higher order Fourier waves. These higher order beams may only have small wavelength variations but can also have phase information that can change the positions of atoms. Next the effect of selecting certain higher order beams in image reconstruction is considered.
4.3 The effect of higher order waves/beams for the 7 × 7
Further evidence of the role of phase in these higher order waves/beams becomes more evident particularly if small changes arise to the idealized DAS structure. The top central panel (b) of Fig. 18 shows the Fourier transform of an idealized symmetrised DAS adatom having the atoms around the corner hole compressed 10% and the next nearest neighbors compressed 5% as shown below it. This structure has been identified as the cs-DAS model earlier as per Fig. 11c. Shown on each side of (b) are the sections of the original pattern which have been back transformed to produce the ‘atom’ images below. (a) presents a diffraction pattern that excludes the beams near the 00 beam as well as the 1,1 set of beams and the waves beyond them. The image reconstruction of this shows features in red that bear little relationship to the actual atomic positions, which are superimposed. In fact some areas that have no atoms have the strongest amplitudes while other areas where the actual atoms are have zero amplitude. (Note that in the image comparisons, the orientation of the atomic arrangement in (a) and (c) have been flipped so as to produce a mirror image across the common boundaries with (b) for a direct comparion.)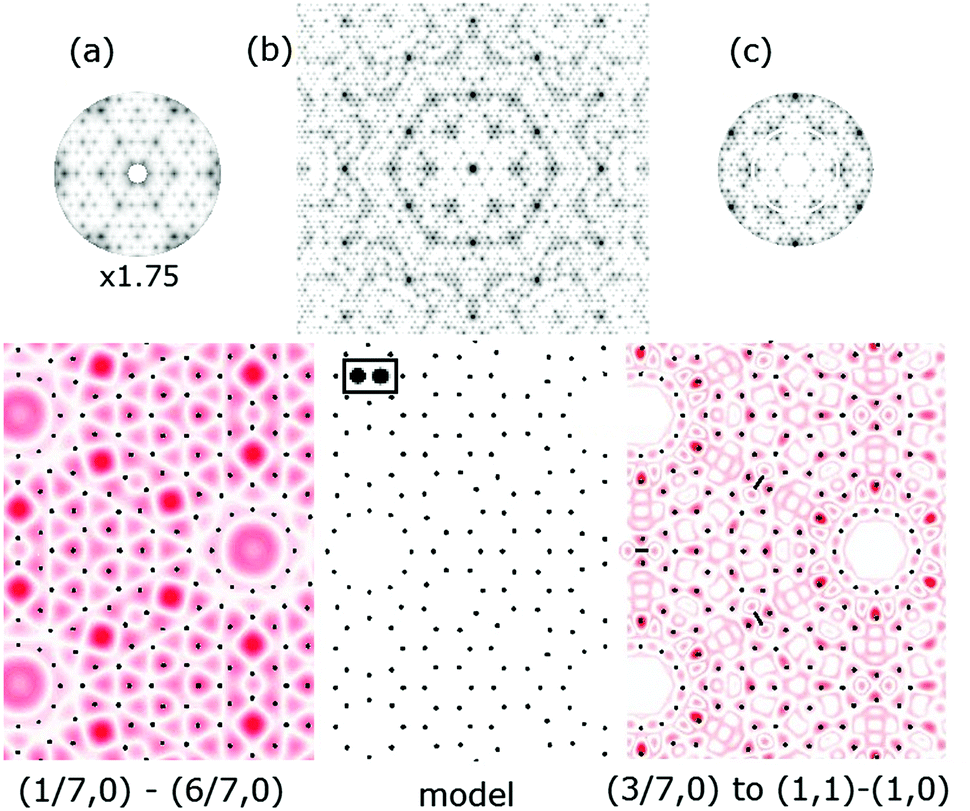 | ||
| Fig. 18 Fourier transform of a C3v compressed hole symmetrised 7 × 7 DAS model in (b) with its 2D projected truncation rods shown below. (a) uses the indicated wavevectors to reconstruct the atomic features below while (c) adds additional Fourier components out to and including the (11) beams. The original atoms shown are 0.45 Å in diameter and show a slight pixelation of their circular shape as indicated by the inset of two enlarged atoms. | ||
Extending the wavevectors out to include the (1,1) set of beams but exclude the fractional order beams below the 3/7 beams is shown in (c). Now the image reconstruction shows more of the original adatom features except for the adatoms around the corner holes, which again seem to be phase mismatched with the adatoms in the center of the unit cell. The image reconstruction of (c) shows only the central dimers along the unit cell boundary as marked by the orthogonal bar between them. It is clear that many beams beyond the first Brillouin zone are required to reconstruct such 7 × 7 DAS model structures.
Fig. 19 shows another reconstructed image that uses all beams out to and including the (1,1) set of waves/beams. The dimers along the unit cell boundary are now replicated as in the starting DAS model. The blue arrow points to a defect created in the original model formed by removing two dimer atoms, which are also absent in the image reconstruction. Including the very lowest order 1/7 and 2/7th beams improves the features of the starting model. These lower order beams have been difficult to measure but appear important in defining the dimers of the DAS structure.
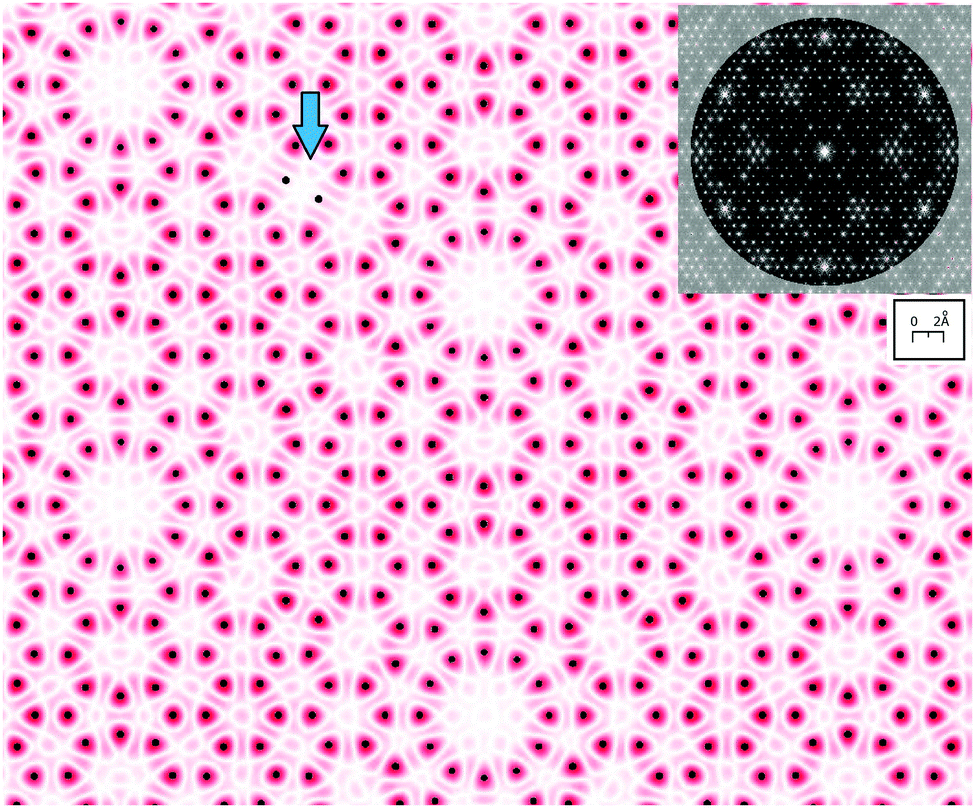 | ||
| Fig. 19 Small section of the reconstruction of an ideal planar mirror symmetry 7 × 7 DAS model using the range of Fourier components, i.e., beams shown in the insert. The arrow indicates two atoms in the model that have been removed. The original is taken from an image 40× the area of the inset shown. (The atoms used here are 0.45 Å in diameter.) | ||
To test the possibility that the honeycomb structure of DFA arises in Takayanagi's Patterson map from the exclusion of the integral order beams in the 7 × 7 pattern, simulations have been done to suppress the integral order beams in the ideal C3v symmetry, s-DAS model. Fig. 20(a) shows the FT of the s-DAS model below, in the (c) panel, while (b) shows the FT of a model in which the 00 and sets of 01 and 11 beams have been removed, back transformed and then FT'ed again. The diffraction pattern (b) contains suppressed integral order beams but still shows some of the integral order beam intensities from the complex interferences that produce the seventh order features. The backtransform of (b) produces the atomic image in Fig. 20(d). This shows strongly reduced adatom features but the dimers and atoms around the corner hole persist. This demonstrates that the adatom interferences dominate the lower order, integral order beams.
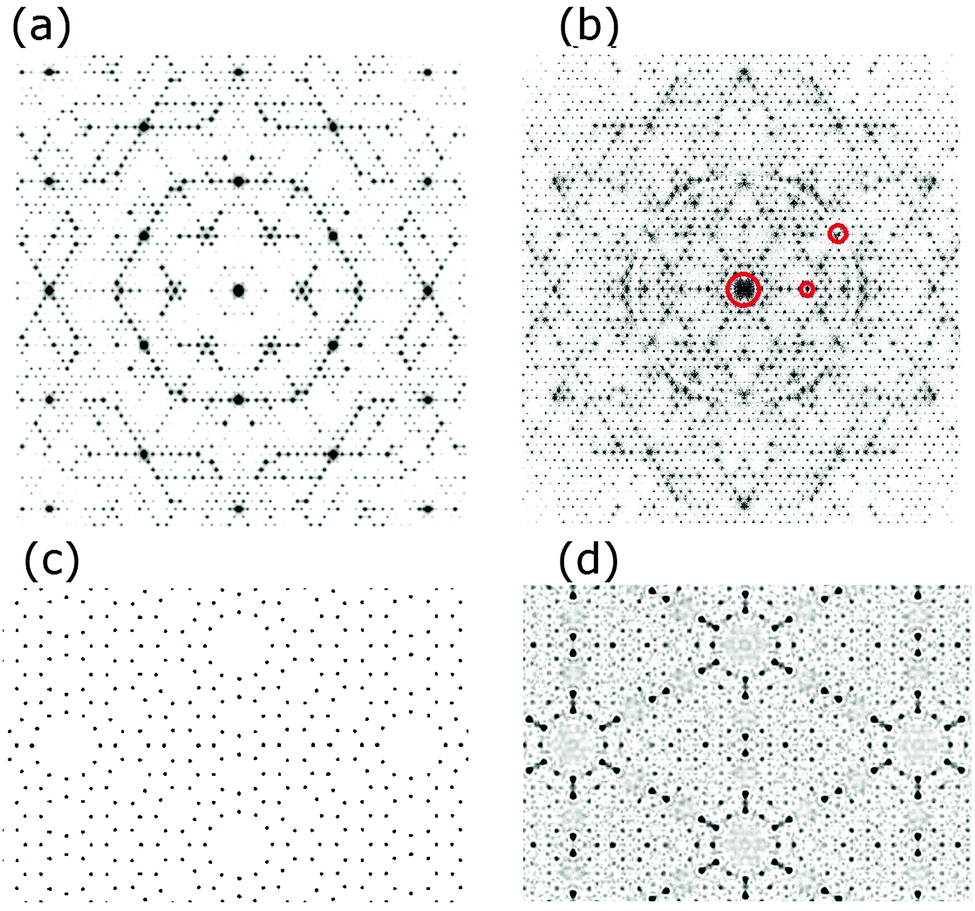 | ||
| Fig. 20 Diffraction patterns of (a) a C3v DAS 2-D layer and (b) from the reconstructed image having the integral order beams ‘removed’. The reconstructed images are shown below each in (c) and (d). | ||
Such back transforms were further performed with the 1,0; 1,1 and 2,0 and all strong integral order beams removed up to the 5,0 beams but yet the dimers remain as shown in (d). Using just the fractional order beams above the 2,0 beams to below the 5.0 beams still shows the dimer features! The dimer structure arises from phase information encoded in the fractional order beams, even just the higher order beams for this DAS structure! Do the dimers exist in the experimental data or do they arise because they were put into the atomic model? This is discussed further in Section 7.7.
4.4 The waves that comprise the wing like 7 × 7 features
One of the hallmarks of the 7 × 7 diffraction pattern, and for that matter the DAS structure, is the 6 wing-like ‘B’ and ‘C’ features discussed earlier as shown in Fig. 9. Fig. 21 shows the image reconstruction from an annulus that includes just these wing features of the DAS atomic model. This is the same DAS model used in Fig. 18 and 19 that was used to explore the waves that comprise the adatom features.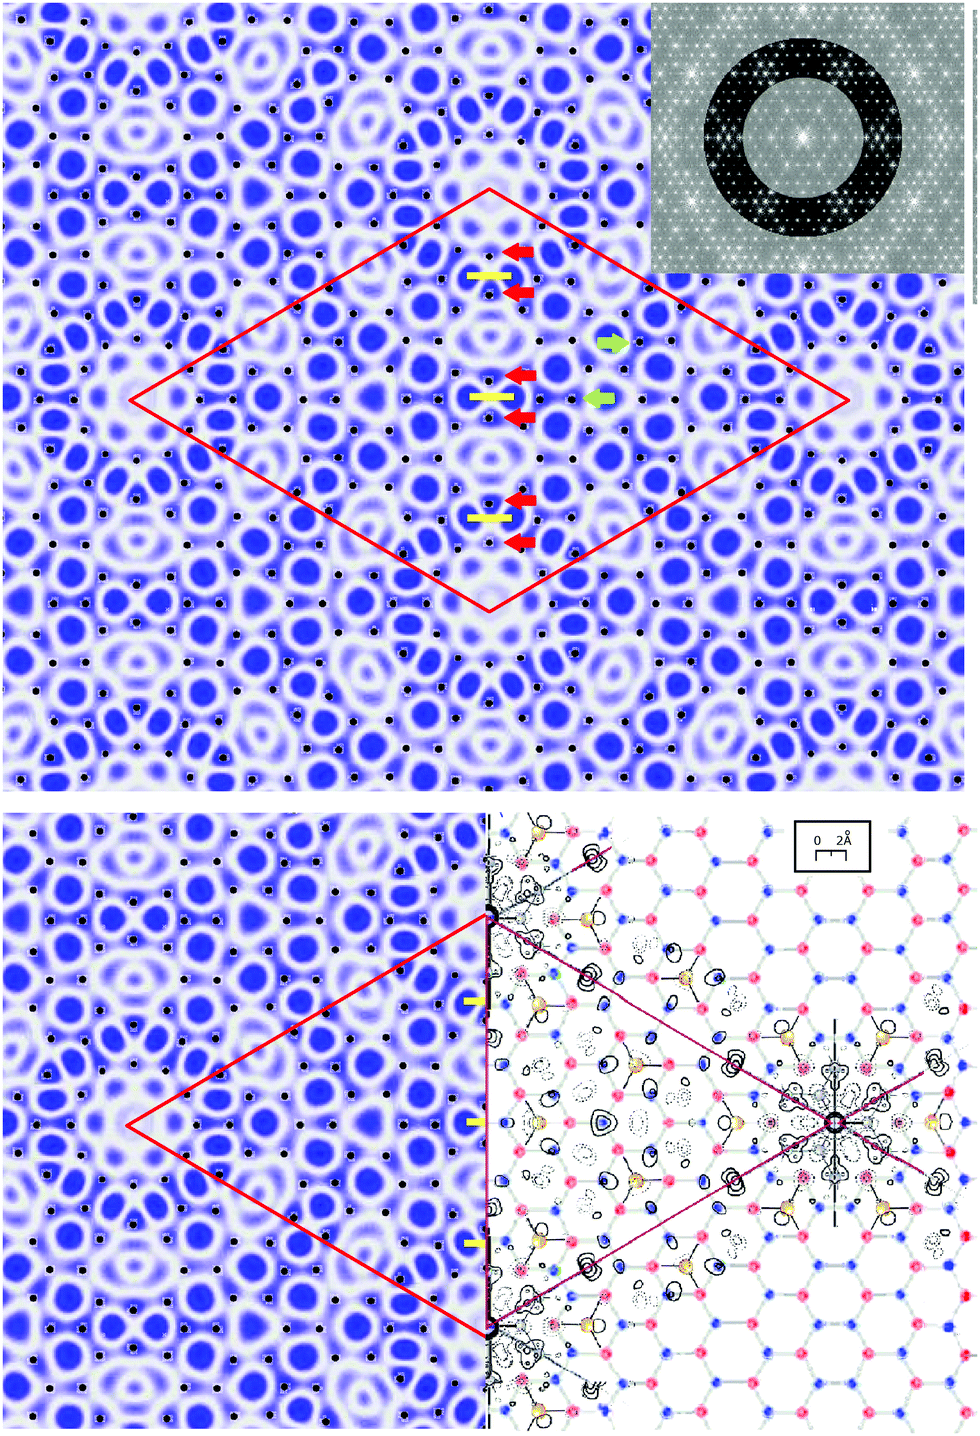 | ||
| Fig. 21 Image reconstruction of the symmetrised 2-D projection rod model of DAS for the wing-like feature charateristic of the 7 × 7 structure. The atom positions in the model are superimposed on the backtransform and also shown below relative to the experimentally derived Patterson map. (Atoms are 0.45 Å in diameter.) | ||
Surprisingly, the back transform of these periodic components shown in blue produces a very different set of broad features than the atoms in the DAS model. The atoms from this starting DAS model are superimposed on the top image and appear as dots. Here some weak features indicated by the red arrows arise in the back transform representing the DAS atoms and in particular the dimers along the central cell boundary. A few of the many weaker DAS atoms are indicated by the green arrows. However, the most intense (dark blue) features are arranged hexagonally and form pairs of features across the unit cell boundary as indicated by the yellow lines. As a result this image reconstruction contains Fourier features of predominantly the DFA model and to a lesser extent some features of the DAS! They arise from the DAS model simply by changing the waves selected in the backtransform!
The image below shows a split screen view of the left side of the top image with a DFA model and superimposed Patterson map on the right. This reveals the striking correspondence between the most intense blue features of this partially reconstructed ‘DAS’ image on the left and the blue atoms in the DFA model on the right. One must conclude that the higher fractional order beams in the TEM data used to produce the Patterson map have reinforced the beams/waves that form the DFA model!
In concluding this section it is clear that both the wavelength and the phase of the waves are important in describing the RL and thereby the diffraction from the 7 × 7. The higher order, smaller wavelength waves and their phases provide this information to reconstitute the atomic arrangement. As small distortions of otherwise idealized highly symmetric 7 × 7s occur, these higher order waves and the flexibility they provide to describe finer details further contribute to these distortions. Thus, the higher order diffraction features currently underrepresented in X-ray measurements are very important in defining the RL and the detailed structure of the 7 × 7. Understanding the phases of the scattered waves from 7 × 7 becomes key to unravelling its structure and is discussed further in Section 7.
5. The DFA structure
5.1 Diffraction features expected for an ideal DFA model
The diffraction expected from the DFA structure is considered now along the lines as discussed already for the DAS structure. Fig. 22 summarizes the results of the FT of various honeycomb 2-D models relevant to the proposed 7 × 7 DFA polymorph. Like the adlayer probed by STM, the ideal DFA is expected to more closely resemble a 2-D layer due to its stronger in-plane bonding and the absence of strong covalent σ-bonds which produce stresses that propagate and displace the substrate atoms in the DAS model. As a result the DFA should satisfy the projection rod theory better than the DAS structure and thereby be amenable to a rod projection analysis.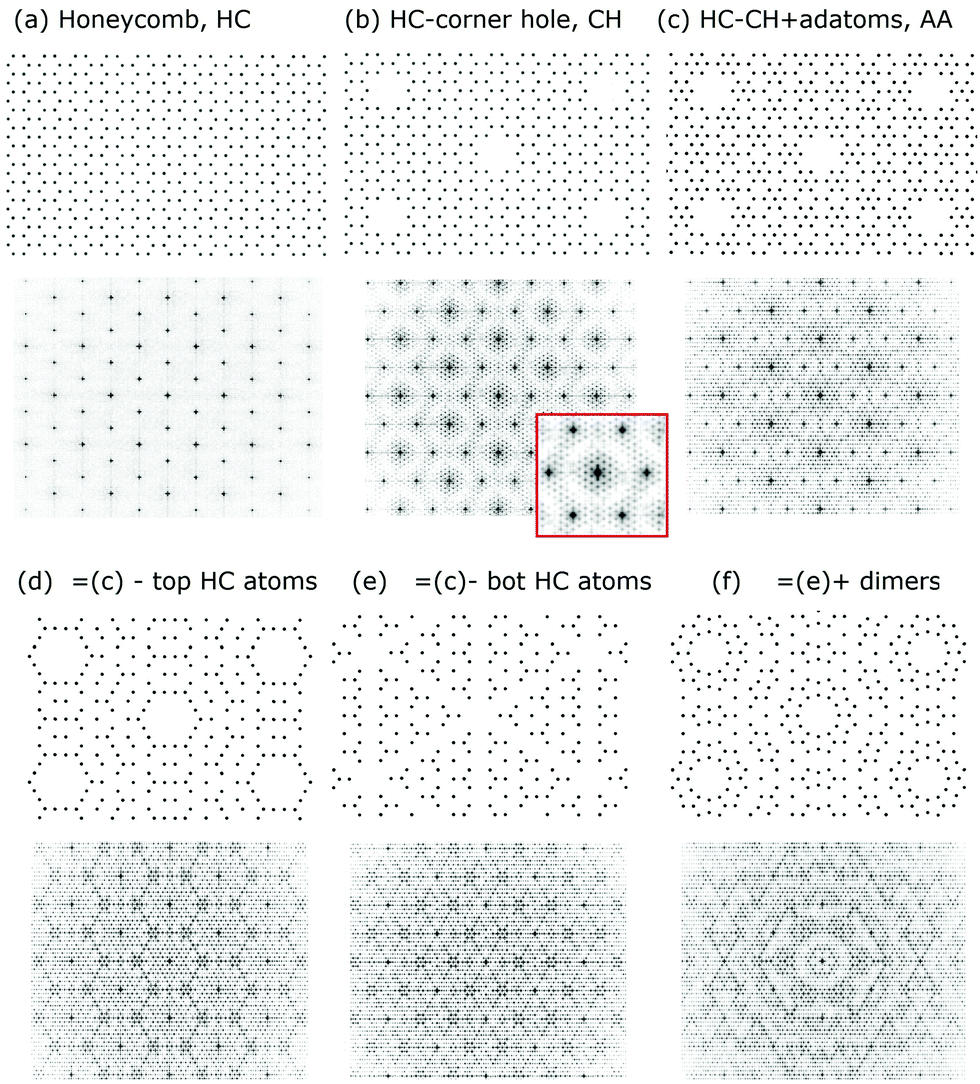 | ||
| Fig. 22 Comparison of various 2-D arrangements of atoms (0.5 Å diameter) in a honeycomb, HC, lattice and their corresponding FT centered about the 00 beam. (a) is a pure HC, (b) is a HC with corner holes, CH, (c) is (b) with adatoms, (d) is (c) without the bottom honeycomb atoms, (e) is (c) without the bottom HC atoms and (f) is (e) with dimers inserted (with a bond distance of 2.45 Å as found in DAS calculations. | ||
Fig. 22 builds up a DFA structure starting from a honeycomb 2-D lattice in (a), creating the corner holes in (b) and adding adatoms in (c). The features observed in Takayanagi's PM, do not reflect the upper honeycomb atoms, and are removed in (d). Similarly the lower honeycomb atoms are removed in (e). Such ‘missing’ atoms may arise from scattering interferences arising in the DFA structure under certain diffraction conditions. (f) Shows the effect of arbitrarily adding dimers along the unit cell boundary as occurs in the DAS model. These changes produce some features characteristic of the experimental diffraction patterns. Arbitrarily adding dimers along the unit cell boundary of 22(e) to introduce a DAS-like structure not only produces stronger 3/7th order features in (f) but also strong fractional order spots in between the integral order beams. These differ from the experiment.
5.2 A more accurate projection model?
In modelling the DFA structure it was noticed that all the distorted atoms in the DAS structure shown in Fig. 3 and 4 were not considered in the early TEM and X-ray analysis simply because these sub adlayer distortions were not anticipated. However, as pointed out by Robinson20 all distortions from the bulk lattice will impact the interfering waves to modulate these rods. As a result such atoms must also be considered within a rod projection model. This is done for the DAS model in Fig. 23(a) which now shows the projected atoms in the first and second bilayers. Here the right side of the unit cell is the faulted side and has fewer projected atoms than the left, unfaulted side. The FT of (a) is shown in (b) while (c) corresponds to a FT of the DAS model in (a) but with the additional projected atoms of the third bilayer atoms on the faulted side of the unit cell. This projection makes both sides of the DAS unit cell equally dense.The DFA model in (d) does not have a stacking fault and shows fewer projected atoms due to the uniformity of the honeycomb lattice. Here the symmetric location of the substrate atoms in the center of each adlayer honeycomb are assumed to not be strongly disturbed from their bulk positions. As a result they are not projected. Also in (d) a small modulation of every other pair of honeycomb atoms along the cell boundary is used to enhance the 3/7 beams. This structure is denoted as a distorted DFA or d-DFA.
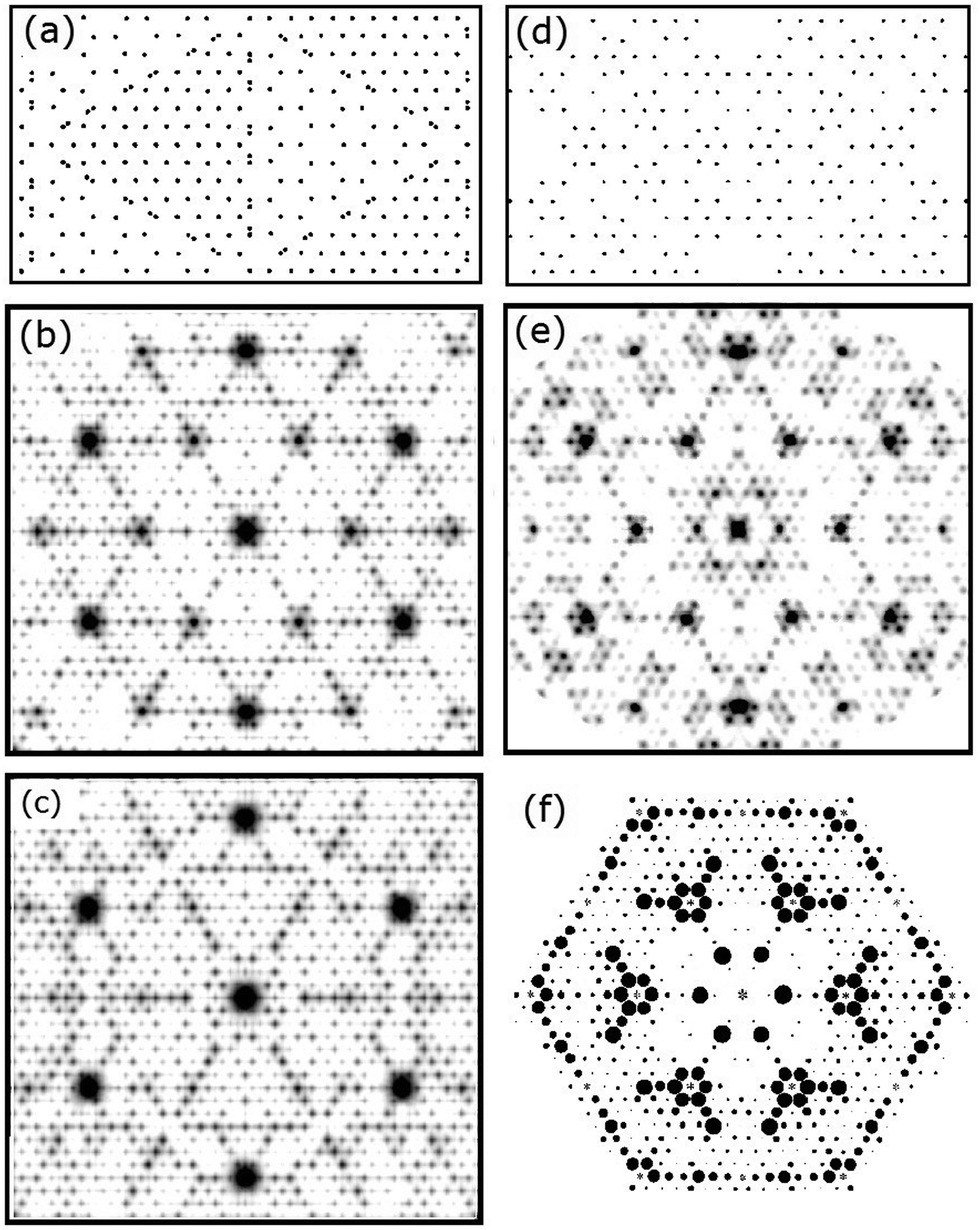 | ||
| Fig. 23 Adlayer projection model of the multilayer DAS structure in (a) (see text) and its FT in (b). (d) Corresponds to a distorted DFA structure and (e) its FT. (c) Represents the FT of a DAS model like (a) but with the projections of the atoms in the third bilayer. (f) Presents what is believed to be the best X-ray diffraction data to date (see the text). | ||
The resulting diffraction patterns in (b), (c) and (e) can be compared to the diffraction data in (f) whose scattering conditions better approximate the rod projection theorm.21 While all FTs contain the wing-like feature of the 7 × 7, the d-DFA FT in (e) produces an improved pattern of beams around the more intense 3/7th order beams and improved beam extinction features inside the 01 order beams. However, (f) still shows fractional order features that disagree. This includes the ‘Star of David’ pattern in (f) and many fractional order beams beyond the (0,1) beams. Based on how numerous small distortions can alter these weaker fractional order beams, there are likely additional distortion to the DFA model in (d) that can still improve these fractional order beam intensities.
An FT of another distorted DFA structure is shown in Fig. 24 that alters the d-DFA structure shown in Fig. 23(d). This further suppresses the two alternating pairs of atoms along the unit cell boundary of the DFA. A linescan below shows the relative intensities of the 3/7 and 4/7 beams. Based on how various compressions have been found to alter various intensities, it is possible to further reduce the 4/7th beams via an ‘extinction ring’ as discussed earlier.
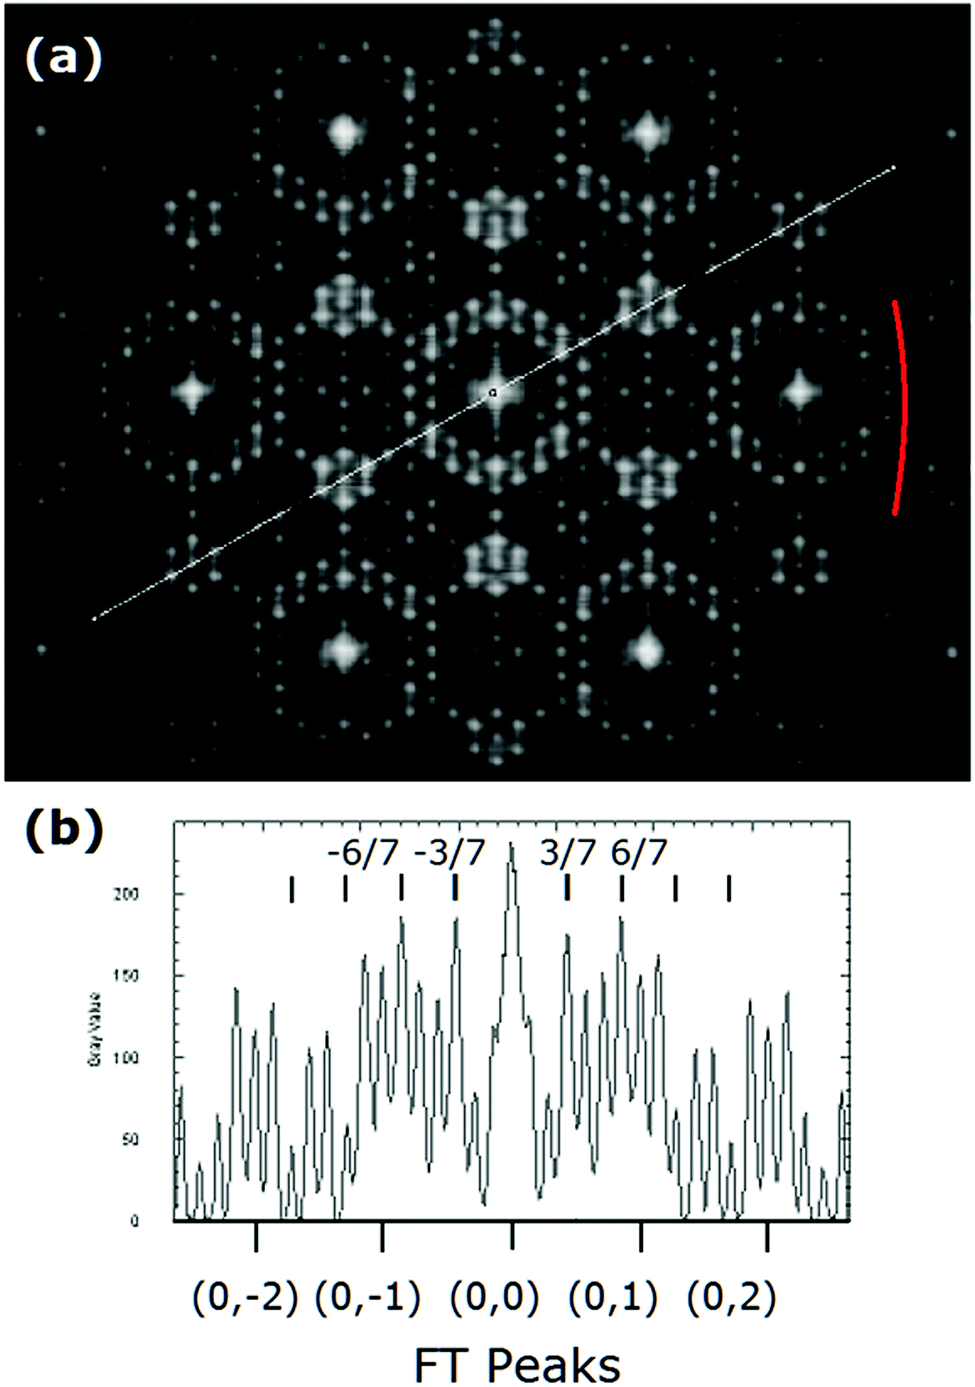 | ||
| Fig. 24 Diffraction from a DFA model in (a) with alternating side atoms that cancels various phases. (b) Is a linescan along the direction shown in (b). Part of an extinction ring for this distorted structure is indicated by the red arc in (a). | ||
In view of the questions raised as to the accuracy of projection rod modelling of the 7 × 7, optimization efforts for the DFA structure were curtailed. The accuracy of the projection model and the role of distortion in modifying the structure in those rods are considered next. Clearly there is more work to be done in a full optimization of the DFA structure. This will likely require an automated search procedure similar to that used in Tensor LEED.49 Hopefully in the future a full 3-D structure factor calculation or a 3-D FT analysis of the calculated DAS and DFA structures can be performed for these 5 adlayer DAS and DFA systems.
6. The validity of planar 2-D projection models for 7 × 7
As discussed and shown earlier from the calculated structure in Fig. 3, the 7 × 7 surface within a DAS model is not a simple 2-D layer and consists of many displaced atoms over several layers of the original 111 surface. The first bilayer atoms are shifted into multiple vertical positions with an adatom atop. The dimer is in its own layer while the restatom in the corner hole, and its neighbours are displaced significantly upward along with many atoms in the second bilayer. Again, every layer that differs from the bulk will produce or modify the interference structure in the adlayer RL rods.22These adlayer distortions decay into the crystal so that between the second and third substrate bilayer the variations are down to 0.02 Å, except for the atom in the corner hole. Here the restatom in the corner hole having accepted an electron is pushed up 1.1 Å from its bilayer position which also pulls its neighbouring bilayer atoms up by 0.3 Å.18 The other atoms in this first bilayer, particularly those bonded to the ‘dimers’, are also moved ∼0.3 Å as well. All such periodically repeated distortions of atoms from their nominal bulk positions will alter the interferences and the diffraction intensities, i.e. the diffraction patterns.
Such adlayer distortions recast this problem into a multi-layer reconstructed surface on a substrate as shown in Fig. 25(a). Here, kinematic scattering from these layers is a superposition of the diffraction from the adlayer with that of the bulk Bragg reflections as shown in Fig. 25(b). Now one must consider the truncation rods of this more complex thin 3-D layer indicated by the red box in Fig. 25(a). This produces its own set of interferences and a more complex reciprocal lattice rod structure than shown in (b). In addition, the third bilayer will also produce new interferences with the periodic distortions of atoms in the corner hole on the second bilayer. This requires considering interference features arising from at least the first 3 bilayers.
 | ||
| Fig. 25 Schematic of the calculated DAS structure18 (a) and in (b) the corresponding simplified reciprocal lattice rods for the adlayer (top) along with a schematic of the expected bulk Bragg reflections. | ||
6.1 Interference features arising from more complex adlayers
Next, the diffraction features arising from the more complex adlayer structure expected for the 7 × 7 are considered. The greater complexity of the calculated adlayers can be shown to produce interference features that modulate the ideal planar truncation rod structure. First, consider a single flat 2-D layer. If every other atom is pushed lower, this z-displacement contributes an additional interference path and phase difference that changes the interferences along these simple projection rods.To understand the extent and how such lateral and vertical displacements modify these reciprocal lattice rods, a simple cross sectional model is utilized. Such 2-D simulations cannot be applied quantitatively, but they do reveal the nature of these rod modifications. Fig. 26 shows the calculated Fourier components from increasing complex distortions starting from (a) a simple 1-D strand of 25 atoms spaced ∼3.84 Å apart. This produces true truncation rods since there are no periodicities in the z-direction. Introducing an extra offset layer below the first layer representative of a Si bilayer introduces interference nodes in the rods in (b). (c) presents 3 bilayers in total 6.3 Å thick and 91 Å long showing a more complex nodal structure. (d) shows 15 bilayers again 91 Å long which starts to reflect more well defined Bragg like peaks. Such nodal structure in surface truncation rods has been used to delineate between the two possible terminations of a Si(111) surface.22 However, this gets more complicated when multiple atomic displacements arise within an adlayer as discussed next.
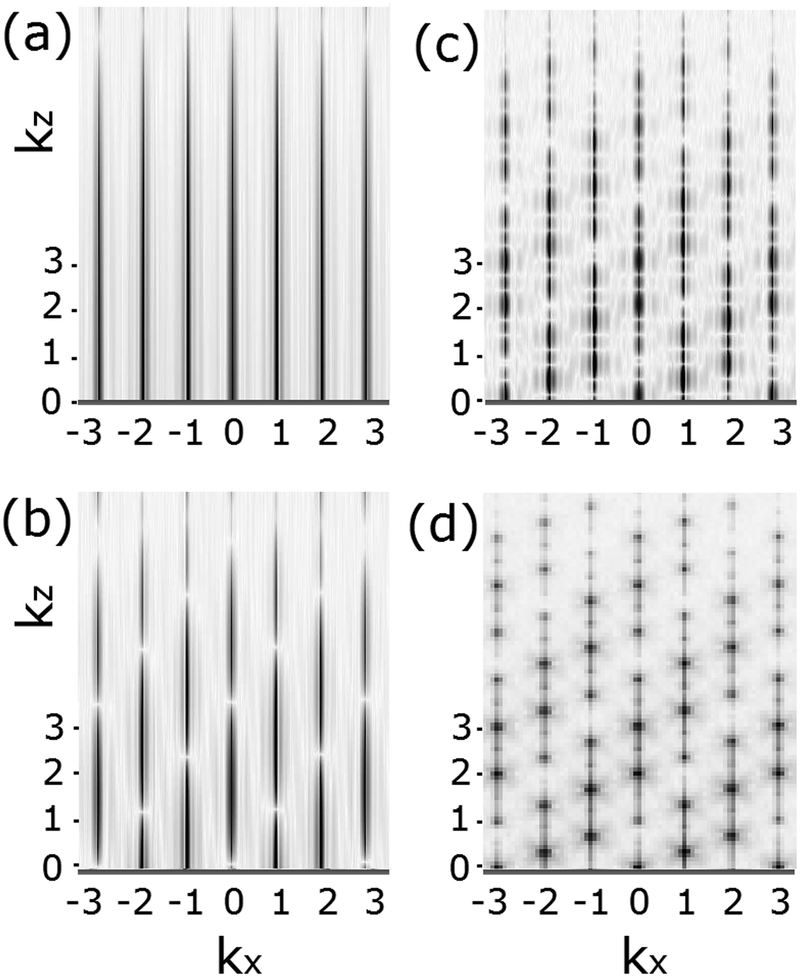 | ||
| Fig. 26 Reciprocal lattice rod intensity (black) for a linear row of atoms (a), a bilayer in (b), three bilayers in (c) and 15 bilayers in (d). Both the thickness and lateral extent of these layers blur out the interference features due to the finite size effect, which limits the coherent interference. | ||
We next consider how the displacement of atoms in a bilayer modifies the truncation rods shown in Fig. 27. Fig. 27(a) shows a linear chain of atoms and how the displacement of the offset bilayer atoms modifies these truncation rods. The red lines indicated in (b–f) indicate interference nulls in successive rods that stem from the wave fronts of the offset atoms indicated in blue. As the offset gets larger, more nulls arise which repeat every third rod following the x offset in this bilayer, i.e. similar to the bulk stacking sequence offsets in Fig. 2.
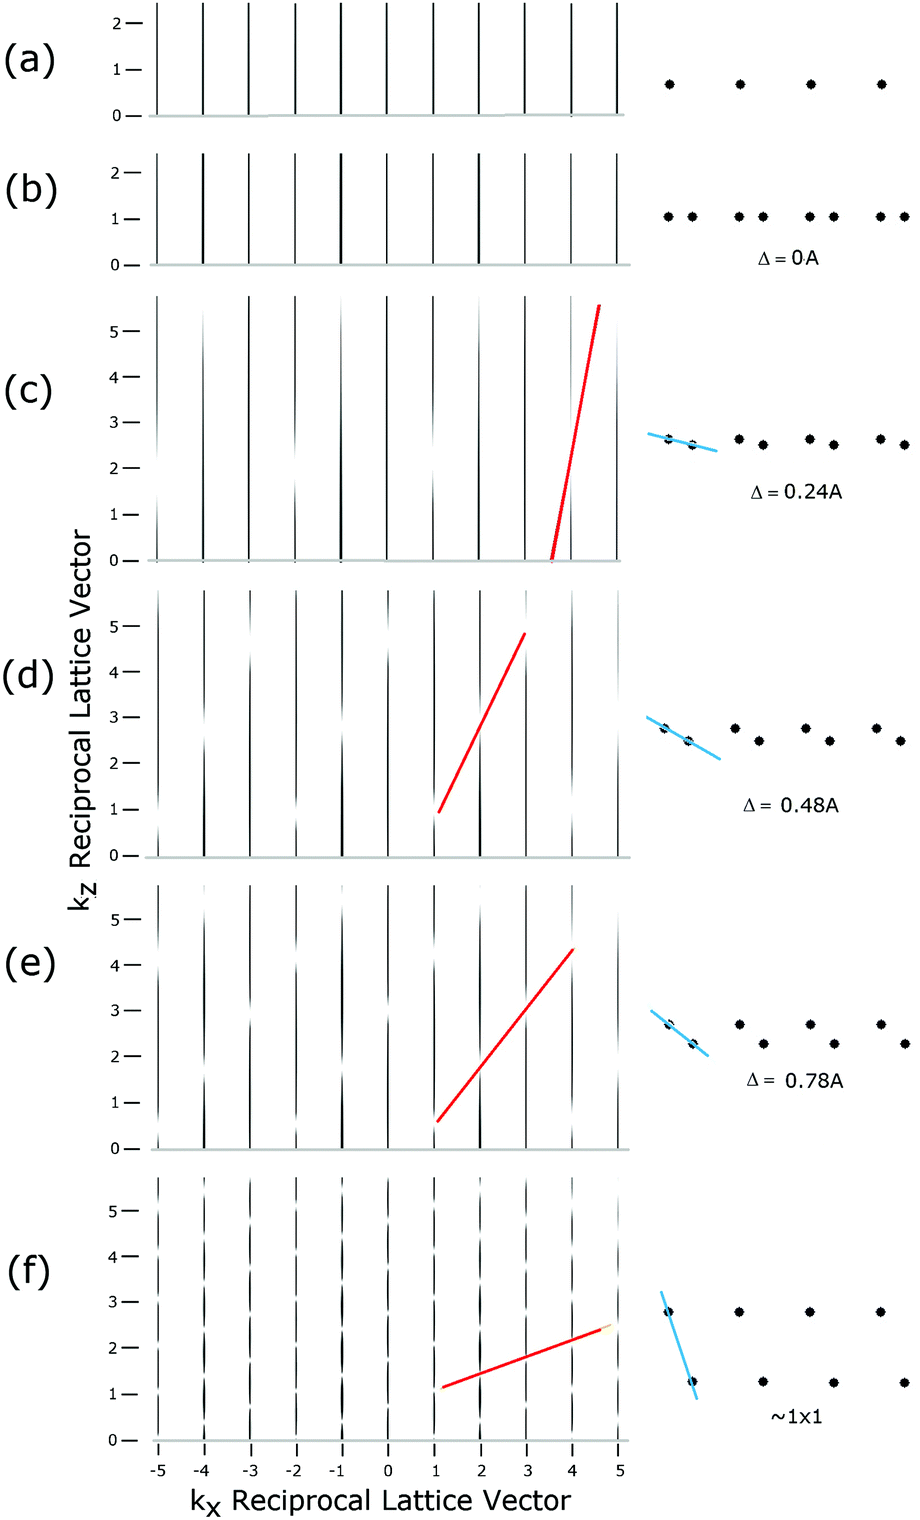 | ||
| Fig. 27 Truncation rod intensity (black) for a linear layer and increasingly offset bilayer structures (a) and (b–f), respectively, Δ indicates the offset of the bilayer atoms. | ||
Fig. 28 shows how the additional complexity of adatoms and corner holes, CHs, alter the rod structure for a simple 3-bilayer system arranged in a 7× array. As shown in Fig. 28(a), the resulting rod structure for this three bilayer system is quite complex and gets even more complicated with adatoms and CHs.
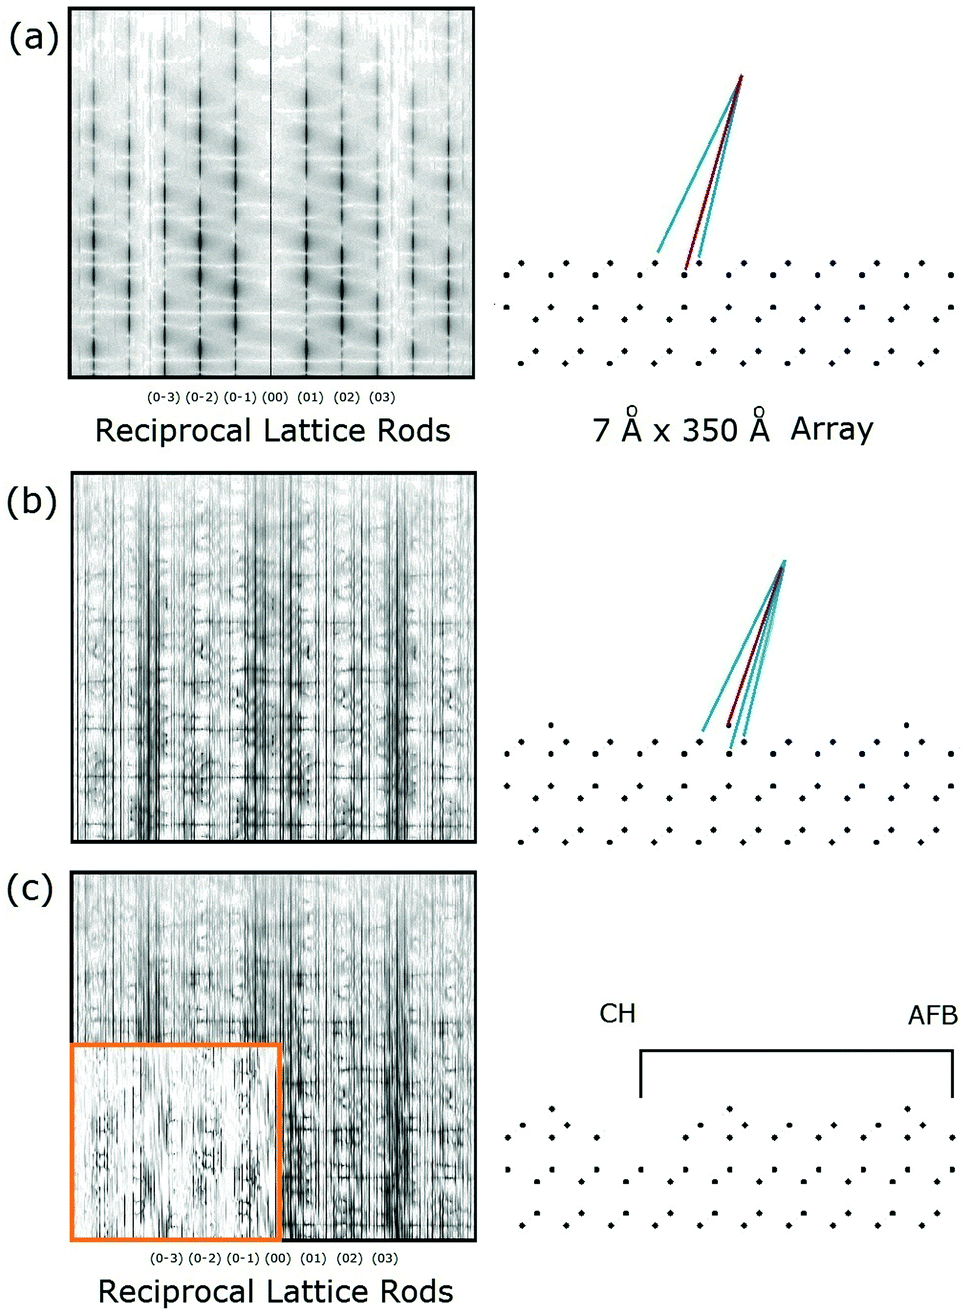 | ||
| Fig. 28 Rod intensities (black) of a cross section of 3 bilayers of a diamond lattice in (a), adding periodic adatoms in (b) and also repeating 7× corner holes, CH, in (c). The second corner hole is not in the field of view of the schematic, so that an antiphase boundary between corner holes is indicated. The rod intensities in (a) and (b) show the variations relative to a single bilayer array, i.e. subtracted off to show how these rods change for three bilayers. The inset in (c) is the change in the rod intensity after adding the corner hole to (b). | ||
When sections of the top layer are reversed to form an antiphase boundary, APB, as occurs with a DAS or DFA polymorph, the rods become almost mirror images across the APB. This is shown in Fig. 29(a and b) for DAS or DFA-like terminations, respectively. Now due to this phasing the lateral repeat pattern in these rods with kx is less prevalent than in the unfaulted layers. However, the mirror symmetry for −L and +L is not complete as the atoms below this top layer still retain the bulk stacking sequence. This can account for the asymmetry seen in the experimental X-ray data along the 〈11〉 directions discussed earlier for Miceli's new X-ray data. In comparison, the STM image of the 7 × 7 probes only the electron density in the very top layers and does not sense this.
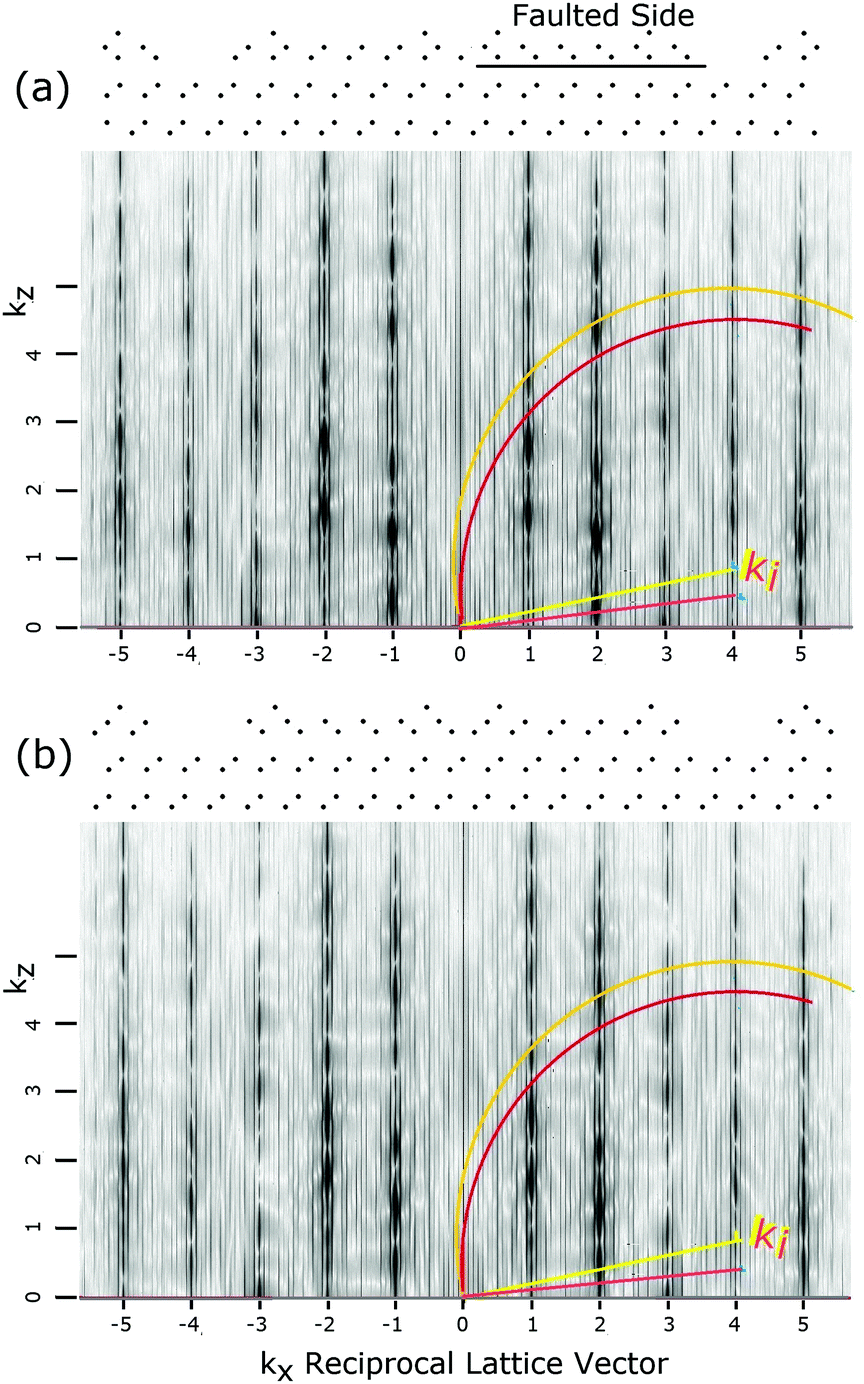 | ||
| Fig. 29 Simulated adlayer rods for DAS (a) and DFA (b) analogues. Dark bands represent high intensity, light are weaker. The red and yellow lines indicate the different incident conditions between the older and newest X-ray measurements. | ||
The complex truncation rod structure in Fig. 29(a and b) can also account for another experimental feature of 7 × 7, namely the near beam extinctions in some fractional order beams as well as the strong suppression of the low order fractional order beams of the 2011 measurements. This can be seen in the differences in the Ewald constructs for different scattering conditions.
An Ewald sphere construction is shown on the right side of Fig. 29(a) and (b), which are schematically representative of the incident X-ray wave vector, ki, for the 198813 and 199920 measurements (yellow) and the 2011 measurements (red).21 The different intersections of these Ewald spheres with the rods between 1/7 and 4/7 can shift from a region of strong rod interference to a region of weaker interference to suppress several fractional order beams. Flat regions of extinctions can also occur for larger kx values so as to account for the extinctions of such higher order, fractional order beams. Obviously, these 2-D models are not accurate truncation rod models for a 7 × 7 and are only intended to provide insight as to how such complex adlayer distortions and an anti-phase top layer can alter the rod structure to affect the diffraction intensities.
Additional interference modulations also arise from the height of the adatoms on the adlayer as shown in Fig. 30. Here the limited lateral small size of the layer used here may limit the coherence and blur out higher kz rod structure. In each set of rods the model has a nominal bilayer as shown on the left with adatoms in a T4 site at the indicated height above it. The panel on the right removes the low atoms of the bilayer to remove some of the interference features. Here as indicated by the black circles one finds interference nodes of different strengths which are displaced along each set of 2-D lattice rods. This adds one more layer of interference complexity to those already discussed. Also note how the nodal features become weaker as larger kz is accessed. This is also found in all other cases once sufficiently larger kz values are considered.
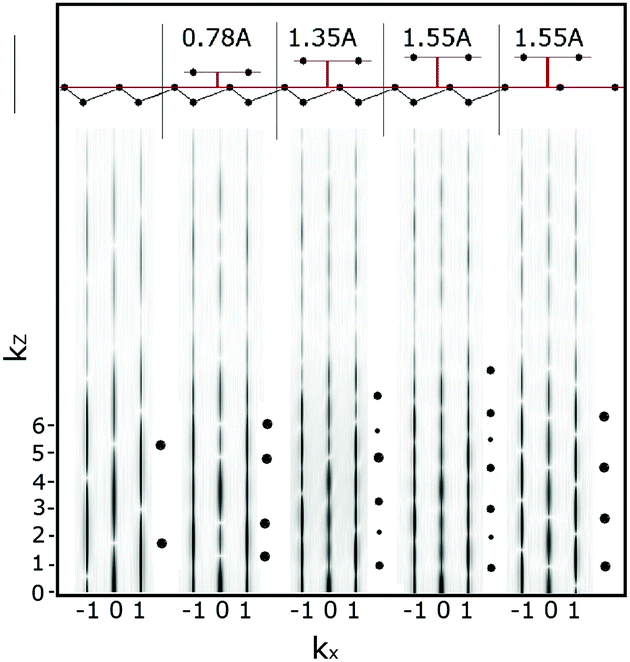 | ||
| Fig. 30 Truncation rod modulations in the xz plane for a single simulation bilayer in (a) and with additional adatoms spaced above it at the indicated height. The dots represent the depth of the nodes in the k = 0 rod. In the last panel on the right one of the lower atoms of the bilayer has been removed for comparison. | ||
Yes, the nodal structure in the truncation rods of such a complex 7 × 7 adlayer is far more complicated than previously modelled! Basically, the experimental conditions used in the X-ray measurements do not allow L to be sufficiently close to zero for this approximation to be accurate. If one is very lucky, there may be a wavelength and diffraction direction where the nodal interference structures created by the z offsets within the adlayer are not significant, but that is not known a priori.
As this section demonstrates, the expected complex 7 layer distorted structure of the DAS model will introduce interferences along the nominal truncation rods due to the phase changes these displaced atoms produce. As a result intensity variations along the ‘truncation’ rod will occur. Based on the intensity differences between the 1999 and 2011 data obtained using different scattering conditions, the L → 0 condition has certainly not been achieved in the 1988 or 1999 X-ray measurements. It is unclear that it is met in the 2011 measurements. Improved modelling of the RLs of such a complex adlayer is necessary to define the structure of the RL rods so as to perform a comparison and optimization of the calculated and experimental diffraction intensities.
7. Discussion
7.1 Reproducibility of the data and sample
The experimental diffraction patterns from the 7 × 7 have varied over time. They all show very similar strong features but significant variations in many weaker fractional order diffraction beams, especially the higher order beams. 3 fold symmetry pervades most diffraction results starting with Takayanagi's 1984 publication, later in the 90s with Robinson's newer unpublished work and more recently in Gramlich's 2011 measurements. Similarly, recent LEED of samples following STM validated cleaning procedures33 has also indicated 3-fold symmetry. Such threefold symmetry has been included in Vlieg's most recent analysis of the newer 1999 and 2011 X-ray data.63 However, this reanalysis confirms the DAS structure but uses the same projection modelling and χ2 intensity optimization procedures as performed earlier. As noted this optimization procedures primarily reflects the most intense fractional order beams and numerically suppresses the contributions of many weaker but important fractional order beams.7.2 The diffraction features used for surface X-ray analysis
All X-ray results measure diffraction over a more limited range of beams than the original TEM measurements. As a result, all the X-ray analyses have focused on the lower order diffraction features going out to the 02 beams which contain the most intense diffraction features. As discussed previously, there are still many low intensity beams not reflected in the χ2 X-ray structural optimization procedure. Consider also that the χ2 procedure does not even consider full and near beam extinctions that are seen experimentally, which are important due to the nature of interference in quantum mechanics.An example of this simple quantum mechanical behavior is shown in Fig. 31 for the interference of two waves at two different Bragg conditions B1 and B2. B1 is near a high intensity interference feature while B2 is near, or at, an interference null. If a phase change occurs near a null in the Bragg condition, i.e. a location indicated by B2, then its change in magnitude is significantly greater than near B1 where the waves are near their peak amplitude. This makes the lower intensity interferences produced at B2 more sensitive to structural modifications. The diffraction amplitude or expectation value for such interfering waves is ψ2, which further magnifies such changes. This reflects the importance of the lower intensity beams and such phase changes and cancelations in deriving the structure.
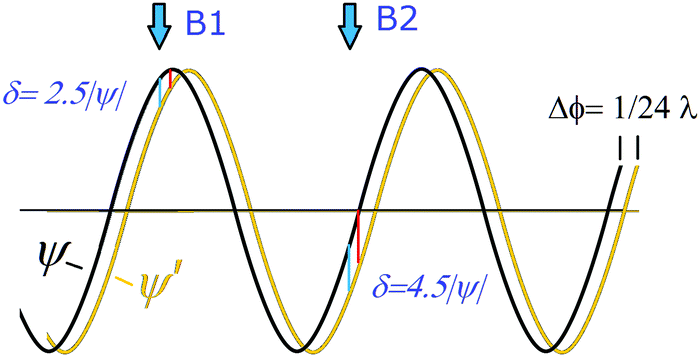 | ||
| Fig. 31 The interference of two waves for two different Bragg conditions near a peak maximum or peak minimum. δ represents the relative change in amplitude due to the indicated phase shift, Δϕ, at these different Bragg conditions. | ||
As these FT studies show, many distortions lead to interferences that produce full and near beam extinctions and phase cancellations indicative of the B2 situation. Furthermore, the wide range of calculated diffraction patterns presented here shows significant variations of the lower intensity beams with structural changes, e.g., see Fig. 11c. This calls for some type of R-factor analysis that normalizes the scattering magnitude to better reflect such phasing effects, when optimizing structures.
7.3 The kinematics of diffractive scattering
Section 6 has just discussed the limitation in the scattering conditions used for the X-ray experiments, and the likelihood that the X-ray scattering conditions for projection rod modelling have not been achieved. This will not be repeated here. To address any shortcomings in such modelling requires more rigorous modelling of the 7 × 7 adlayer to determine the scattered phases and interferences arising from atomic displacements in the z-direction. Given the complexity of the 7 × 7 adlayer this becomes a difficult problem. Any controversy in analyzing the structure based on diffraction data essentially resides in determining or recovering the lost phase information of these scattered waves. The FT simulations indicate that many higher order diffraction features carry this phase information and need to be considered and included in such analyses.An important observation make by Takayanagi in 1984 was that slight rotations of his sample did not change the relative intensities of the higher order beams seen in TED but did for the lower order beams. As a result he assumed that these low order beam variations reflected the effects of multiple scattering and made a correction for that by averaging certain beams. (Part of his assumption was also that the 7 × 7 diffraction pattern was 6-fold symmetric.) This lack of variation in his higher order beams with ‘rocking’ the Ewald sphere suggests that the surface truncation rods for these higher momentum transfer conditions show little if any of two factors: interference effects in the z-direction from shortcomings of the rod projection approximation and/or multiple scattering effects. For these beams the projection rod model may be adequate which may allow the projection rod model to be used in this case. This should be considered further in future measurements and analyses.
One of the interesting findings from the FT simulations is that the higher order beams supplement the image reconstruction and create more highly resolved details of the structure due to their smaller wavelengths. One can actually filter out the lower order beams up to second order and include only the waves to 3rd order in a back transform to recreate the original structural features. Use of these higher order, even lower intensity beams, may provide a different strategy to extract structural information from the diffraction patterns.
7.4 The four waves involved in 7 × 7 diffraction
At this stage it is useful to clarify the various waves involved in the diffraction process and the relation of these wave descriptions to the charge densities that comprise the atoms of the surface. Fig. 32 shows a schematic of the incident wave/beam, ki, in blue, the atoms in bulk position in black, the atoms in the adlayer region with mixed red and black atoms and the scattered waves kf in green that arise from the interaction of the field of the incident wave with the charge densities of the atoms. The adlayer region contains a ‘surface’ layer of red atoms which transitions into the bulk atomic positions that are supported by the stationary waves of momentum ks (x,y,z) that satisfy the wave equation and atomic positions there. These stationary states create the charge densities in this adlayer. Their periodic structure also defines the RL structure by which crystal momentum can be exchanged with the incident and scattered waves to satisfy energy conservation, i.e., on the Ewald sphere, so as to produce diffracted waves.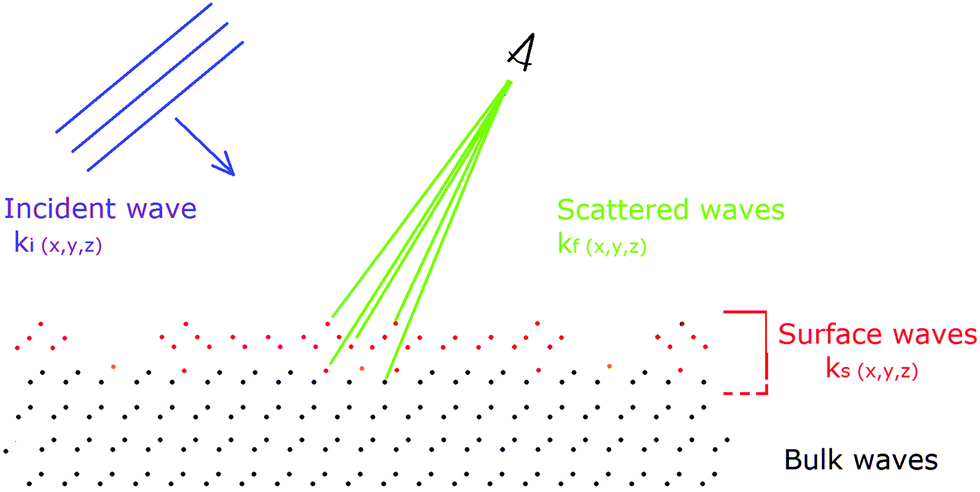 | ||
| Fig. 32 Schematic of the various waves involved in diffraction. Here the surface region has periodic features and atomic locations different from the bulk that characterize the new eigenstates and charge densities that arise on the surface. | ||
The observed diffraction pattern arises from the complex superposition of waves of differing phases that give rise to diffraction. These phase differences can arise from two sources: first, from the different path lengths/locations of the scattering atoms, and, secondly, from phase shifts that occur in the scattering process. These can be associated with the nature of the wavefunction and charge densities of these stationary surface waves.
The simple modelling of the scattered waves assumes that the scattering phase from each atom is identical and that interference is created from differences in scattering path lengths. However, phase shifts in these scattering atoms can also create interferences which alter the interferences and structure along the RL rod. Both types of phase shifts will thereby limit the agreement between calculated and measured diffraction patterns. Calculating the diffraction patterns accurately for the multi-layer 7 × 7 is one way to determine which phase shift dominates. Thus, it is unclear that a calculation of simply the structure factor will address these different types of phase contributions.
7.5 The role of the higher order beams in structural analyses
There is one case where the level of agreement in the diffraction pattern can be examined based on Takayangi's measurements rather than relying on a χ2 error analysis of the intensity, which can neglect the phase information in diffraction. Fig. 33 shows a comparison of a section of Takayanagi's measured TEM diffraction intensities on the left, (a), to the intensities for his optimized DAS structure on the right, (b). For direct comparison the experimental pattern is folded along the Y axis, along a unit cell boundary, so as to mirror these patterns. Each triangular wedge represents 1/6 of the pattern with an assumed symmetry about the 〈11〉 direction, i.e. the faint line drawn between the 00 and 22 beams on the right. The reflections shown here as presented in 19851 represent only a fraction of the 460 beams measured and provided by Takayanagi for each wedge.
 | ||
| Fig. 33 Experimental TEM diffraction intensities1 in (a) compared to the optimized DAS intensities in (b) on the right. The relative intensities of a few experimental beams are indicated in (a). The red beams represent the most intense beams with the black beams less than 23% of the more intense beams. | ||
The red intensities in Fig. 33 represent all peaks with an intensity greater than 23% of the 3/7 order beam, i.e., the most intense experimental beam. These beams become the most heavily weighted beams in the error analysis used to optimize this DAS structure. The amplitudes of the weaker beams are of little consequence in past optimizitions of the 7 × 7 structure, and as shown in Fig. 31, still convey important phase information.
The “best fit” to the experimental intensities shown in (b) was determined in 1985 by iteratively moving the atoms of a DAS structure around and recalculating the diffraction pattern to find the best fit.1 As shown in (b) the structure found that optimizes the fit to a DAS structure does a relatively good job in reproducing the relative intensities of these most intense (red) beams, particularly the “wing feature” around the 01 beam discussed earlier. Even though there are small variations in the intensities of these predominant peaks found in 1988, 1999 and 2011, such variations have not changed the structural conclusion reached favouring the DAS model.63
There are many regions in Fig. 33(b) as indicated in blue that show striking intensity differences relative to the experiment. Using the 80 published experimental intensities,1 one can see how the contributions of the weaker beams when weighted for their intensities can outweigh the changes in the higher intensity beams as arises in the χ2 optimization approach. To demonstate this, the experimental beams in Fig. 33 with an intensity above 23% of the 3/7 beam were selected and the intensity of the corresponding beam for the optimized structure was subtracted, the absolute value was taken, and then the beam was weighted according to its experimental beam intensity. This was repeated using the squares of the intensity difference again normalized by the square of the experimental value. This resulted in an average variation of 1.45% and an rms value of 13.7% for the most intense beams. The same was done for the beams smaller than 23% using the same number of beams as used for the higher intensity beams. In this case a few beams with zero intensity were assumed to have a noise level equal to half the intensity of the lowest measured beam, which turns out to be 0.6% the intensity of the 3/7 beam. For these lower intensity beams the average error value is 91% and the rms value 60%. The error value introduced by these weaker beams are 63× (avg) and 4.4× (rms) greater than those found by using just the unweighted beam intensities. Clearly, with a 4× greater number of weaker beams present in the 7 × 7 pattern, such weaker, higher order beams can dominate this error function. By underweighting the low intensity beams, one loses important phase information from a large number of beams that reflects the adlayer's structure.
7.6 Patterson analysis and the resolution of Patterson maps
Patterson analysis and the resulting Patterson map, PM, was developed to help untangle the lost phase information in diffraction and to provide insight into the structure. The PM features also contain some phase information encoded in the pair correlation function of the PM.As discussed elsewhere10,11 the established 3-fold (C3v) mirror symmetry of the 7 × 7 adlayer allows the PM to reflect the locations of the scattering centers along each side of the unit cell. This essentially triangulates the location of each scattering center from the unit cell boundaries to pin down each scattering center within the unit cell. The PM may also provide clues as to the phasing from the scattering of different scattering centers.
To do this it useful to compare the PM of the optimized DAS structure to the calculated DAS structure18 which is shown in the overlay in Fig. 34(a). As expected, this optimized structure indicates small distortions analogous to the ‘refinements’ found in Robinson's first X-ray study.13 However, these distortions go well beyond what the calculated DAS structure predicts as indicated in orange for the adatoms as well as the dimer (red) displacements in Fig. 34(a). The differences in the PM using 460 beams to the calculated DAS structure is shown in Fig. 34(b) and shows even larger displacements. These experimentally derived shifts (in addition to the unusual adatom heights discussed elsewhere10) present a conflict with the atomic locations found in the calculated DAS structure well beyond what is expected in such calculations.10
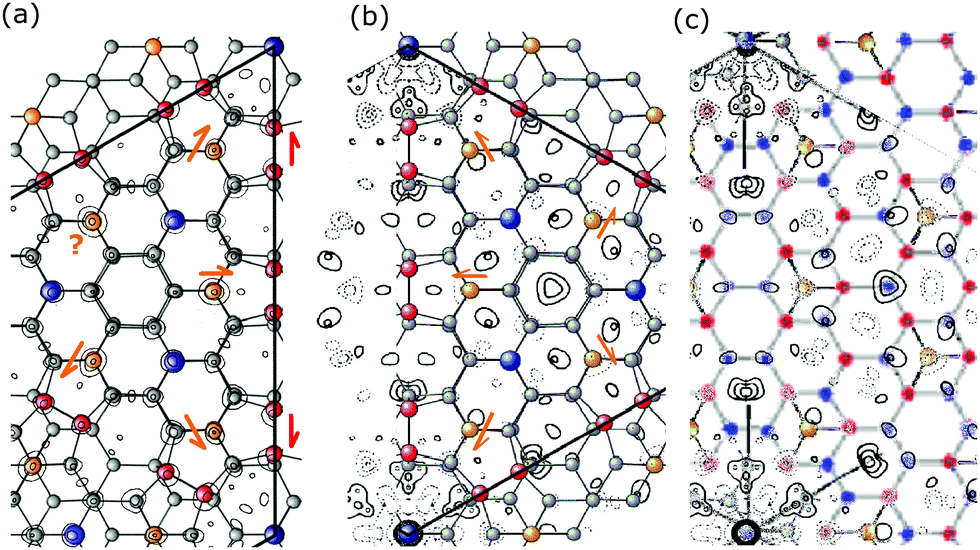 | ||
| Fig. 34 Calculated DAS structure18 of the faulted side of 7 × 7 with an overlay of the Patterson map derived from the calculated intensities of the optimized DAS1 model in (a) or with the Patterson map derived from all beams in (b).1 For the optimized DAS structure in (a) as well as the DFA structure in (c) both sides of the PM are identical, i.e. mirror images. Note in (b) the direction of the adatom displacements are chosen to point in the direction of the dashed PM feature, but the corner adatoms could be displaced in the opposite direction. | ||
In the real experimental 7 × 7 when using all the additional beams for the PM, the dimers disappear and a new set of atoms of the honeycomb appears, consistent with the colored DFA overlay shown in Fig. 34(c). Again, this stems from the phases of the scattering, and how all the 7 × 7 diffraction beams of the sample contribute to the PM. However, one must recognize the possibility that multiple scattering and the exclusion of the integral order beams may distort these PM features.
Next, the detailed features of the Patterson map and the PM from the optimized proposed DAS structure are compared. Fig. 35(a) and (b) show the unit cells for the experimental PM and the optimized PM calculated using the ‘optimized’ beams intensities shown in Fig. 33(b). These unit cells are conjoined by flipping the unit cell in (a) along the common side for comparison. The side of each unit cell is symmetric so the different atoms on the top half of each unit cell are color coded in the same manner for Fig. 35(b) and (c) as done in Fig. 34(b) and (c) to help relate these features to earlier diagrams.
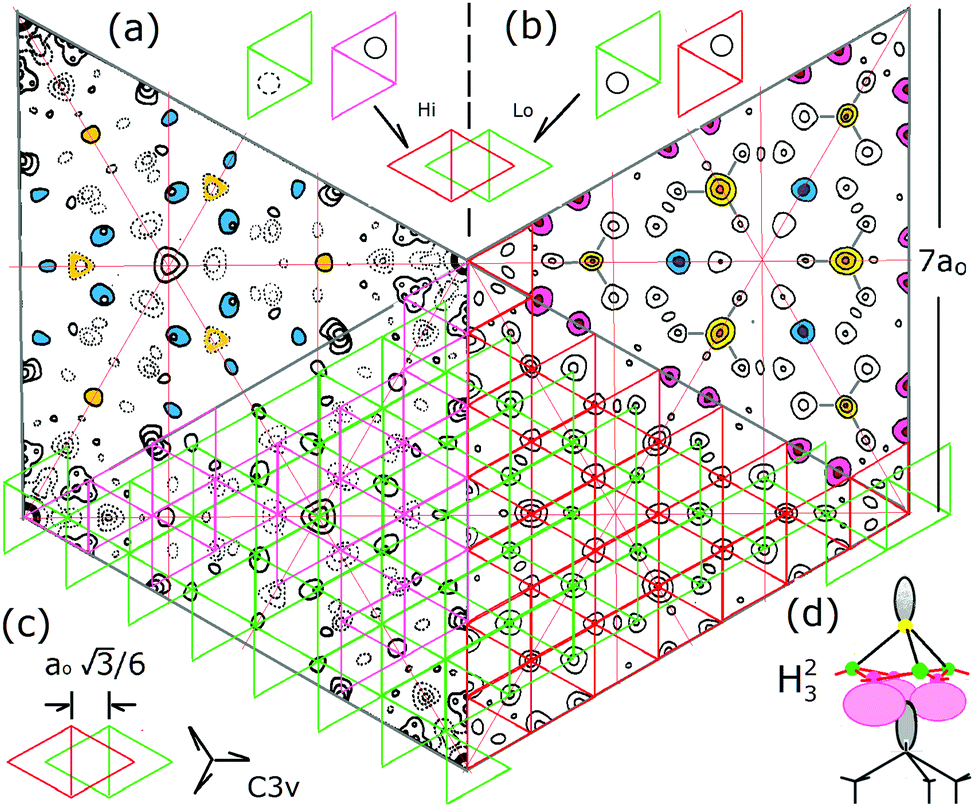 | ||
| Fig. 35 Comparison of the Patterson map features derived from the diffraction intensities of the 7 × 7 (a) and the optimized DAS structure (b) deduced by Takayanagi.1 The two 1 × 1 units comprising the 7 × 7 unit cell are shown above with their respective PM features indicated in each and overlaid in (c). This reveals a common reciprocal lattice for both consisting of two red and green unit cells offset due to the differences in the registry of the adlayer with the underlying 1 × 1 substrate atoms, i.e. the honeycomb rests atop an underlying substrate atom as per the DFA structure. (d) Shows the proposed H32 model11 for the mirrored interaction of the honeycomb with the adatom above and the substrate dangling bond below. | ||
The main difference in constructing these two PMs is that the PM for (b) reflects primarily the fit of the strongest lower order beams, which number 15 symmetry unrelated beams, while the experimental PM in (a) relies on the measured intensities of 460 symmetry unrelated beams. This includes many more higher order beams having shorter wavelengths. Using these many higher order beams in the PM (a) produces sharper features as seen in the image reconstruction simulations that include more shorter wavelength waves in many more directions. In fact the dynamic range of the PM features in (a) is approximately double that found in (b) as indicated by the denser dashed and solid lines for the PM features in (a).1 This suggests that the use of additional higher order waves allows one to resolve weaker PM features (or distinguish them from background noise) than seen in (b). While the details of these PM features differ, both follow the same general periodic structure.
A mapping of the adlayer lattice is shown in the lower section of Fig. 35 for both maps using green and red 1 × 1 cells superimposed on each of these PMs. The small 1 × 1 cells atop each PM schematically show the overall PM features seen within each 7 × 7 cell in (a) and (b). Together these form a common pair of overlapping lattice structures for both PMs. The offsets between them show the red cells being associated with the higher honeycomb atoms and the green cell associated with the lower honeycomb atoms. These two 1 × 1 unit cells can be viewed as offset in any three of the C3v symmetry directions as shown in (c).
Almost all the PM features generally align with these grids except where the features in (a) have more structure than in (b) and appear to break apart with the higher resolution. These as well as other departures from this grid may indicate lattice distortions or phase shifts in the scattered waves which appear prevalent around the corners of the 7 × 7 unit cells, the so called corner holes. With the lower resolution in (b) some of the 'sharper' features in (a) may not appear due to their lower intensity. Some of the upper atoms of the DFA honeycomb in (a) are not even observed. The shapes of the charge densities observed in (a) will be discussed later.
The smallest unit cell that describes a common overall pattern is a face centered close packed hexagonal lattice, FCH lattice, best visualized by the symmetrically centered red and green hexagons in the center of the lower section of Fig. 35(b). This results in an unusual surface Brillouin zone and zone folding not characteristic of the underlying 1 × 1 diamond lattice.54
7.7 Where do the dimers come from?
The presence of the dimers in Fig. 35(b) arises since they were added to this model as a construct to explain how the two sides of the unit cell might join together. If dimers were present they should also appear in the higher resolution PM in (a), but they do not. And given the extensive simulations and back transforms studied, there is no evidence that the neglect of the integral order beams nor multiple scattering effects have prevented the dimers from appearing in the higher resolution PM. Namely, as found in the FT and back transforms of the DAS 7 × 7 construct (see Fig. 20), the dimers and adatom features stem from different periodic functions and their periodic features appear in superposition. Thus, the dimers appear in (b) simply because these atoms were added to the unit cell in the 7 × 7 DAS model. In the DFA structure the up versus down atoms of the honeycomb switch on each side of the unit cell boundary instead of physically introducing a new periodic dimer structure to the existing atomic arrangement, as shown for the DAS structure in Fig. 35(b).7.8 Why is the DAS model predicted theoretically?
After reconciling the appearance of the dimers in the PM in Fig. 35(b), how can one explain the theoretical results that DFT calculations predict the DAS model and fail to converge for the simple DFA10 model? One can speculate on several possibilities that have been discussed elsewhere.11 This includes a more flexible wavefunction, including many body or electron self-energy effects, spin or even correcting for polarization and/or unusual screening of the electrons orthogonal to the surface.A resonance state of the electrons in the 7 × 7 has also been suggested from the temperature dependence of the STM images.12 These resonance eigenstates are composed of a variety of single particle states so as to create stationary states that satisfy the boundary conditions and mirror symmetry under C3v. Also within C3v symmetry an instability may arise due to the triply degenerate nature of this FCH lattice, which is an odd electron system.12 As discussed shortly, from a diffraction perspective, one cannot rule out that this symmetry and odd electron count is broken by a substitutional dopant near the surface that can remove this degeneracy to lower the system energy.
7.9 C 3v symmetry and the nature of the 7 × 7 wavefunction
Let us assume that the scattering phase shifts are not an issue and that the high resolution PM reflects the symmetries of the atoms; then the description of the atoms in terms of an FCH lattice provides evidence of the symmetry of the bonding arising in the 7 × 7. Here one hexagon corresponds to the adlayer system and the other the subsurface 1 × 1 atoms that nominally would have ‘dangling bonds’. Based on this arrangement an H32 bonding scheme was proposed11 as shown in Fig. 35(d). This would account for the triangular shape of the adatom PM feature and the 180° rotation of the next neighbor PM features, which also reflects the staggered rotation of the higher and lower atoms of the honeycomb.The mirror symmetry of the H32 bonding configuration above and below the honeycomb may also play a role in these interactions and the polarization normal to the surface, particularly if spin is involved. (See for example, the spontaneous, weakly reconstructed magnetic phase discussed in ref. 11). Alternately, the C3v symmetry may produce a resonance state whose wavefunction is composed of many one electron ground states as well as excited states as suggested by the temperature dependent distortions of the adatom charge density seen in STM.12
7.10 Alternative rod projection models of the 7 × 7
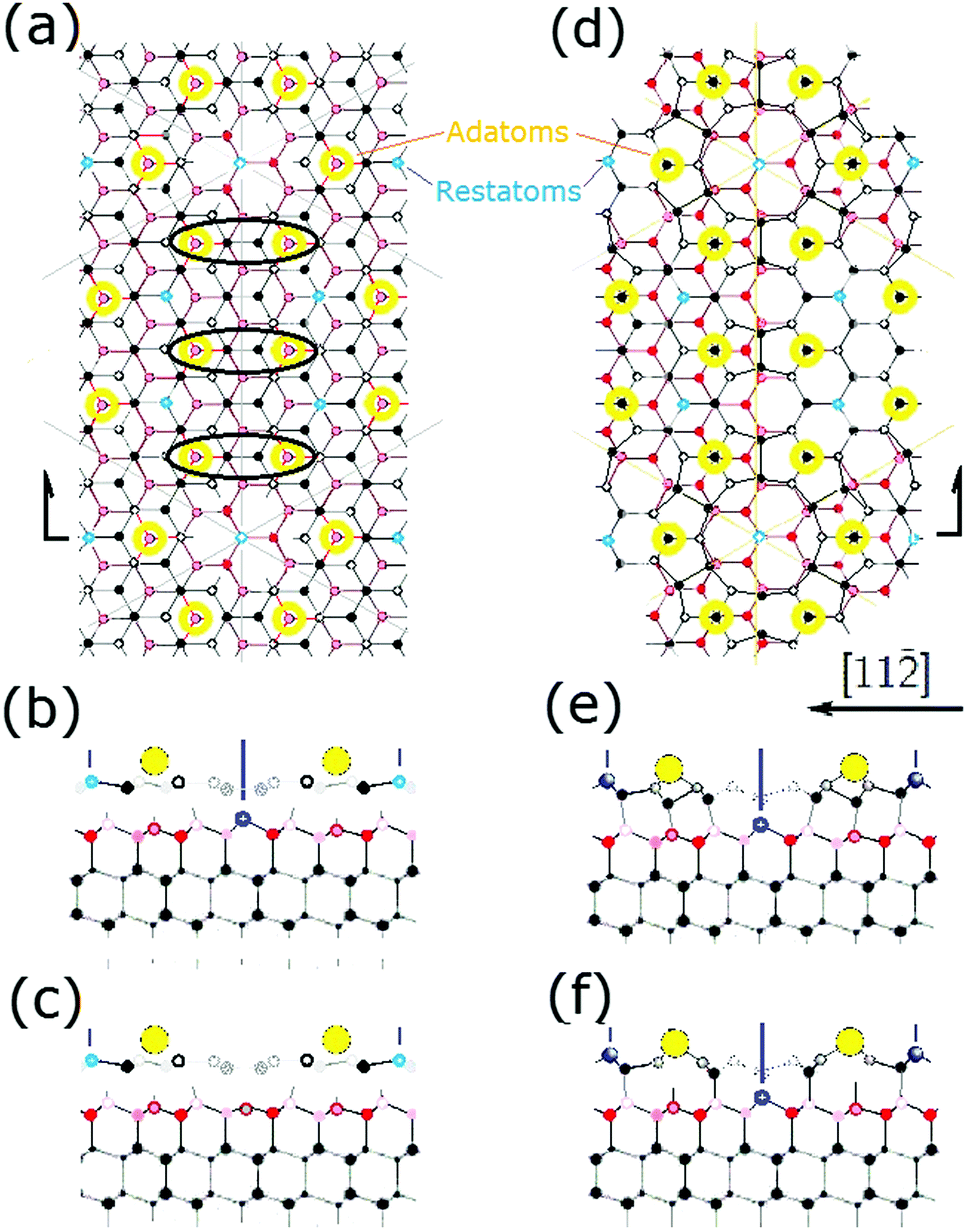 | ||
| Fig. 36 DFA, DAS and hybrid DAS models are shown in (a–c) with their side views below (d–f). In (c) the (pink) rest atom is not longer a silicon atom but boron. | ||
The ideal DAS shown in (d) and (e) has projection rods that may not reveal whether there are atoms under all of the adatoms as shown in (d) and (e). (f) Shows a DAS configuration where the atoms below the side adatom are missing. This choice was considered within a DAS model so as to allow the possibility of a magnetic surface state to form in this region of the unit cell as experimentally suggested elsewhere.11
Since diffraction modelling cannot distinguish Si from C or B, one may have these impurities substituted for Si atoms in certain positions. Both B and C are known to be trace impurities that can occur and are known to be electrically active. B is particularly interesting as a substitutional dopant that can change the number of electrons in the unit cell and alter the unit cell's properties. For example, a B atom substituted for the restatom in the corner hole as shown in Fig. 36(c) removes one electron per unit cell so as to allow the ordinarily metallic 7 × 7 surface to become insulating as observed at low temperatures.12 Boron is a well established low level contaminant in the UHV chamber due to leaching of B from the boro-silica windows in these vacuum chambers.11,12,66 The prolonged slow annealing from the high temperatures typically used to form well ordered 7 × 7s is know to place B impurities in stable bonding configurations near the surface and is difficult to directly detect.66,67 Since the mid 70s, the 7 × 7 has been considered to represent a clean surface so a more careful examination for any low level impurities may have been lax. It may even be that a boron atom in every two or three unit cells or even further below the surface, may trigger an electronic and structural change that further stabilizes the 7 × 7.
In considering the distortions in the experimental PM, the changes found from an ideal DFA may have important consequences. Fig. 37 shows the extended PM that examines distortions within the honeycomb based adlayer and circles various regions of atoms. It shows an arrangement consisting of three distinct ‘tiles’: two enclosed by black hexagons that contain the central adatoms on the two sides of the unit cell and the other by a red hexagon around the corner hole.
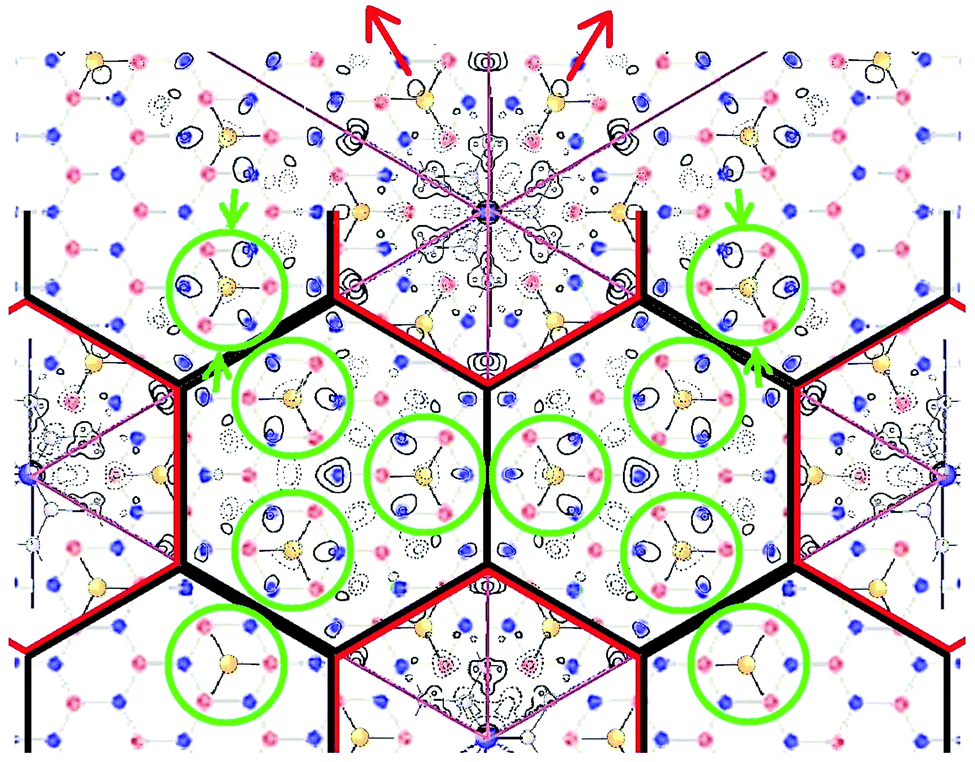 | ||
| Fig. 37 The two regions of atomic displacements suggested by the extended Patterson map as superimposed on the ideal DFA model. These regions are defined here by the red and black hexagons that encompass different types of distortions. | ||
In Fig. 37, the smaller green circles and arrows indicate that the lower blue atoms in the honeycomb are compressed inward. On each side of the unit cell they form anti-phase structures enclosed by the larger black hexagons that form borders with in the central region on each side of the 7 × 7 unit cell. The neighbouring blue atoms along the anti-phase boundary are also distorted near the corners of the red and black hexagonal cells. All these pairs of blue atoms along the anti-phase boundary have dangling bonds under them from the substrate below that are symmetrically placed between each of these 4 lower honeycomb atoms. The change in these pairs nearest the black and red verticies of the hexagonal cells bordering the corner hole suggests some type of distortion that displaces these atoms differently than those in the green circle. Such a change is consistent with the locations of the Fourier back transformed features along the unit cell boundary shown in Fig. 18 and 21.
Meanwhile, around the corner holes a red hexagonal boundary is drawn that includes the adatoms nearest the corner hole. Using the most intense PM feature for this adatom suggests symmetric outward expansion as shown by the red arrows. Note that this is opposite to the displacement discussed earlier but would offset the compression within the central region of the unit cell to balance the overall stress. However, an opposite compression of these adatoms could be caused by the underlying atoms in the honeycomb along with a complex phase change in the scattering from these atoms.
As a result 7 × 7 can be considered to consist of three structurally distinct cells or tiles: the dilitated or compressed corner hole region and two compressed central adatom structures that are mirror images of one another. Such distortions may also reflect distortions associated with a lattice instability or anharmonic forces acting on certain atoms.12
In support of such stress matching tiles, the higher density, metastable structure, i.e. the √3 rot 30° Si structure that arises under Si rich growth conditions, forms only small domains ∼ten √3 unit cells in diameter.11 It is a highly stressed structure with only random defects – some that appear like corner holes. Upon heating it relieves this stress by forming more corner holes with mixed 5 × 5 and 7 × 7 structures. This implies a very small energy difference between these structures and a modest energy barrier in forming the corner holes. Other ordered honeycomb based adatom structures, such as 9 × 9, 11 × 11 etc., are known to form under certain conditions, but the 7 × 7 is the most stable as formed in UHV.12
Fig. 38 shows a schematic of the arrangement of these three hexagonal regions or tiles (white, red and green) that together produce a common 7 × 7 unit cell. Each tile, Y, X and Y*, is also characteristic of the underlying symmetry of the ideal DFA lattice and C3v symmetry where Y and Y* are simply mirror images. These Y and Y* tiles each represent a nanostructure having 26 honeycomb atoms plus 3 adatoms which can form a bonded unit, i.e. a sub-cell or tile. The mirror symmetry of these two tiles can explain why the resulting diffraction features of this 7 × 7 appear to be six fold symmetric, yet on an atomic level these nanoregions are based on local three fold symmetry. The packing of these cells or tiles has a 3× repeat over the 7 × 7 unit cell, which can also contribute to intensify the sets of (0, 3/7) beams.
 | ||
| Fig. 38 Pattern of the three hexagonal tiles and their displacement vectors t1 and t2 that fully describe the 7 × 7 structure based on the distortions found in the extended Patterson map. | ||
The atoms around the corner hole are regularly repeated and appear to be closely linking as part of the honeycomb lattice. The translational vectors of the two interior tiles are shown as t2 = 2t1 where t1 = √3/2(7ao) and can be projected from any of the three equivalent 〈11〉 directions. As a result, 7 × 7 with its three distinct tiles is no longer a simple unit cell whose properties arise from a regular periodic structure.
This 7 × 7 tiling produces a lattice with a close packed 2-D structure that differs from the more open cubic diamond lattice or its projection onto the surface. Such a close packed tiling applicable to this 7 × 7 DFA represents a Wigner Seitz supercell that describes the mixed periodicities. A simple primitive or non-primitive lattice with two basis atoms, as in bulk silicon, is not a space filling lattice for the DFA arrangement. The description presented in Fig. 38 does provide a true space filling non-primitive lattice with waves that presumably satisfy this more complex periodic structure.
The less stable 5 × 5 structure that forms on Si(111) before the 7 × 750 still retains the antiphase character of the underlying honeycomb motif but the tiling differs due to the even number of adatoms along the side of the 5 × 5 unit cell. This arrangement essentially removes the Y and Y* tiles to leave a central restatom between the corner hole tiles that is bonded to three lower atoms of the honeycomb. This produces a tiling of primarily the X cells that define the 5 × 5 unit cell. A 5 × 5 unlike the 7 × 7 is known to have a 0.25 eV energy gap between filled and empty states.51 This implies that these unusual central tiles in the 7 × 7 are responsible for the very small energy gap in its low temperature ground state.
Uhrberg has shown that it is possible to create large areas of a 5 × 5 structure from low temperature annealing of high quality cleaved (not fractured) Si(111) 2 × 1 surfaces.52 X-Ray measurements and analysis as well as DFT calculations of such a tiled 5 × 5 should be less demanding than 7 × 7. It may also show similarities to the thoroughly studied ‘5 × 5’ Cu on Si(111) system discussed shortly.
 | ||
| Fig. 39 Different views of the 7 × 7 unit cell, UC, in terms of its atomic features (top) or as Tiles (below). In the center a hybrid view of the corner tile surrounded by the antiphased honeycomb tiles is shown which produces a Star of David pattern analogous to a Kagomi lattice. Here the dots and crosses represent the mirror symmetry of these tiles. | ||
Based on the trigonal Kagomi like pattern of the trigonal components of these hexagonal Y cells, this tiling can be considered as a “Hex-omi” lattice (referred to here as simply Hexomi) due to the space filling hexagonal tiles that compose it. These unusual trigonal symmetries in a Kagomi lattice lead to phase cancellations of the eigenstates and the resulting unusual properties.53 An analogous symmetry relationship for 7 × 7 needs to be more thoroughly explored.
Unusual symmetry properties of the cubic diamond structure have also been recently proposed which can lead to unusual phonon properties of Si that may manifest themselves at the surface to produce lattice instability and distortions.25 An unpublished analysis of the anharmonicity of the 7 × 7 surface atoms and how they can lead to the observed asymmetries in the 7 × 7 diffraction features has also been proposed20 which may be related to lattice instability and the observed distortions. Such unusual surface vibrational properties may correspond to the anomalous thermal expansion of Si(111) that arises from anharmonicity of the Si lattice.47
In a 7 × 7 arrangement, the different symmetries of these three subunits or tiles must be supported by different combinations of waves than in a primitive lattice. The issue is which waves of all those possible will support the lowest energy equilibrium structure. The need for higher order ks (x,y) waves to support any d-DFA structure is consistent with the Hexomi lattice with a non standard surface Brillouin zone. Both 3× supercell waves and 7 × 7 primitive waves and their harmonics are the most likely choices for this. Also the very slight broadening suggested in 3/7 in both the STM and LEED beam profiles shown in Fig. 13 suggests beam broadening associated with small islands – now on a nanoscale as tiled regions.
Photoemission band mapping of the 7 × 7 states near the Fermi level for 7 × 7 has also suggested a non standard surface Brillouin zone.54 The standard zone folding scheme, i.e. a standard surface Brillouin zone used for DAS calculations of 7 × 7, may not sample all the waves involved in determining the forces and the lowest system energy. The extra waves that support these distortions must contribute to the additional interactions that allow d-DFA to be more stable than DAS. These distortions may not only lead to beam extinctions but may produce cancellations of the standing waves of the surface states, which will reduce the system energy.
Non standard unit cells are exemplified more dramatically in the case of quasi-crystals,55 and in a few well studied 2-D systems that are incommensurate but have well defined long range diffraction features. The unusual adlayer tiling on Si(111) has also been found for the ‘5 × 5’ Cu on Si(111),56 and for the ‘6.3 × 6.3’ Ga on Si(111).57
The ‘5 × 5’ Cu on Si(111) structure has been long studied40,56–62 and shown to reflect features of an almost planar hexagonal Cu2Si layer that gives rise to a hexagonal network of discomensurations with a period of 5.5ao (relative to an underlying Si lattice).56,62 These layers are distorted and produce well defined electronic structure and bands having a hexagonal Fermi surface with unusual nesting.61 Despite the locally distinct tiling, they still maintain a periodic relationship to the substrate but not in the ordinary sense of primitive long range periodicity.40,56,59 He atom scattering from this ‘5 × 5’ has also revealed this incommensurate nature as well as unusual phonon modes.56 The observed phonon modes lack band gaps at fractional order zone boundaries and exhibit a continuous transition from an extended mode to a local mode with increasing wave vector.56 This is consistent with it not being a primitive unit cell. More recent theoretical work has also revealed unusual nodal character and topological features.61,62
This tiling for the ‘5 × 5’ Cu on Si(111) system was generally associated with stress relief, which may be the case for 7 × 7. However the 7 × 7 tiles seem to be bonded together more rigidly via the honeycomb lattice now decorated with adatoms that contribute to a more coherent extended structure. Interestingly, the intensity distribution in the ‘5 × 5’ Cu on Si diffraction pattern55 shows similar features to the 7 × 7 and is worthy of note. This includes a brighter set of 2/7th order beams, an extinction of the 3/7th order beams and the hexagonal set of fractional order beams around the 1,0 beams i.e., the “C” like features around the same 1,0 beams as found for the 7 × 7.
8. Summary and conclusions
A variety of experimental measurements and 2-D diffraction modelling are presented here to better understand the limitations of the data as well as the diffraction analysis of the complex 7 × 7 adlayer system. However, it is largely the extended Patterson map that is used to resolve the paradoxes found for 7 × 7 and to offer an explanation of why the DAS structure is found in both diffraction and favored in DFT calculations. Further theoretical work is necessary to fully resolve the detailed structure of 7 × 7. The origin of the asymmetries in some of the lower order beams seen experimental is still unclear but may not be a critical factor. Namely, if a sufficient number of higher order beams as well as the weaker beams are adequately considered in matching experimental and calculated diffraction intensities, a reliable model structure may emerge.On balance, however, the author finds that the results from this study as well as a variety of other experimental measurements9–12 favor a honeycomb based DFA model. These include (1) the identification of a forgotten surface state of the 7 × 7 and (2) its magnetic nature, (3) the occurrence of other honeycomb structures closely related to the 7 × 7, as well as (4) its insulating ground state and its temperature dependent conversion to a semimetal. Experimental measurements of the adatom height above the surface are also 0.2 Å larger than all state of the art theoretical calculations predict.9,10 In general, the overall structure of the DFA suggests unusual planar interactions within a 7 × 7 framework.
Diffraction provides another handle to understand the detailed nature of the 7 × 7 Si(111) surface. Both X-rays and transmission electron diffraction, TED, have been applied each with its particular strengths. For X-rays it is the (weak) kinematic nature of scattering, whereas TED allows many higher order beams to be measured. In the diffraction of either, the uncertainty in the scattering phases of the incident waves from the complex multi-layer 7 × 7 adlayer is one of the complicating factors. Part of this arises from the scattering angles used in these measurements and their applicability for an accurate analysis using rod projection methods. Going beyond projection rod methods is possible but difficult given the large unit cell, the multiple layers that comprise the adlayer and the complex atomic distortions possible. Diffraction fitting procedures used to compare experimental and theoretical diffraction intensities must treat all beams on an equal footing, and not overweight the higher intensity beams. As shown here, overweighting the high intensity beams from the 7 × 7 can be misleading.
Projection rod modelling of a multilayer 7 × 7 adlayer based on the structure determined in effective one electron calculations shows important differences from simpler adlayers. This multilayer modelling no longer favors the DAS model. Additional diffraction information and modelling allow one to understand what types of distortions are consistent with the observed diffraction pattern. Fourier transforms and back transforms, i.e. image reconstruction of model structures, have provided new insights as to the interference features that such a complex structure can produce. Back transforms of different diffracted beams from model structures also show the extent and limitations by which different scattered waves can define the atomic structure using both phasing and amplitude variations.
The Patterson maps as constructed from the experimental data contain both the amplitude and most importantly much of the phase information arising in diffraction. As determined from FT simulations, the diffraction features for the DFA and DAS structure have many of the same waves but differences in their phase and amplitude that can change the periodic structure when phase reconstruction is performed. The structure created depends on how many and which beams are used in reconstructing the original atomic image from these Fourier waves. Features of both structures can be found depending on which FT beams are selected from the same starting structure. The use of the most intense diffracted beams in early structural refinement methods has misrepresented the encoded phase information in the actual 7 × 7 structure. Nature basically encodes this phase information in this observed 7 × 7 pattern, which the experimentally determined Patterson map reflects.
As found in the FT simulations, adding dimers to a model will introduce new scattering phases to alter the resulting diffraction pattern. These changes reflect these new atoms. When the resolution of the experimentally derived PM is improved by using a wide range of diffracted beams, more of the encoded phase information of the actual atomic arrangement can be decoded to reveal the actual structure. This is made possible for the 7 × 7 due to its C3v and 3-fold mirror symmetries. In contrast, by assuming a DAS structure with dimers, one can indeed find a limited set of diffraction intensities that best match a DAS structure. However, this 'optimized' construct fails to reproduce the pattern of the higher order and generally weaker diffraction features, observed experimentally.
The failure of effective one electron DFT calculations to define the DFA structure (that experiment seems to favor) thereby reflects the deficiencies of such theoretical constructs to adequately represent the actual wavefunction and charge densities that define the system energy and structures. As discussed, many possibilities arise due to the approximations in DFT as well as the assumptions in the nature and form of the wavefunction as well as in the exchange-correlation functional used. A new idea described here involves differences in the z components of the ks (x,y,z) waves used in DFT that are not adequately represented in the density functional approximation. While some physical properties of systems are known to arise from such directional modification of the single particle wavefunction,65 these changes for the 7 × 7 remain to be resolved theoretically.
In addition to casting light as to which general class of structures can fit the observed 7 × 7 diffraction pattern, the characteristics of diffraction found here also lead to several modified structures that cannot be distinguished by diffraction alone. These involve missing atoms in the DAS model, distortions in the DFA model and a vacancy or contaminant in either the DAS or DFA structure. Further considerations of the detailed distortions in the PM of the experimental data suggest a nano-tiling model that is a non primitive unit cell which produces a non standard surface Brillouin zone. The ‘triad-like’ antiphased features within this tiling have features similar to a Kagomi lattice, and leads to the consideration of the 7 × 7 as a “Hexomi” lattice.
In considering diffraction there is a possibility that 7 × 7 is not an intrinsic structure but is stabilized by trace amounts of boron that arise from insipid background contamination in UHV chambers. This removal of an electron near the surface can change the unit cell from an odd electron system to an even electron system, thereby triggering changes in the structure. Such an electrically active acceptor atom may alter the energetics, stability and structure of an ‘ideal’ perfect 7 × 7 whether it be the DAS or DFA structure.
Yes, it appears that there are still many unanswered questions about the 7 × 7 surface! The implication that yet unrealized electronic interactions arise on the Si(111) surface that favor a more 2-D like structure is intriguing and potentially valuable in ultimately developing new 2-D silicon technology.
Conflicts of interest
There are no conflicts to declare.Acknowledgements
The IBM T. J. Watson Research Center and ONR are gratefully recognized for their support during the author's research career, as well as the University of Pittsburgh for library access. Also acknowledged are Ian Robinson for providing documentation of his group's unpublished 1999 work, Paul Miceli for providing unpublished 2011 X-ray data and discussions of his measurements, and Elias Vlieg for performing a conventional surface X-ray analysis of these two new data sets and for discussions of his findings.Notes and references
- K. Takayanagi, Y. Tanishiro, S. Takahashi and M. Takahashi, Surf. Sci., 1985, 164, 367 CrossRef CAS; K. Takayanagi and Y. Tanishiro, J. Microsc., 1984, 136(2), 287 CrossRef.
- J. Zhao, H. Liu, Z. Yu, R. Quhe, S. Zhou, Y. Wang, C. C. Liu, H. Zhong, N. Han, J. Lu, Y. Yao and K. Wu, Prog. Mater. Sci., 2018, 83, 24 CrossRef CAS; A. Zhao and B. Wang, APL Mater., 2020, 8, 030701 CrossRef.
- A. Molle, C. Grazianetti, Li Tao, D. Taneja, Md. Hasibul Alam and D. Akinwande, Chem. Soc. Rev., 2018, 47, 6370 RSC.
- P. Vogt, P. DePadova, C. Quaresima, J. Avila, E. Frantzeskakis, M. C. Asensio, A. Resta, B. Ealet and G. LeLay, Phys. Rev. Lett., 2012, 108, 155501 CrossRef PubMed.
- A. H. Ishida, Y. Hamamoto, Y. Morikawa, E. Minamitani, R. Arafune and N. Takagi, Prog. Surf. Sci., 2015, 90(1), 1 CrossRef CAS; N. Takagi, C. L. Lin and R. Arafune, Springer Series in Materials Science, ed. M. Spencer and T. Morishita, ch. 7, 235. Springer, Cham, 2016 CrossRef; K. Kawahara, T. Shirasawa, C. L. Lin, R. Nagao, N. Tsukahara, T. Takahashi, R. Arafune, M. Kawai and N. Takagi, Surf. Sci., 2016, 651, 70 CrossRef.
- P. De Padova, H. Feng, J. Zhuang, Z. Li, A. Generosi, B. Paci, C. Ottaviani, C. Quaresima, B. Olivieri, M. Krawiec and Y. Du, J. Phys. Chem. C, 2017, 121, 27182 CrossRef CAS; P. De Padova, A. Generosi, B. Paci, C. Ottaviani, C. Quaresima, B. Olivieri, M. Kopciuszynski, L. Zuraweh, R. Zdyb and M. Krawiec, Materials, 2019, 12, 2258 CrossRef PubMed.
- S. K. Mahatha, P. Moras, P. M. Sheverdyaeva, V. Bellini, T. O. Menteş, A. Locatelli, R. Flammini, K. Horn and C. Carbone, J. Electron Spectrosc. Relat. Phenom., 2017, 219, 2 CrossRef CAS.
- B. Lucatto, D. S. Koda, F. Bechstedt, M. Marques and L. K. Teles, Phys. Rev. B, 2019, 100, 121406 CrossRef CAS.
- J. E. Demuth, 2019, arXiv:1905.12416.
- J. E. Demuth, 2020, arXiv:2002.11113.
- J. E. Demuth, J. Phys. Chem. C, 2020, 124(41), 22435 CrossRef CAS.
- J. E. Demuth, Phys. Status Solidi B, 2020, 257, 2000229 CrossRef CAS.
- I. K. Robinson, W. K. Waskiewicz, P. H. Fuoss and L. J. Norton, Phys. Rev. B: Condens. Matter Mater. Phys., 1988, 37, 4325 CrossRef CAS PubMed.
- E. Bengu, R. Plass, L. D. Marks, T. Ichihashi, P. M. Ajayan and S. Iijima, Phys. Rev. Lett., 1996, 77, 4226 CrossRef CAS PubMed.
- T. F. Heinz, M. M. T. Loy and W. A. Thompson, Phys. Rev. Lett., 1985, 54(1), 63 CrossRef CAS PubMed.
- W. Monch, Semiconductor surfaces and interfaces, Springer series in surface science, Springer-Verlag, Berlin, 1993, vol. 26 Search PubMed.
- See ref. 15–21 in ref. 10 above.
- B. Geisler and P. Kratzer, Phys. Rev. B: Condens. Matter Mater. Phys., 2013, 88, 115433 CrossRef; B. Geisler, PhD thesis, Univ. Duisburg-Essen, Germany, 2014.
- I. K. Robinson and E. Vlieg, Surf. Sci., 1992, 261, 123 CrossRef CAS.
- I. K. Robinson, 2020, Private communication of 1999 measurements and analysis.
- P. F. Miceli, 2019–2020, Private communications; M. W. R. Gramlich, PhD thesis, University of Missouri, 2011.
- I. K. Robinson and D. J. Tweet, Rep. Prog. Phys., 1992, 55, 599 CrossRef CAS.
- R. Feidenhans'l, Surf. Sci Rep., 1989, 10, 105 CrossRef.
- G. Taylor, Acta Crystallogr., Sect. D, 2003, 59(11), 1881 CrossRef PubMed.
- Y. Liu, N. Zou, L. Zhao, X. Chen, Y. Xu and W. Duan, 2020, arXiv:2010.00224v1.
- R. E. Schlier and H. E. Farnsworth, J. Chem. Phys., 1959, 30, 917 CrossRef CAS.
- K. C. Pandey, Phys. Rev. Lett., 1981, 47, 1913 ( Phys. Rev. Lett. , 1982 , 49 , 223 ) CrossRef CAS.
- S. H. Lee and M. H. Kang, Phys. Rev. B: Condens. Matter Mater. Phys., 1996, 54, 1482 CrossRef CAS PubMed; S. H. Lee and M. H. Kang, Phys. Rev. B: Condens. Matter Mater. Phys., 1997, 55, 1903 Search PubMed; M. Rohlfing, M. Palummo, G. Onida and R. Del Sole, Phys. Rev. Lett., 2000, 85, 5440 CrossRef PubMed.
- G. Binnig, H. Rohrer, C. Gerber and E. Weibel, Phys. Rev. Lett., 1983, 50, 120 CrossRef CAS.
- P. H. Fouss and I. K. Robinson, Nucl. Instrum. Methods Phys. Res., 1984, 222, 171 CrossRef.
- E. Vlieg, A. van’t Ent, A. P. Jongh, H. Neerings and J. F. Van der Veen, Nucl. Instrum. Methods Phys. Res., Sect. A, 1987, 262, 522 CrossRef.
- M. Ladd and R. Palmer, Structure Determination by X-ray Crystallography, Springer, Boston, MA, 1977 Search PubMed.
- M. Horn-von Hagen, Z. Kristallogr., 1999, 214, 591 Search PubMed.
- M. V. Laue, Ann. Phys., 1936, 26, 55 CrossRef.
- H. Huang, S. Y. Tong, W. E. Packard and M. B. Webb, Phys. Lett. A, 1988, 130(3), 166 CrossRef CAS.
- E. Zanazzi and F. Jona, Surf. Sci., 1977, 62, 61 CrossRef CAS.
- M. J. Cardillo and G. E. Becker, Phys Rev. Lett., 1979, 42, 508 CrossRef CAS; G. Lange, J. P. Toennies, P. Ruggerone and G. Benedek, Europhys. Lett., 1998, 41, 647 CrossRef.
- A. Kawasuso, Y. Fukaya, K. Hayashi, M. Mackawa, S. Okada and A. Ichimiya, Phys. Rev. B: Condens. Matter Mater. Phys., 2003, 68, 241313(R) CrossRef.
- A. S. Disa, F. J. Walker and C. H. Ahn, Adv. Mater. Interfaces, 2020, 7, 1901772 CrossRef.
- J. E. Demuth, U. Koehler, R. J. Hamers and P. Kaplan, Phys. Rev. Lett., 1989, 62, 641 CrossRef CAS PubMed.
- J. E. Demuth, R. J. Hamers and R. M. Tromp, Solvay Conference on Surface Science, ed. F. W. deWelte, Springer Series in Surface Science, Springer, NY, 1988, vol. 14, p. 320 Search PubMed.
- P. Avouris and I.-W. Lyo, Surf. Sci., 1991, 242, 1 CrossRef CAS.
- Diffraction peak intensities illustrated as circles lead to visually underestimating the differences in their intensities due to how our visual cortex interprets relative sizes. A line scan of this same data in the 〈0k〉 direction normalized to the (0 3/7) beam shown in Fig. 8 indicates how dramatically these intensities differ from those visually perceived.
- R. D. Twesten and J. M. Gibson, Ultramicroscopy, 1994, 53, 223 CrossRef CAS; C. J. Gilmore, L. D. Marks, D. Grozea, C. Collazo, E. Landree and R. D. Twesten, Surf. Sci., 1997, 381, 7791 CrossRef.
- I. K. Robinson and S. K. Ghose, (∼1998), Abstract No. Ghos0215, Symmetry Breaking in the Si (111) 7 × 7 Structure, Brookhaven National Lab, National Light Sources User's Meeting.
- E. Vlieg, Private communication, 2019.
- D. S. Kim, O. Hellman, J. Herriman, H. L. Smith, J. Y. Y. Lin, N. Shulumba, J. L. Niedziela, C. W. Li, D. L. Abernathy and B. Fultz, Proc. Natl. Acad. Sci. U. S. A., 2018, 15(9), 1992 CrossRef PubMed.
- Unpublished STM images from the author, 1987–1990.
- P. J. Rous, J. B. Pendry, D. K. Saldin, K. Hienz and N. Bickel, Phys. Rev. Lett., 1986, 57, 2951 CrossRef CAS.
- M. A. Lutz and R. M. Feenstra, Phys. Rev. B: Condens. Matter Mater. Phys., 1990, 42(8), 5391 CrossRef PubMed.
- R. M. Feenstra and M. A. Lutz, J. Vac. Sci. Technol., B: Nanotechnol. Microelectron.: Mater., Process., Meas., Phenom., 1991, 9, 716 CrossRef CAS.
- R. I. G. Uhrberg, E. Landemark and L. S. O. Johansson, Phys. Rev. B: Condens. Matter Mater. Phys., 1989, 39, 13525 CrossRef CAS PubMed.
- Z. Li, J. Zhuang, L. Wang, H. Feng, Q. Gao, X. Xu, W. Hao, X. Wang, C. Shang, K. Wu, S. X. Dou, L. Chen, Z. Hu and Y. Du, Sci. Adv., 2018, EAAU4511, 1 Search PubMed.
- R. Losio, K. N. Altmann and F. J. Himpsel, Phys. Rev. B: Condens. Matter Mater. Phys., 2000, 61, 10845 CrossRef CAS.
- W. Steurer, Z. Kristallogr., 2004, 219, 391 CAS.
- R. B. Doak and D. B. Nguyen, Phys. Rev. B: Condens. Matter Mater. Phys., 1989, 40, 1495 CrossRef CAS PubMed.
- J. Zegenhagen, E. Fontes, F. Grey and J. R. Patel, Phys. Rev. B: Condens. Matter Mater. Phys., 1992, 46, 1860 CrossRef CAS PubMed.
- J. Zegenhagen, M. S. Hybertsen, P. R. Freelans and J. R. Patel, Phys. Rev. B: Condens. Matter Mater. Phys., 1988, 38, 7885 CrossRef CAS PubMed.
- R. J. Wilson, S. Chiang and F. Salvan, Phys. Rev. B: Condens. Matter Mater. Phys., 1988, 38, 12696(R) CrossRef PubMed.
- B. Feng, S. Fu and S. Kasamatsu, et al. , Nat. Commun., 2017, 8, 1007 CrossRef PubMed.
- H.-J. Neff, I. Matsuda, M. Hengsberger, F. Baumberger, T. Greber and J. Osterwalder, Phys. Rev. B: Condens. Matter Mater. Phys., 2001, 64, 235415 CrossRef.
- M. Cameau, R. Yukawa, C.-H. Chen, A. Huang, S. Ito, R. Ishibiki, K. Horiba, Y. Obata, T. Kondo, H. Kumigashira, H.-T. Jeng, M. D'angelo and I. Matsuda, Phys. Rev. Mater., 2019, 3, 044004 CrossRef CAS.
- E. Vlieg, Private communication, 2020.
- S. Modesti, P. M. Sheverdyaeva, P. Moras, C. Carbone, M. Caputo, M. Marsi, E. Tosatti and G. Profeta, Phys. Rev. B, 2020, 102, 035429 CrossRef CAS.
- M. Rohlfing, Phys. Rev. B: Condens. Matter Mater. Phys., 2010, 82, 205127 CrossRef.
- M. Liehr, M. Renier, R. A. Wachnik and G. S. Scilla, J. Appl. Phys., 1987, 61, 4619 CrossRef CAS.
- H. M. Zhang, K. Sakamoto, G. V. Hansson and R. I. G. Uhrberg, Phys. Rev. B: Condens. Matter Mater. Phys., 2008, 78, 035318 CrossRef.
- J. E. Demuth, U. Koehler and R. L. Hamers, J. Vac. Sci. Technol., 1909, A8(1), 214 Search PubMed.
| This journal is © the Owner Societies 2021 |