
 Open Access Article
 This Open Access Article is licensed under a Creative Commons Attribution-Non Commercial 3.0 Unported Licence
A microfluidic device for TEM sample preparation†
Janosch
Hauser
 a,
Gustaf
Kylberg
b,
Mathieu
Colomb-Delsuc
b,
Göran
Stemme
a,
Ida-Maria
Sintorn
*b and
Niclas
Roxhed
*a
a,
Gustaf
Kylberg
b,
Mathieu
Colomb-Delsuc
b,
Göran
Stemme
a,
Ida-Maria
Sintorn
*b and
Niclas
Roxhed
*a
aDivision of Micro and Nanosystems, KTH Royal Institute of Technology, 10044 Stockholm, Sweden. E-mail: roxhed@kth.se
bVironova AB, 11364 Stockholm, Sweden. E-mail: ida.sintorn@vironova.com
First published on 9th October 2020
Abstract
Transmission electron microscopy (TEM) allows for visualizing and analyzing viral particles and has become a vital tool for the development of vaccines and biopharmaceuticals. However, appropriate TEM sample preparation is typically done manually which introduces operator-based dependencies and can lead to unreliable results. Here, we present a capillary-driven microfluidic single-use device that prepares a TEM grid with minimal and non-critical user interaction. The user only initiates the sample preparation process, waits for about one minute and then collects the TEM grid, ready for imaging. Using Adeno-associated virus (AAV) particles as the sample and NanoVan® as the stain, we demonstrate microfluidic consistency and show that the sample preparation quality is sufficient for automated image analysis. We further demonstrate the versatility of the microfluidic device by preparing two protein complexes for TEM investigations using two different stain types. The presented TEM sample preparation concept could alleviate the problems associated with human inconsistency in manual preparation protocols and allow for non-specialists to prepare TEM samples.
Introduction
nsTEM (negative stain transmission electron microscopy) is widely used in the characterization of biological particles and in the development of vaccines and pharmaceuticals.1 The main advantage over bio-chemical characterization techniques is the possibility to directly visualize the sample of interest.2 This allows determination of, for example, the cell morphology3 or to identify the virus family of a pathogenic organism. In nsTEM the image contrast is achieved through a heavy metal stain solution (uranyl acetate, phosphotungstic acid, etc.) that embeds the particles of interest. When imaged using TEM, the stain scatters more electrons than the particles. This results in an image where the particles appear bright on a dark background with a resolution in the order of a few nanometers.4 Conventionally, TEM grids are prepared following a manual preparation protocol. This involves pipetting 3–5 μl of the sample liquid onto a TEM grid and letting it adsorb for around 10–60 s, depending on the specimen.5,6 Then, the excess sample is manually blotted off the grid, using blotting paper. Immediately after blotting the sample, 3–5 μl of an aqueous stain solution is added to the grid.6 The excess stain is then blotted off, ideally leaving a uniform thin layer of stain liquid covering the adsorbed specimen. This thin film is left to dry,7 embedding the specimen for TEM imaging and protecting it from dehydration.4 The problem is that this manual procedure is highly dependent on the skill of the operator which can affect the preparation consistency and lead to unreliable results.8,9 In particular inconsistent timings of the manual steps and the final blotting are causes for bad TEM grid preparations. Hence, there is a need for an nsTEM sample preparation method that minimizes user interactions and makes the preparation steps more consistent. Alternative methods to obtain a consistent nsTEM sample preparation employ contact pin-printing techniques where pipetting robots automatically dispense liquids onto the TEM grid.5,10–13 These approaches have some advantages over the manual preparation, such as reduction of liquid volumes and the possibility for automation. However, they require special instrumentation and are significantly more complex and time-consuming than the manual preparation protocol.6 Mukhitov et al. proposed a microfluidic device for nsTEM grid preparation.9 The TEM grid is confined in a microfluidic channel and the liquid handling for sample preparation is controlled by an external pressure pump. While this improves the preparation consistency over manual preparations, the approach requires significantly more liquid volume than the manual procedure, and special equipment, and involves the user to control the timing of every preparation step.Here, we present a capillary-driven microfluidic device that requires the same small liquid volumes as the manual procedure and prepares a TEM grid with minimal user interaction. The user only initiates the sample preparation process, waits for about one minute and then extracts the TEM grid, ready for imaging. The autonomous process is enabled by a water-soluble PVA (polyvinyl alcohol) film, as demonstrated previously,14,15 that automatically controls the time for sample adsorption and blotting. We demonstrate microfluidic consistency for five microfluidic devices by comparing the timing and duration of the microfluidic TEM grid preparation events. Furthermore, we investigated the adjustability of the time-delay with 15 devices using three different thicknesses of the water-soluble film (12 μm, 24 μm, and 36 μm). We examined sample preparation consistency by imaging five TEM grids prepared with the device using AAV (Adeno-associated virus) particles as the sample and methylamine vanadate (NanoVan®) as the stain. A particle detection script, extracting morphological information such as the average particle size, was run on 45 microscopy images per grid to investigate whether the images are suitable for automated image analysis.
Working principle and device design
The device is designed by adapting the sample preparation steps of the manual procedure and replacing user interactions by automated, capillary-driven microfluidic events. The device is intended for single use and does not require special instrumentation. The key elements of the device are depicted in the cross-sectional illustration shown in Fig. 1a and in the top view shown in Fig. 1b. The device consists of a stain reservoir, a grid chamber, and a blotting unit. The key function of the stain reservoir is to contain the stain liquid until the user adds the sample liquid. A key enabling feature is a pinning edge, as indicated in Fig. 1a and b, that separates the stain reservoir from the grid chamber. The stain is pinned at the pinning edge due to capillary forces, thus enabling the sample preparation process to be initiated by sample addition. The grid chamber contains the TEM grid and is connected to the stain reservoir upstream of the grid and to the blotting unit downstream of the grid. The grid is fixated using a low-tack adhesive at the backside grid perimeter. The cavity below the grid makes sure that no liquid reaches the backside of the grid, which otherwise could lead to TEM imaging artifacts. The top opening in the grid chamber serves as the sample inlet and ensures fast drying of the thin stain film after blotting. The opening is slightly smaller than the TEM grid, leaving an overlap between the top hydrophilic layer and the grid. This overlap ensures that the sample reliably connects with the preloaded stain and the blotting unit. The blotting unit is formed by a stack of two papers and a water-soluble PVA film, as indicated in Fig. 1a. PVA is soluble in water but typically insoluble in organic solvents, hence the current design is limited to aqueous samples. However, as biological specimens are typically prepared in aqueous solution, PVA is particularly suited for this type of application. The top paper (paper 1) provides a stable connection between the grid chamber and the PVA layer. A vent above the top paper ensures that no air is trapped, which could block the blotting process. The dissolving time of the PVA layer controls the adsorption time of the sample on the TEM grid. The staining time is not controlled by the PVA layer. Blotting is triggered when the PVA layer is dissolved and the liquid reaches the second paper (paper 2). The high capillary force of the second paper leads to fast absorption of the liquid volume contained in the device. After the sample preparation, the flap, as illustrated in Fig. 1a and b, can be peeled off to collect the grid. Besides grid collection, the flap could allow the user to introduce a grid of choice before the preparation procedure or to have the grid preloaded in the device.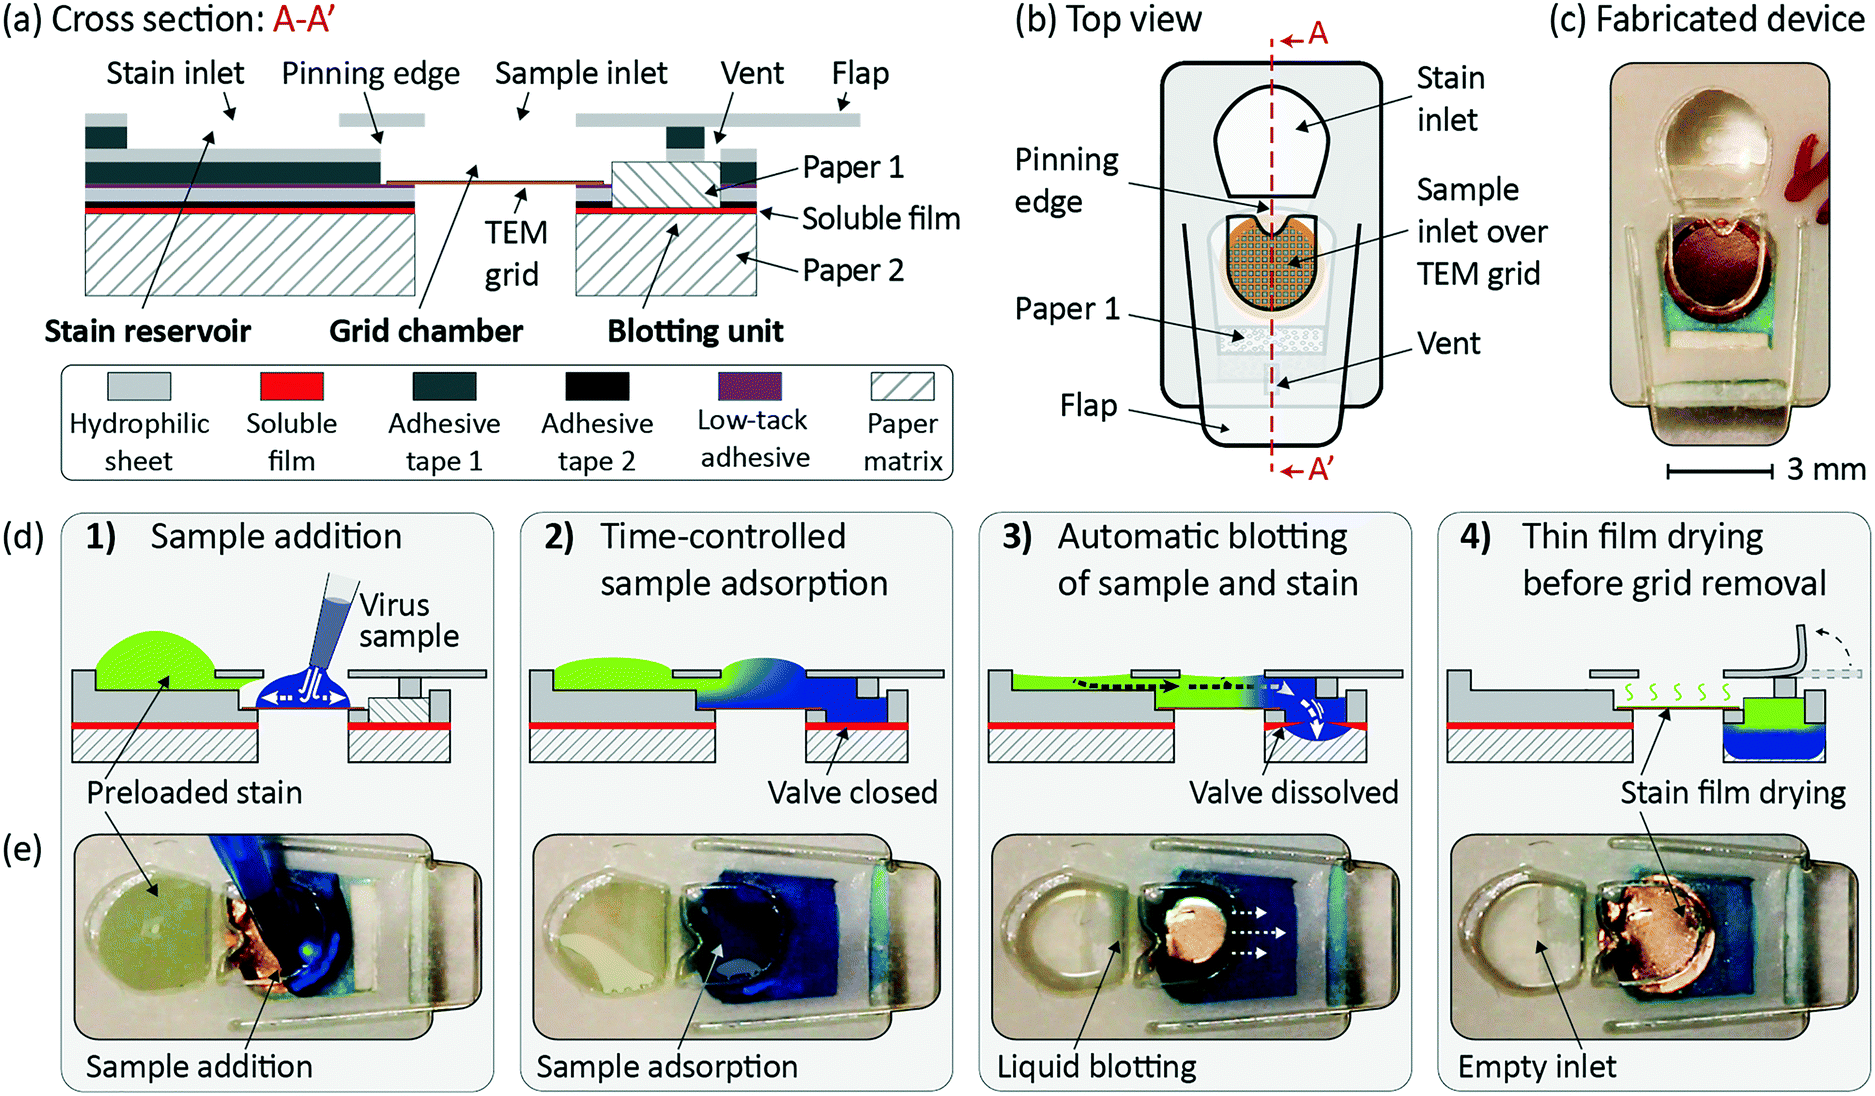 | ||
| Fig. 1 (a) A schematic cross-sectional view, indicating the laminated materials; (b) a schematic top view and (c) a picture of the microfluidic device for hands-off TEM grid preparation. The dimensions of the device are 6 × 12 mm2. (d) The TEM grid preparation sequence as a series of schematics of the device cross-section and (e) corresponding frames from a movie (top view), where colour dyes are used to visualize the steps of the microfluidic TEM grid preparation: 1) adding the virus sample starts the process, connecting to the preloaded stain upstream of the grid and to the blotting paper with the closed dissolvable valve downstream of the grid. 2) The sample adsorbs to the TEM grid as long as the dissolvable valve is closed. 3) Blotting starts when the valve is dissolved, purging both the sample and stain. 4) The remaining thin stain film dries and embeds the virus particles. The flap is peeled off for grid extraction. | ||
Fig. 1d indicates the TEM grid preparation sequence (device cross-section). Fig. 1e shows the corresponding frames from a video sequence of a device used with color dyes (top view). Fig. 1d, step 1 shows how adding the sample initiates the autonomous preparation process. The sample covers the TEM grid and connects to the preloaded stain upstream of the grid and to the blotting paper downstream of the grid. This starts the time-controlled sample adsorption step (Fig. 1d, step 2). The sample covers the TEM grid while a dissolvable valve, separating two layers of blotting paper, is closed. Once this valve is dissolved, both the sample and stain are autonomously blotted by the blotting paper as indicated in Fig. 1d, step 3. Finally, the remaining thin stain film dries and embeds the sample particles (Fig. 1d, step 4). The grid is then ready for imaging and can easily be retrieved by peeling off the flap and extracting it with a pair of tweezers.
Experimental
Materials
The microfluidic device consists of several layers of different materials, as indicated in Fig. 1a. It was fabricated from hydrophilic sheets (type C laser printing transparency, Xerox, Elmstock, UK), adhesive tape 1 (64620, Tesa, Norderstedt, Germany) and adhesive tape 2 (300LSE, 3M, VWR, Spånga, Sweden). Low-tack adhesive tape (Scotch® 928, 3M, Amazon, Koblenz, Germany) was used to fixate the 400 mesh TEM grids (01754-F, Ted Pella Inc., Redding, CA) which are formvar coated copper grids with a continuous carbon film. Ahlstrom grade 238 and 222 (Ahlstrom Filtration LLC, Mt. Holly Springs, PA) were used as paper 1 and paper 2 in the blotting unit, respectively. The soluble film was fabricated from granular PVA (360627, Sigma-Aldrich, St. Louis, MO). AAV (adeno-associated virus) particles, serotype 2 (AAV2) encapsulated with Cytomegalovirus (CMV) promoter-driven expression of Green Fluorescent Protein (GFP), with a stock concentration of 1 × 10¹³ gc mL−1 (CV10004-50UL, AMS Biotechnology Ltd., Abingdon, UK) was used as the sample. The AAV sample was diluted with phosphate-buffered saline (PBS, 14190-094, Thermo- Fisher, Uppsala, Sweden) to a concentration of 1 × 10¹² gc mL−1. 26S proteasome (#: E-350, BostonBiochem, Cambridge, MA), with a concentration of 0.01 mg ml−1 in PBS, was used as a test sample representing a large globular protein complex. The sample with protein fibrils from whey protein isolate (WPI),16 with a concentration of 0.5 mg ml−1 in deionized water, was a gift from the Division of Applied Physical Chemistry at the Royal Institute of Technology in Stockholm, Sweden. NanoVan®, 2% methylamine vanadate in solution, (#2011-5ML, Nanoprobes, Yaphank, NY) and uranyl acetate 2% in solution (#2240-2, Electron Microscopy Sciences, Hatfield, PA) were used as stains. Aqueous solutions of food color dyes (EAN-codes: 5701073064665 and 5701073064672, Dr. Oetker, Coop, Solna, Sweden) were used as models for the sample and stain.Device fabrication
The devices were fabricated using lamination technology where the device is formed by stacking several layers of different materials, as described previously.17,18 The cross section in Fig. 1a shows the different layers. The thicknesses of these layers are listed in Table S1 in the ESI.† The adhesives and the hydrophilic sheets were structured using a cutting plotter (CE6000, Graphtec America Inc., Irvine, CA).The PVA film was fabricated, as previously reported,17,18 from an aqueous solution of 20 wt% of granular PVA. Using a thin-film applicator (4340, Elcometer, Manchester, UK) the PVA films were uniformly transferred to laminating pouches (3385694, Office Depot, LA Venlo, Netherlands) and dried at room temperature. The final PVA film thickness was measured using a thickness gauge with 1 μm graduation (2109L Metric Dial Gauge, Mitutoyo, Upplands Väsby, Sweden).
The PVA film was laminated onto paper 2 at 85 °C using a laminator (Heat Seal Pro H600, GBC, Northbrook, IL). The paper-PVA laminates were kept in a humidity chamber at 80% relative humidity until 30 minutes before use.
The paper materials, including the paper-PVA laminate, were cut by a laser cutter (VLS 2.30, Universal Laser Systems, Vienna, Austria). After structuring, the layers were assembled using alignment pins and laminated at room temperature. For improved particle adhesion3 the TEM grids were glow discharged in oxygen plasma with a PELCO easiGlow™ (91000S-230, Ted Pella Inc., Redding, CA) before fully assembling the microfluidic device. A fully assembled microfluidic device is shown in Fig. 1c. The dimensions of the device are 6 × 12 mm2. The devices were used within one hour after glow discharging the TEM grids.
Device operation
The microfluidic device is designed to minimize user interactions. To demonstrate the autonomous device operation and microfluidic consistency we evaluated six devices. Five devices were used with AAV particles as the sample and NanoVan® as the stain. The grids from these five devices were used to collect TEM images for automated image analysis on a total of 225 images. To better visualize the individual preparation steps of the microfluidic device, one device was used with color dye solutions. The blue dye solution and yellow dye solution were used as models for the sample and stain, respectively. First, 5 μl of stain was added to the stain inlet. Then, the autonomous TEM grid preparation mechanism was triggered by adding 5 μl of sample to the sample inlet.The TEM grid preparation sequence of all devices was recorded with a camera with a frame rate of 50 frames per second. A typical preparation sequence is shown in the ESI† video. To analyze the device performance and consistency of the autonomous preparation steps, we manually obtained the time interval of each step. The time between stain and sample addition is defined as the stain preloading time. To demonstrate the robustness of the stain reservoir, i.e. stain confinement without leakage, the time between stain and sample addition was varied between 20 and 60 s. As illustrated in Fig. 1d, the microfluidic TEM grid preparation steps after sample addition include sample adsorption, blotting and thin film drying. The adsorption time of the sample on the TEM grid corresponds to the dissolving time of the PVA film. It is defined as the time between wetting of paper 1 and the start of the blotting event. Here, the PVA layer thickness was 10 μm. The blotting time is the interval between the start and the end of the blotting event. The start of the blotting event is defined as the moment when the liquid first moves. The end of the blotting event is defined as the moment when the bulk of liquid is drained by the blotting unit, leaving a thin stain film on the TEM grid. After this, the drying interval starts and lasts until the remaining thin film of stain is visually dry.
Adjustability of adsorption time
TEM imaging is a powerful visualization technique for many different types of samples. However, the required sample adsorption time varies between different samples. The main reason for this is that sample adsorption depends on the interaction between the sample and the carbon surface of the TEM grid.11 Hence, devices with different adsorption times to account for different sample requirements would be desirable.A key element of the presented microfluidic device is the water-soluble PVA film that autonomously controls the device timing, where the dissolving time of the PVA film corresponds to the sample adsorption time. To demonstrate the adjustability of the adsorption time we fabricated and investigated microfluidic devices with three different thicknesses of the water-soluble film (12 μm, 24 μm and 36 μm). Among the parameters that affect the dissolving time (e.g. temperature, relative humidity), the thickness of the dissolvable film is one of the easiest to tune. The PVA thicknesses of 24 μm and 36 μm were achieved by stacking multiple layers of 12 μm PVA sheets and laminating them to paper 2 at 85 °C with the laminator. The paper–PVA laminates were kept in a humidity chamber at 80% relative humidity until 30 minutes before use. We evaluated the adsorption time of 15 devices, five devices per film thickness, using 5 μl of blue dye solution and 5 μl of yellow dye solution as a model for the sample and stain, respectively.
Electron microscopy and particle detection
To assess the sample preparation quality, we performed TEM imaging on the five TEM grids prepared with AAV particles as the sample and NanoVan® as the stain. NanoVan® was chosen because it is not radioactive, unlike the commonly used uranyl acetate, and can be handled in an ordinary laboratory. For all five grids, we investigated whether AAVs were successfully adsorbed onto the TEM grid and sufficiently embedded in the stain. We inspected the AAV particles at different magnification levels, with a field of view (FOV) between 16 μm and 500 nm. The imaging was performed on MiniTEM™ microscopes (Vironova AB, Stockholm, Sweden) with an operating voltage of 25 kV.To investigate if the obtained TEM images are useful for automated image analysis, we applied a particle detection script to the TEM images of the five autonomously prepared grids. We collected a total of 225 images according to the imaging scheme shown in Fig. 3a. At low magnification, the user manually chose five non-neighboring grid squares. Then, nine high magnification images were acquired per grid square at a FOV of 2 μm, resulting in 45 images per grid. At this magnification, where a pixel represents approximately 1 nm, a number of particles per image can usually be seen and the morphology of the AAVs is typically visible. Grid 1, grid 4 and grid 5 were imaged on the same microscope, while grid 2 and grid 3 were imaged on a second microscope. We applied the particle detection script (ESI,† Fig. S1) to all 225 images. AAVs have an icosahedral capsid that appears round and has an expected diameter of 20–25 nm.19 However, the script was designed to detect the stain envelope around the AAV particles so that the particles appear larger than the actual virus size. Therefore, the particle detection script was set to detect round objects within a diameter range of 24 nm to 32 nm. From the automated image analysis, we obtained the amount of detected particles per grid, where each detected particle is characterized by its position and size.
To quantify the particle detection results we performed manual particle detection on a subset of 25 of the images, with five randomly chosen images per TEM grid. We manually counted the number of particles and compared them with the results from the detection script. This allowed us to find the ratio of true and false positives, both important measures for the performance of the detection script.
TEM preparation of other sample types
nsTEM is routinely used as a quality control during the preparation of biological specimens, e.g. protein complexes, for structural biology. To investigate the potential use of the microfluidic device for wider applications we prepared and imaged proteasomes, as a larger globular protein complex, and protein fibrils from WPI, as a filamentous protein. The PVA films in the used microfluidic devices had a thickness of 15 μm, corresponding to a dissolving time of around 35 s. To investigate the possibility of using different stain types, we used stock solution of uranyl acetate and NanoVan® for the proteasomes and fibrils, respectively.Results and discussion
Device operation
The TEM grid preparation sequence is shown in Fig. 1e. For visibility, colored dye solutions were used instead of sample and stain solutions. The first step shows how a preloaded stain (yellow dye solution) is contained in the stain reservoir and the sample (blue dye solution) is added (Fig. 1e, step 1). In the second step, the sample covers the TEM grid as long as the PVA valve is closed (Fig. 1e, step 2). When the PVA valve has dissolved, the liquids are blotted (Fig. 1e, step 3). Finally, the bulk of liquids is contained in the blotting paper and the stain film dries (Fig. 1e, step 4). Compared to a previously reported microfluidic TEM grid preparation,9 we have reduced the user interactions by providing an autonomous microfluidic operation, controlled by a water-soluble PVA film. Furthermore, we demonstrate a significantly lower liquid consumption with liquid volumes as small as in manual preparation protocols.5,6To demonstrate microfluidic consistency, we analyzed video recordings with respect to timing and duration of the microfluidic events on the five devices used with AAVs as the sample and NanoVan® as the stain. Fig. 2a presents a bar chart with the time intervals for each of the four sample preparation steps. The results show that regardless of the length of the stain preloading time, all following steps, adsorption, blotting and drying, are close to identical for the five devices. This demonstrates that the stain reservoir reliably contains the stain until the sample is added, irrespective of the stain preloading time. The average adsorption time for the five devices is 10.6 ± 0.3 s, corresponding to a CV of 3%. This indicates a highly consistent autonomous time-control of the microfluidic device. The average blotting time is 0.8 ± 0.1 s, corresponding to a CV of 12.5%. While the CV seems high, the absolute deviation is low and speaks to the microfluidic consistency. The drying does not end abruptly which makes it difficult to measure the exact drying interval from videos. However, it was observed that all the TEM grids were visually dry within one minute. The reliable and fast drying is enabled by the grid area sized top opening in the grid chamber.
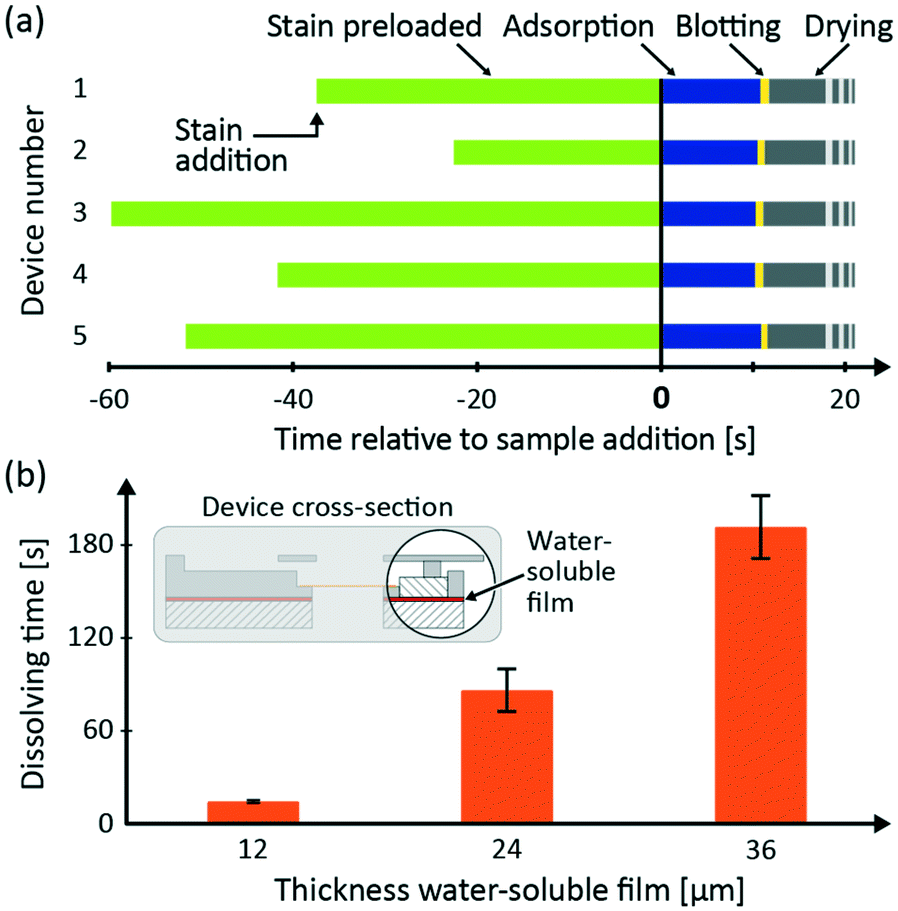 | ||
| Fig. 2 (a) The microfluidic timing results for five different devices, showing the times for stain preloading (time between stain and sample addition), adsorption time, blotting time and drying time. The devices were used with AAV particles as the sample and NanoVan® as the stain. The autonomous TEM grid preparation starts with the sample addition. (b) Measurements showing the average dissolving time of the water-soluble layer in the blotting unit at three different layer thicknesses (12 μm, 24 μm and 36 μm). Each bar represents the average of five individual measurements and the error bars indicate the standard deviation. The dissolving time increases with layer thickness and ranges between 14 s (12 μm) and 190 s (36 μm). | ||
The results show that the microfluidic device works as intended. Irrespective of the stain preloading time, the autonomous TEM grid preparation sequence is close to identical for five devices, demonstrating high microfluidic consistency.
Adjustability of adsorption time
To demonstrate the adjustability of the sample adsorption time, which corresponds to the PVA dissolving time, we tested three different thicknesses (12 μm, 24 μm and 36 μm) of the water-soluble PVA film in the microfluidic device. Fig. 2b shows the measurement results of the adsorption time. The dissolving time increases with PVA film thickness. For 12 μm, 24 μm and 36 μm the average dissolving time is 14.4 ± 0.9 s (n = 5), 89.9 ± 12.0 s (n = 5) and 191.6 ± 20.3 s (n = 5), respectively. The results show that it is possible to easily adjust the adsorption time by changing the PVA thickness. The variation of dissolving time increases with increasing PVA film thickness. This could be due to small differences in the PVA film thickness between different devices. However, the variation is low enough to conclude that the adsorption times can be controlled by the design of the PVA layer.Electron microscopy and particle detection
TEM imaging of the five TEM grids prepared with AAVs allowed us to assess the sample preparation quality. Fig. 3b shows a magnification series with three FOVs: 16 μm, 2 μm, and 500 nm. In the largest FOV (16 μm) the AAV particles appear as dark spots. The intermediate FOV (2 μm) shows a higher level of detail. The particles are visible as bright, round objects encircled by dark rings with a radially fading stain gradient. The smallest FOV (500 nm) in this series has the highest level of detail and provides a close-up view of the AAV particles. Fig. 3c shows one exemplary image from each of the five grids (FOV 2 μm). We found that all five TEM grids contain well embedded particles, visible as bright spots surrounded by dark stain envelopes. Variations in the appearance of the stain envelope might be due to the local variations of stain thickness. Also, thickness variations of the TEM grid, e.g. caused by local inhomogeneities of the carbon film, can result in variations of the image darkness. Overall, the results from the five microfluidic devices showed consistent sample preparation with well embedded AAV particles.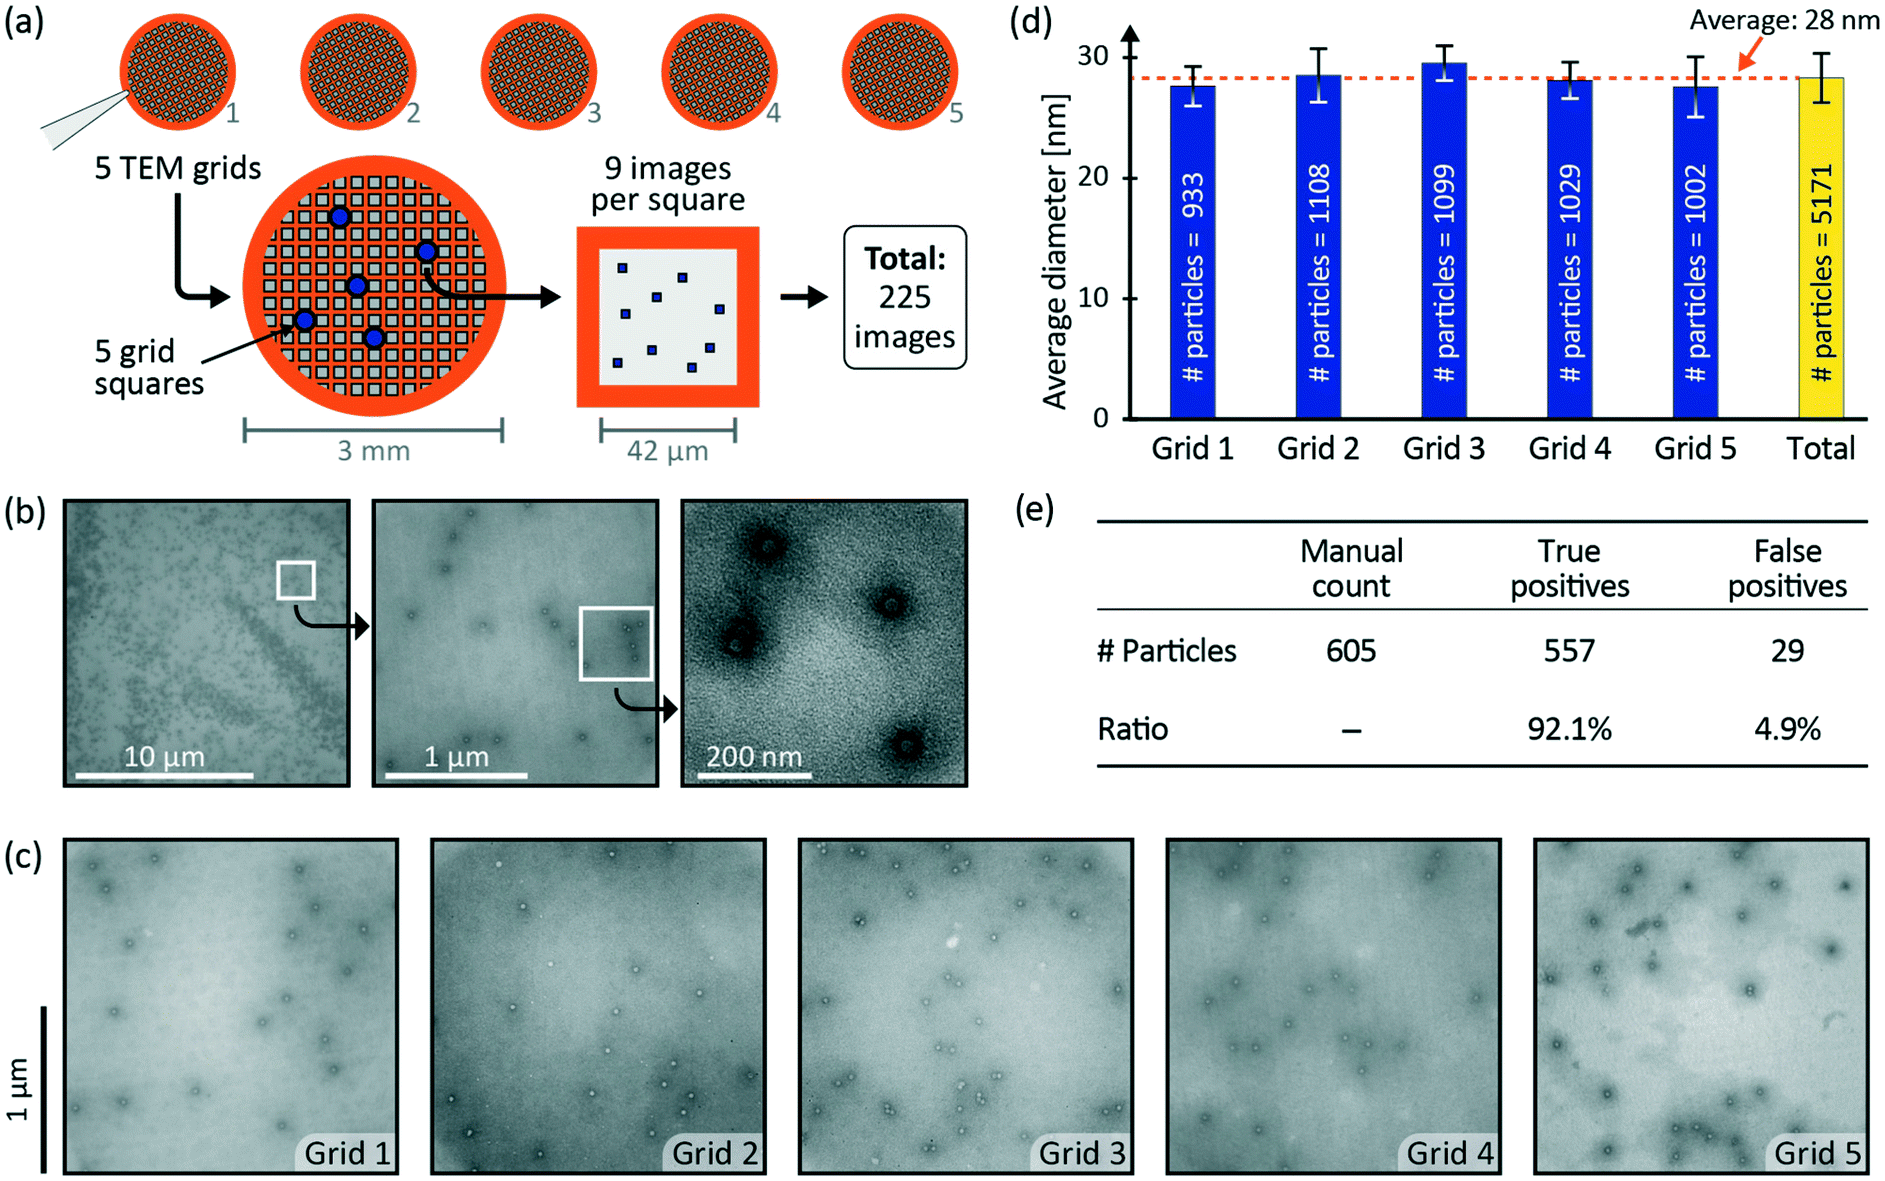 | ||
| Fig. 3 (a) The imaging scheme with five grids, five grid squares per grid and nine images per grid square results in 225 images. (b) A magnification series (field of view: 16 μm, 2 μm and 500 nm) of TEM grids prepared by the microfluidic device showing embedded AAV particles. (c) A typical example image for each of the five grids prepared by the microfluidic device shows successfully embedded AAV particles. (d) The average particle diameter for the five different grids and the total particle count, as obtained using the particle detection script. Each bar represents the average of the respective detected particle amount and the error bars indicate the standard deviation. (e) The result of the manual subset testing with five images per grid gives the ratio of true and false positives. | ||
To further demonstrate sample preparation consistency, we collected 225 TEM images and performed automated particle detection. The particle detection script (ESI,† Fig. S1) detected 5171 particles in all 225 images. Every grid, with 45 images, contained an average of 1034 ± 65 particles, corresponding to a CV of 6%. This indicates a reproducible and consistent AAV particle spreading over five independently prepared TEM grids. Using the results of the automated particle detection, we extracted the detected size of the particles. Fig. 3d shows the average particle diameter for the detected particles in each grid. Two different microscopes were used and even though the calibrations might be slightly different, the average particle size for each grid is well within the error bars of the other samples. The average size of all detected particles is 28 ± 2 nm (n = 5171), corresponding to a CV of 7%. This low variation means that, irrespective of the grid, all detected particles have a similar detected size. The real size of AAV particles is 20–25 nm but appears larger when imaged in nsTEM due to the stain envelope. The detection script is designed to outline and measure particles at the stain layer, i.e. outside the actual particle. Therefore, the detected particle size is well within the expected size window.
The result of the manual particle detection in a subset of 25 images allowed quantification of the automated detection results. Fig. 3e summarizes the results of the subset test. The manual count resulted in 605 particles in the subset. The automated particle script found 557 of these particles correctly (true positives), which corresponds to a success rate of 92%. The script found 29 objects that were not correct (false positives), which corresponds to 4.9%. With true positives above 90% and false positives around 5%, we conclude that the images and the autonomous sample preparation have sufficient quality for simple automated image analysis.
TEM preparation of other sample types
To demonstrate the potential of wider applications we prepared and imaged proteasomes and protein fibrils from WPI. The results of those two samples, presented in Fig. 4, reveal an even spreading of the proteins on the TEM grid with well-embedded areas suitable for TEM investigations. The analysis of the proteasome specimen (Fig. 4a) shows that individual proteasomes can clearly be identified, and structural features such as details of the subunits can be distinguished.20 Different projections can be observed on the images, with the top view appearing as a circular particle and the side view appearing rectangular. The analysis of the WPI fibrils (Fig. 4b) allows the observation and characterization of well-defined individual fibrils of various lengths. Overall, the morphological observations are in line with reported data of similar samples prepared with conventional manual nsTEM.21–23 The preparation of these two protein samples did not require further adjustments of the microfluidic device, hence demonstrating the versatility and robustness of the method.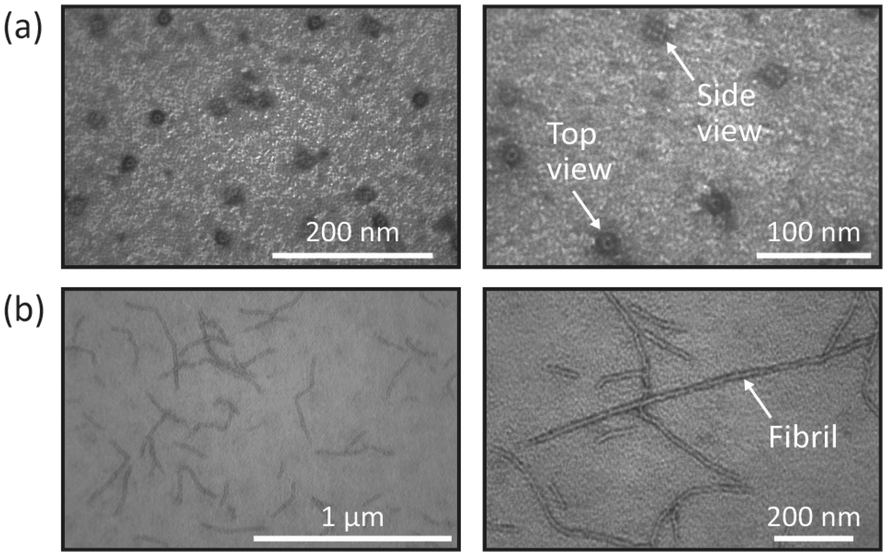 | ||
| Fig. 4 (a) Images of the 26S proteasomes at two different magnifications. Top view and side view of the proteasomes can be observed. (b) Images of WPI fibrils at two different magnifications. | ||
Conclusions
A capillary-driven single-use device for TEM sample preparation was presented. To avoid operator bias and error-prone manual steps, the device is designed to minimize user interactions. The key design elements are a stain reservoir and a water-soluble valve. These enable starting an autonomous TEM grid preparation with only one non-critical user interaction. We demonstrated device consistency for both the microfluidic performance and the sample preparation quality. The consistency of the microfluidic performance was shown by five microfluidic devices with close to identical TEM grid preparation sequences. The sample preparation consistency was demonstrated by five TEM grids that all exhibit well embedded AAV particles. This preparation consistency was further highlighted by the results of the automated particle detection. From a subset test with true positives above 90% and false positives around 5%, we conclude that the images and the autonomous sample preparation hold sufficient quality for image analysis. The additional preparation of two protein samples demonstrated the versatility of the microfluidic device for a wider scope of applications regarding both sample types and stains. Furthermore, we demonstrated the adjustability of timing of the microfluidic events by changing the thickness of the water-soluble valve. This allows accounting for different sample adsorption requirements. Relevant future work includes integration of a washing step between the sample and stain. Such a washing step is required for certain sample-stain combinations or needed when sample buffer components need to be washed off.6 To account for TEM sample preparation requiring different staining times, the device could be extended using a second blotting unit. In conclusion, the demonstrated microfluidic device presents a promising solution to alleviate the problems associated with human inconsistency in manual TEM grid preparations.Author contributions
JH, GS, NR, and IMS conceived the original idea. JH, GS, and NR designed and developed the microfluidic device. JH, NR, GK, MCD and IMS planned the TEM grid preparation experiments. JH conducted the experiments and performed the image analysis with support from GK and MCD. JH wrote the original draft. All authors discussed the results, commented on the manuscript, and approved the final version of the manuscript.Conflicts of interest
GK, MCD, IMS are employees of Vironova AB, a company that provides services, software and hardware solutions for TEM-based nanoparticle imaging and analysis.Acknowledgements
This study was funded in parts by Vironova AB, the Swedish Foundation for Strategic Research (SSF) (GMT14-0071), and the Foundation Olle Engkvist Byggmästare. We thank Kushal Sejwal for the fruitful discussions regarding negative stain TEM grid preparation. We also thank Asc. Prof. Christofer Lendel for providing the whey protein sample.References
- S. De Carlo and J. R. Harris, Micron, 2011, 42, 117–131 CrossRef CAS.
- B. Sander and M. M. Golas, Microsc. Res. Tech., 2011, 74, 642–663 CrossRef CAS.
- M. Gentile and H. R. Gelderblom, New Microbiol., 2014, 37, 403–422 Search PubMed.
- A. Bremer, C. Henn, A. Engel, W. Baumeister and U. Aebi, Ultramicroscopy, 1992, 46, 85–111 CrossRef CAS.
- C. Schmidli, L. Rima, S. A. Arnold, T. Stohler, A. Syntychaki, A. Bieri, S. Albiez, K. N. Goldie, M. Chami, H. Stahlberg and T. Braun, J. Visualized Exp., 2018, 2018, 1–12 Search PubMed.
- S. A. Arnold, S. A. Müller, C. Schmidli, A. Syntychaki, L. Rima, M. Chami, H. Stahlberg, K. N. Goldie and T. Braun, Proteomics, 2018, 18, 1–10 CrossRef.
- M. Ohi, Y. Li, Y. Cheng and T. Walz, Biol. Proced. Online, 2004, 6, 23–34 CrossRef CAS.
- R. G. Milne, in Methods in Virology, ed. K. Maramorosch and H. Koprowski, Academic Press Inc., Orlando, Florida, 1st edn, 1984, vol. 7, pp. 87–120 Search PubMed.
- N. Mukhitov, J. M. Spear, S. M. Stagg and M. G. Roper, Anal. Chem., 2016, 88, 629–634 CrossRef CAS.
- S. Kemmerling, J. Ziegler, G. Schweighauser, S. A. Arnold, D. Giss, S. A. Müller, P. Ringler, K. N. Goldie, N. Goedecke, A. Hierlemann, H. Stahlberg, A. Engel and T. Braun, J. Struct. Biol., 2012, 177, 128–134 CrossRef CAS.
- S. A. Arnold, S. Albiez, N. Opara, M. Chami, C. Schmidli, A. Bieri, C. Padeste, H. Stahlberg and T. Braun, ACS Nano, 2016, 10, 4981–4988 CrossRef CAS.
- P. Castro-Hartmann, G. Heck, J. M. Eltit, P. Fawcett and M. Samsó, Ultramicroscopy, 2013, 135, 105–112 CrossRef CAS.
- N. Coudray, G. Hermann, D. Caujolle-Bert, A. Karathanou, F. Erne-Brand, J. L. Buessler, P. Daum, J. M. Plitzko, M. Chami, U. Mueller, H. Kihl, J. P. Urban, A. Engel and H. W. Rémigy, J. Struct. Biol., 2011, 173, 365–374 CrossRef CAS.
- G. A. Lenk, G. Stemme and N. Roxhed, in The 18th International Conference on Miniaturized Systems for Chemistry and Life Sciences (MicroTas), San Antonio, Texas, 2014, pp. 216–218 Search PubMed.
- G. Lenk, S. Sandkvist, A. Pohanka, G. Stemme, O. Beck and N. Roxhed, Bioanalysis, 2015, 7, 2085–2094 CrossRef CAS.
- X. Ye, M. S. Hedenqvist, M. Langton and C. Lendel, RSC Adv., 2018, 8, 6915–6924 RSC.
- J. Hauser, G. Lenk, J. Hansson, O. Beck, G. Stemme and N. Roxhed, Anal. Chem., 2018, 90, 13393–13399 CrossRef CAS.
- J. Hauser, G. Lenk, S. Ullah, O. Beck, G. Stemme and N. Roxhed, Anal. Chem., 2019, 91, 7125–7130 CrossRef CAS.
- A. Bello, K. Tran, A. Chand, M. Doria, M. Allocca, M. Hildinger, D. Beniac, C. Kranendonk, A. Auricchio and G. P. Kobinger, Gene Ther., 2009, 16, 1320–1328 CrossRef CAS.
- M. Groll, L. Ditzel, J. Löwe, D. Stock, M. Bochtler, H. D. Bartunik and R. Huber, Nature, 1997, 386, 463–471 CrossRef CAS.
- H. Choi, H. Jeon, S. Noh, O. Kwon and J. Y. Mun, Appl. Microsc., 2018, 48, 1–5 CrossRef.
- A. Kroes-Nijboer, H. Sawalha, P. Venema, A. Bot, E. Flöter, R. Den Adel, W. G. Bouwman and E. Van Der Linden, Faraday Discuss., 2012, 158, 125–138 RSC.
- R. A. Mantovani, G. de Figueiredo Furtado, F. M. Netto and R. L. Cunha, J. Food Eng., 2018, 223, 99–108 CrossRef CAS.
Footnote |
| † Electronic supplementary information (ESI) available: Table of device materials, flow chart of particle detection script, and a video. See DOI: 10.1039/d0lc00724b |
| This journal is © The Royal Society of Chemistry 2020 |