 Open Access Article
Creative Commons Attribution 3.0 Unported Licence
Laboratory based GIXRF and GEXRF spectrometers for multilayer structure investigations
Veronika
Szwedowski-Rammert
 *a,
Jonas
Baumann
 a,
Christopher
Schlesiger
 a,
Ulrich
Waldschläger
b,
Armin
Gross
b,
Birgit
Kanngießer
a and
Ioanna
Mantouvalou
 a
a
aTechnische Universität Berlin, Hardenbergstr. 36, 10623 Berlin, Germany. E-mail: jonas.baumann@physik.tu-berlin.de
bBruker Nano GmbH, Am Studio 2D, 12489 Berlin, Germany
First published on 11th February 2019
Abstract
This work reports laboratory angle resolved measurements with the goal of establishing laboratory techniques to obtain a more complete idea of the intralayer composition of multilayer samples. While X-ray reflectometry is a widely available technique for the characterization of multilayer samples, angle resolved XRF measurements (grazing emission/incidence X-ray fluorescence) are usually performed at synchrotron radiation facilities. With the development of efficient laboratory spectrometers and evaluation algorithms for angle resolved measurements, these methods become suited for routine measurements and screening. We present two laboratory spectrometers which make quantitative non-destructive elemental depth profiling feasible. For reasons of comparison a validation sample, a nickel–carbon multilayer sample, is measured with both setups and additional information on krypton contamination and its distribution is retrieved. Additionally, the first application for the characterization of multilayer structures with sub-nanometer layer thicknesses is shown.
Introduction
In the non-destructive characterization of multilayer structures, the X-ray reflectometry (XRR) method is widely used in industrial and scientific applications. In XRR measurements, X-ray radiation is directed onto a sample at varying incidence angles and the reflected radiation is detected with a photodiode. The measurements can be performed at synchrotron radiation facilities1,2 as well as with benchtop instruments.3,4 Due to the broad applications of XRR, several codes for the quantification of the measurements exist, with IMD5,6 being the most popular. Though, as has been shown in ref. 7 and 8, relying solely on XRR measurements for the characterization of complex, stratified materials is insufficient. The number of degrees of freedom in the quantification rises rapidly with the complexity of the sample, calling for complementary measurements. A possible way of obtaining element specific in-depth information from the sample non-destructively is the use of angle resolved X-ray fluorescence (XRF) methods.9 As in XRR, X-ray radiation is used, though not the reflected radiation but the element specific fluorescence radiation emitted from the sample is detected. This provides additional information about the composition of the investigated sample since the elemental distribution is measured. Contamination as well as intermixing regions can be characterized. Several studies have already combined XRR with grazing incidence XRF analysis.10–12Grazing angles refer to the angular range from below the angle of total reflection up to a few multiples of the value of the angle of total reflection. Depending on the energy of the incident beam and the investigated material, it is the angular range where interference effects from the samples are observable.
Angular resolution of XRF measurements can be achieved in a twofold manner: by varying the shallow incidence angle of the primary X-ray radiation on the sample (grazing incidence X-ray fluorescence: GIXRF) or by measuring the fluorescence radiation from the sample at distinct shallow emission angles (grazing emission X-ray fluorescence: GEXRF). Both methods yield equivalent information about the sample as was shown in ref. 13.
A beneficial phenomenon for analysis occurring in both angle resolved measurements when the interfaces of the layers are smooth is an enhancement of excitation due to the formation of X-ray standing waves (XSW) within the sample. In the case of GIXRF the incident X-ray beam can interfere with the beam reflected at layer boundaries14 and therefore constructive and destructive interference nodes are formed. Essential for the standing wave field is a monochromatic primary beam with low divergence. Contrarily, in GEXRF measurements the quality of the primary beam is not crucial for interference to occur. In that case, the probability density functions of the possible paths of the fluorescence radiation released by atoms within a layer can interfere. This effect is known as the Kossel effect15 and can be observed under the grazing emission conditions in all investigations with beams that excite fluorescence radiation from atoms of the sample (protons,16 electrons,15 and photons17,18).
The result of both angle resolved techniques is an angular profile where the intensity of a given fluorescence line of a specific element is shown for each measured angle. Since each angle corresponds to a different penetration or information depth for a given sample, a depth-resolved elemental profile can be calculated. Additional conclusions about the sample may be drawn from interference structures in the GI- or GEXRF profile in the case of multilayer samples. The position of the structures depends on the thickness of the layers of the sample. Roughness and interdiffusion between the layers decrease the amplitude of the structures and a density variation shifts the position of the angle of total reflection.
In the following, measurements of a validation sample with a laboratory GEXRF and a commercial GIXRF setup and the respective quantification routines are presented. The goal is to ensure a reliable characterization of these laboratory setups, which is crucial for the quantification of unknown samples beyond synchrotron radiation measurements. The measurements show the capabilities of these laboratory spectrometers, their strengths, challenges and benefits.
Laboratory setups for angle resolved XRF
Angle resolved XRF methods are dominantly applied at synchrotron radiation facilities. The high flux of the X-ray beam and a small focus size are beneficial for fast and precise measurements of X-ray fluorescence. However, a rapid development of laboratory equipment in recent years accompanied by the improvement of efficient evaluation algorithms enables angle resolved measurements in the laboratory with comparable angular resolution and statistics.19 This has the potential to expand the availability of these methods for a broader range of users. Especially in the development of new, more efficient multilayer structures with high reflectivity complementary methods to XRR are beneficial for the characterization of interlayer diffusion, contaminations and roughness.Grazing incidence X-ray fluorescence
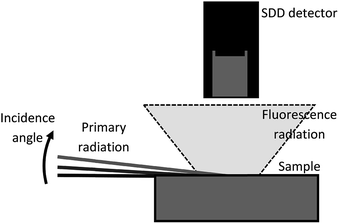
In GIXRF measurements the incidence angle of the radiation on the sample is varied in a range depending on the beam's energy and the investigated sample's material(s). Most commonly, a GIXRF scan starts below the angle of total reflection and surpasses it.20 To benefit from the interference effect enhancement resulting from the formation of X-ray standing waves, GIXRF measurements are usually performed with monochromatized radiation either from an X-ray tube11 or at synchrotron radiation facilities.7 The sample is tilted with respect to the beam at defined angles and the fluorescence radiation is detected above the sample with an energy dispersive detector, see Fig. 1. In most setups the detector is a silicon drift detector, SDD. The achievable angular resolution is limited by the divergence of the X-ray beam used and influences the intensity of the interference patterns. It is thus crucial to characterize the divergence of a GIXRF setup to distinguish between the effect it has on the profile and the damping resulting from roughness or intermixing of the interfaces of the layers. With the NANOHUNTER II from Rigaku and the BRUKER S4 T-STAR, benchtop GIXRF setups have become commercially available.Grazing emission X-ray fluorescence
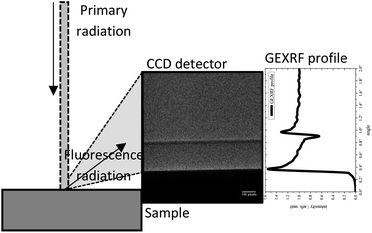
GEXRF measurements are typically performed with the primary X-ray radiation incident on the sample at angles much larger than the angle of total external reflection. Two possible setups with distinct configurations are established to detect the fluorescence radiation from the sample at grazing emission angles: the conventional and the so-called scan-free approach. In the former the radiation is detected with an SDD and the angular resolution is achieved e.g. by placing a slit in front of the detector.13 The detector or sample is moved to measure the angular profile. The angular resolution that can be achieved is usually limited by the slit system. Additionally, the sensitivity of such a setup is low due to the small solid angle of detection. These limitations prompted the development of the scan-free GEXRF (SF-GEXRF) setup,21 where the slit-detection unit is replaced with a 2D area detector. This facilitates the recording of several angles in one measurement without the necessity to move parts of the setup. This version of a GEXRF setup is shown in Fig. 2. A crucial condition to perform energy dispersive SF-GEXRF experiments is that all photons counted by the detector in each frame are well separated from the adjacent photons. If this is satisfied, the energy and position of the photon detected by the CCD can be reconstructed. Thus, several frames are recorded, with the number of frames depending on the required statistics. To fulfil the single photon condition either the exposure time of each frame or (if possible) the flux of the source can be regulated.A significant benefit of GEXRF compared to GIXRF follows from the investigation of samples at normal incidence in the former. This enables the scanning of laterally inhomogeneous samples, since the footprint on the sample is smaller than that for grazing incidence conditions as the beam is not broadened by the shallow incidence angle. This was used to map impurities in silicon wafers.22 While the SF-GEXRF setup was first successfully introduced at a synchrotron radiation facility21 it could be transferred to the laboratory. Measurements were performed in the soft X-ray range23 as well as with polychromatic radiation in the hard X-ray range.24
Materials and methods
For the validation of the laboratory angle resolved XRF techniques a nickel–carbon (NiC) multilayer manufactured by AXO DRESDEN is chosen. The carbon/nickel bi-layer structure is repeated 15 times on a silicon substrate. From XRR measurements performed by the manufacturer and evaluated with the IMD software package the bi-layer thickness is calculated to be 5.55 nm, with 2.42 nm for nickel and 3.13 nm for carbon. This sample is well suited for validation purposes since a sharp interference structure forms due to its smooth interfaces on the X-ray wavelength length scale and neglectable interdiffusion.Laboratory grazing incidence X-ray fluorescence
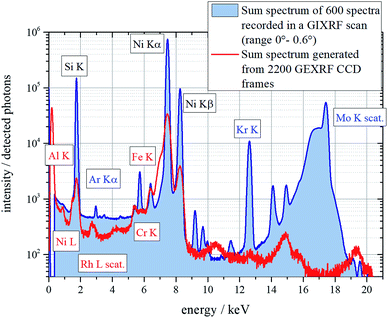
The GIXRF scans are performed with a commercial BRUKER S4 T-STAR. This setup was developed for total reflection XRF analysis of trace elements and a new feature allows the execution of angular scans. The molybdenum Kα-line (17.4 keV) is used as the excitation radiation, which is monochromatized and focused on the sample with parabolic graded multilayer optics. The beam shape is calculated by measuring the FWHM of the beam with a CCD camera at different distances from the monochromator. It is determined to be Gaussian in the x-direction with a FWHM of 100 ± 10 μm and a rectangular function in the y-direction with a width of 5.62 ± 0.01 mm in the focus. From the same measurement, beam divergence in the x-direction is calculated to be FWHM = 0.25 ± 0.06 mrad. From that the angular resolution of the GIXRF measurements can be calculated to be FWHM = 0.014° ± 0.003° since beam divergence is the limiting factor. The sample is placed on a robotic arm and the fluorescence radiation detected with an SSD detector. The robotic arm positions the sample beneath the SDD and tilts the sample relative to the X-ray beam about the y-axis to perform a GIXRF scan. The SDD detector is also tilted with the sample. Due to the shallow incidence angles the footprint on the sample changes during the measurement. In this case this concerns the x-direction of the beam, thus only the divergence in this axis is considered in calculations. The GIXRF scan of the NiC multilayer sample is executed in an angular range from 0° up to 0.6° with a detector real time of 10 seconds and a step size of 0.001°. Considering motor movements this results in an overall measurement time of 125 minutes. In view of the step size exceeding the limitations imposed by beam divergence, measurements with a larger step size would be appropriate. The divergence calculations were performed after the measurements, and thus this discrepancy. Including these considerations an improvement of measurement time by a factor of 10 is not only achievable in this case but also rational. For each angular position a distinct spectrum is recorded and Fig. 3 shows the sum spectrum of the whole measurement depicted in blue. The energy resolution is 150 eV@Ni Kα.Laboratory grazing emission X-ray fluorescence
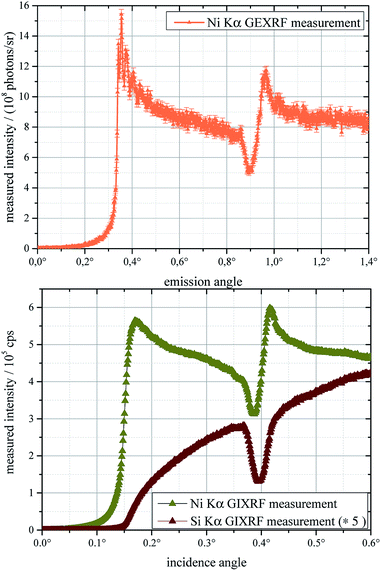
The laboratory scan-free GEXRF spectrometer for hard X-rays is set up at the Berlin Laboratory for innovative X-ray technologies (BLiX). An X-ray tube with a rhodium target operated at 50 kV and 600 μA is equipped with a polycapillary lens to focus the radiation to the pivotal point of a vacuum chamber.32 A back illuminated deep-depletion CCD (BI Princeton PI-SX:1300) with 1340 × 1300 pixels, each with the dimensions of 20 μm × 20 μm, is used to detect the fluorescence radiation from the sample. The deep-depleted sensor of the CCD is a crucial improvement of the setup compared to the first proof-of-principle measurements published in ref. 24, since hard X-rays of up to 20 keV are detected. Throughout the measurement the CCD’s temperature was set to −45 °C and was monitored to ensure an unchanged dark current. To achieve an angular resolution of below 0.005° the CCD is mounted 57 cm away from the sample. This resolution is required to resolve fine interference structures in the GEXRF profile of the multilayer (corresponding to Kiessig fringes in XRR) and can be calculated from trigonometric considerations when the pixel size of the CCD is known. For this specific measurement the covered angular range is 2.2° (0–1.4° shown in Fig. 4 top) and the angular resolution is 0.005°. For the SF-GEXRF measurement a total number of 2200 CCD frames and additionally 18 dark frames are recorded. The exposure time is 3 seconds and a read-out speed of 1 MHz is used. This results in an overall measurement time of 160 minutes. The GEXRF frames are dark frame corrected, which means that from each pixel a median value calculated from the dark frames for the respective pixel is subtracted. Furthermore, from the dark frames the standard deviation of each pixel is calculated and used as a threshold to evaluate the CCD frames. Thus, there is a necessity to ensure a constant temperature throughout the measurement. The clustering PEE algorithm25 is applied and on average 600 events are registered in one GEXRF frame. The sum spectrum of the NiC multilayer is calculated and shown in Fig. 3 depicted in red. The energy resolution is 306 eV@Ni Kα.Comparison of the sum spectra of GI- and GEXRF measurements
Both sum spectra show nickel, silicon and scattering peaks from the primary radiation as expected. In the sum spectrum of the laboratory SF-GEXRF measurement there are multiple lines which do not originate from the sample (aluminum, chromium, etc.) and which are missing in the GIXRF spectrum. The presence of these lines results from the primary radiation scattered from the sample exciting fluorescence radiation from the walls of the experimental chamber. The small detector–sample distance in the GIXRF setup prevents such artefacts in the respective sum spectrum. On the other hand, the GIXRF sum spectrum contains a prominent krypton peak that cannot be assigned to artifacts originating from the setup. Krypton is used as the sputtering gas in the magnetron sputtering process of manufacturing the sample, and hence it is present in the sample. In the SF-GEXRF measurement a CCD is used as a detector and the quantum efficiency of such detectors drastically decreases for energies above 10 keV.24 Thus, the statistics of the SF-GEXRF measurement are insufficient for the detection of the krypton peak at 12.6 keV. Moreover, the polycapillary lens in the GEXRF setup has a neglectable transmission above 20 keV, additionally limiting the excitation of krypton. The GIXRF measurements are performed in air (which explains the presence of argon) and a beryllium window is in front of the detector. This all together prevents the detection of low Z elements and the L-line of nickel in the GIXRF experiment. The fact that carbon could not be measured in the in-vacuum SF-GEXRF experiment is a result of using hard X-rays as the excitation radiation and additionally the prominent noise peak for low X-ray energies. The lines not assigned to any element in both sum spectra are either escape or pile-up peaks. Even though the measurement time of the SF-GEXRF measurement is longer, the GIXRF measurement has better statistics. This results from the small solid angle of detection of the measurement in the SF-GEXRF case. Improving this factor or more efficient excitation of fluorescence radiation would significantly improve the statistics of the SF-GEXRF measurement.Angular GI- and GEXRF profiles
From the measured spectra angular XRF profiles for each measurement and each relevant element are generated. In the case of the GIXRF measurement each spectrum recorded at each respective angle is deconvolved with a code provided by the manufacturer. The calculated intensity of the individual elemental lines is plotted over the angular position of the corresponding measurement.Contrarily, in the SF-GEXRF measurements only the Ni Kα fluorescence line profile is shown. This results from the absorption of the silicon fluorescence line due to the extended paths through the sample at low emission angles. The intensity of the detected silicon signal starts rising at around 1.7°. No additional information can be extracted from the measured silicon profile range in the SF-GEXRF case, consequently it is not shown or discussed further. To generate the SF-GEXRF profile a region-of-interest (ROI) around the Ni Kα fluorescence line peak is chosen (7.07–7.69 keV) and the 2200 CCD frames after dark frame correction are searched for events within this ROI. A new CCD frame is generated and at the x, y-position of each Ni Kα fluorescence photon detection position in the recorded CCD frames the value of the corresponding pixel in the new frame is increased by one. As a result, a CCD image with the interaction positions of all Ni Kα fluorescence photons is generated. This image is shown in Fig. 2 on the CCD. To calculate a GEXRF profile from the CCD image the pixels are summed along isoangular lines and each pixel intensity is normalized to its solid angle of detection resulting in a GEXRF profile as depicted next to the ROI image in Fig. 2. The geometrical information necessary to perform these calculations is gathered beforehand in a calibration routine.24 These geometrical parameters are the distance between the sample and the detector and the tilt of the CCD since the CCD’s position cannot be adjusted once mounted on the chamber. Additionally, with these parameters the angular range covered in one scan and the theoretical angular resolution of the measurement can be calculated.
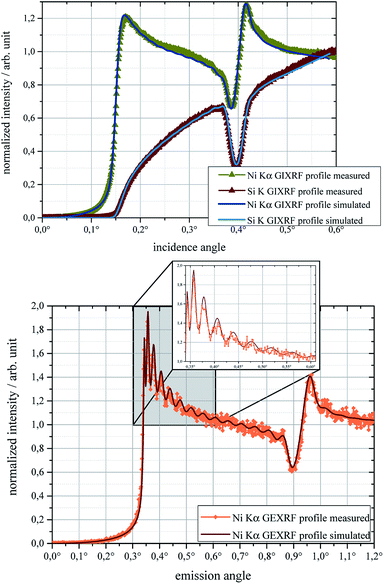
The resulting GIXRF profiles of silicon and nickel are shown in the bottom of Fig. 4, where the intensity of silicon is multiplied by a factor 5 to display the profiles clearly in one plot. The rapid increase of intensity above 0.1° occurs when the angle of total reflection is surpassed and the signal from the depth of the sample is detected. The prominent interference structure with a minimum at 0.38° and a maximum at 0.42° in the nickel profile corresponds to angles where the intensity of the standing wave field in the nickel layers is the largest and smallest, respectively. The top of that figure shows the SF-GEXRF profile of the Ni Kα fluorescence line with the equivalent interference structure and additionally a substructure of fine oscillations. These correspond to the Kiessig fringes visible in XRR measurements between two reflectivity maxima.26 Only those maxima in the angular profile correspond to minima in the XRR profile and vice versa. What additionally can be seen in this profile is that for higher angles angle resolved profiles become approximately constant. Compared to the SF-GEXRF, in the GIXRF profile no fine interference structure can be detected. This is mainly caused by the lower angular resolution due to the beam divergence of this setup. This decreases the amplitude of the structure and is a crucial factor in GIXRF setups.
To measure the interference fringes a combination of sufficient temporal and spatial coherence needs to be considered. The temporal coherence is mainly influenced by the natural line width which is a comparable factor for both angle resolved setups. In the GIXRF setup, this concerns the characteristic emission lines from the X-ray tube. The applied multilayer optics is adapted for the respective energy, and the bremsstrahlung background within the bandwidth of the multilayer is negligible. In GEXRF the temporal coherence is given by the natural line width of the fluorescence radiation if the detector’s energy resolution is sufficient to isolate the line. Contrarily, spatial coherence is influenced by angular resolution. This means divergence of the incidence beam in GIXRF and the geometry of the setup (pixel size and detector–sample distance) for GEXRF. Thus, these factors are entirely setup dependent and there always is a compromise between setup efficiency and angular resolution.
Comparison with simulations
The quantification of angle resolved measurements can be performed by varying the parameters of a simulated sample to achieve an agreement with the measured profiles. This requires well-known and well-characterized instrumental parameters of the setup.20 In the demonstrated case a well-characterized sample, the NiC multilayer, is used to validate the established experimental parameters of the introduced setups. The data from the XRR measurements of the NiC multilayer are applied to perform simulations of the angular profiles with an in-house code based on the solution of the Sherman equation:27 the xrfLibrary. However, the simple Sherman approach is insufficient if an X-ray standing wave field is formed in the sample. In that case reflection and refraction need to be additionally considered. In the xrfLibrary the algorithm introduced by de Boer9,14 is used in the case of GIXRF and of Urbach and de Bokx28 for GEXRF. The code facilitates the application of any X-ray excitation radiation, the use of optics and both scanning geometries. The angular scans are implemented by varying the excitation angle (GIXRF) or the detection angle (GEXRF). In the latter the angular calibration is used in the calculation of the isoangular lines and the solid angle of detection.For GIXRF the geometry of the setup is additionally included in the calculations of the solid angle of detection. Furthermore, beam divergence must be considered in the simulations since it causes damping of the amplitude of the interference structures.
The solid angle is calculated by means of a Monte-Carlo approach. The geometry of the setup is implemented in the code as obstructions for the X-ray trajectories. 106 X-rays are generated within the point of origin, which is the footprint of the beam on the sample considering its shape: Gaussian in one and rectangular in the perpendicular direction. From there the X-rays proceed in arbitrary directions within a half sphere solid angle. Whenever the X-ray paths collide with the collimator the trajectory is disregarded from further calculations. The solid angle of detection is hence the ratio of photons hitting the detector without collision to the number of emitted photons times the emission solid angle (2π). A respective solid angle is calculated for each angular position of the sample by smearing the area of origin with respect to the X-ray beam. Smearing of the footprint at shallow incidence angles is thus included in the calculation.
Fig. 5 top shows the comparison of the simulated and measured GIXRF profiles of nickel and silicon. The data are normalized since the efficiency of the focusing multilayer and the detecting system is unknown. This is justifiable since the sample is defined by the shapes of the profiles and not the absolute intensities. In the bottom of the same figure the GEXRF profile of the Ni Kα fluorescence line is shown and the region around the prominent fine interference structures is enlarged. In contrast to GIXRF, the geometrical parameters of the setup are not included in the simulation, rather they are used to generate profiles from CCD frames. Since no investigations on the detector's efficiency were performed and a consistent investigation into the polycapillary lenses’ absolute transmission is currently executed, the GEXRF profiles are also normalized.
The presented simulated and measured data overlap for both setups and in the GIXRF case for both fluorescence lines. The validation sample is well defined and thus these results allow the characterization of these laboratory setups. This enables the application of recursive algorithms for quantitative results when unknown samples are investigated.
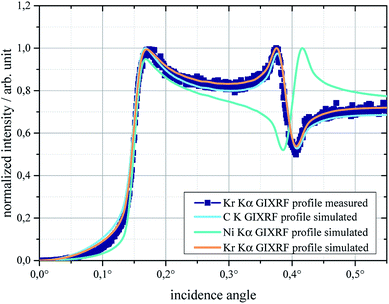
As already mentioned, krypton was found in the GIXRF sum spectra. Interestingly, the analysis of the krypton Kα fluorescence line profile shows that this sputtering gas is preferably deposited in the carbon layers of the multilayer. This can be seen in Fig. 6 where the measured GIXRF krypton fluorescence line profile (dark blue) and the simulated profiles of carbon (light blue), krypton (orange) and nickel (green) are shown. The shapes of the carbon and measured krypton profiles follow a similar trend, indicating that krypton fluorescence is excited when the standing wave field is formed within the carbon layers. In the simulation of the krypton profile it was assumed that 1 at% of the carbon layer is krypton. Except for the region around 0.1° this assumption generates an overlap of the simulated and measured krypton profiles. The mismatch in the low angle region indicates that krypton is preferably concentrated deeper inside the first carbon layer. This qualitative analysis of the results indicates how the system can be used to determine in-depth contaminations in samples with nanometer layer thickness. A dedicated sample could be used to characterize the angle dependent lower limits of detection of the final setup.
Discussion and outlook
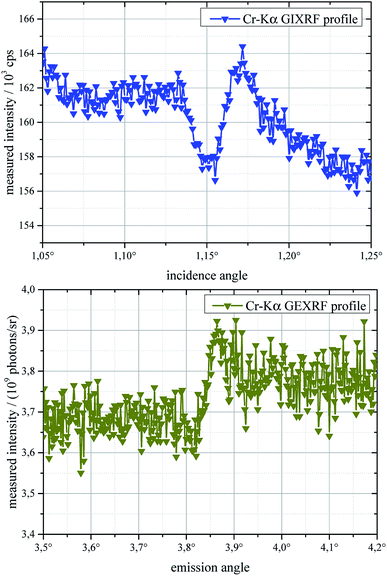
For both presented angle resolved laboratory XRF measurements the measured and simulated profiles agree. Since the investigated sample is well-known and well-characterized by XRR measurements, this proves the applicability of these laboratory spectrometers. The benefit of the SF-GEXRF method is the independence of the interference structure from the quality of the primary radiation. This facilitates the resolution of fine interference structures in the NiC multilayers’ Ni Kα fluorescence line profile which are not present in the GIXRF measurement due to beam divergence. On the other hand, the angular resolution of the SF-GEXRF strongly depends on the pixel size of the CCD and its distance from the sample. Due to the better excitation and detection efficiency of krypton in the GIXRF measurement additional information such as the preferable deposition of krypton in carbon layers can be extracted.In the discussed case the sample has sharp interfaces and a period thickness in the nm range. For samples with sub-nm layer thickness and worse quality of the layer boundaries the measurement time for the SF-GEXRF case increases drastically to achieve good statistics. This is demonstrated in Fig. 7 with the comparison of a GIXRF (top) and SF-GEXRF (bottom) profile of the Cr Kα fluorescence line of a chromium–scandium multilayer with a bi-layer thickness of 1.7 nm (repeated 100 times) and strong intermixing between the respective layers. The measurements are performed under the same conditions as the measurements of the NiC multilayer. Though, to resolve the interference structure of the chromium Kα fluorescence line from this sample for the SF-GEXRF profile 10![[thin space (1/6-em)]](https://www.rsc.org/images/entities/char_2009.gif) 000 frames with an exposure time of 3 seconds are recorded. This yields an overall measurement time of 950 minutes compared to the 15 minutes needed to record the GIXRF scan. This difference results mainly from the small solid angle of detection of the SF-GEXRF setup. Additionally, the excitation at normal incidence is less efficient than at grazing incidence angles.
000 frames with an exposure time of 3 seconds are recorded. This yields an overall measurement time of 950 minutes compared to the 15 minutes needed to record the GIXRF scan. This difference results mainly from the small solid angle of detection of the SF-GEXRF setup. Additionally, the excitation at normal incidence is less efficient than at grazing incidence angles.
One approach to tackle the challenge of long measurement times of the SF-GEXRF setup is the use of a different position sensitive detector, a single photon detector as in the studies of Kayser21 and Baumann.23 These specialized detectors facilitate fast read-out speeds while maintaining very low noise.29,30 For laboratory angle resolved setups, the high price and the complexity of operation of these detectors are serious drawbacks. Especially considering that with the specific GEXRF geometry introduced in this work within an exposure time of 3 seconds around 2000 photons are detected by the CCD for the samples presented. Thus, a faster read-out would reduce the measurement time by around 20% and a further reduction of measurement time could only be achieved by a higher flux on the sample. This is possible by using rotating anode X-ray tubes or metal-jet anodes,31 which have the same drawbacks as the photon counting detectors and additionally the former produces a large footprint on the sample. An increase of flux in the SF-GEXRF measurements could also be achieved if the sample was investigated at shallower incidence angles. From geometrical considerations it follows that for an incidence angle of 6° an increase of detected fluorescence intensity by a factor 10 is expected. Though, the influence on the solid angle of detection of this modification needs to be included in the calculations as it can have an impact on the measured profile. Another option is to decrease the distance between the sample and the detector, which also decreases the angular resolution if the pixel size remains unchanged. Another perspective is the use of cmos detectors, since they enable fast read-out and small pixel size. So far, the depletion zone thickness has been insufficient for this kind of investigation but there is a rapid development in this area.
The main drawback of GIXRF is the lower angular resolution which can only be improved by lowering the divergence of the X-ray beam. This is possible by adding collimators to the setup or crystal optics. The former would result in a lowered flux on the sample, but due to the small sample–detector distance this parameter is not critical in the GIXRF spectrometer used. Furthermore, the necessity to scan the sample for GIXRF measurements increases the complexity of the setup. A substantial benefit of GIXRF is the possibility to combine the GIXRF setup with XRR measurements. This has been shown in the literature11 and provides two complementary measurements at once. Additionally, a combined analysis lowers the uncertainties of the results as thoroughly discussed e.g. by D. Ingerle et al.33
Conclusions
The demonstrated experiments prove that angle resolved techniques are reliable enough to serve as complementary measurements to XRR in the laboratory. Especially for samples with strong intermixing the angle resolved methods benefit from the element specific in-depth information. Opposed to XRR, not only contaminations can be identified but also their distribution in the sample can be calculated. Since both methods yield theoretically equivalent information about the sample the choice of which method, GI- or SF-GEXRF, to use depends on the sample and available hardware.Conflicts of interest
There are no conflicts to declare.Acknowledgements
The authors would like to thank Helga for her reliability, Bruker Nano GmbH for the permission to perform the GIXRF measurements and the constant support, AXO DRESDEN GmbH for manufacturing the validation sample, Philippe Jonnard and Meiyi Wu from Université Pierre et Marie Curie in Paris for providing the Cr/Sc sample, Daniel Grötzsch for constructing substantial components of both setups, and Michael Haschke for inspiring this comparative work. J. B. would like to thank the Helmut Fischer Foundation for financial support.Notes and references
- W. H. Briscoe, F. Speranza, P. Li, O. Konovalov, L. Bouchenoire, J. Van Stam, J. Klein, R. M. J. Jacobs and R. K. Thomas, Soft Matter, 2012, 8, 5055–5068 RSC.
- L. Zhou, L. Fox, M. Włodek, L. Islas, A. Slastanova, E. Robles, O. Bikondoa, R. Harniman, N. Fox, M. Cattelan and W. H. Briscoe, Carbon, 2018, 136, 255–261 CrossRef CAS.
- D. N. Gurgew, D. M. Broadway, M. Gubarev, B. D. Ramsey and D. A. Gregory, Rev. Sci. Instrum., 2016, 87, 104501 CrossRef PubMed.
- Y. A. Babanov, Y. A. Salamatov, D. A. Ponomarev, L. I. Naumova, V. V. Proglyado, M. A. Milyaev and V. V. Ustinov, Phys. Met. Metallogr., 2015, 116, 1116–1126 CrossRef.
- D. L. Windt, Comput. Phys., 1998, 12, 360–370 CrossRef CAS.
- D. G. Stearns, J. Appl. Phys., 1989, 65, 491–506 CrossRef CAS.
- P. Hönicke, B. Detlefs, M. Müller, E. Darlatt, E. Nolot, H. Grampeix and B. Beckhoff, Phys. Status Solidi, 2015, 212, 523–528 CrossRef.
- A. Haase, S. Bajt, P. Hönicke, V. Soltwisch and F. Scholze, Appl. Crystallogr., 2016, 49, 2161–2171 CrossRef CAS PubMed.
- D. K. G. de Boer, Phys. Rev. B, 1991, 44, 498–511 CrossRef CAS.
- J. Spear, H. Murakami and S. Terada, AIP Conf. Proc., 2003, 683, 646–650 CrossRef CAS.
- D. Ingerle, M. Schiebl, C. Streli and P. Wobrauschek, Rev. Sci. Instrum., 2014, 85, 1–6 CrossRef PubMed.
- W. W. Van Den Hoogenhof and D. K. G. De Boer, Spectrochim. Acta, Part B, 1993, 48, 277–284 CrossRef.
- R. S. Becker, J. A. Golovchenko and J. R. Patel, Phys. Rev. Lett., 1983, 50, 153–156 CrossRef CAS.
- L. G. Parratt and C. F. Hempstead, Phys. Rev., 1954, 94, 1593–1600 CrossRef.
- W. Kossel, V. Loeck and H. Voges, Z. Phys., 1935, 94, 139–144 CrossRef CAS.
- M. Wu, K. Le Guen, V. Ilakovac, I. Vickridge, D. Schmaus, E. Briand, C. Burcklen, E. Meltchakov, F. Delmotte and P. Jonnard, Nucl. Instrum. Methods Phys. Res., Sect. B, 2016, 386, 39–43 CrossRef CAS.
- E. Langer, M. Haschke and S. Däbritz, Microchim. Acta, 2008, 161, 39–43 CrossRef.
- G. Bortel, G. Faigel, M. Tegze and A. Chumakov, J. Synchrotron Radiat., 2015, 23, 214–218 CrossRef PubMed.
- S. Terada, H. Furukawa, H. Murakami and K. Nishihagi, Adv. X-Ray Anal., 2000, 43, 504–509 Search PubMed.
- B. Beckhoff, J. Anal. At. Spectrom., 2008, 23, 845–853 RSC.
- Y. Kayser, J. Szlachetko and J. Sà, Rev. Sci. Instrum., 2013, 84, 123102 CrossRef CAS PubMed.
- J. Szlachetko, D. Banaś, A. Kubala-Kukuś, M. Pajek, W. Cao, J.-C. Dousse, J. Hoszowska, Y. Kayser, M. Szlachetko, M. Kavčič, M. Salome and J. Susini, J. Appl. Phys., 2009, 105, 086101 CrossRef.
- J. Baumann, C. Herzog, M. Spanier, D. Grötzsch, L. Lühl, K. Witte, A. Jonas, S. Günther, F. Förste, R. Hartmann, M. Huth, D. Kalok, D. Steigenhöfer, M. Krämer, T. Holz, R. Dietsch, L. Strüder, B. Kanngießer and I. Mantouvalou, Anal. Chem., 2017, 89, 1965–1971 CrossRef CAS PubMed.
- V. Szwedowski, J. Baumann, I. Mantouvalou, L. Bauer, W. Malzer and B. Kanngießer, Phys. Status Solidi C, 2017, 14, 1700158 Search PubMed.
- J. Baumann, R. Gnewkow, S. Staeck, V. Szwedowski-Rammert, C. Schlesiger, I. Mantouvalou and B. Kanngießer, J. Anal. At. Spectrom., 2018, 33, 2043–2052 RSC.
- H. Kiessig, Ann. Phys., 1931, 10, 770–788 Search PubMed.
- J. Sherman, Spectrochim. Acta, 1955, 7, 283–306 CrossRef CAS.
- H. P. Urbach and P. K. De Bokx, Phys. Rev. B, 1996, 53, 3752–3763 CrossRef CAS.
- L. Strüder, U. Briel, K. Dennerl, R. Hartmann, E. Kendziorra, N. Meidinger, E. Pfeffermann, C. Reppin, B. Aschenbach, W. Bornemann, H. Bräuninger, W. Burkert, M. Elender, M. Freyberg, F. Haberl, G. Hartner, F. Heuschmann, H. Hippmann, E. Kastelic, S. Kemmer, G. Kettenring, W. Kink, N. Krause, S. Mülle, A. Oppitz, W. Pietsch, M. Popp, P. Predehl, A. Read, K. H. Stephan, D. Stötter, J. Trümper, P. Holl, J. Kemmer, H. Soltau, R. Stötter, U. Weber, U. Weichert, C. von Zanthier, D. Carathanassis, G. Lutz, R. H. Richter, P. Solc, H. Böttcher, M. Kuster, R. Staubert, A. Abbey, A. Holland, M. Turner, M. Balasini, G. F. Bignami, N. La Palombara, G. Villa, W. Buttle, F. Gianini, R. Lainé, D. Lumb and P. Dhez, Rev. Mex. Astron. Astrofis., Ser. Conf., 2001, 365, L18–L29 Search PubMed.
- B. Henrich, A. Bergamaschi, C. Broennimann, R. Dinapoli, E. F. Eikenberry, I. Johnson, M. Kobas, P. Kraft, A. Mozzanica and B. Schmitt, Nucl. Instrum. Methods Phys. Res., Sect. A, 2009, 607, 247–249 CrossRef CAS.
- O. E. Hemberg, M. Otendal and H. M. Hertz, Opt. Eng., 2004, 43(7), 1682 CrossRef CAS.
- M. Spanier, C. Herzog, D. Grötzsch, F. Kramer, I. Mantouvalou, J. Lubeck, J. Weser, C. Streeck, W. Malzer, B. Beckhoff and B. Kanngießer, Rev. Sci. Instrum., 2016, 87, 035108 CrossRef CAS PubMed.
- D. Ingerle, G. Pepponi, F. Meirer, P. Wobrauschek and C. Streli, Spectrochim. Acta, Part B, 2016, 118, 20–28 CrossRef CAS.
| This journal is © The Royal Society of Chemistry 2019 |

