DOI:
10.1039/C7RA04492E
(Paper)
RSC Adv., 2017,
7, 28684-28688
Preparation of PEG materials for constructing complex structures by stereolithographic 3D printing†
Received
21st April 2017
, Accepted 25th May 2017
First published on 31st May 2017
Abstract
The 3D printing of biocompatible materials is very promising due to their potential for use in biological applications, such as the development of artificial organs. Among various 3D printing methods, stereolithography is a good candidate due to its ability to produce high-resolution structures. Although the 3D printing of hydrogels has been investigated, few studies on printing complex structures have been conducted. In this study, we investigate various challenges during the construction of complex structures such as tilted ratchets and ladders which has T-shapes using UV-curable PEG materials as well as the mechanisms to address these problems. We study the effect of UV absorbing pigments to control the UV penetration depth and the relation with the slice thickness. Also, we design ladder-type structures with different neck widths to verify the mechanical strength of the prepared hydrogel polymers.
1. Introduction
Recently, 3D printing methods have received significant attention for their application in rapid prototyping, electronics, microfluidics, and tissue engineering.1–10 The possibility of constructing unusual and complex structures drawn via computer-aided design (CAD) is the reason we are interested in this technology. Several approaches exist for additive manufacturing technology, including fused deposition modelling (FDM), selective laser sintering (SLS), stereolithography (SLA), and inkjet 3D printing.1,2 Among these 3D printing methods, stereolithography is a good candidate for the high-resolution fabrication of constructs because it is similar to conventional photolithography.3 After designing 3D structures with a CAD program, the 3D printer software slices the three-dimensional structures into many two-dimensional patterns, and the printer repeats photopolymerization many times to realize the 3D structure. For photopolymerization-induced 3D printing, we need to prepare photocurable prepolymers as well as photoinitiators. Poly(ethylene glycol) diacrylate (PEGDA) is one of the best materials for use in stereolithographic 3D printing for biological applications because it is curable in UV light, and PEG materials are very useful due to their biocompatibility.11–13 Stereolithographic 3D printing of PEG materials has been conducted by several researchers for tissue engineering.14–16 Neiman used stereolithography to fabricate PEG scaffolds with open channels.14 Bashir group reported the fabrication of cell encapsulating 3D structures by PEG15 and hydrogel microenvironment to investigate cellular interactions.16 Also, they exploited the 3D printed PEG structures for cantilever or actuators.17 These days, 3D construction of artificial micro fish with PEG mixed with platinum nanoparticles can be applied to the study of self-propelling motions.18 And, PEG nanocomposite prepared by sol–gel method was used to enhance the mechanical properties.19 The previous works focused on functions or applications of 3D printed PEG, so, the constructed structures were simple boxes or upright straight channels. Although there has been an attempt to examine the effect on photoinitiators,20 there were few studies to discuss issues on realizing complex structures, such as tilted, trapezoidal or T-shape patterns, which can give us design freedom. In this study, we investigate the potential issues of the preparation of PEGDA for the 3D printing of complex structures and discuss how to solve the problems that arise. We use a UV absorbent to achieve appropriate light absorption to prevent the transmission of UV light in the undesired region. Here, we examine the problem using a simple model of the Beer–Lambert law and search for suitable conditions (i.e., absorbent concentration and thickness of one layer (slice)). In addition, we propose a conceptual design to test the mechanical properties of the materials by 3D printing.
2. Experimental
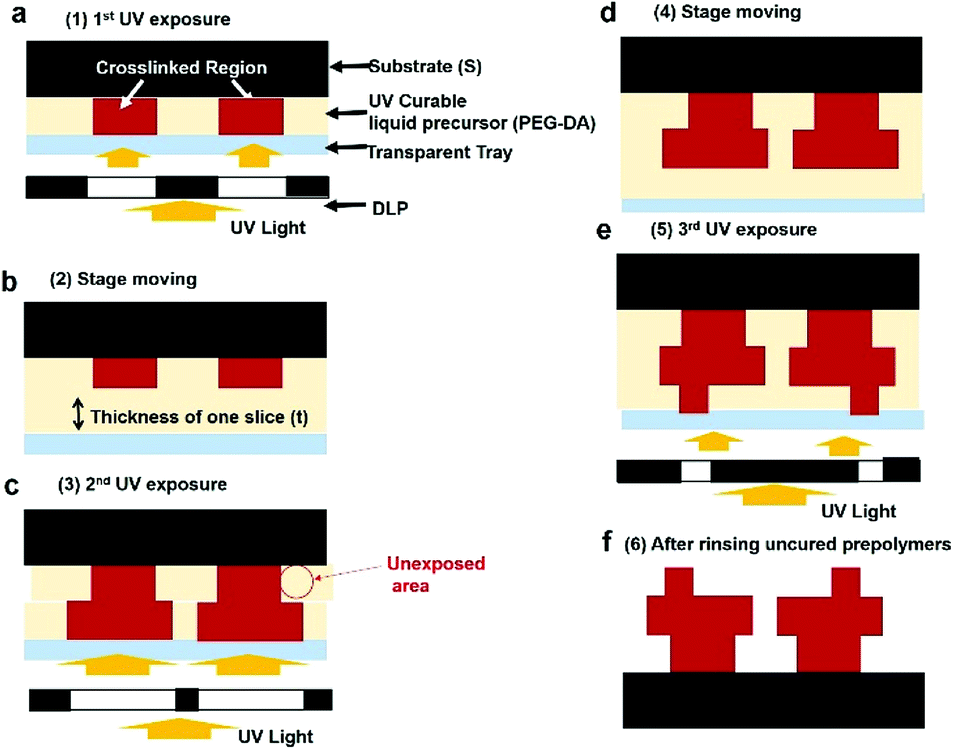
First, we prepare PEGDA prepolymers (molecular weight: 700 and 250 Da) purchased from Sigma-Aldrich and used them without any other treatments. We mixed the prepolymer with 1–2 wt% of bis(2,4,6-trimethylbenzoyl)phenyl phosphine oxide (Irgacure 819, Ciba Specialty Chemicals), which is a photoinitiator with a broad range of UV absorption. Then we filled the liquid prepolymer into a transparent tray. The tray is composed of a Petri dish coated with polydimethylsiloxane (PDMS). We mixed PDMS prepolymers and curing agents with a ratio of 10![[thin space (1/6-em)]](https://www.rsc.org/images/entities/char_2009.gif) :1 and cured them at 60 °C for 3 hours. We note that the PDMS coating on the tray is used to release the cured polymer from the plate with ease. Then we placed the vat filled with liquid prepolymer into a commercial 3D printer (LITHO, Illuminade Co., Ltd.) for 3D printing of PEGDA. The equipment uses a bottom-up method for UV light exposure. The image can be found in Fig. S1.† Programmed patterns are generated by digital light processing (DLP) in the printer, and the light is exposed from the bottom of the prepolymers between the substrate and the transparent tray. The lamp power is 190 W, and the exposure dose is 8–12 W m−2. After designing 3D structures by software (3DS Max), the equipment converts them to many 2D patterns. As shown in Fig. 1, liquid prepolymers are placed between the substrate and a transparent tray. After crosslinking with a programmed light via DLP, the crosslinked polymer is detached from the tray (Fig. 1b). Next, the substrate is moved upward with a thickness of one slice (50 μm or 100 μm) followed by filling the space between the pattern and the tray with the liquid prepolymer. And then, the material is exposed to programmed light again, as shown in Fig. 1c. Exposure time per layer is 4000 ms. When the exposure area is larger than the pre-patterned area (Fig. 1c), the undesired area in the red circle can be unexpectedly crosslinked when the UV light is not absorbed through the defined thickness. After repeating the UV exposure (Fig. 1d) and substrate movement (Fig. 1e), the desired shapes can be obtained after rinsing the uncured liquid prepolymer with alcohol (Fig. 1f).
:1 and cured them at 60 °C for 3 hours. We note that the PDMS coating on the tray is used to release the cured polymer from the plate with ease. Then we placed the vat filled with liquid prepolymer into a commercial 3D printer (LITHO, Illuminade Co., Ltd.) for 3D printing of PEGDA. The equipment uses a bottom-up method for UV light exposure. The image can be found in Fig. S1.† Programmed patterns are generated by digital light processing (DLP) in the printer, and the light is exposed from the bottom of the prepolymers between the substrate and the transparent tray. The lamp power is 190 W, and the exposure dose is 8–12 W m−2. After designing 3D structures by software (3DS Max), the equipment converts them to many 2D patterns. As shown in Fig. 1, liquid prepolymers are placed between the substrate and a transparent tray. After crosslinking with a programmed light via DLP, the crosslinked polymer is detached from the tray (Fig. 1b). Next, the substrate is moved upward with a thickness of one slice (50 μm or 100 μm) followed by filling the space between the pattern and the tray with the liquid prepolymer. And then, the material is exposed to programmed light again, as shown in Fig. 1c. Exposure time per layer is 4000 ms. When the exposure area is larger than the pre-patterned area (Fig. 1c), the undesired area in the red circle can be unexpectedly crosslinked when the UV light is not absorbed through the defined thickness. After repeating the UV exposure (Fig. 1d) and substrate movement (Fig. 1e), the desired shapes can be obtained after rinsing the uncured liquid prepolymer with alcohol (Fig. 1f).
 |
| | Fig. 1 Schematic representation of the procedure for stereolithographic 3D printing. (a) UV-curable liquid prepolymers are placed between a substrate and a transparent tray. Then, UV light with a desired pattern generated by DLP is exposed to the prepolymers. (b) The substrate moves upward with a thickness of a slice, and the liquid prepolymers are filled in the space between the pre-cured pattern and the tray. (c) The prepolymer is exposed to UV light with different patterns. The undesired area should not be crosslinked by UV light. (d) The substrate with the cured polymer moves again. (e) UV light with a different shape is used again. (f) After rinsing the uncured liquid prepolymers, the cured polymer with the desired shape is obtained. | |
3. Results and discussion
Fig. 2 shows the CAD designs generated by the 3D printer software and the printed structures. To confirm the ability to fabricate complex structures, we designed a ladder-type design and slanted ratchets. As shown in Fig. 2b, the results of the 3D printing of PEGDA do not correspond to the designed shape (Fig. 2a). The prepolymers in the red rectangle (Fig. 2b) should not be crosslinked by UV light to realize the design in Fig. 2a. However, the light is transmitted through the crosslinked PEG region during UV exposure, and the UV light crosslinked the prepolymers in the red area. When we decrease the expose time to limit transmission of UV light, the crosslinking time was not sufficient to solidify the desired pattern. Fig. 2c and d show a CAD design for a slanted structure and the experimental result after 3D printing, respectively. The area in the red triangle in Fig. 2d is also not a desired pattern. This pattern was also due to unwanted transmittance of UV light through the pre-patterned PEGDA. We note that the top area of the structures is crosslinked first because the structures for the bottom-up process are upside down. To address the problems due to curing in the undesired region, we reduce the transparency of the PEGDA to UV light by adding UV-absorbing pigments.
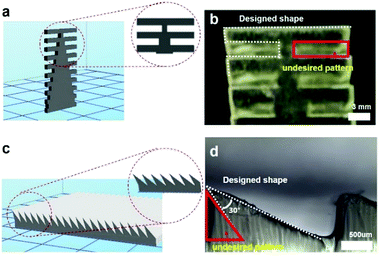 |
| | Fig. 2 (a) An image of a ladder design produced by a CAD program in the 3D printer. (b) An image of 3D printed structures from the design. The area indicated by the red rectangular is the undesired pattern. (c) An image of slanted ratchets. (d) An image of 3D printed ratchets. The area of the red triangle was not designed by the CAD program. | |
Fig. 3a shows a graph of the light absorbance of PEGDA prepolymers mixed with initiators and UV absorbing pigments (http://Coolglow.com). We measured the absorbance using a UV-Vis spectrometer (UV mini-1240, SHIMADZU) with different pigment concentrations ranging from 380 nm to 420 nm because the wavelength of the UV lamp in the 3D printer is approximately 400 nm. The absorbance is given by the Beer–Lambert law.21
| |
 | (1) |
where
A is the absorbance of the sample,
I0 is the intensity of the radiation entering the sample,
I is the intensity of the radiation emerging from the sample,
c is the concentration of the sample,
L is the length of the light path through the sample and
ε is the molar absorptivity. We note that the data in
Fig. 3a have been converted to a thickness of 100 μm. From the Beer–Lambert law, we can predict the absorbance for different slice thicknesses at a fixed pigment concentration.
Fig. 3b shows a graph of the absorbance for different slice thicknesses, which corresponds to the length of the light path at different pigment concentrations. To obtain the same absorbance when the concentration is 1 wt%, the slice thickness should be two times the thickness for a concentration of 2 wt%.
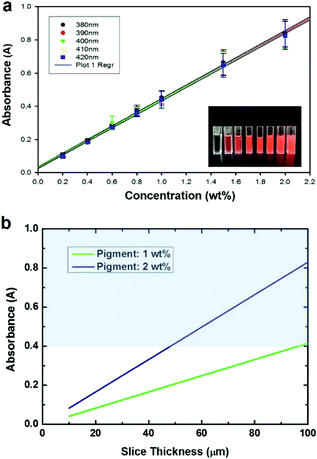 |
| | Fig. 3 (a) A graph showing absorbance as a function of the pigment concentration in PEGDA. The absorbance is converted to the condition of thickness (i.e., 100 μm) using the Beer–Lambert law. (b) A graph of absorbance as a function of slice thickness. To obtain an absorbance higher than 0.4, 2 wt% for a slice thickness of 50 μm or 1 wt% for a slice thickness of 100 μm is required. | |
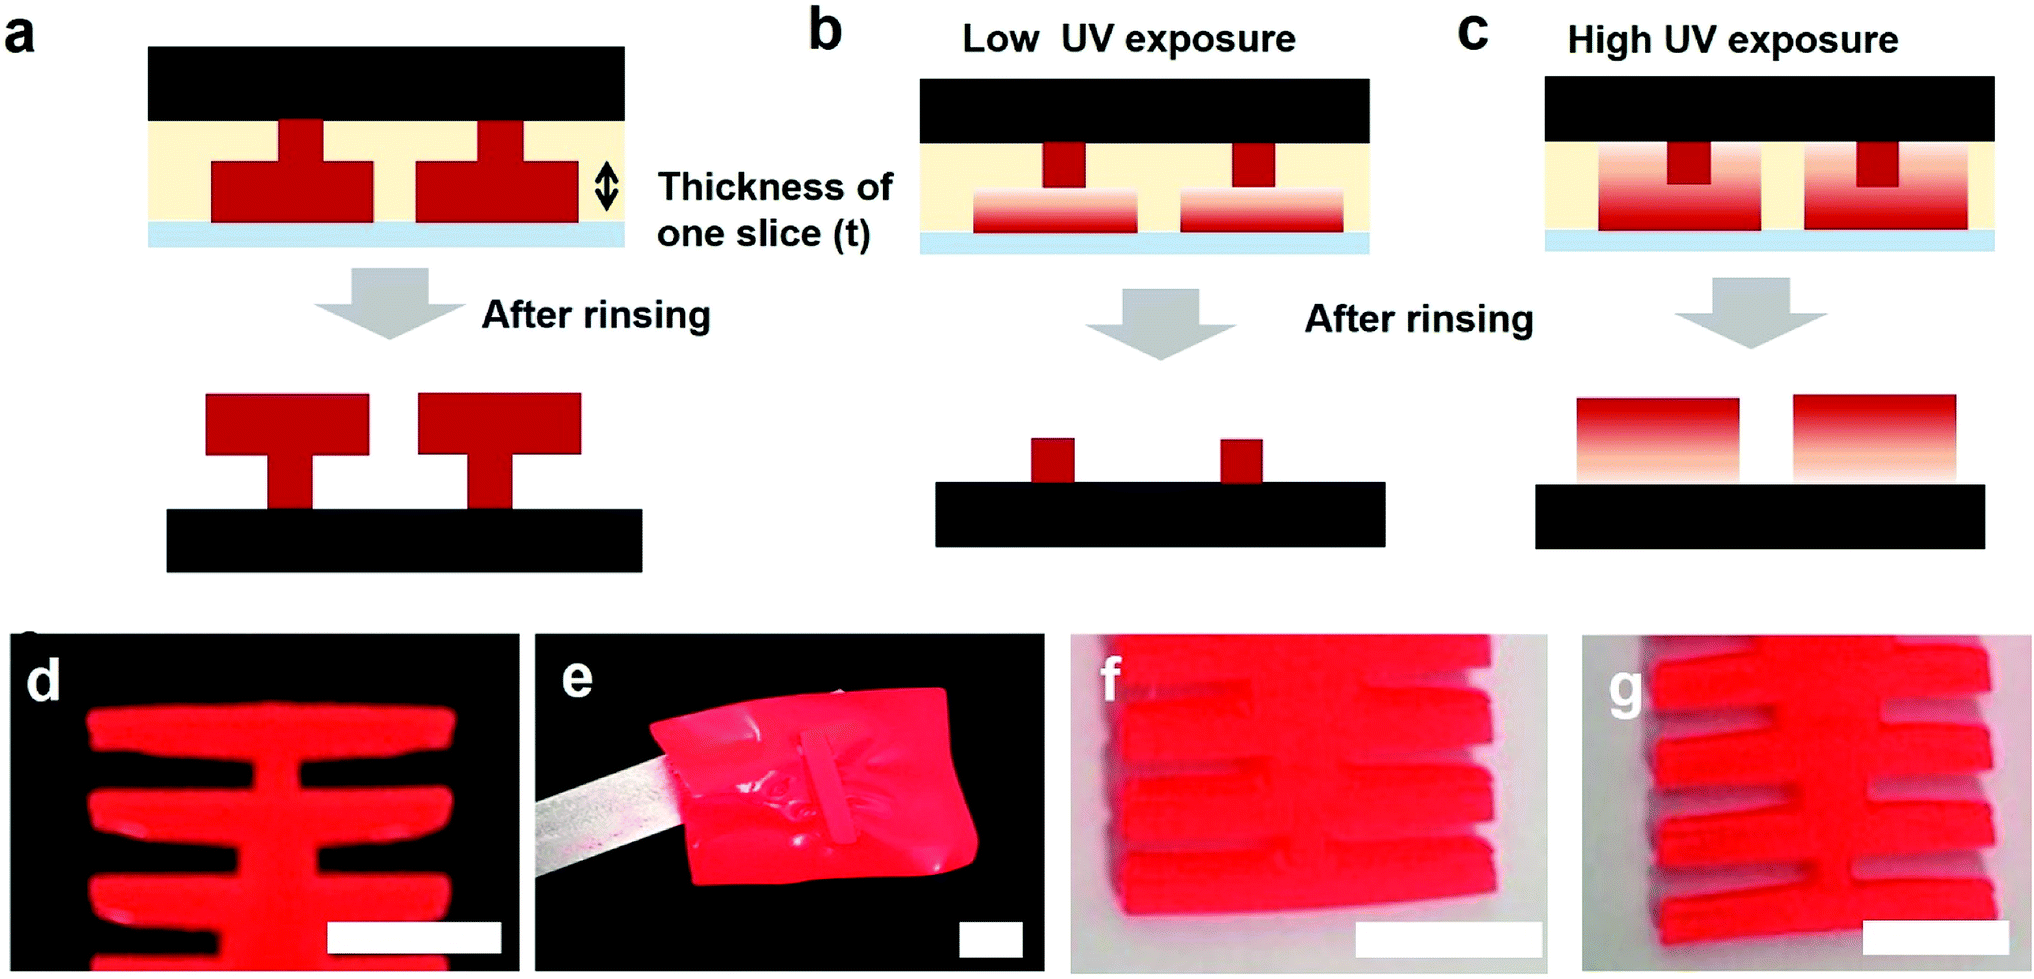
Fig. 4 shows failure models during stereolithographic 3D printing. As shown in Fig. 4a, we can obtain two T-shape structures when the exposure time is optimized. However, when the UV exposure time is not sufficient, the wider patterns are not cured and do not bond to the pre-cured patterns. After rinsing the uncured prepolymer, we obtained only the pre-cured patterns, as shown in Fig. 4b. When the amount of UV absorbing pigments is too high, the UV light may not reach the pre-cured patterns even though the exposure time was increased. However, when the exposure time is too high for a given pigment concentration, the UV light is transmitted over the slice thickness, as shown in Fig. 4c, and undesired patterns can be cured, which is a condition similar to that at a low pigment concentration even with an optimized exposure time, as discussed in Fig. 2. After obtaining the optimum UV exposure times, we constructed ladder structures with different pigment concentrations and slice thicknesses. Fig. 4d shows an image for a slice thickness of 50 μm and a pigment concentration of 2 wt%. The constructed pattern corresponds to the structures designed with the CAD program. When the pigment concentration is 10 wt%, the patterns do not bond to the substrate even with a long exposure time (Fig. 4e) because the UV light is screened by the pigments. Therefore, the prepolymers cannot be cured to the interface on the pre-cured patterns. When the pigment concentration was reduced to 1 wt% with a slice thickness of 50 μm, the UV light was transmitted through the slice thickness, which is explained in the failure model in Fig. 4c, and an undesired area was cured, as shown in Fig. 4f. Fig. 4g shows the experimental result when we increase the slice thickness to 100 μm with a pigment concentration of 1 wt%. The structure is consistent with that from the CAD design because the absorbance is the same as the condition with a concentration of 2 wt% and a slice thickness of 50 μm, as discussed in Fig. 3.
 |
| | Fig. 4 (a) Schematic illustration of 3D printing by DLP equipment with a slice thickness of t. (b) Failure models in low and (c) high UV exposure. (d) An image after construction of the ladder structures with PEGDA mixed with 2 wt% of pigments when the slice thickness is 50 μm. (e) When the pigment concentration is too high (10 wt%), the UV light does not reach the end of one slice, which is similar to the failure condition shown in (b). (f) When the concentration is reduced to 1 wt% with a slice thickness of 50 μm, the UV light transmits through the mixed PEGDA (failure model of (c)). (g) When we reduce the pigment concentration, the slice thickness should be increased to 100 μm to obtain the designed structures. Scale bars represent 5 mm. | |
In addition, we need to consider mechanical strength during stereolithographic 3D printing. In some cases, neck structures with small widths may be needed to connect wider structures to realize complex structures. Under extreme conditions, the necks are broken during 3D printing, which is an undesired outcome during the construction of 3D structures. The neck region is broken due to a weaker cohesion, elongation at break compared to the adhesion forces between the UV-cured polymer and the substrate as well as gravitational forces or capillary forces when the solidified structures is removed from a bath filled with liquid prepolymers (Fig. 5a). To estimate the ratio of widths between necks and bars, we designed ladder structures with a fixed bar width (1 cm) and different neck widths. We designed the widths of the necks to decrease from 9 mm to 0.1 mm, as shown in Fig. 5b. To compare the mechanical properties, we used two kinds of PEGDA (molecular weight (MW): 700 Da and 250 Da), and the pigment concentration was fixed at 1 wt%, and the slice thickness was 100 μm. It is important to note that the mechanical properties of PEGDA with different pigment ratio exhibit minor changes during our experiments. As shown in Fig. 5c, the designed pattern was produced with PEGDA with a MW of 700. However, when the PEGDA with a MW of 250 was used, only 10 layers were fabricated, and the other was not obtained after 3D printing.
 |
| | Fig. 5 (a) Design for testing the mechanical properties using a bar with a constant width. (b) Experimental results with different PEGDA molecular weights. When the MW is 250, the elongation at break is smaller. (c) Design for testing the mechanical properties with necks of a constant width of necks. | |
To investigate the reason, we measured elongation at break of PEGDAs with different molecular weights by a fatigue test system (E300LT, Instron). As shown in Fig. 6, the PEGDA of MW 700 can endure until the strain reaches to 13.3% while PEGDA of MW 250 are broken when the strain is about 5%. The results correspond to the previous work22 in which PEGDA of smaller molecular weight showed lower elongation at break. During the upward movement of the stage in the 3D printer, the adhesion force between the printed structures and transparent tray leads to a tensile strain, which causes the break at the neck area with a small width. Also, we examine the swelling degree of hydrogels because the biocompatible structures can be used in a water environment. After preparing samples, we placed them in a water bath for 24 hours and measured the change of geometry and mechanical properties by the fatigue test system. The swelling ratio of PEGDA with MW 700 is 11–17% as shown in Fig. S2.† The maximum strain before break reduces to 4% after swelling, which is similar to the result of PEGDA with MW 250. We note that the PEGDA with MW 700 has a higher elongation at break to be fabricated during the 3D printing operation. After the construction, the fabricated structures can be remained even after swelling unless there is external tensile strain over 4%. We also note that there is no significant release of pigments during swelling due to the fixation of the UV absorbent during crosslinking of PEGDA. From the experimental data, the minimum ratio of the bar and neck widths can be used as a guideline for the design of 3D structures using the studied materials.
 |
| | Fig. 6 A graph showing elongation at break of PEGDA with MW 700 and MW 250 before and after swelling. | |
4. Conclusions
In this study, we investigated the challenges of the 3D printing of complex structures using UV-curable materials. Many failure models, such as transparency of the UV-curable materials, high absorption preventing the UV light from reaching the upper parts, and mechanical failure after preparation of the material for 3D printing, are discussed. We explain how to increase UV absorption and optimize concentration. Also, we demonstrated that the slice thickness could be used to solve the UV transparency problem. In this experiment, the optimum condition of slice thickness is 100 μm with 1 wt% of pigments and 50 μm with 2 wt% of pigments when we use PEGDA with MW 700, which has higher mechanical property than PEGDA with smaller molecular weight. Furthermore, we propose a design to measure the mechanical properties to obtain a design rule from the structures. Because the 3D printing of various materials is important, the issues and design rules may provide guidance on the design of 3D structures using UV-curable materials and stereolithographic methods.
Acknowledgements
This work was supported by Seoul National University of Science & Technology.
References
- S. Waheed, J. M. Cabot, N. P. Macdonald, T. Lewis, R. M. Guijt, B. Paull and M. C. Breadmore, Lab Chip, 2016, 16, 1993–2013 RSC.
- A. Waldbaur, H. Rapp, K. Länge and B. E. Rapp, Anal. Methods, 2011, 3, 2681–2716 RSC.
- J. R. Tumbleston, D. Shirvanyants, N. Ermoshkin, R. Janusziewicz, A. R. Johnson, D. Kelly, K. Chen, R. Pinschmidt, J. P. Rolland, A. Ermoshkin, E. T. Samulski and J. M. DeSimone, Science, 2015, 347, 1349–1352 CrossRef CAS PubMed.
- J. A. Lewis and B. Y. Ahn, Nature, 2015, 518, 42–43 CrossRef CAS PubMed.
- D. Kokkinis, M. Schaffner and A. R. Studart, Nat. Commun., 2015, 6, 8643 CrossRef PubMed.
- S. V. Murphy and A. Atala, Nat. Biotechnol., 2014, 32, 773–785 CrossRef CAS PubMed.
- J. T. Muth, D. M. Vogt, R. L. Truby, Y. Mengüç, D. B. Kolesky, R. J. Wood and J. A. Lewis, Adv. Mater., 2014, 26, 6307–6312 CrossRef CAS PubMed.
- J. J. Martin, B. E. Fiore and R. M. Erb, Nat. Commun., 2015, 6, 8641 CrossRef PubMed.
- W. Jo, D. H. Kim, J. S. Lee, H. J. Lee and M.-W. Moon, RSC Adv., 2014, 4, 31764–31770 RSC.
- L. H. Sinh, K. Harri, L. Marjo, M. Minna, N. D. Luong, W. Jürgen, W. Torsten, S. Matthias and S. Jukka, RSC Adv., 2016, 6, 50706 RSC.
- L. A. Hockaday, K. H. Kang, N. W. Colangelo, P. Y. C. Cheung, B. Duan, E. Malone, J. Wu, L. N. Bonassar, H. Lipson, C. C. Chu and J. T. Butcher, Biofabrication, 2012, 4, 035005 CrossRef CAS PubMed.
- G. M. Cruise, D. S. Scharp and J. A. Hubbell, Biomaterials, 1998, 19, 1287–1294 CrossRef CAS PubMed.
- J. L. Ifkovits and J. A. Burdick, Tissue Eng., 2007, 13, 2369–2385 CrossRef CAS PubMed.
- J. A. S. Neiman, R. Raman, V. Chan, M. G. Rhoads, M. S. B. Raredon, J. J. Velazquez, R. L. Dyer, R. Bashir, P. T. Hammond and L. G. Griffith, Biotechnol. Bioeng., 2015, 112, 777–787 CrossRef CAS PubMed.
- V. Chan, P. Zorlutana, J. H. Jeong, H. Kong and R. Bashir, Lab Chip, 2010, 10, 2062–2070 RSC.
- P. Zorlutuna, J. H. Jeong, H. Kong and R. Bashir, Adv. Funct. Mater., 2011, 21, 3642–3651 CrossRef CAS.
- V. Chan, J. H. Jeong, P. Bajaj, M. Collens, T. Saif, H. Kong and R. Bashir, Lab Chip, 2012, 12, 88–98 RSC.
- W. Zhu, J. Li, Y. J. Leong, I. Rozen, X. Qu, R. Dong, Z. Wu, W. Gao, P. H. Chung, J. Wang and S. Chen, Adv. Mater., 2015, 27, 4411–4417 CrossRef CAS PubMed.
- A. Chiappone, E. Fantino, I. Roppolo, M. Lorusso, D. Manfredi, P. Fino, C. F. Pirri and F. Calignano, ACS Appl. Mater. Interfaces, 2016, 8, 5627–5633 CAS.
- K. Arcaute, B. K. Mann and R. B. Wicker, Ann. Biomed. Eng., 2006, 34, 1429–1441 CrossRef PubMed.
- D. F. Swinehart, J. Chem. Educ., 1962, 39, 333 CrossRef CAS.
- J. S. Temenoff, K. A. Athanasiou, R. G. LeBaron and A. G. Mikos, J. Biomed. Mater. Res., 2002, 59, 429–437 CrossRef CAS PubMed.
Footnote |
| † Electronic supplementary information (ESI) available. See DOI: 10.1039/c7ra04492e |
|
| This journal is © The Royal Society of Chemistry 2017 |
Click here to see how this site uses Cookies. View our privacy policy here. 
 Open Access Article
 This Open Access Article is licensed under a
  *
*