Crack growth mechanism of natural rubber under fatigue loading studied by a real-time crack tip morphology monitoring method

Gengsheng Weng*, Hong Yao, Aijun Chang, Kun Fu, Yanpeng Liu and Zhongren Chen*
Faculty of Materials and Chemical Engineering, Ningbo Key Laboratory of Specialty Polymers, Ningbo University, Ningbo, 315211, P. R. China. E-mail: wenggengsheng@nbu.edu.cn; chenzhongren@nbu.edu.cn

Received 2nd July 2014 , Accepted 3rd September 2014

First published on 3rd September 2014


Abstract

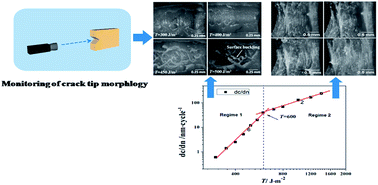
The present paper deals with the crack growth behavior of vulcanized natural rubber under fatigue loading. Our research focuses on the crack tip morphology evolution and its relationship with the crack growth rate. For this purpose, an original real-time monitoring method is applied to capture the crack tip morphology during standard fatigue testing. This method involves the use of a high speed microscopic camera and a dynamic mechanical analyzer with a crack growth testing unit. The tear energy (T) dependence of the crack tip morphology is discussed. It is revealed that there are two characteristic cracking morphologies: at T < 600 J m−2, the power law slope of dc/dn versus T is 6. Surface buckling and peeling at the crack-front surface occur, which result in the appearance of secondary cracks; at T > 600 J m−2, the power law slope of dc/dn versus T is 2. A ligament break-up mechanism dominates. This work gives us new opportunities to study the crack growth mechanism of rubbers from the viewpoint of real-time crack tip morphology investigation.

1. Introduction

Crack propagation in rubbers is of fundamental importance in many applications, such as rubber cycling loading (fatigue loading), rubber wear and pressure sensitive adhesives.1–3 Typical rubber product failure by crack propagation such as tire explosion often leads to catastrophic events involving large loss of life. The mechanism of rubber crack propagation is widely investigated by pure mechanical theories, which are often inspired by metallic materials result through the definition of tear energy T, or in other words, energy release rate.4,5 These researches are based on the Griffith's hypothesis which proposes that crack growth is due to the conversion of a structure's stored potential energy to surface energy associated with new crack surface.6,7 For rubber materials, viscoelastic energy dissipation also contributes to the energy needed for crack growth.7 It reflects higher energy necessary for rubbers to propagate cracks.

Experimentally, Lake and Lindley indentified four distinct regimes of fatigue crack growth behavior based on the peak tear energy per cycle T.8,9 The crack growth rate dc/dn below a threshold T0 is independent of the mechanical loading. Since T0 value is very small, three regimes are indentified in the plot of dc/dn versus T in most cases. The relationship between dc/dn and T can be explained by some theoretical model, such as Crack-Layer model for rubber, which was developed by Aglan and Moet.10 This model is based on the irreversible thermodynamics of an “active zone”. It takes the thermodynamic flux to be the crack growth rate. This model can predict the regimes at T > T0 for load ratio equals zero. Other models were also developed to understand the crack growth behavior of rubbers. However, these approaches can only solve part of the crack growth problem. They could not satisfactorily predict the effect of microstructure changes due to the complexity of rubber mechanical properties.

In 1980s, Gent et al. proposed micromechanics research of crack tip in elastomers.11 By the use of scanning electron microscopy, they studied the torn surfaces and the tips of propagating tears in elastomers. In their investigations, characteristic cracking morphologies were discovered. This study confirmed the importance of research on the cracking morphology, which could be used to explain the microstructure changes at the crack tip. Due to the limit of experimental apparatus, real-time investigation was not done. Later, Hamed focused on the investigation of fracture surface morphology of rubbers.12 In recent years, Le Cam et al. used an SEM monitoring method to determine the physical mechanism of crack propagation in filled natural rubber (NR).13,14 By this method, they observed some new morphology features, such as ligaments, microcracks and microvoids. Based on their observation, they deduced that fatigue damage is mostly due to cavitation induced by decohesion between the zinc oxides and rubber matrix. Later, Verron et al. also used a similar method to study the crack tip morphology. It was found that fatigue crack growth is driven by the ligaments breakage.15 It is clear that these important works were obtained from small-scale tensile machine mounted on an SEM instrument. So, two problems should be noticed: (i) small-scale tensile machine could not do standard fatigue tests, so available loading condition is limited. (ii) Samples often were first performed on a standard fatigue test machine. Since sample relaxation appears during the transfer of testing condition, crack tip morphology may be different from the standard fatigue testing.

The aim of the present paper is to propose a real-time crack tip morphology investigation of NR on a standard fatigue testing machine. By this method, comprehensive real-time crack tip morphology evolution under different tear energy levels can be detected. Meanwhile, the fatigue testing apparatus can be used to record energy dissipation, dynamic modulus, etc. The detailed testing procedure is described in the next section. Based on the real-time crack tip morphology monitoring and SEM characterizations, we proposed new insight into the crack growth mechanism of NR under different tear energy levels.

2. Experimental

2.1 Material

The material used in this work is a vulcanized natural rubber. Table 1 summarizes its chemical composition and some mechanical characteristics. NR used in this study was ribbed smoked sheet from Indonesia (RSS1). Non-vulcanized NR, containing all the vulcanization ingredients, was prepared in a laboratory twin roll mixing mill (SK-160B, made by Shanghai Rubber Machine Co., China) at room temperature, and then vulcanized at 140 °C for 12 min under a pressure of 1.5 × 10⁷ Pa.
Table 1 Material formulation and mechanical properties
Material Formulation (phr) Mechanical Properties
a N-Cyclo-hexyl-2-benzothiazolesulfenamide (CZ).
Natural rubber 100 Density (g cm−3) 0.97
Zinc oxide 5 Shore A hardness 45
Stearic acid 2 Tensile strength (MPa) 16
Antioxidant 1 Elongation at break (%) 680
Acceleratora 1    
Sulfur 2    


2.2 Crack growth testing

The uniaxial crack growth tests were performed on a Metravib DMA + 1000 dynamic mechanical analysis (DMA) machine. This machine is a specially designed DMA system which consists of powerful standard fatigue test unit and dynamic mechanical analysis unit. Energy dissipation during fatigue test also can be recorded. Fatigue tests can be achieved under wide frequency and tear energy ranges.

The test sample has well-defined test geometry (2 × 6.8 × 40 mm). It can be treated as pure shear test piece, which is shown in Fig. 1. In this case, tear energy is independent of the crack length.16 The tear energy is expressed in eqn (1):

 
T = w0h0 (1)
where w0 is the energy density per volume unit expressed in J m−3, h0 is the specimen height expressed in m. This equation can be reduced to:
 
image file: c4ra06518b-t1.tif(2)
where Ef is the energy delivered expressed in J (see Fig. 2), L is the specimen width and e is the specimen thickness.


image file: c4ra06518b-f1.tif
Fig. 1 Real-time measurement of the morphology at the crack tip: experimental apparatus and schematic representation of cracking morphology measurement. Crack-front morphology is recorded at direction (A). Crack-side morphology is recorded at direction (B).

image file: c4ra06518b-f2.tif
Fig. 2 Ef determined from the cyclic loading. The vertical axis denotes force (F) and the horizontal axis denotes displacement (D). The area of colored region denotes Ef. The area of the hysteresis loop denotes the work lost per cycle Eh.

According to eqn (2), tear energy can be easily estimated from the force and displacement data. The T values were given by the machine computation under the following three steps:

(a) Applying a number of excitation cycles to the specimen in order to stabilize it.

(b) Calculating the relation automatically between the energy delivered per area unit and loading displacement value and drawing the T curve which allows the displacement value to be applied for each cracking T value.

(c) Choosing the corresponding displacement when the experimental condition is validated.

Before the fatigue tests, the samples were notched at both sides (see Fig. 1). The fatigue tests were carried out under a frequency of 10 Hz at room temperature with a load ratio of zero. The Leica microscopic lens is used to locate the crack tip and test the crack growth length. Then, the crack growth rate dc/dn can be determined by crack length and cycle increments. The tear energy used in the fatigue tests ranges from 300 to 1400 J m−2. The precut crack depth is about 1.5 mm and the final depth of the crack is no more than 5 mm.

Fig. 3 shows a typical dc/dn test result at T = 450 J m−2. After 1 × 10⁴ fatigue cycles, dc/dn of both sides reach nearly the same value (∼5 nm per cycle). Thus, this value is used as the crack growth rate at T = 450 J m−2. In most cases, the first dc/dn test value is significant higher than the later tested values (see the first test point at both sides) because of the unstable growth at the initial fatigue test condition, so the first dc/dn values of both sides are neglected during the estimating of dc/dn.


image file: c4ra06518b-f3.tif
Fig. 3 The dc/dn values of both sides of the cracking sample as a function of cycles measured at T = 450 J m−2.

Based on the force, displacement, frequency values recorded by the dynamic mechanical analysis during cyclic loading, storage modulus G′, loss modulus G′′ and tan[thin space (1/6-em)]δ can be calculated. The computation process is the same with that of a normal DMA instrument. Meanwhile, the work lost per cycle Eh (see Fig. 2) is also calculated.

2.3 Crack tip morphology monitoring

A high speed microscopic camera (Olympus iSpeed 3) was used to monitor the crack-front morphology evolution at direction (A) and the crack-side morphology at direction (B) of the NR sample during cyclic loading (see Fig. 1).

2.4 Fracture surface morphology analysis

The fracture surface morphologies of the samples were tested by a SEM instrument (TM 3000, Hitachi) operation at 20 kV. Before observation, the samples after fatigue tests were carefully cut off along the crack front-line. Then, rubber samples were cleaned using ultrasounds in a neutral solution for SEM imaging.

3. Results and discussion

3.1 Crack growth rate of NR

The rates of fatigue crack growth of NR vulcanizate were determined as a function of tear energy and the result is shown in Fig. 4. It can be seen clearly that there are two distinct crack growth regimes and the transition occurs at T = 600 J m−2. In both regimes, the relationships between the fatigue crack growth rate and tear energy obey power-laws: dc/dnT6 for regime 1, dc/dnT2 for regime 2. Aglan and Moet proposed a Crack-Layer propagation theory to predict crack growth,17,18 which is based on the irreversible thermodynamics of an “active zone” (Fig. 5). The active zone is the damage zone at the crack tip. The crack tip proceeds surrounded and preceded by the damage zone (active zone). Accordingly, the rate of active zone translation denotes the crack growth rate and is considered as thermodynamic flux. The law of Crack-Layer propagation is thus established by relating the flux to the reciprocal force within the framework of irreversible thermodynamics. Thus, the law of Crack-Layer propagation by translational mode is given by:
 
image file: c4ra06518b-t2.tif(3)
 
R = 〈ρW (4)
where i is the rate of Crack-Layer translation, β is a dissipative coefficient, T is the tear energy, 〈d〉 is a characteristic size of the active zone, γ* is the specific enthalpy of damage, R is the translational resistance moment, 〈ρ〉 denotes damage density averaged along the trailing edge of the active zone and W is the width of the active zone measured at the crack tip (Fig. 5). Based on their model, one can distinguish three regimes of Crack-Layer propagation. It is widely accepted that there are four power-law regimes of fatigue crack growth of rubbers. The first regime relates to a constant crack growth rate independent of T. The relationship developed by Aglan and Moet does not describe this regime. Their model only predicts the other three regimes and has an approximative power-law. Thus, our experimental result shown in Fig. 4 can be explained by the Crack-Layer propagation model. In regime 1, the crack propagates through the material damaged during the initiation period, so R is very small. For this reason, the power law slope of dc/dn versus T in regime 1 is high. Regime 2, with intermediate T, is characterized by damage growth accompanying crack propagation. Thus R increases, yielding a decreasing power law slope. Since we did not consider the crack growth behavior in regime 3, which relates to uncontrolled mode of propagation, the corresponding dc/dn versus T relation is not shown in Fig. 4.

image file: c4ra06518b-f4.tif
Fig. 4 Crack growth rate versus tearing energy T for NR vulcanizate. The power law slopes (“6” and “2”) are indicated in two different cracking rate regimes.

image file: c4ra06518b-f5.tif
Fig. 5 Schematic illustration of active zone at a crack tip.

Fig. 6a gives the relationship between storage modulus G′ and T. It can be seen that G′ decreases gradually. Since G′ of damaged region is smaller, a possible reason of G′ decreasing is that the damaged region at the crack tip (active zone) is small at lower T values, but larger at higher T values. Additionally, Mullins effect also accounts for the G′ decreasing. The work lost per cycle Eh during fatigue testing is shown in Fig. 7. The Eh values are calculated from the area of the hysteresis loop (e.g. the hysteresis loop in Fig. 7b). During cracking, Eh originates from irreversible deformation, which consists of two parts. One part of the work is dissipated on damage formation; the rest is converted into heat. According to Fig. 6b, tan[thin space (1/6-em)]δ decreases with increasing T. So, the percentage of heat dissipation decreases with increasing T. It indicates that more work is dissipated on damage formation at larger T. It can be seen clearly from Fig. 7 that Eh and T obey a power law of 1. When T increases, irreversible deformation becomes larger. So, an increasing trend of Eh occurs.


image file: c4ra06518b-f6.tif
Fig. 6 Evolution of storage modulus G′ (a) and tan[thin space (1/6-em)]δ (b) as a function of T.

image file: c4ra06518b-f7.tif
Fig. 7 Work lost per cycle Eh versus T (a) and the relationship between force and displacement (b).

Based on the dc/dn and Eh data obtained above, we defined the energy dissipated per unit depth of cracking Ediss as

 
image file: c4ra06518b-t3.tif(5)

The Ediss variation is expressed in Fig. 8. We can distinguish two distinct regimes, where the power law slope of Ediss versus dc/dn changes at T = 600 J m−2. At T < 600 J m−2, the power law slope is −5, while the power law slope equals −1 at T > 600 J m−2. This result reflects the higher energy necessary to advance the crack tip by one unit length at T < 600 J m−2. Moreover, different power law relations imply different cracking mechanisms, which depend on tear energy.


image file: c4ra06518b-f8.tif
Fig. 8 Energy dissipated per unit length of cracking Ediss versus T for NR vulcanizate.

3.2 Crack tip morphology study of NR at T < 600 J m−2

To deeply understand the difference of crack propagation mechanism between the two cracking regimes, real time morphology evolution on the crack tip is captured during cracking tests. The crack-front morphologies of NR at T < 600 J m−2 captured by high speed microscopic camera are shown in Fig. 9a. Interestingly, surface buckling (see the striations) can be seen clearly in the crack-front surface. Particularly, criss-crossing striations appear at higher T values. When the striations link up in line, crack-front surface peeling can be observed (see the regions marked by the white circles in Fig. 9b). The schematic presentation of crack-front peeling morphology is shown in Fig. 9b. Usually, we can observe two orders of surface peeling lines. Cracking region shown in the schematic presentation locates between the two 2nd order surface peeling lines. Here, the peeling substrate denotes the surface left after surface peeling. According to the crack-front morphology monitoring, we declare that surface buckling at the cracking region contributes to the crack tip advancing at T < 600 J m−2.
image file: c4ra06518b-f9.tif
Fig. 9 Crack-front morphology of NR at T < 600 J m−2 (a) and schematic presentation of crack-front peeling morphology (b).

Typical crack-side morphology of NR is given in Fig. 10a, which shows that the crack branches at T < 600 J m−2. We can see distinct secondary cracks exhibit around the crack tip. This phenomenon presents us two features: (i) secondary cracks grow almost orthogonal to the cracking direction; (ii) when the crack branches, tear energy is dissipated to every secondary crack. Thus, crack growth rate slows down. The front view of crack branching is shown in Fig. 10b, which is the further development of the corresponding sample in Fig. 9b. This figure obviously shows that the crack branching is attributed to the development of surface peeling. Although surface peeling leads to the appearance of secondary cracks, crack still mainly grows along the former growth direction and dc/dn tests are also based on the former growth direction.


image file: c4ra06518b-f10.tif
Fig. 10 Crack branching observed from crack-side morphology (a); the front view of crack branching is shown in (b).

To further understand the crack branching phenomenon, SEM images of fracture surfaces were recorded. At a first glance, the fracture surface of NR sample tested at T = 400 and 500 J m−2 is rather rough. Take a closer look at the fracture surface; we can see a number of porous structures on the fracture surface. Particularly, some crazes exist on the fracture surface (see the areas pointed by the arrows in Fig. 11b). According to Fig. 11b, there are many layered structures on the fracture surface. Many voids and crazes lie between these layered structures. Moreover, the layered structures lie orthogonal to the crack growth direction. Particularly, many voids are flattened and some voids have a trend of coalescence. Hereby, we deduce that the crazes are resulted from the coalescence of the voids. As to Fig. 11c, we can also see many voids. However, the voids exist mainly on the layered structures and some of the layered structures and crazes have larger lengths and widths. It implies that larger voids are coalesced at larger tear energy, only small voids remain on the layered structures. In Fig. 12, we can see the initial crack front-line of the fracture surface at T = 500 J m−2. From this image (the inset image is clearer), we can also see the appearance of the layered structures and the coalescence trend of the voids. Fig. 13 shows the schematic presentation of the coalescence process. Two stages can be seen in this figure: (1) voids coalesce into crazes. Layered structures lie between adjacent crazes (see the region indicated in B); (2) crazes coalesce further. If crazes coalesce throughout the whole fracture surface, we can see the edge notch on the side view. Then, surface peeling is observed and crack branching appears. According to the surface buckling theory,19 the layered structures account for the appearance of surface buckling. So, striations observed in Fig. 8 are attributed to the layered structures.


image file: c4ra06518b-f11.tif
Fig. 11 Fracture surface of NR sample tested at different T. T = 400 J m−2: the full view of the fracture surface is presented in (a). The arrow in (a) indicates the crack growth direction; panel b is the enlarged image of the region marked in (a). Panel c is the fracture surface SEM image of NR sample tested at T = 500 J m−2.

image file: c4ra06518b-f12.tif
Fig. 12 SEM image of the fracture surface at T = 500 J m−2. The initial crack front-line is pointed by the arrow. The inset image is the enlarged part of the circled region.

image file: c4ra06518b-f13.tif
Fig. 13 Schematic presentation of coalescence process. (A–C) denote the coalescence process on the fracture surface. (D) is the side view of the edge notch region indicated in (C).

Fig. 14 shows the SEM images of NR fracture surfaces tested at T = 400, 500 and 600 J m−2. As it has been proposed above, T = 600 J m−2 is a transition point. At T < 600 J m−2, the SEM images of fracture surface are rather rough, due to porous and layered structures. When T = 600 J m−2, the fracture surface morphology becomes squama-like and smooth. Compared with the fracture surface morphologies at T < 600 J m−2, there are only a few voids with small dimensions. Still, a few layered structures can be seen, indicating the transition of the fracture surface morphology at T = 600 J m−2.


image file: c4ra06518b-f14.tif
Fig. 14 SEM images of NR fracture surfaces tested at T = 400, 500 and 600 J m−2. The black arrows indicate the crack growth directions.

3.3 Crack tip morphology study of NR at T > 600 J m−2

Crack-front morphologies obtained at T = 800 (a) and 1200 J m−2 (b) are shown in Fig. 15, which represent typical crack-front morphology of NR tested at T > 600 J m−2. Compared to the crack-front morphology tested at T < 600 J m−2, the crack-front morphology at T > 600 J m−2 is quite different. In these images, we can see ligaments with different diameter. These ligaments are stretched almost parallel to the loading direction and vary during cracking. Moreover, crack-front surface buckling and surface peeling disappear. During cracking, some ligaments become thicker and finally break, resulting in cracking knot. From the monitoring of crack-front morphology of NR tested at T > 600 J m−2, we can deduce that crack growth is driven by the ligaments breakage. That is to say, crack growth changes from the surface peeling mechanism at T < 600 J m−2 to ligament break-up mechanism at T > 600 J m−2. Typical crack-side morphology (T = 800 J m−2) captured at T > 600 J m−2 is shown in Fig. 16. Since surface peeling does not occur, we do not see crack branching in Fig. 16. SEM images of the fracture surface tested at T > 600 J m−2 is shown in Fig. 17. Evidently, the fracture surface morphology is quite different, presenting squama-like structures. Meanwhile, we hardly see porous structures. As tear energy increases, the fracture surface becomes smoother. The squama-like structures of the fracture surface may be attributed to the formation of cracking knot.
image file: c4ra06518b-f15.tif
Fig. 15 Crack-front morphology of NR at T > 600 J m−2: (a) T = 800 J m−2; (b) T = 1200 J m−2.

image file: c4ra06518b-f16.tif
Fig. 16 Crack-side morphology obtained at T = 800 J m−2.

image file: c4ra06518b-f17.tif
Fig. 17 SEM images of the fracture surface tested at T = 800, 1000, 1200 and 1400 J m−2. The black arrows indicate the cracking direction.

Based on the above cracking morphology investigations, it can be proposed that the cracking morphology has a tear energy dependence. It contains three aspects: (i) crack-front morphology evolution; (ii) crack-side morphology evolution; (iii) fracture surface morphology evolution. The latter two morphology characters are determined by the crack-front morphology. Due to surface buckling and peeling at low tear energies, more new surfaces are created in a unit cracking depth. So, the fracture surface morphology is rather rough at lower tear energies. The fracture surface morphology is smooth at higher tear energies, because only ligaments breakage occurs. From the viewpoint of energy dissipation, the creation of more new surfaces reflects higher energy necessary to create new propagating cracks.20 This has been proved by the plot of Ediss versus T presented in Fig. 8.

4. Conclusions

In this work, the crack tip morphology evolution of natural rubber under different tear energy was investigated by a real-time cracking morphology monitoring apparatus. This apparatus is mainly composed of a DMA machine of crack growth performance test unit and a high speed microscopic camera. Two crack growth rate regimes were observed in the dc/dn versus T plot. At T < 600 J m−2, the power law slope of dc/dn versus T is 6, while the counterpart at T > 600 J m−2 is 2. The energy dissipation results indicate that the energy dissipated per unit length of cracking Ediss is higher at T < 600 J m−2. Crack tip morphology investigations show that surface buckling and peeling at the crack-front surface occur at T < 600 J m−2. The surface buckling and peeling account for the appearance of secondary cracks. Thus, the crack growth rate is low. Crack growth changes from the surface peeling mechanism at T < 600 J m−2 to ligament break-up mechanism at T > 600 J m−2. This work gives us new opportunities to study the crack growth mechanism of rubbers in the viewpoint of real-time crack tip morphology investigation.

Acknowledgements

The authors warmly thank the financial support of National Natural Science Foundation of China (Grant No. 21404063), Zhejiang Provincial Natural Science Foundation of China (Grant No. LQ14E030001), Ningbo Natural Science Foundation (Grant No. 2013A610024) and the Scientific Research Fund of Zhejiang Provincial Education Department (Grant No. Y201327227). The authors are also grateful for K.C. Wong Magna Fund of Ningbo University and the financial support of Ningbo Key Laboratory of Specialty Polymers (2014A22001).

References

  1. L. White, Extreme oilfield conditions push elastomers to the limit, Eur. Rubber J., 1999, 181, 24 Search PubMed.
  2. D. W. Nicholson and N. W. Nelson, Finite-element analysis in design with rubber, Rubber Chem. Technol., 1990, 63, 368 CrossRef.
  3. G. S. Weng, G. S. Huang, H. X. Lei, L. L. Qu, Y. J. Nie and J. R. Wu, Crack initiation and evolution in vulcanized natural rubber under high temperature fatigue, Polym. Degrad. Stab., 2011, 96, 2221 CrossRef CAS PubMed.
  4. R. S. Rivlin and A. G. Thomas, Rupture of rubber. I. Characteristic energy for tearing, J. Polym. Sci., 1953, 10, 291 CrossRef CAS PubMed.
  5. A. N. Gent, Engineering with rubber, Hanser Publishers, Munich, 1992, p. 96 Search PubMed.
  6. A. A. Griffith, The phenomena of rupture and flow in solids, Philos. Trans. R. Soc. London, Ser. A, 1920, 221, 163 CrossRef.
  7. G. Garbone and B. N. J. Persson, Hot cracks in rubber: Origin of the giant toughness of rubberlike materials, Phys. Rev. Lett., 2005, 95, 114301 CrossRef.
  8. G. J. Lake and P. B. Lindley, The mechanical fatigue limit for rubber, J. Appl. Polym. Sci., 1965, 9, 1233 CrossRef PubMed.
  9. W. V. Mars and A. Fatemi, A literature survey on fatigue analysis approaches for rubber, Int. J. Fatigue, 2002, 24, 949 CrossRef CAS.
  10. H. Aglan and A. Moet, The resistance of rubber compounds to brittle crack propagation, Rubber Chem. Technol., 1989, 62, 98 CrossRef CAS.
  11. A. N. Gent and C. T. R. Pulford, Micromechanics of fracture in elastomers, J. Mater. Sci., 1984, 19, 3612 CrossRef CAS.
  12. G. R. Hamed and M. Y. Huang, Tensile and tear behavior of anisotropic double networks of a black-filled natural rubber vulcanizate, Rubber Chem. Technol., 1998, 71, 846 CrossRef CAS.
  13. J. B. Le Cam, B. Huneau, E. Verron and L. Gornet, Mechanism of fatigue crack growth in carbon black filled natural rubber, Macromolecules, 2004, 37, 5011 CrossRef CAS.
  14. J. B. Le Cam and E. Toussaint, The mechanism of fatigue crack growth in rubbers under severe loading: the effect of stress induced crystallization, Macromolecules, 2010, 43, 4708 CrossRef CAS.
  15. S. Beurrot, B. Huneau and E. Verron, In Situ SEM study of fatigue crack growth mechanism in carbon black-filled natural rubber, J. Appl. Polym. Sci., 2010, 117, 1260 CAS.
  16. S. Kaang, Y. W. Jin, Y. Huh, W. J. Lee and W. B. Im, A test method to measure fatigue crack growth rate of rubbery materials, Polym. Test., 2006, 25, 347 CrossRef CAS PubMed.
  17. A. Chudnovsky and A. Moet, Thermodynamics of translational crack layer propagation, J. Mater. Sci., 1985, 20, 630 CrossRef.
  18. A. Chudnovsky and A. Moet, A theory for crack layer propagation in polymers, J. Elastomers Plast., 1986, 18, 50 CrossRef CAS PubMed.
  19. Y. N. Novichkov and E. N. Sinitsyn, Surface buckling of a layered medium, Polym. Mech., 1973, 9, 572 CrossRef.
  20. B. N. J. Persson, O. Albohr, G. Heinrich and H. Ueba, Crack propagation in rubber-like materials, J. Phys.: Condens. Matter, 2005, 17, R1071 CrossRef CAS.

This journal is © The Royal Society of Chemistry 2014
Click here to see how this site uses Cookies. View our privacy policy here.