Programmable diagnostic devices made from paper and tape†
Andres W.
Martinez
a,
Scott T.
Phillips
a,
Zhihong
Nie
a,
Chao-Min
Cheng
a,
Emanuel
Carrilho
b,
Benjamin J.
Wiley
a and
George M.
Whitesides
*a
aDepartment of Chemistry & Chemical Biology, Harvard University, Cambridge, MA 02138, USA. E-mail: gwhitesides@gmwgroup.harvard.edu
bInstituto de Química de São Carlos, Universidade de São Paulo, São Carlos, SP 13566-590, Brazil
First published on 30th July 2010
Abstract
This paper describes three-dimensional microfluidic paper-based analytical devices (3-D µPADs) that can be programmed (postfabrication) by the user to generate multiple patterns of flow through them. These devices are programmed by pressing single-use ‘on’ buttons, using a stylus or a ballpoint pen. Pressing a button closes a small space (gap) between two vertically aligned microfluidic channels, and allows fluids to wick from one channel to the other. These devices are simple to fabricate, and are made entirely out of paper and double-sided adhesive tape. Programmable devices expand the capabilities of µPADs and provide a simple method for controlling the movement of fluids in paper-based channels. They are the conceptual equivalent of field-programmable gate arrays (FPGAs) widely used in electronics.
Introduction
We and others are developing microfluidic paper-based analytical devices (µPADs) for use in health-related analyses (e.g., medical diagnostics, water purity, food quality, etc.) for use in developing countries.1–10 MicroPADs are made from paper patterned into hydrophilic channels bounded by hydrophobic polymers2 or paper cut into channels with controlled geometry using laser cutter.11 They are inexpensive, easy-to-use, and equipment-free.2–4,12–17 The function of µPADs is normally determined during fabrication: i.e., fluids will fill the channels in the device in a sequence predetermined by the design of the channels. This article describes programmable µPADs, where the structure of the channels, the paths taken by fluid flowing through the devices, and the function of the devices are determined by the user after fabrication is complete. These devices follow a design philosophy similar to that in field-programmable gate arrays (FPGAs), which enable the functions of an integrated circuit to be determined after fabrication.18 The value of these systems is that a single platform can be fabricated in quantity, and programmed for multiple, smaller, and more specialized uses. With programmable µPADs, the user can choose which channels or areas of the device should be filled with fluid, and which channels or areas should not. The user also can choose when to fill a given channel with fluid. A single programmable device, for example, can be used to test for glucose and nitrites when programmed one way, and to test for protein and ketones when programmed another way. Alternatively, a single device can be programmed to perform from one to eight replicates of a glucose assay, depending on how many repetitions of an assay are desired based on the volume of sample available. These capabilities should be useful in situations where only a limited quantity of sample is available, where analytical standards necessitate multiple repetitions of an assay, or where reagents and samples must be combined in a timed sequence.A number of valving mechanisms have been reported for controlling the pressure-driven flow of fluids in conventional microfluidic devices made out of glass, silicone and plastics,19–23 but none of these technologies can be applied to paper-based microfluidics because the movement of fluids in paper-based microfluidic channels is based on capillary flow. Li et al.24 described a reconfigurable switch for controlling capillary wicking in paper-based channels by cutting a channel into two parts and then manually separating or joining them to control capillary flow. Alternatively, Noh and Phillips25 programmed the flow rate of fluids by modulating the wettability of paper-based microfluidic channels, and thus the time required for fluids to wick to different locations within a µPAD. Programmable µPADs introduce a different, and perhaps more practical method for controlling capillary flow in paper-based devices.
We control the flow of fluid in programmable µPADs by compressing single-use ‘on’ push-buttons that are built into the device (Fig. 1). Programmable µPADs are made using the same techniques described for fabricating three-dimensional (3-D) µPADs: that is, they comprise stacked layers of patterned paper and double-sided adhesive tape with designed perforations.3 When the layers of paper and tape are stacked to assemble the 3-D device, there is a small gap between the layers of paper that is created by the finite thickness of the tape (Fig. 1). Fluid will not flow across the gap between channels in two adjacent layers of paper unless the gap is filled with cellulose powder or some other hydrophilic material.3 The gap is closed by pressing the two layers of paper together through a hole in the tape interlayer using a modest mechanical force; the paper deforms inelastically and remains compressed (Fig. 2).
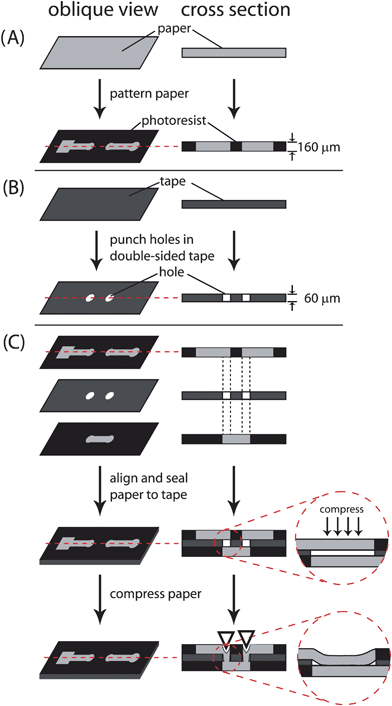 | ||
| Fig. 1 Fabrication of 3-D microfluidic devices out of paper and tape. (A) Patterning of chromatography paper by photolithography. (B) Patterning of double-sided tape using a laser cutting. (C) The patterned paper and tape are aligned and stacked. Small gaps between the channels in adjacent layers of paper reflect the thickness of the tape. For fluids to wick between channels in adjacent layers of paper, these gaps must be eliminated. To do so, either the gap can be filled with a hydrophilic material during fabrication, or the paper in adjacent layers can be brought into contact using a mechanical force. | ||
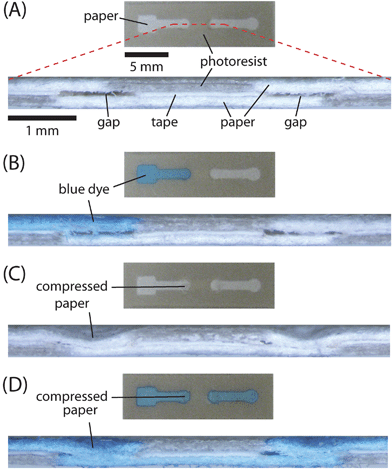 | ||
| Fig. 2 Demonstration of ‘on’ buttons. (A) Top view and crosssection of a fully assembled 3-D device. The crosssection shows the two layers of paper, the layer of tape, and the small gaps between the channels. The crosssection image is obtained by sectioning the device, as illustrated by dashed line. (B) Top view and crosssection of a device identical to the one shown in (A) after adding 10 µL aqueous blue dye (1 mM Erioglaucine) to the left end of the channel. The gaps prevented the dye from wicking between the two adjacent layers of paper. (C) Top view and crosssection of a 3-D device after closing the gaps by compressing the top layer of paper with a ballpoint pen. (D) Top view and crosssection of a device identical to the one shown in (C) after adding blue dye to the left end of the channel. The dye wicked across the entire length of the channel. | ||
The input from the user is the choice of the layers of paper to connect, and the pattern of those connections; the output is fluid flowing into a specific channel. The devices can be programmed by the user with a standard ballpoint pen or any other object with a narrow point (∼0.5 to 1 mm in diameter). The programming can be done at any time before (and in some cases, after) adding the sample to the device.
Results and discussion
‘On’ buttons
We designed and fabricated ‘on’ buttons based on four principal elements: (i) an inlet channel that carries fluid to the button, (ii) an outlet channel that carries fluid from the button to another location when the button is compressed, (iii) two gaps between the inlet and outlet channel separated by an additional layer of patterned paper, and (iv) a mark on the top of the device that indicates the location of the button (Fig. 3). This mark helps the user to locate the position of gaps precisely, and switch on the buttons efficiently.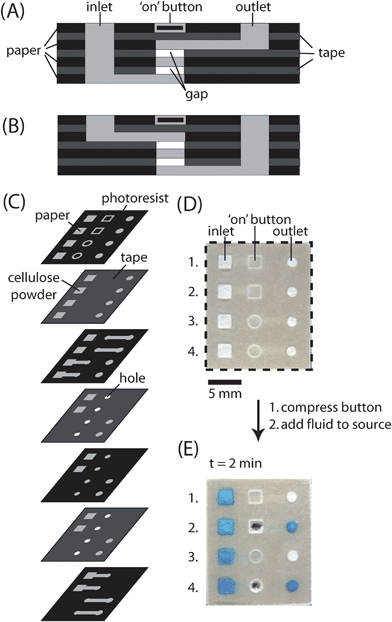 | ||
| Fig. 3 Fabrication of ‘on’ buttons in 3-D microfluidic devices. (A) Schematic of the cross-section of an ‘on’ button where the inlet channel is below the outlet channel. The inlet channel and outlet channel are separated by two gaps and one layer of paper. The location of the button is indicated by a square design (□) patterned on the top of the device. (B) Schematic of the crosssection of an ‘on’ button where the inlet channel is above the outlet channel. The location of the button is indicated by a circular design (○) patterned on the top of the device. (C) Schematic representation of the layers of paper and tape required to assemble a device with four independent ‘on’ buttons. When assembling the device, all the holes in the tape except those used in the ‘on’ buttons were filled with cellulose powder. (D) Top of the assembled device with four ‘on’ buttons. Each button has its own inlet and outlet. Buttons 1 and 2 have the inlet channel below the outlet channel, while buttons 3 and 4 have the inlet channel above the outlet channel. (E) Buttons 2 and 4 of the device shown in D were compressed and aqueous blue dye was added to the four inlets. The dye reached the outlet within two minutes only when the buttons were compressed. | ||
We chose to incorporate two gaps between the inlet and the outlet channel because initial experiments indicated that fluid would sometimes wick across a single gap before the button was compressed; two (or more) gaps provided redundancy and prevented errors; the fluid reliably did not wick across the gaps unless both buttons had been compressed (Fig. 4). There are two possible configurations for the buttons: (i) the inlet channel below the outlet channel (Fig. 3A), or (ii) the inlet channel above the outlet channel (Fig. 3B). We demonstrated that both of these configurations led to functional buttons (Fig. 3D, E and 4). After assembling the devices, we tested the buttons by compressing them (or not), adding fluid to the inlet, and measuring the amount of time required for the fluid to reach the outlet. When compressed, the ‘on’ buttons successfully connected the inlet to the outlet in 83 out of 84 tests. When not compressed, the ‘on’ buttons successfully prevented fluid from wicking from the inlet to the outlet after 10 minutes of observation in 79 out of 80 tests. ‘On’ buttons can only be used one time; once they are compressed, fluid will wick continuously through the channels until the sample is consumed.
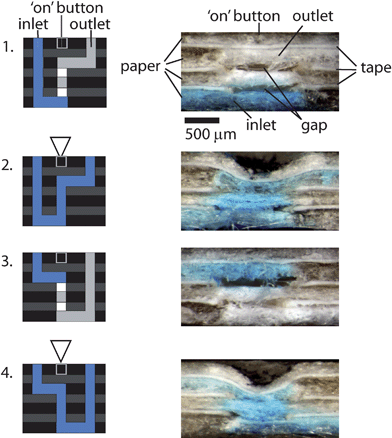 | ||
| Fig. 4 Schematic representations and photographs of the crosssections of the four buttons in Fig. 3. Buttons 2 and 4 were switched on by compressing the buttons using a ballpoint pen; buttons 1 and 3 were not compressed. The photographs were taken 10 minutes after the fluid had been added to the inlet. | ||
The height of the gaps is defined by the thickness of the double-sided tape (∼100 µm). Fluid would rarely wick across a button consisting of two (or more) gaps before the button was compressed. When the device was carelessly bent or when a large quantity of liquids was added on the paper, the buttons, however, sometimes leaked and failed to function as designed.
To solve this problem, we removed the portion of paper located between two adjacent gaps that separate the inlet channel and outlet channel, and created one single gap with significantly increased space (∼400 µm), as described in ESI† (Fig. S1). We tested the performance of ‘on’ buttons with single large spaces that separate the inlet and outlet channels.26 After 10 minutes without being compressed, the ‘on’ buttons successfully prevented the fluid from wicking from the inlet to the outlet in all of the 112 tests. When compressed, the ‘on’ buttons successfully connected the inlet to the outlet in all of the 112 tests.
The smallest functional ‘on’ buttons that we made had a diameter of 1.2 mm and connected inlet and outlet channels that were 1 mm wide. We used buttons with these dimensions in all our tests. Smaller ‘on’ buttons were difficult to assemble and operate, so we did not consider them in our study. Larger ‘on’ buttons can be fabricated, and we made buttons with diameters up to 3 mm (data not shown). The size of the button should be chosen based on the width of the inlet and outlet channels. We recommend that the diameter of the button be 0.2 mm larger than the width of the channels to allow for slight misalignment among layers in a device.
Fluidic de-multiplexers made out of paper and tape
To demonstrate the function of the ‘on’ buttons and the capabilities of programmable µPADs, we developed a fluidic de-multiplexer (Fig. 5). The fluidic de-multiplexer directed fluid from a single inlet into any combination of outlets—each outlet was controlled by an independent ‘on’ button. Although our prototype device had eight buttons and eight outlets, it is possible to incorporate many more buttons and outlets into a device.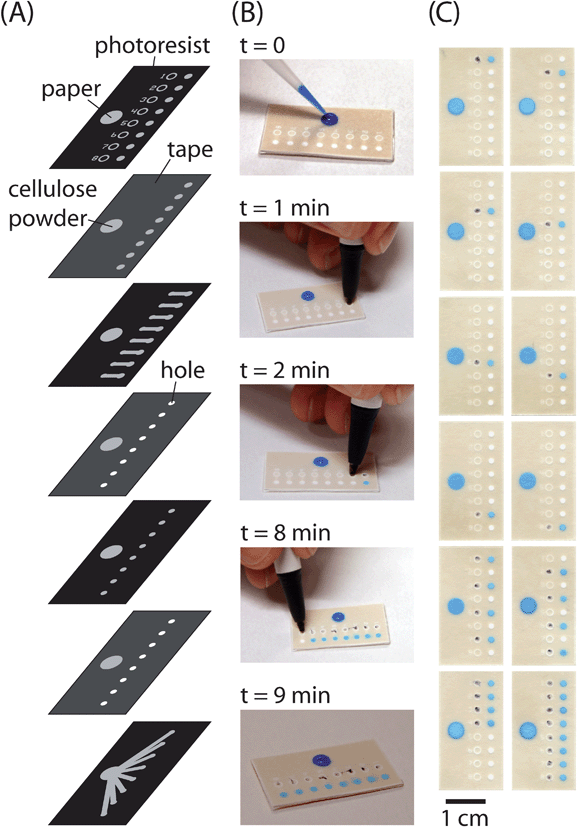 | ||
| Fig. 5 A fluidic de-multiplexer. This device can be used to direct fluid from a single inlet into any combination of eight outlets. The device consists of a fluid inlet, eight ‘on’ buttons, and eight circular zones connected to the outlet of each button. (A) Schematic of the layers in the fluidic de-multiplexer. (B) Use of the fluidic de-multiplexer. The ‘on’ buttons can be compressed before or after the fluid is added to the fluid inlet. In this example, the buttons were pressed using a ball-point pen at one minute intervals after adding fluid (1 mM Erioglaucine) to the inlet. (C) Pictures of de-multiplexers after compressing different buttons or combinations of buttons and adding fluid to the source. Each picture shows a different device. | ||
The prototype de-multiplexer requires 15 µL of fluid to fill the first outlet and only 0.7 µL of fluid to fill each additional outlet. This difference in volume requirements arises because all eight inlet channels must be filled before any of the outlet channels can be filled. The fluid takes approximately 1 min to wick from an inlet to the ‘on’ button and another 1 min to wick from the ‘on’ button to an outlet. The variation in time required for fluids to reach the outlets from the buttons was about ±4 seconds after the buttons were compressed.
We compressed the buttons at one minute intervals using a ballpoint pen after adding fluid (1 mM Erioglaucine) to the inlet (Fig. 5B). The fluid was successfully delivered to each outlet in sequence. Alternatively, we programmed the device to distribute fluid to specific location(s) on the device by compressing different buttons selectively (Fig. 5C).
Programmable µPADs for urinalysis
We developed a programmable µPAD for urinalysis with which the user can choose to run any combination of colorimetric assays for testing the presence of glucose, proteins, ketones or nitrite (Fig. 6).4,27–29 For ease of use, one corner of the device was designed as a sample inlet and was dipped directly into the sample. The sample inlet then wicks the sample to four ‘on’ buttons, each of which controls access to a separate test zone. The device was tested with solutions of artificial urine30 containing known amounts of glucose, bovine serum albumin (BSA), acetoacetate and sodium nitrite. The device required 10 µL of sample to fill the first test zone and an additional 1.5 µL to fill each additional test zone. The device wicked fluid into all four test zones within five minutes.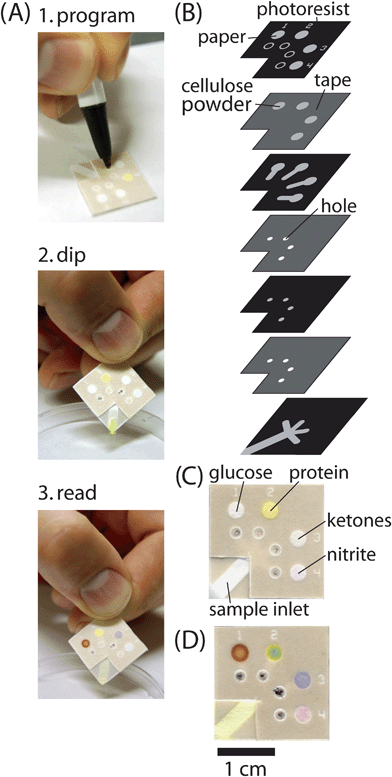 | ||
| Fig. 6 Programmable µPADs for urinalysis. (A) Schematic of the proposed strategy for using programmable µPADs. The device was programmed with a ballpoint pen to test for glucose and ketones, and dipped into a sample; the assays developed in the test zones. (B) Schematic diagram of the layers of paper and tape in the device shown in (A) for testing a sample of urine for any combination of glucose, protein, ketones or nitrite. (C) µPAD that was programmed to run all four assays, and dipped into a sample of artificial urine that contained no glucose, protein, ketones or nitrite. (D) µPAD that was programmed to run all four assays and was dipped into a sample of artificial urine that contained 10 mM glucose, 30 µM BSA, 10 mM acetoacetate, and 300 µM sodium nitrite. The color changes in each test zone indicate the presence of the analyte. | ||
Conclusions
Programmable µPADs bring another layer of sophistication to microfluidic devices made out of paper and tape without compromising the simplicity, low cost, or ease-of-use that are characteristic of paper-based devices. Single-use ‘on’ buttons allow the user to prioritize tests based on the amount of sample that is available. They could also be used to control a time-sensitive sequence of fluid movements for an assay, or be incorporated into a ‘universal µPAD’ designed to test a wide variety of samples (e.g., water, urine, saliva, blood) for a wide range of analytes, where the user could program the device on-site based on the type of sample being analyzed.Acknowledgements
This work was funded by the Bill & Melinda Gates Foundation under award number 51308, by the Micro-Nano Fluidics Fundamentals Focus Center (MF3) at the University of California, Irvine, by a visiting scholar fellowship from the Fundação de Amparo à Pesquisa do Estado de São Paulo–FAPESP, Brazil (to E.C.), and by a postdoctoral fellowship from the Natural Science and Engineering Research Council of Canada (to Z. H. N.).References
- A. W. Martinez, S. T. Phillips, G. M. Whitesides and E. Carrilho, Anal. Chem., 2010, 82, 3–10 CrossRef CAS.
- A. W. Martinez, S. T. Phillips, M. J. Butte and G. M. Whitesides, Angew. Chem., Int. Ed., 2007, 46, 1318–1320 CrossRef CAS.
- A. W. Martinez, S. T. Phillips and G. M. Whitesides, Proc. Natl. Acad. Sci. U. S. A., 2008, 105, 19606–19611 CrossRef CAS.
- A. W. Martinez, S. T. Phillips, E. Carrilho, S. W. Thomas, 3rd, H. Sindi and G. M. Whitesides, Anal. Chem., 2008, 80, 3699–3707 CrossRef CAS.
- Z. H. Nie, C. A. Nijhuis, J. L. Gong, X. Chen, A. Kumachev, A. W. Martinez, M. Narovlyansky and G. M. Whitesides, Lab Chip, 2010, 10, 477–483 RSC.
- W. Dungchai, O. Chailapakul and C. S. Henry, Anal. Chem., 2009, 81, 5821–5826 CrossRef CAS.
- R. F. Carvalhal, M. S. Kfouri, M. H. D. Piazetta, A. L. Gobbi and L. T. Kubota, Anal. Chem., 2010, 82, 1162–1165 CrossRef CAS.
- A. K. Ellerbee, S. T. Phillips, A. C. Siegel, K. A. Mirica, A. W. Martinez, P. Striehl, N. Jain, M. Prentiss and G. M. Whitesides, Anal. Chem., 2009, 81, 8447–8452 CrossRef CAS.
- A. Apilux, W. Dungchai, W. Siangproh, N. Praphairaksit, C. S. Henry and O. Chailapakul, Anal. Chem., 2010, 82, 1727–1732 CrossRef CAS.
- E. Carrilho, S. T. Phillips, S. J. Vella, A. W. Martinez and G. M. Whitesides, Anal. Chem., 2009, 81, 5990–5998 CrossRef CAS.
- E. Fu, B. Lutz, P. Kauffman and P. Yager, Lab Chip, 2010, 10, 918–920 RSC.
- A. W. Martinez, S. T. Phillips, B. J. Wiley, M. Gupta and G. M. Whitesides, Lab Chip, 2008, 8, 2146–2150 RSC.
- W. Zhao and A. van der Berg, Lab Chip, 2008, 8, 1988–1991 RSC.
- K. Abe, K. Suzuki and D. Citterio, Anal. Chem., 2008, 80, 6928–6934 CrossRef CAS.
- D. A. Bruzewicz, M. Reches and G. M. Whitesides, Anal. Chem., 2008, 80, 3387–3392 CrossRef CAS.
- E. Carrilho, A. W. Martinez and G. M. Whitesides, Anal. Chem., 2009, 81, 7091–7095 CrossRef CAS.
- C. M. Cheng, A. W. Martinez, J. L. Gong, C. R. Mace, S. T. Phillips, E. Carrilho, K. A. Mirica and G. M. Whitesides, Angew. Chem., Int. Ed., 2010, 49, 4771–4774 CAS.
- E. Monmasson and M. N. Cirstea, IEEE Trans. Ind. Electron. Control Instrum., 2007, 54, 1824–1842 Search PubMed.
- D. B. Weibel, M. Kruithof, S. Potenta, S. K. Sia, A. Lee and G. M. Whitesides, Anal. Chem., 2005, 77, 4726–4733 CrossRef CAS.
- W. H. Zhang, S. C. Lin, C. M. Wang, J. Hu, C. Li, Z. X. Zhuang, Y. L. Zhou, R. A. Mathies and C. Y. J. Yang, Lab Chip, 2009, 9, 3088–3094 RSC.
- E. H. Yang, C. Lee and J. M. Khodadadi, Sens. Mater., 2007, 19, 1–18 Search PubMed.
- K. W. Oh and C. H. Ahn, J. Micromech. Microeng., 2006, 16, R13–R39 CrossRef.
- G. Maltezos, E. Garcia, G. Hanrahan, F. A. Gomez, S. Vyawhare, R. M. van Dam, Y. Chen and A. Scherer, Lab Chip, 2007, 7, 1209–1211 RSC.
- X. Li, J. F. Tian, T. Nguyen and W. Shen, Lab Chip, 2008, 80, 9131–9134 Search PubMed.
- H. Noh and S. T. Phillips, Anal. Chem., 2010, 82, 4181–4187 CrossRef CAS.
- Paper channels in these 3-D devices were fabricated by wax-printing, in order to demonstrate the capability of wax-printing technique for the fabrication of the programmable µPADs.
- M. Cheesbrough, District Laboratory Practice in Tropical Countries, Tropical Health Technology, Cambridgeshire, UK, 1998 Search PubMed.
-
Y. Ogawa and U. Yonetani, US Pat., 3
![[thin space (1/6-em)]](https://www.rsc.org/images/entities/char_2009.gif) 880
880![[thin space (1/6-em)]](https://www.rsc.org/images/entities/char_2009.gif) 590, 1975.
590, 1975. -
J. V. Smith, US Pat., 6
![[thin space (1/6-em)]](https://www.rsc.org/images/entities/char_2009.gif) 537
537![[thin space (1/6-em)]](https://www.rsc.org/images/entities/char_2009.gif) 823, 2003.
823, 2003. - T. Brooks and C. W. Keevil, Lett. Appl. Microbiol., 1997, 24, 203–206 CrossRef CAS.
Footnote |
| † Electronic supplementary information (ESI) available: Fabrication and performance of programmable μPADs, urinalysis assays, and 3-D μPADs made by wax printing. See DOI: 10.1039/c0lc00021c |
| This journal is © The Royal Society of Chemistry 2010 |
